Our HTML is all set up, and the elements are properly placed horizontally, but we still have a lot of work to do with our layout. Let's start with an overview of CSS if you've not already worked with it before.
If you have worked with CSS before, feel free to skip below!
CSS is the language that's going to let you control the nuances of anything you could want style-wise. The acronym CSS stands for Cascading Style Sheets. Writing CSS gives you control over your layout, colors, fonts, positioning, and more. The Bootstrap framework gives you a great base once you arrange elements in columns, but it's not sufficient to handle all your style rules so that you end up with a perfect replica of your mockup.

Despite its tricky looking syntax, CSS is relatively straightforward. You'll:
Identify an HTML element
Open a set of curly braces
Set particular values for particular properties of the element within.
For example, to change the background color of an element, you would set a value like red or a hex code for the property background-color. Here's an example of properties that you might change within your CSS:
element {
    color:
    opacity:
    background-color:
    font-family:
    text-align:
    font-size:
    border:
    margin:
    padding:
    float:
    height:
    width:
}
Within this list you have properties that change the color of elements, the arrangement of elements, the space between elements, the space around elements, and more. The list is actually much longer than this too!
There is no need to memorize all of these properties; you can always look them up online if you realize you need to change the particular property for an element. I recommend using Mozilla Developer Network to do this. They have great, comprehensive documentation on almost everything in CSS!
CSS priority
When you're setting style rules in CSS, you must bear in mind that the more specific rules for particular elements have priority over rules you set broadly. For example, if you set that the text color on the whole page (using an HTML body tag) should be black, but for a particular paragraph, you set a style rule saying that its text should be yellow, that will have priority because it’s more specific. Rules are also set in chronological order, so if you set one rule higher up in your stylesheet and then set the same rule again later in the stylesheet, the second value will override the first.
Why does this matter for mockups?
You’ll have a lot of elements to take into account, and it will be very easy to get disorganized with your CSS. Disorganized CSS often leads to a disorganized page, as your rules can accidentally override one another, or some rules accidentally get applied to other elements that should've been untouched.
Our first small step into adding CSS to our mockup's HTML will be to create a CSS file. In the same folder as your index.html file, add a folder called css. Within that folder, create a file calledstyles.css (you can do this from within your text/code editor; create a new document and save it in the .css format).
Look now at similar elements in the mockup and consider what they have in common. Maybe you notice the two biggest headers in the mockup both have white text:
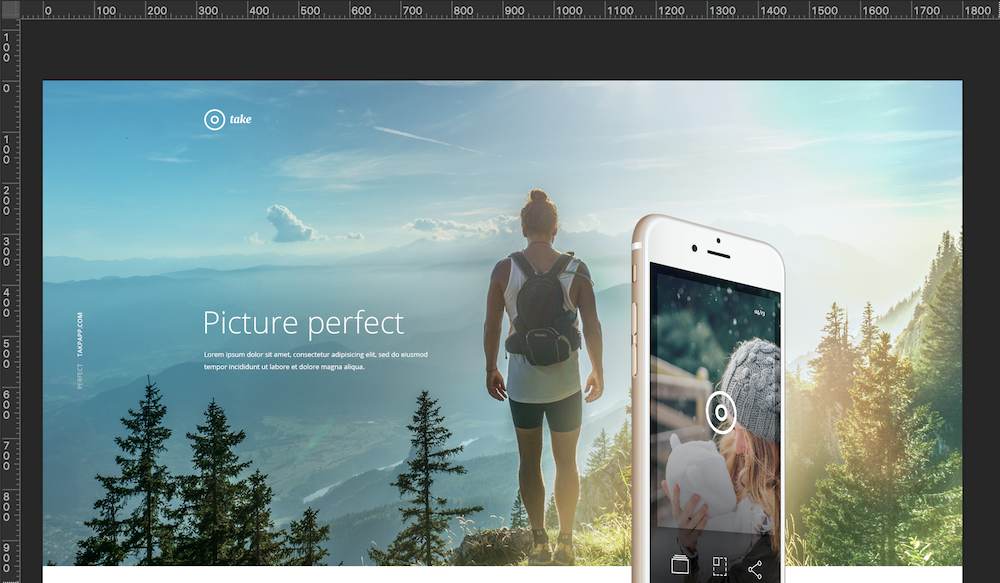

As they're the biggest headers on the page, you can assume they're <h1> elements in HTML. Here's how the first one would appear in your index.html file (see line 16):
...
<body>

   <!--Masthead-->
   <div>
       <div class="container">
           <div class="row">
             <div class="col-md-2">
                 <img src="assets/logo.svg" class="logo"/>
             </div>
             <div class="col-md-8"></div>
           </div>

           <div class="row">
               <div class="col-md-8 col-sm-12 col-lg-6">
                   <h1>Picture perfect</h1>
                   <p>Lorem ipsum dolor sit amet, consectetur adipisicing elit, sed do eiusmod tempor incididunt ut labore et dolore magna aliqua. </p>
                   <a href="#">Read More →</a>
               </div>
               <div class="col-md-4 hidden-sm-down">
                   <img src="assets/iPhone.png/">
               </div>
           </div>
       </div>
   </div>
   ...
In your styles.css file, let's set the text color as white for all <h1> elements.
h1 {
   color: #ffffff;
}
Since it's a good idea to start with more general styles, let's also think about the font choices that we can set in the body style rules. Click on the page’s text; you’ll notice that the font name is Open Sans. A great and easy bet is to use Google Fonts for all your web font needs.

Fonts
Visit Google Fonts and find Open Sans in there. If you click the small arrow in the square, you’ll be taken to a great quick-start guide. Choose the font styles you want, the character sets, and you’ll even have the exact lines of code to include in your project.
In the<head> section of your HTML document, you’ll include:<link href='https://fonts.googleapis.com/css?family=Open+Sans' rel='stylesheet' type='text/css'>
Within your stylesheet, include: font-family: 'Open Sans', sans-serif;. Let’s throw it in thebody styles, since we want pretty much all the text elements to be Open Sans.
body {
    font-family: 'Open Sans', sans-serif;
}
You’re starting to understand how to set general CSS rules using your mockup as a base, and in the next chapter we’ll see how to get even more specific with your styles!
