Now that you know a little more about Android architecture components, we’re going to be able to implement some elements in SaveMyTrip. The objective is create the repository and ViewModel classes, and then call them inside our activity TodoListActivity.
In the previous part of this course, we developed the two classes that will serve as data sources, namely the classes ItemDao and UserDao.
Make code compatible with Java 8
First, we’re going to ensure the code is compatible with Java 8 so that we can use lambdas. Lambdas will allow us to write less code, in a much more readable way:
// WITHOUT LAMBDAS
button.setOnClickListener(object: View.OnClickListener {

   override fun onClick(v: View?) {
      Toast.makeText(parent, "Button clicked", Toast.LENGTH_LONG).show();
   }
});

//WITH LAMBDAS
button.setOnClickListener { Toast.makeText(parent, "Button clicked", Toast.LENGTH_LONG).show() }
See how much simpler that is? We don't need object: View.OnClickListener or override fun onClick(v: View?) anymore. It's all streamlined! Now resume the application, and edit your build.gradle file as follows:
Excerpt of build.gradle
android {
   ...
   compileOptions {
      targetCompatibility 1.8
      sourceCompatibility 1.8
   }
}
There you have it, the app now supports Java 8 and lambdas. 😉
Creating repositories
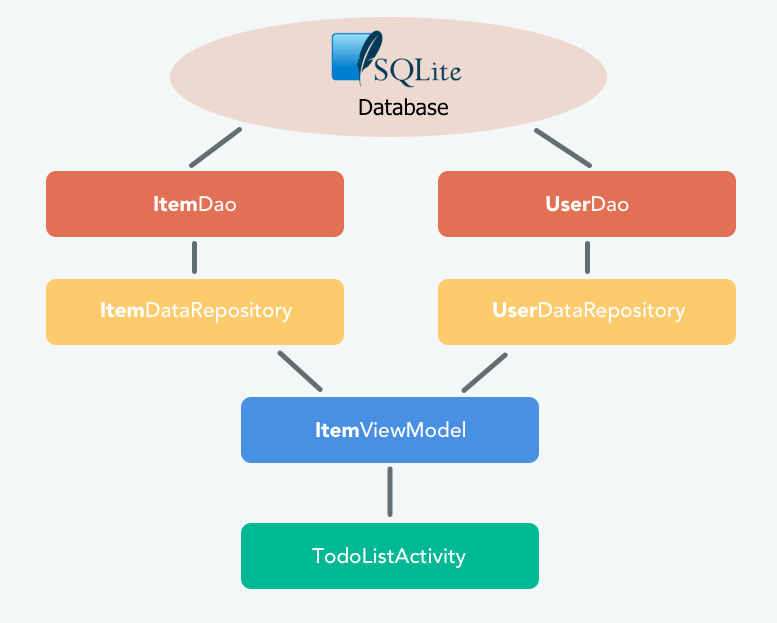
You may have noticed that our data source is currently the SQLite database, manipulated via the different DAOs that we created previously. Going by the same logic as architecture components, we will now create two classes: ItemDataRepository and UserDataRepository, which we’ll then use in a ViewModel. 🙂
To do this, create a new package and call it repositories/, then put the following files into it:
Class repositories/UserDataRepository.kt
 class UserDataRepository(private val userDao: UserDao) {

   // --- GET USER ---
   fun getUser(userId: Long): LiveData<User> {
       return this.userDao.getUser(userId)
   }
}
And a second file:
Class repositories/ItemDataRepository.kt
class ItemDataRepository(private val itemDao: ItemDao) {

   // --- GET ---

   fun getItems(userId: Long): LiveData<List<Item>> {
       return this.itemDao.getItems(userId)
   }

   // --- CREATE ---

   fun createItem(item: Item) {
       itemDao.insertItem(item)
   }

   // --- DELETE ---
   fun deleteItem(itemId: Long) {
       itemDao.deleteItem(itemId)
   }

   // --- UPDATE ---
   fun updateItem(item: Item) {
       itemDao.updateItem(item)
   }

}
These two classes are simple enough on their own, since they retrieve, from their constructor, a DAO that they reuse in their public methods. 🙂 The purpose of the repository is to isolate the data source (DAO) from the ViewModel so that the model does not directly manipulate the data source.
Creating the ViewModel
Let’s keep implementing architecture components within our application by creating the class ItemViewModel, which we will place in the package todolist/ and which will then be integrated into our activity TodoListActivity.
Class todolist/ItemViewModel.kt
class ItemViewModel(private val itemDataSource: ItemDataRepository,
                   private val userDataSource: UserDataRepository,
                   private val executor: Executor) : ViewModel() {

   // DATA
   private var currentUser: LiveData<User>? = null

   fun init(userId: Long) {
       if (currentUser != null) {
           return
       }
       currentUser = userDataSource.getUser(userId)
   }

   // -------------
   // FOR USER
   // -------------

   fun getUser(userId: Long): LiveData<User>? {
       return currentUser
   }

   // -------------
   // FOR ITEM
   // -------------

   fun getItems(userId: Long): LiveData<List<Item>> {
       return itemDataSource.getItems(userId)
   }

   fun createItem(item: Item) {
       executor.execute { itemDataSource.createItem(item) }
   }

   fun deleteItem(itemId: Long) {
       executor.execute { itemDataSource.deleteItem(itemId) }
   }

   fun updateItem(item: Item) {
       executor.execute { itemDataSource.updateItem(item) }
   }
}
So that’s what our ViewModel looks like! 😃 First, it inherits from the class ViewModel. Next, declare the two previously created repositories as well as a variable of the type executor in it as class variables, which will help run certain methods in the background. These three variables are instantiated directly from the constructor of the class.
We've also created an init() method, to initialize our ViewModel as soon as the activity is created, and which will be called inside of its method onCreate().
Okay, but why are we using this method to check whether the user already exists in the ViewModel?
Well, because the ViewModel stores its data in memory, even if the activity that called it is destroyed, such as after a rotation. 🙂 That’s the whole reason for the ViewModel! So, after a rotation of the activity TodoListActivity, you won't need to re-retrieve the user from the database if the user was previously stored in the ViewModel.
Next, we created different methods to perform actions on our database (representing our data source). We used the class executor to asynchronously perform update requests for our SQLite tables.
This is also the reason why you use the type LiveData in the methods getItems and getUser of your DAOs, to automatically benefit from asynchronous retrieval.
Editing the activity
Before declaring the ViewModel in our activity TodoListActivity, we need to build it. You may have already noticed that the constructor of the class ItemViewModel requested as a parameter:
The class ItemDataRepository (itself requesting the class ItemDao as a parameter).
The class UserDataRepository (itself requesting the class UserDao as a parameter).
The class Executor.
This may be a lot of things to declare and instantiate in our activity; and as a reminder, it’s not supposed to deal with such things! It should be as streamlined as possible. 😉
Which is fortunate, as we can move the construction of our ViewModel into a Factory class!
And just what is that? Another design pattern, I’m guessing?
Yes indeed... 🙂 But don’t panic! A factory is simply a pattern used to delegate the creation of one class to another. We're not going to create our ItemViewModel class in our activity directly; instead, we're going to assign that task to the class: ViewModelFactory, which we’ll put in a package we’ll call injections/.
Class injections/ViewModelFactory.kt
class ViewModelFactory(private val itemDataSource: ItemDataRepository,
                       private val userDataSource: UserDataRepository,
                       private val executor: Executor) : ViewModelProvider.Factory {

   @Suppress("UNCHECKED_CAST")
   override fun <T : ViewModel> create(modelClass: Class<T>: T {
       return if (modelClass.isAssignableFrom(ItemViewModel::class.java)) {
           ItemViewModel(itemDataSource, userDataSource, executor) as T
       } else {
            throw IllegalArgumentException("Unknown ViewModel class")
       }
   }
}
We've created a class ViewModelFactory, implementing the interface ViewModelProvider.Factory created by Google, which will be used to declare our ViewModel in our activity. Here we define a constructor containing the objects we need to correctly instantiate our class ItemViewModel.
Wait, I don't get it! We created the same constructor for the class ViewModelFactory as for the class ItemViewModel. What good is that?
For now, this allows us to consolidate the process of creating our ViewModels into a dedicated Factory, ViewModelFactory. This way, if at some later point we want to create another ViewModel, such as UserViewModel, we will declare it here, in the same Factory, inside the method create().
To better visualize the logic of this fairly complex encapsulation process, we will complete the implementation by creating a class responsible for injecting each object in the constructor of our factory. This process is often referred to as dependency injection. The idea behind dependency injection is: Don’t create instances of your dependencies. Instead, declare your dependencies. Have something else create them and pass them to you.
This is a little easier to understand in practice. So, let’s create the Injection.java object in the package injection/.
Object injection/Injection.kt
object Injection {

   private fun provideItemDataSource(context: Context): ItemDataRepository {
       val database = SaveMyTripDatabase.getInstance(context)
       return ItemDataRepository(database!!.itemDao())
   }

   private fun provideUserDataSource(context: Context): UserDataRepository {
       val database = SaveMyTripDatabase.getInstance(context)
       return UserDataRepository(database!!.userDao())
   }

   private fun provideExecutor(): Executor {
       return Executors.newSingleThreadExecutor()
   }

   fun provideViewModelFactory(context: Context): ViewModelFactory {
       val dataSourceItem = provideItemDataSource(context)
       val dataSourceUser = provideUserDataSource(context)
       val executor = provideExecutor()
       return ViewModelFactory(dataSourceItem, dataSourceUser, executor)
   }
}
This class will be responsible for providing objects already built, in a centralized way. For instance, when you want to create objects present in this class anywhere in an application, directly invoke its public methods instead of making a new MyObject(). This allows you to make your code even more modular by avoiding the creation of strong dependencies between classes. That's the magic of dependency injection! 😉
Let’s edit our TodoListActivity activity to add our ViewModel:
Excerpt from TodoListActivity.kt
class TodoListActivity : BaseActivity(), ItemAdapter.Listener {
   ...
   // 1 – Variables

  // FOR UI
  private lateinit var recyclerView: RecyclerView
  private lateinit var spinner: Spinner
  private lateinit var editText: EditText
  private lateinit var profileImage: ImageView
  private lateinit var profileText: TextView
  private lateinit var addButton: Button

  // FOR DATA
  private lateinit var itemViewModel: ItemViewModel
  private lateinit var adapter: ItemAdapter = null
  private val USER_ID = 1
   ...
  override fun onCreate(savedInstanceState: Bundle?) {
      ...
     editText = findViewById(R.id.todo_list_activity_edit_text)
     profileImage = findViewById(R.id.todo_list_activity_header_profile_image)
     profileText = findViewById(R.id.todo_list_activity_header_profile_text)

     addButton = findViewById(R.id.todo_list_activity_button_add)
     addButton.setOnClickListener{ createItem() }

     val ab = supportActionBar
     ab!!.setDisplayHomeAsUpEnabled(true)
     configureToolbar()
     configureSpinner()

     // 2 - Configure RecyclerView & ViewModel
     configureRecyclerView();
     configureViewModel();
     // 3 - Get current user & items from Database
     getCurrentUser(USER_ID);
     getItems(USER_ID);
  }


   // -------------------
   // ACTIONS
   // -------------------

   @OnClick(R.id.todo_list_activity_button_add)
   fun onClickAddButton() {
      // 4 – Create item after user clicks on add button
      createItem()
   }

   // 5 - Delete item after user clicks on delete button
   override fun onClickDeleteButton(position: Int) {
       deleteItem(this.adapter!!.getItem(position))
   }

   // -------------------
   // DATA
   // -------------------

   // 6 - Configuring ViewModel
   private fun configureViewModel() {

        val mViewModelFactory = Injection.provideViewModelFactory(this)
        itemViewModel = ViewModelProviders.of(this, mViewModelFactory).
          get(ItemViewModel::class.java)
        itemViewModel.init(USER_ID.toLong())
   }

   // 7 - Get Current User
    private fun getCurrentUser(userId: Int) {
       itemViewModel.getUser(userId.toLong())!!.observe(this, Observer
         { this.updateHeader(it) })
   }

   // 7 - Get all items for a user
   private fun getItems(userId: Int) {
       itemViewModel.getItems(userId.toLong()).observe(this, Observer
         { this.updateItemsList(it) })
   }
   // 7 - Create a new item
   private fun createItem() {
       val item = Item(this.editText.text.toString(), this.spinner.selectedItemPosition,
                      USER_ID.toLong(), false)
       editText.setText("")
       itemViewModel.createItem(item)
   }

   // 7 - Delete an item
   private fun deleteItem(item: Item) {
       itemViewModel.deleteItem(item.id)
   }

   // 7 - Update an item (selected or not)
   private fun updateItem(item: Item) {
       item.selected = !item.selected
       itemViewModel.updateItem(item)
   }
   // -------------------
   // UI
   // -------------------
   private fun configureSpinner() {
       spinner = findViewById(R.id.todo_list_activity_spinner)
       val adapter = ArrayAdapter.createFromResource(this, R.array.category_array,
                     android.R.layout.simple_spinner_item)
        adapter.setDropDownViewResource(android.R.layout.simple_spinner_dropdown_item)
       spinner.adapter = adapter
   }

   // 8 - Configure RecyclerView
   private fun configureRecyclerView() {
       itemAdapter = ItemAdapter(this)
       recyclerView = findViewById(R.id.todo_list_activity_recycler_view)
       recyclerView.adapter = itemAdapter
       recyclerView.layoutManager = LinearLayoutManager(this)
       val support: ItemClickSupport = ItemClickSupport.addTo(recyclerView, R.layout.activity_todo_list_item)
       support.setOnItemClickListener(this)
   }


   override fun onItemClicked(recyclerView: RecyclerView, position: Int, v: View) {
       updateItem(itemAdapter.getItem(position))
   }

   // 9 - Update header (username & picture)
   private fun updateHeader(user: User?) {
       profileText.text = user?.username
       Glide.with(this).load(user?.urlPicture).
          apply(RequestOptions.circleCropTransform()).into(profileImage)
   }

   // 10 - Update the list of items
   private fun updateItemsList(items: List<Item>?) {
       itemAdapter.updateData(items!!)
   }
}
Let's walk through this block of code step by step! In our activity TodoListActivity, we first declared (1) different variables for our user interface items, ViewModel, ItemViewModel , our adapter, and a variable representing our user’s identifier (for testing purposes).
class TodoListActivity : BaseActivity(), ItemAdapter.Listener {
   ...
    // 1 – Variables
	// FOR UI
    private lateinit var recyclerView: RecyclerView
    private lateinit var spinner: Spinner
    private lateinit var editText: EditText
    private lateinit var profileImage: ImageView
    private lateinit var profileText: TextView
   	private lateinit var addButton: Button

   	// FOR DATA
   	private lateinit var itemViewModel: ItemViewModel
   	private lateinit var adapter: ItemAdapter = null
	private val USER_ID = 1
   ...
   	override fun onCreate(savedInstanceState: Bundle?) {      ...
     	editText = findViewById(R.id.todo_list_activity_edit_text)
     	profileImage = findViewById(R.id.todo_list_activity_header_profile_image)
     	profileText = findViewById(R.id.todo_list_activity_header_profile_text)
       	addButton = findViewById(R.id.todo_list_activity_button_add)
       	addButton.setOnClickListener{ createItem() }
       	val ab = supportActionBar
       	ab!!.setDisplayHomeAsUpEnabled(true)
		configureToolbar()
		configureSpinner()

     	// 2 - Configure RecyclerView & ViewModel
     	configureRecyclerView();
     	configureViewModel();

      	// 3 - Get current user & items from Database
      	getCurrentUser(USER_ID);
      	getItems(USER_ID);
   }
Then, in the activity onCreate(), we called methods to configure our RecyclerView and ViewModel (2). We also have calls to get the current user object and get the list of items that user has created. (3)
In the add button click listener, we added a call to call a createItem method (4).
   // -------------------
   // ACTIONS
   // -------------------

   @OnClick(R.id.todo_list_activity_button_add)
   fun onClickAddButton() {
      // 4 – Create item after user clicks on add button
      createItem()
   }

   // 5 - Delete item after user clicks on delete button
   override fun onClickDeleteButton(position: Int) {
       deleteItem(this.adapter!!.getItem(position))
   }
We also implemented the interface ItemAdapter.Listener in our activity to manage clicking on the Delete button (5).
Next, we created a method (6) called configureViewModel, which we will use to initialize our ViewModel.
   // -------------------
   // DATA
   // -------------------

   // 6 - Configuring ViewModel
   private fun configureViewModel() {

        val mViewModelFactory = Injection.provideViewModelFactory(this)
        itemViewModel = ViewModelProviders.of(this, mViewModelFactory).
          get(ItemViewModel::class.java)
        itemViewModel.init(USER_ID.toLong())
   }
As you can see, we’re initializing a variable ViewModelFactory from our class Injection, which we created earlier. Using this factory, we’ll be able to instantiate our variable ItemViewModel, without needing to go directly through its constructor. 🙂 Finally, once our ViewModel has been retrieved, we call its method init() to first retrieve the user, and store it in ViewModel.
We've also created different private methods (7) calling on the public methods of our ViewModel to observe their result.
   // 7 - Get Current User
    private fun getCurrentUser(userId: Int) {
       itemViewModel.getUser(userId.toLong())!!.observe(this, Observer
         { this.updateHeader(it) })
   }

   // 7 - Get all items for a user
   private fun getItems(userId: Int) {
       itemViewModel.getItems(userId.toLong()).observe(this, Observer
         { this.updateItemsList(it) })
   }
   // 7 - Create a new item
   private fun createItem() {
       val item = Item(this.editText.text.toString(), this.spinner.selectedItemPosition,
                      USER_ID.toLong(), false)
       editText.setText("")
       itemViewModel.createItem(item)
   }
   // 7 - Delete an item
   private fun deleteItem(item: Item) {
       itemViewModel.deleteItem(item.id)
   }

   // 7 - Update an item (selected or not)
   private fun updateItem(item: Item) {
       item.selected = !item.selected
       itemViewModel.updateItem(item)
   }
For Get methods, we have used the method observe() to be alerted automatically if the result in the database changes. 🙂
We've also used the lambdas to reduce our expression, and call the method updateHeader() when a change occurs.
// WITH LAMBDAS
private fun getCurrentUser(userId: Int) {

   itemViewModel.getUser(userId.toLong())!!.observe(this, Observer { this.updateHeader(it) })

}

// WITHOUT LAMBDAS
private fun getCurrentUser(userId: Int) {

   itemViewModel.getUser(userId.toLong())!!.observe(this,object: Observer<User> {

      override fun onChanged(it: User?) {
         updateHeader(it)
       }
   })
}
We also created (8) a method configureRecyclerView() enabling us, as its name indicates, to configure the RecyclerView that we use to display our list of to do items.
   // 8 - Configure RecyclerView
   private fun configureRecyclerView() {
       itemAdapter = ItemAdapter(this)
       recyclerView = findViewById(R.id.todo_list_activity_recycler_view)
       recyclerView.adapter = itemAdapter
       recyclerView.layoutManager = LinearLayoutManager(this)
       val support: ItemClickSupport = ItemClickSupport.addTo(recyclerView, R.layout.activity_todo_list_item)
       support.setOnItemClickListener(this)
   }


   override fun onItemClicked(recyclerView: RecyclerView, position: Int, v: View) {
       updateItem(itemAdapter.getItem(position))
   }
We've also added two methods (9) and (10) to update our graphical user interface when we retrieve an object representing our user (User), or a list of things to do( List<item> ).
   // 9 - Update header (username & picture)
   private fun updateHeader(user: User?) {
       profileText.text = user?.username
       Glide.with(this).load(user?.urlPicture).
          apply(RequestOptions.circleCropTransform()).into(profileImage)
   }

   // 10 - Update the list of items
   private fun updateItemsList(items: List<Item>?) {
       itemAdapter.updateData(items!!)
   }
}
Run the app, and play a little with it. It should now be 100% functional. 😁 Take the time to read and reread this code to familiarize yourself with all the concepts it refers to. And don't forget the golden rule of any good developer: practice makes perfect! Good luck.
Great! However, I was wondering if there was any way to view our SQLite database from our PC, to facilitate its debugging?
Of course! I recommend you take a look at the library Stetho created by Facebook, which will allow you to view the contents of your database from a web browser. 🙂
Let's recap!
In this chapter we applied architecture components to our application by:
Creating an ItemDataRepository class and a UserDataRepository class.
Creating a ViewModel class.
Calling those classes inside our TodoListActivity.
Now you're ready to take on the challenge in the next chapter. 😁
