Have you ever been lost in a sea of numbers or words? Filtering and sorting allow you to take the data in a spreadsheet and narrow it down or reorder it, so the most applicable data is presented.
Filter your data
To get started with filtering, navigate to Data > Create Filter. By doing so, the entire range of headers and data is highlighted. From there, you are able to hover over the column header and select the dropdown arrow to create a filter.
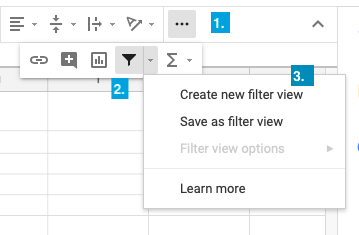
There’s also a quick action button to create a filter. As it's a less commonly used one, it may not be visible straight away. You may need to click on the ... button, known as the points of an ellipse (number 1 in the image below). From there, click on the funnel, which brings you to create a filter option.
When you filter, there are two options available: Filter by values or Filter by conditions .
Filter by value
Filtering by value is when you are presented with a list of all the data in the column, and you can deselect the data you don't want to see. This is the most direct and easiest way to filter.
Here is how that's done:
Filter by condition
When you filter by condition, you are offered the same conditions you saw in the previous chapter on conditional formatting. The following are some of the most commonly used: Cell is empty, Text starts with, Greater than, Is between , etc.
You need to navigate to the condition you want to base your filter on. Here is what that looks like:
Sort your data
As opposed to filtering, sorting doesn't hide any data. Rather, it keeps all of it in view and reorders it to present the information in a way that makes sense or answers a question you have. To sort, navigate to Data in the menu, then variations of either (A -> Z) or (Z -> A).
Choose how you want to reorder the data
Quite intuitively,(A -> Z) orders data in ascending order, and (Z -> A) in descending order.
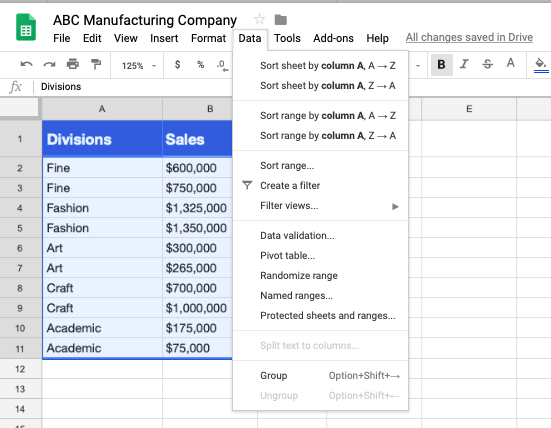
In the Data menu in the image above, you can see three options:
Sort sheet by...,
Sort range by...,
Sort range....
Most often, the first option will match your need. You want all of the data in the spreadsheet to be reorganized according to the ascending or descending order of one column.
In this screenshot above, the sort feature could be applied to column B for example, in which case you would want A and C to be reordered so that each row still contains the right match-up of data.
What is the difference between sort sheet by column or sort range by column?
Sort range by... and Sort range... are less commonly used. They sort the data in a particular range of cells and doesn't affect the other data in the tab. This can be helpful when working with a sheet that contains several tables; however, as you saw previously, it often makes more sense to create a different tab for each table to avoid confusion.
Add multiple sorting options to a sheet of data
You can add multiple levels of sorting, if for example, you wanted to sort by year and sales in each year. Both can be added to a spreadsheet at the same time. This can help you find the particular information you are looking for.
Check out how you can add multiple sorting options to one table in this video:
Let’s recap!
Filtering allows you to take all of the data in a spreadsheet and narrow it down so that the most applicable is presented.
There are two options available for filtering: by values or conditions.
Sorting keeps all of the data in view and reorders it to present the information in a way that makes sense or answers a question you have, often in descending or ascending order.
You can add multiple levels of sorting.
Filtering and sorting are simple, quite intuitive ways to analyze data. Now let's take a look at functions and formulas. By the end of the next chapter, you'll be able to write some yourself!
