Protect Your Dashboard

Protect Your Worksheet
You’ll be sharing your dashboard with your boss, who will also be sharing it with others. You therefore need to protect your file so that no one can modify it.
In the case of your dashboard, the reader can change the formatting.
They should only be able to change the value of cell L6, as this cell will allow them to change the conditional formatting. The other cells should be protected.
However, cell protection only works if the worksheet is protected.
Therefore, you need to start by removing the protection for cell L6:
Right-click on L6 to open the context menu.
Go to “Format Cells,” and then “Protection.”
Uncheck “Locked.”
Click OK.
Now you can go ahead and protect your worksheet:
Go to the Review tab, “Protection” group, and click on Protect Sheet
 .
.Enter the password !Zari01.
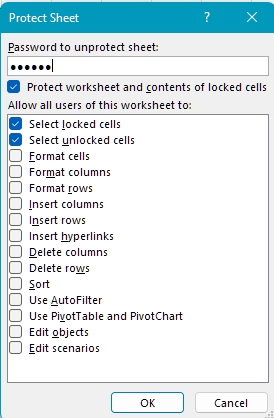
In the authorizations list, leave the default options checked (first two only).
Click OK.
Ta-da! Your worksheet is now password-protected! 😊
Now you know how to manage protection of a worksheet! 😉
Protect the Structure of Your Workbook
In addition to protecting your worksheet, you can also protect the structure of the workbook itself, which includes:
protecting whether or not the tabs are visible. For example, you may wish to hide the cross-reference table if the reader doesn’t need it.
protecting tab names, order, and color.
preventing deletion of tabs.
To do this:
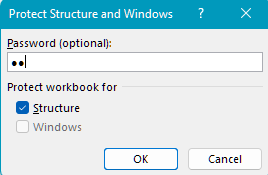
Go to the “Review” tab, “Protection,” and click on
 .
.
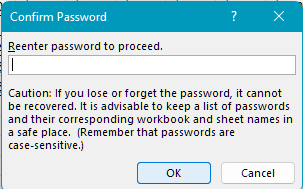
Excel asks you to enter and confirm the password.
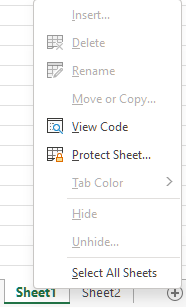
Ta-da! Your workbook structure is now protected!
You can check this by opening a tab’s context menu. You’ll see that nearly all of the menus are locked.
Protect Your Workbook
You want to password-protect your file so that only authorized users can open it.
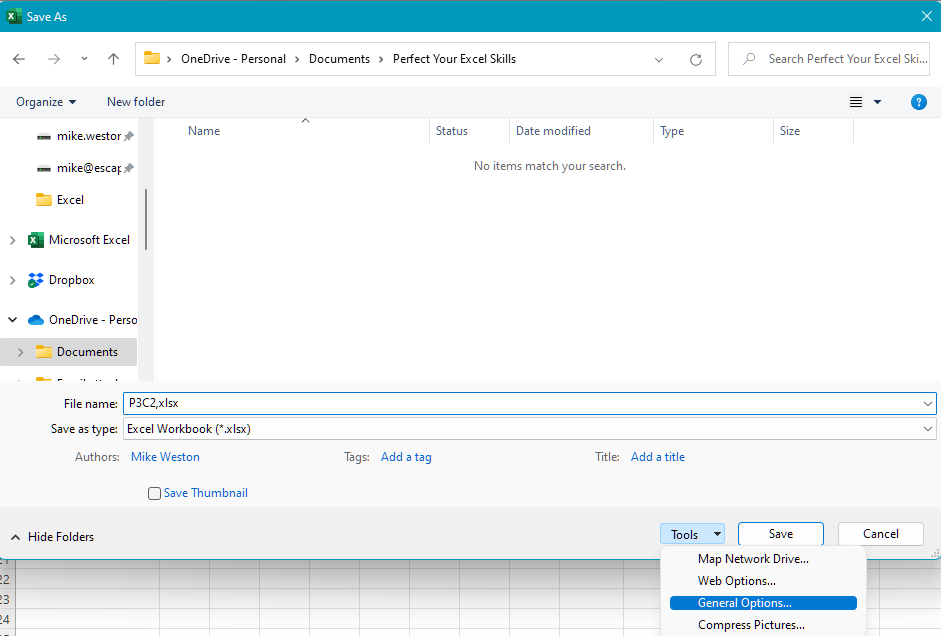
To do so, you’ll need to start by saving your file:
Click “File” and “Save As.”
Choose a folder and a file name. If necessary, you can overwrite your current file.
In the “Save As” dialog box, click “Tools” on the bottom right, and then “General Options...”
Another dialog box opens which gives you two password options:
The first requires the user to enter a password in order to open the file.
The second requires the user to enter a password to modify the workbook.
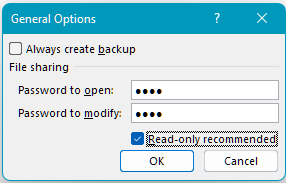
Choose a strong password with at least eight characters, containing capitals, lower-case letters, and special characters.
Click “OK.”
Excel will ask you to confirm your password(s).
Ta-da! Your file is now protected! 😊
Over to You!
Download this file and do the following:
Protect all of the cells in the worksheet with the password “pass,” except for cell D4, which should still be editable.
Protect the workbook, so that the reader opens it in read-only mode using the password “pass.”
Answer Key
You can find the answer key here and watch the video below to check your work.
Let’s Recap!
Your file is going to be shared, so you need to password-protect it.
You can protect your worksheet using the “Protect Sheet” icon under the “Review” tab.
You can also protect the structure of your worksheet using the “Protect Workbook” icon under the “Review” tab.
Your file is now protected. 😃 The next step is to add calculations using advanced formulas!
