From Detroit school to London school: A new type of TDD
You’ll remember Detroit school from Part 1: it’s how you learned TDD in the first place! But there’s another way: London school TDD.
Cutting through the fog: the origin and advantages of London school TDD
During the mid-2000s, London’s eXtreme Programming community became concerned that we weren’t sufficiently focusing on what our users needed. They organically came up with a style of TDD to help make sure that our tests really described the problems of our users and business. Remember those test cases we wrote with the other people who care about building the right software to help deliver our business’ goals?
How is this different from Detroit school?
Detroit school is mostly focused on unit testing at the class level. It’s up to the developer to make sure that these tests reflect the requirements they are trying to build towards. This testing is inside out, from the smallest units of code on out to what the user interacts with.
In contrast, London School TDD starts with the business requirements. Instead of focusing on what you do in the code, such as adding a user to the database, London School TDD focuses on what the user needs from your program. Phrasing requirements as “a user should be able to register," describes a program's behavior through user needs. In other words, you work with acceptance tests! This is why it’s also known as acceptance test-driven development (ATDD) or outside-in testing.
How does this methodology help you? You only do TDD for the classes you need to pass your acceptance test. This means a lot less wasted code. As TDD evolved, I remember seeing well-tested code which was started, but then left to rot in the codebase because something else became important. That is, sometimes it was never ever shown to a user.
How do I start outside and work inwards?
As we mentioned, your acceptance test is usually best placed in your integration tests or above as it describes a business need. Outside-in means that you start with the acceptance test and work down the pyramid, building necessary tests.
Start by asking :
What is our acceptance test?
Do we have an end-to-end test that represents this acceptance test?
Do we have an integration test that covers what’s needed for the end-to-end test?
Do we have unit tests that cover what’s needed for the integration test?
With each no, you write a test and ask what do you need to make that given test pass. Answer: more tests lower down the pyramid!
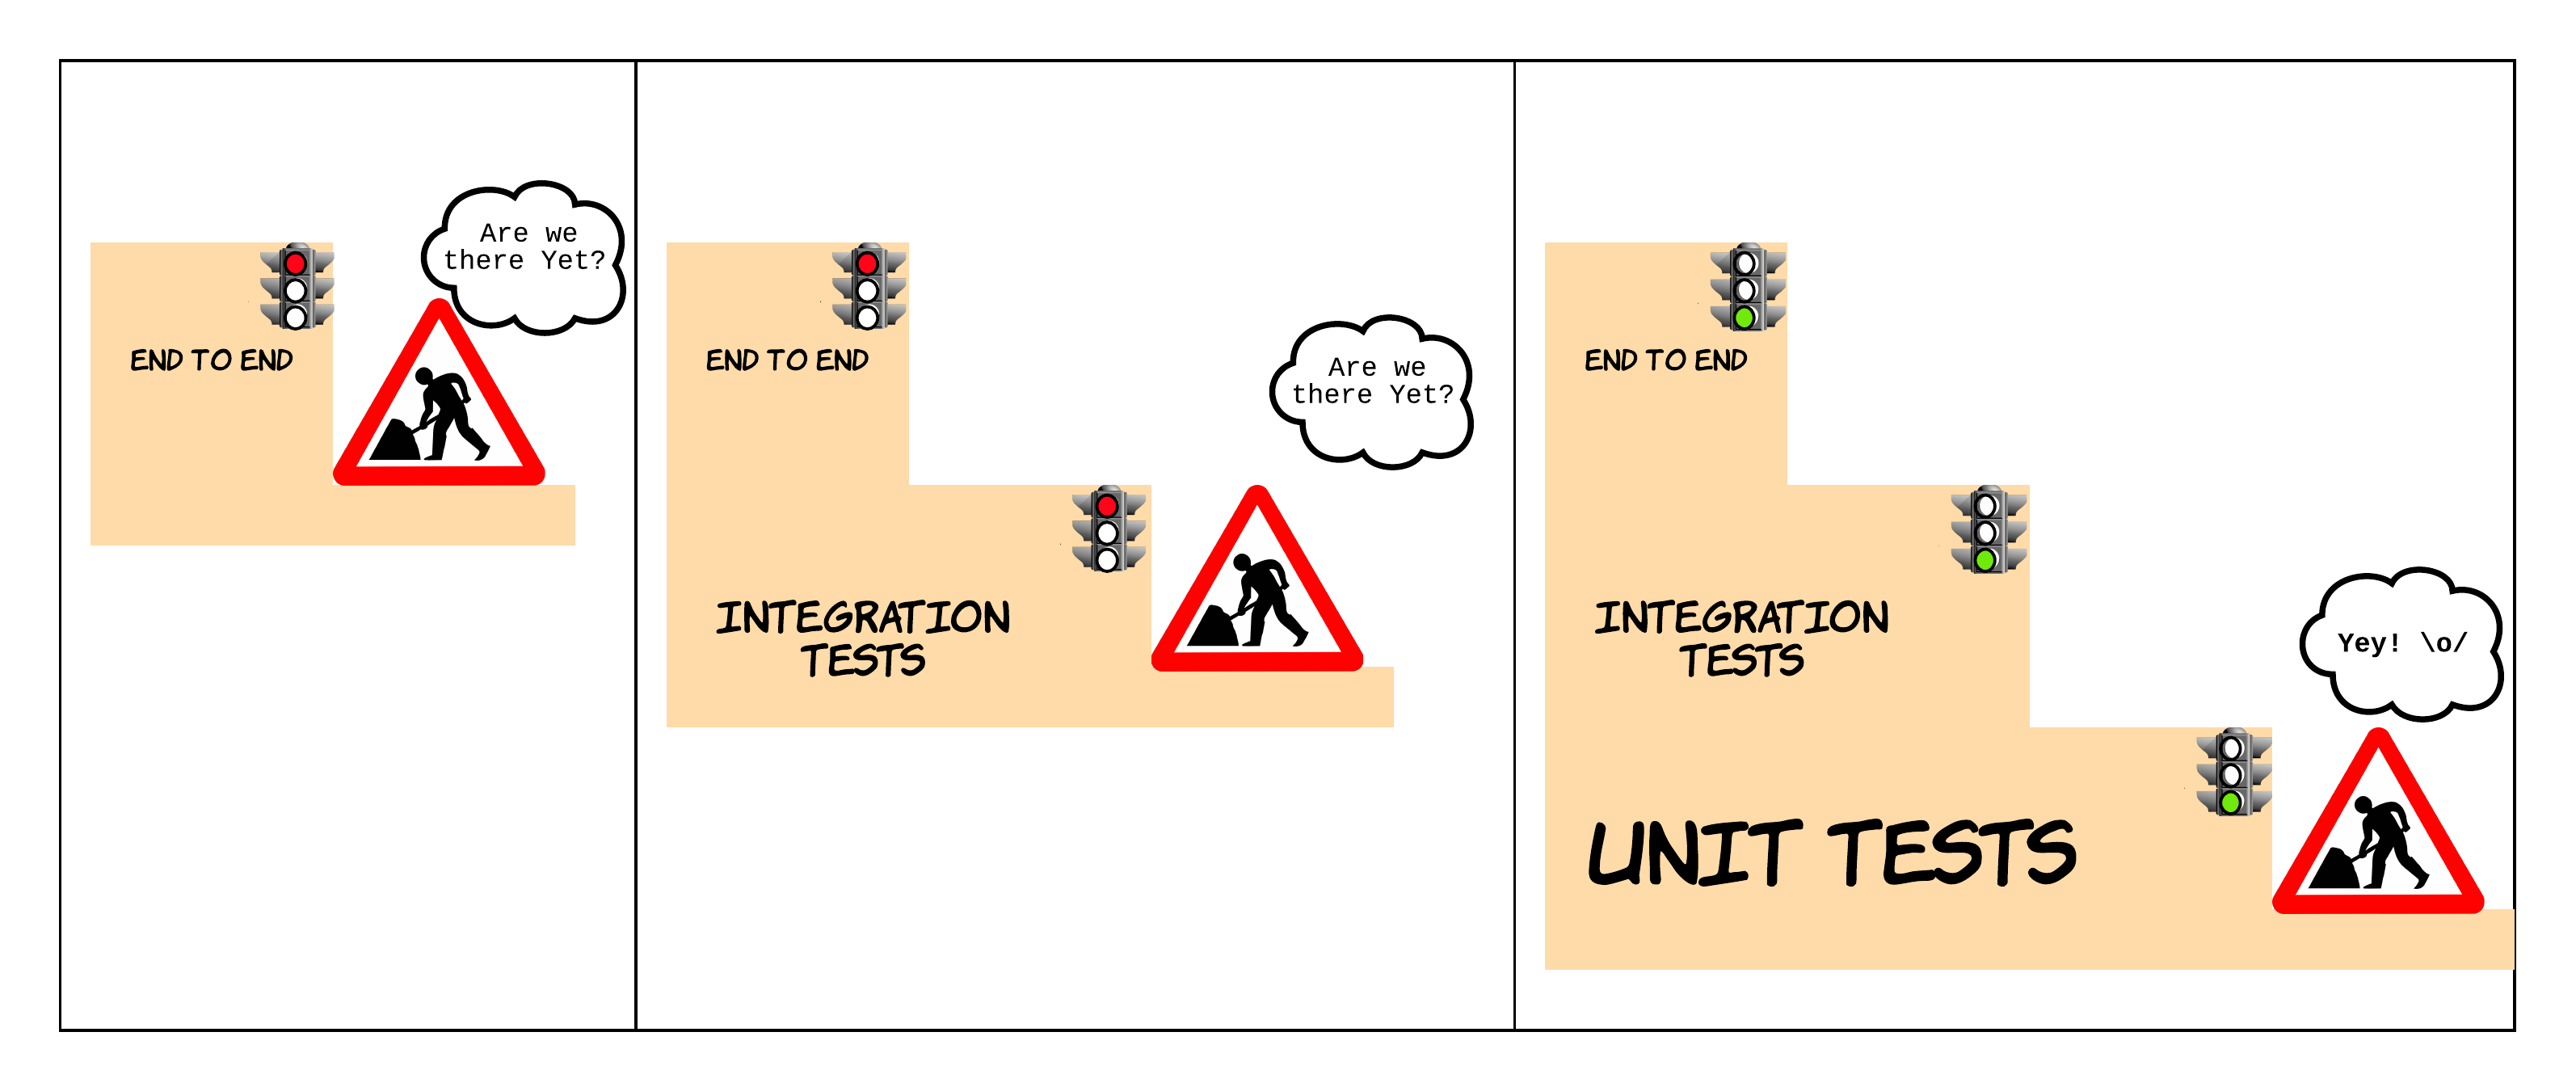
In writing each test, you dig a path from the outside of your code inwards, building only the bits you need. Write more tests until you’re sure you’ve covered the needs of your acceptance test.
Then you begin writing code, working up from the bottom of the pyramid, back to the top. When you build that working code, your unit, integration, and end-to-end tests all start passing. There will always be a bit of tweaking, but you’ll write fewer, more focused lines of code. You’ll still write lots of unit tests, but these will only be the ones you need.
Applying London School TDD
London TDD also encourages you to work in little cycles, one test at a time:
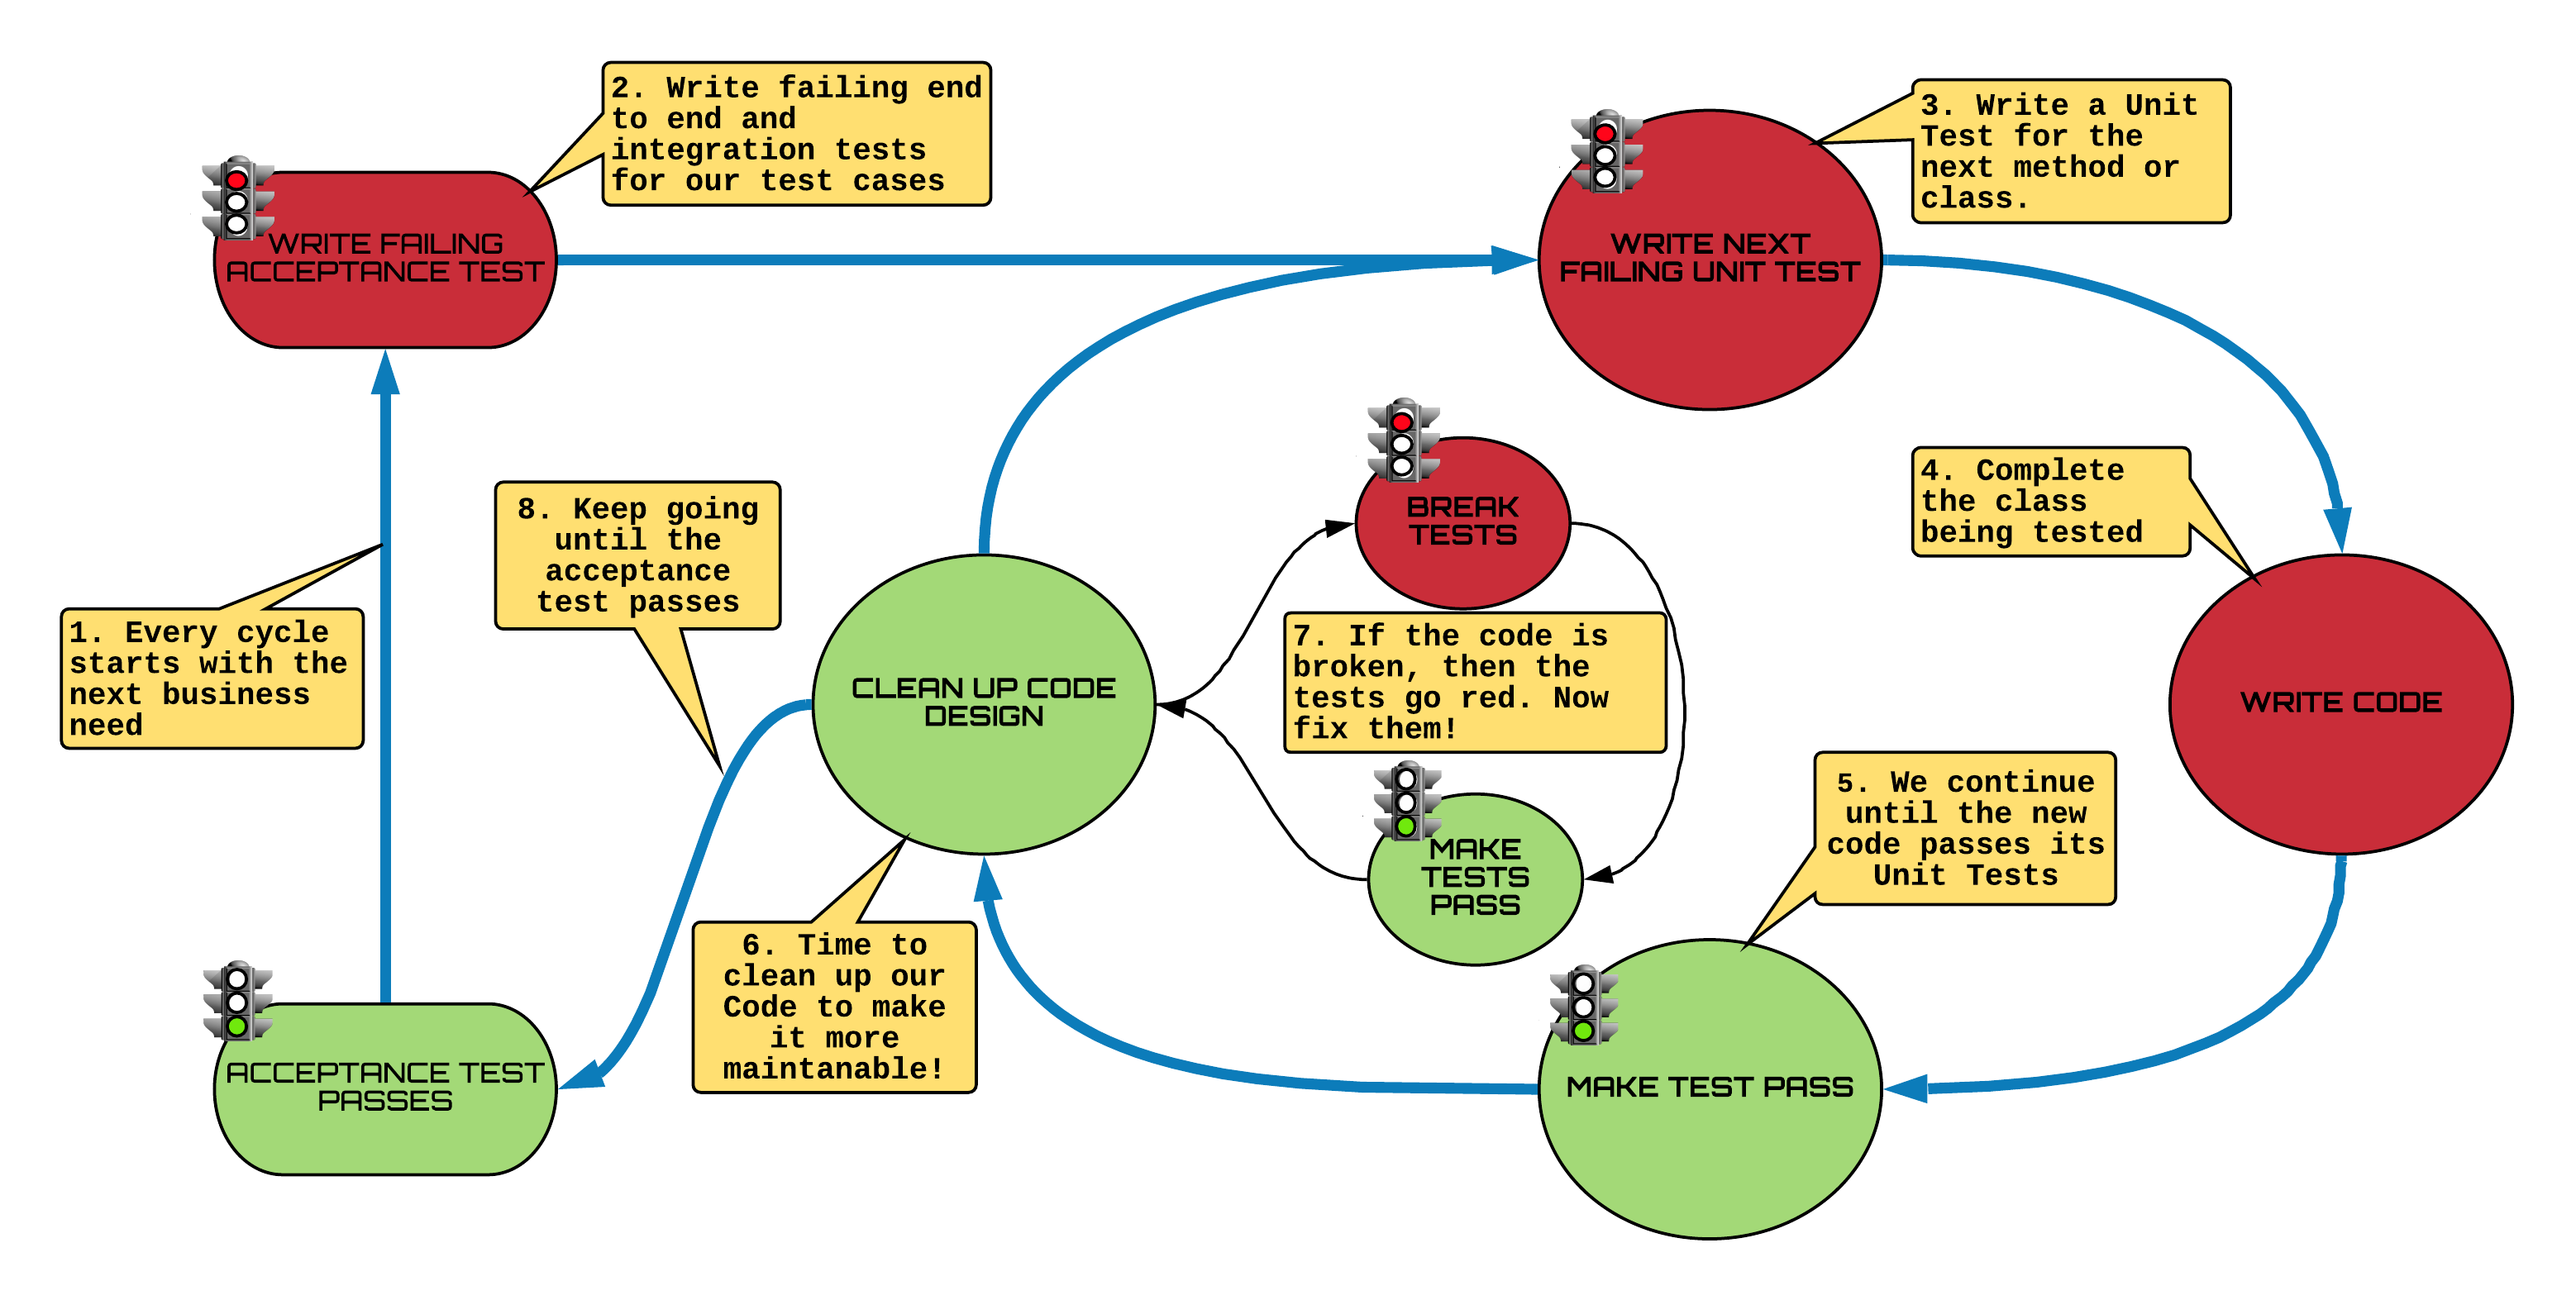
This is a little intense, so let’s break it down!
Steps 1 to 2 is where you take your acceptance test and write test cases for it. This would be failing E2E and integration tests! 🛑
Steps 3 to 6 say that you’d then TDD a method in a class, which helps build the actual code to satisfy that acceptance test. ✅
Steps 6 to 7 is the refactor loop we spoke about in earlier chapters, where you get to clean up your code without breaking the tests. 🌀
From step 7 onward
If your acceptance tests still fail, you need to continue writing more code and loop back around to step 3.
If you have enough so that it’s started to pass, go to step 8 and loop around to start a new acceptance test! 💫
That’s still pretty abstract, so we are going to build a calculator website together using these cycles! When fully built, this should add, subtract, divide, and multiply.
Oh, that sounds like a lot! Where do I even start?
If you start with addition, you'll have a manageable starting point. For example, you can create an acceptance test which says, “A user should be able to add two numbers and see their sum.” Remember, one test at a time!
What tests would you expect to end up with? Remember that there are no rights or wrongs as to what’s tested so much as the test cases you come up with. Let’s walk through it together:
Start by writing a red end-to-end test:
This test should not care what the web page looks like, but may automate visiting a web page, selecting two numbers, and hitting a ‘=’ button. For example, "A user should be able to add two numbers and see their sum."Run this red test below, and it fails because you haven’t built your web server:
TEST TYPE
TEST NAME
WHAT IS TESTED
Acceptance test
A user should be able to add two numbers and see their sum
A user visits a page, enters two numbers, hits ‘=’ and sees a result
Write one integration test for a web server you can send two numbers to:
TEST TYPE
TEST NAME
WHAT IS TESTED
Integration
GivenTwoNumbers
WhenAdded
ThenTheyShouldBeSummed
The server can start, and has a controller which will accept two numbers, and give them to the calculator class to add.
Pick your favorite framework to build a controller which you can send two numbers to.
Run your red end-to-end and integration tests: The server still does nothing with your numbers.
Now write a red unit test case for a new class and method: Calculator.add(Integer a, Integer b)
Create Calculator.add, and your tests are red:
TEST TYPE
TEST NAME
WHAT IS TESTED
UNIT
add_Sums_PositiveAndPositive
Calculator.add(1, 1)
UNIT
add_Sums_NegativeAndPositive
Calculator.add(-1, 1)
UNIT
add_Sums_NegativeAndNegative
Calculator.add(-1, -1)
UNIT
add_Sums_PositiveIntegerAndZero
Calculator.add(1, 0)
UNIT
add_Sums_ZeroAndZero
Calculator.add(0, 0)
Make Calculator.add work and all your test go green.
You can now clean up (refactor) your code and make sure the test stays green.
Move on to writing the next unit test case and build confidence in Calculator.add, making sure that your tests don’t fail. And the next. And the next. Thoroughly exploring the behavior of your add method.
Now write another integration test, and repeat steps 3 to 10!
INTEGRATION | GivenBadValues _WhenAdded ThenAnErrorIsReturned | The server starts; the controller validates the input and provides an error. |
UNIT | add_ThrowsException_AddingToNull | Calculator.add(null, 1) |
UNIT | add_ThrowsException_AddingNull | Calculator.add(1, null) |
Behavior-driven development & specification by example
Great! You’ve got methodology for focusing on users, but how can you make sure that everyone involved in making a product is on the same page? Back in the 2000s, another London-based engineer named Dan North asked himself the same question. He saw the value in working with product owners, experts, and teammates to come up with a shared understanding of test cases in plain English. So, he started naming tests to directly describe the acceptance tests he was trying to fulfill, or in other words, the specific behavior of the product in different situations. This approach became known as behavior-driven development or BDD.
Back in the day, Dan was writing normal JUnit tests (in Java), which clearly described what was being tested. These were essentially acceptance tests to drive the cycle of outside-in testing. At around the same time, another great engineer, Gojko Adzic, came up with a guide to creating better acceptance tests.
These acceptance tests used examples to specify how a system would behave. There are a number of ways to write such tests, but it's important that you define these test cases with product owners and specialists who are responsible for deciding if your code really works.
Who is it that has to accept that the work you've done is correct? It will vary from organization to organization, but your goal should be to find those people! Often your code will need to solve some problems in order for people in your business to accept it as complete. Get together and define those problems in the language they use. You might whiteboard the following:
THE FEATURE WE'RE BUILDING: Adding two numbers

WHAT DOES THE STUDENT WANT?
As a student I want to add two numbers so that I can solve tricky calculations

FOR EXAMPLE:
Assuming a student is using the Calculator when 2 and 5 are added, the student should be shown 7.
You can see that examples can describe preconditions for your test, what a user would do, and what should happen. It’s the arrange, act, and assert of your tests, but in plainer language than your unit tests! All you have to do is automate tests that use the very same language!
Oh man, that’s a lot of manual work, isn’t it?
Not so! You can use a popular tool called Cucumber to automate BDD style development. It helps you describe your scenarios in a natural language.
How does Cucumber work?
Cucumber describes a feature you’re going to build using a feature file. This is equivalent to a slice of your application that you will build incrementally. For instance, "supporting addition" might be a feature of your calculator.
Gherkin is the name given to the language used by Cucumber for testing. It’s a structure for describing how your software should behave in different situations. The Gherkin language describes (in English or your local language) a test scenario with a sentence of the form:
Given some preconditions
When some action
Then what expectations to assert
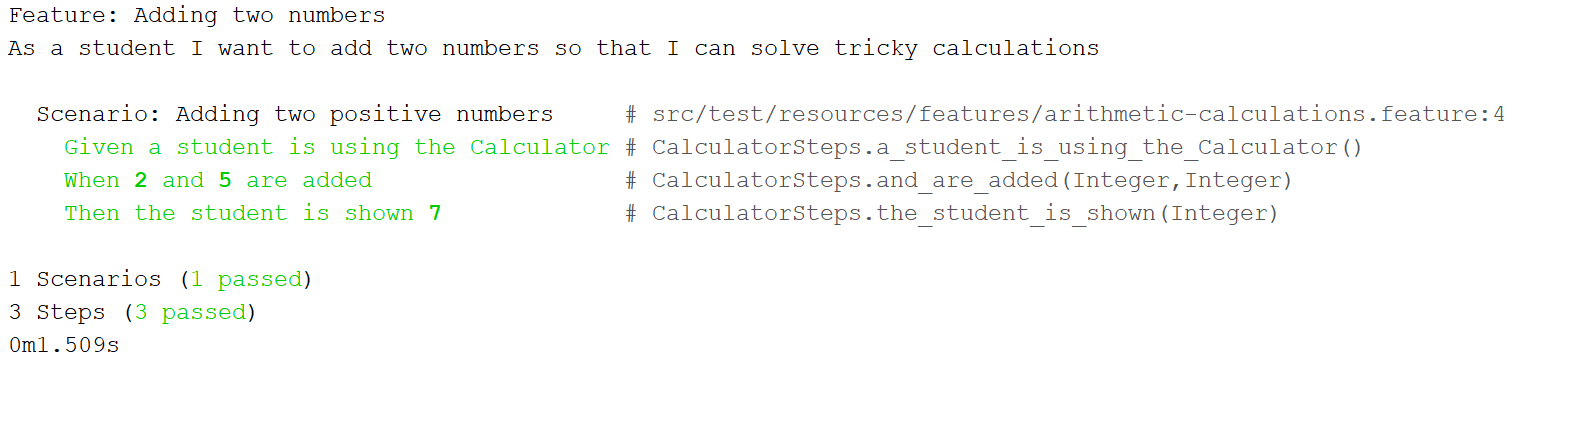
Here’s an example of a feature file for the calculator:
Feature: Adding two numbers
As a student I want to add two numbers so that I can solve tricky calculations

Scenario: Adding two positive numbers
Given a student is using the Calculator
When 2 and 5 are added
Then the student is shown 7
You can clone the repository and add your own code to it!
git clone https://github.com/OpenClassrooms-Student-Center/AchieveQualityThroughTestingInJava.git
git checkout p3-c3-sc1
Or use your IDE to clone the repository and check out the branch p3-c3-sc1.
Run the test with:
mvn test
So, what do the test results look like?
Write a Cucumber acceptance test
Okay, now let’s write one! First, I’ll show you how to add Cucumber to your project and set it up for testing with Spring:
As you’ve seen, you need a class to use the Cucumber JUnit runner, and then the @CucumberOptions annotation to specify a directory where your feature files live. This is the file which contains your Given, When, Then..
It’s time to write the test!
As you can see, Cucumber expects us to have a CalculatorStep class. This is an integration test of CalculatorService. Use @Given, @When, and @Then annotations to translate the feature file into code you can test.
Have a look at how @Given(...) matches the Given statement in the feature file:
@Given("a student is using the Calculator")
public void a_student_is_using_the_Calculator() throws Exception {
...
}
The {int} with the brackets in the @When annotation is called a placeholder. The value represents its primitive type. This is just a template to associate methods in your code with parts of your acceptance test. The following method is called with the values 2 and 5 in response to the line in the feature file that says, "When 2 and 5 are added:"
    @When("{int} and {int} are added")
    public void and_are_added(Integer leftArgument, Integer rightArgument) throws Exception {
    ...
    }
You can see how each of the parameters is passed as the leftArgument and rightArgument arguments to the annotated method.
It magically pulls the addition values out of that line of text and lets you use it in your test, so you know what to set up. In fact, you can have multiple scenarios in your feature file all using that same structure with different values for leftArgument and rightArgument. All of these will have test code sitting in wait. Aren’t annotations wonderful?!
Similarly, the @When can help you figure out what method to call. In this case, it shows us that we’re testing addition. It's in the sentence from our feature file: When 2 and 5 are added.
If you wanted to, you could add additional placeholders and generalize this further.
@Then gives a statement from the feature file, which tells you what result you should expect to see. This helps you assert for the right thing!
  @Then("the student is shown {int}")
    public void the_student_is_shown(Integer expectedResult) throws Exception {
        mockMvc.perform(post("/calculator").
                param("leftArgument", lastLeftArgument.toString()).
                param("rightArgument", lastRightArgument.toString()).
                param("calculationType", "ADDITION")
        ).
                andExpect(status().is2xxSuccessful()).
                andExpect(
                        content().string(
                                containsString(">" + expectedResult + "<")));
    }
As you can see, the sentence in our feature file defines a value which is captured with @Then("the student is shown {int}") and used to set the expectedResult variable. This is then asserted against at line 11. How clear is that feature file?!
If you remember our section on test naming, the evolution of test names owes a lot to Dan and his desire for clarity.
I bet you're wondering if there is a JUnit runner to make all of this work. There is! I've created an empty JUnit test and given it to the Cucumber.class JUnit runner. We also specify where our feature files live with @CucumberOptions.
@RunWith(Cucumber.class)
@CucumberOptions(features = "src/test/resources/features", plugin = {"pretty", "html:target/html-cucumber-report"})
public class CucumberAT {
}
Try it out for yourself!
Typically, with London School TDD, you’d write your acceptance test before your code, but sometimes someone else forgets to write the acceptance test first.
Just so you can get your hands on Cucumber, let’s assume that an acceptance test wasn’t written for subtract. See if you can write one! You should be able to copy the existing feature file and modify the@when so that it matches both "{int} and {int} are added" as well as "{int} and {int} are subtracted."
You can clone the repository and add your own code to it!
git clone https://github.com/OpenClassrooms-Student-Center/AchieveQualityThroughTestingInJava.git
git checkout p3-c3-sc1
Or use your IDE to clone the repository and check out the branch p3-c3-sc1.
Run the test with:
mvn test
Have a look at the README.md for tips!
Let's recap!
Behavior-driven development involves collaborating with your team, product owners, and other stakeholders to write business acceptance tests using business language. These become your first failing tests.
London School TDD or outside-in testing involves taking these acceptance tests and red-green-refactoring from system integration tests inwards towards the unit tests and classes needed to fulfill these.
CucumberJVM uses a non-technical feature file containing acceptance testing scenarios. These scenarios are automation testing by writing step definitions to match against the code.
