Headings, paragraphs, links, lists, images, divs, spans, classes, ids, line breaks: at this point, you're a wizard of HTML elements. You can create all of these elements (and more!) on a page in any combination you like. Bravo.
As you start creating real pages with all of this awesome content on them, you'll need to give browsers information about the pages themselves.
What do we mean by this? Two examples:
1. Look up at your browser's address bar. In a tab, you probably see the name of this course and the OpenClassrooms logo. Ask yourself: how did your browser get that information? 🤔

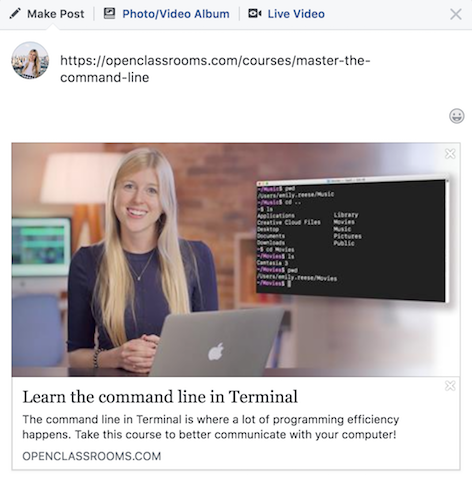
2. Paste a link to any OpenClassrooms course in a new post on Facebook (if you have it). The post automatically grabs the image for the course page, its title, and its description. Ask yourself: how did Facebook get that information? 🤔
Information about web pages, like their titles, icons, social sharing images, and descriptions live in an area of your HTML document called the head.
HTML document structure
When creating a page in HTML, you'll often refer to it as a "document." HTML documents have two major sections: the head and the body.
The body will contain all the content you've already learned to create: text, images, and anything on the page.
The head will contain information about the page. This culminates in a basic page structure like this:
<!doctype html>
<html lang="en">
    <head>
    </head>
    <body>
    </body>
</html>
This HTML page structure is not very "fun" to create because it has no visible content yet, but it is very necessary.
First, define the document type, which is HTML. This should become a line of code you robotically type when you're creating new HTML, and you don't need to think about it much beyond this.
Start your HTML content with an opening <html> tag that includes a language attribute. This could be "en" for English, "fr" for French, "hi" for Hindi, or something else. It helps screenreaders (a tool used people who have difficulty seeing) know which language to read out loud. There are more than 8000 languages to choose from, but in your career, you'll probably use a few at most.
Define and close the document's <head>.
Define the document's body and fill it with the elements you've already learned about in this course (sections, articles, headings, paragraphs, images, whatever's necessary for your page).
Conclude your HTML content with a closing </html> tag.
You already know what to put in the <body>. Let's explore what goes inside the <head> tags shown above.
<head>
Some common information is almost always included in a HTML file's head:
page title
links to your CSS files or page icon
meta data that used for social sharing
The total sum of all these elements could resemble this, which we'll break down shortly:
<head>
    <!-- GENERAL INFO -->
    <title>10 Fun Facts About Dogs</title>
    <meta charset="utf-8">
    <meta name="description" content="Dogs are incredible creatures. There may still be some facts you don't know about them!">

    <!-- LINKS TO CSS FILE ("STYLESHEET") AND SITE ICON -->
    <link href="css/style.css" type="text/css" rel="stylesheet">
    <link href="favicon.ico" type="image/x-icon" rel="shortcut icon" >

    <!-- FACEBOOK METADATA -->
    <meta property="og:image" content="https://dogsdogsdogs.com/images/dog.png">
    <meta property="og:description" content="Dogs are incredible creatures. There may still be some facts you don't know about them!">
    <meta property="og:title" content="10 Fun Facts About Dogs">

    <!-- TWITTER METADATA -->
    <meta name="twitter:card" content="summary">
    <meta name="twitter:title" content="10 Fun Facts About Dogs">
    <meta name="twitter:description" content="Dogs are incredible creatures. There may still be some facts you don't know about them!">
    <meta name="twitter:image" content="https://dogsdogsdogs.com/images/dog.png">
</head>Although this all looks complicated, it's just a series of three tags: <title>, <link>, and <meta>. They have different attributes each time they're listed.
<title>: define a site title using the <title> tag. Put your site's title between the opening and closing <title> tags.
<link>: tell your HTML document where your CSS lives or where your site's icon lives by specifying an href attribute (pointing to the file location), type (specifying the kind of document), and rel attribution (specifying its relationship to the HTML. These are standard lines of code you can almost copy and paste every time.
<meta>: specify as many types of meta data as you need. <meta charset="utf-8"> is a good line of code to set in your HTML pages so that your page can display any type of characters (English, Korean, etc), even if the page is mostly in one main language. A site description can also be set via a line like this:
<meta name="description" content="Dogs are incredible creatures. There may still be some facts you don't know about them!">If set, this will be shown in search engine result listings underneath your site title. You just need to specify a name attribute with a value of "description" and a content attribute with a value that describes your site.
This "invisible" information about your page completes the major tour of HTML that we've undertaken so far in this course. Great work!
The text editor
When you start working with HTML files outside of CodePen or Codevolve (the interactive platforms shown in this course), you'll want to start working with a text editor because you can then create and edit files on your computer itself.
You'll be able to create HTML and CSS files and link them together in the <head> of a document, as seen above.
What software am I going to need to create my website? Am I going to have to break my piggy bank to buy a very complex piece of software that I'm going to take months to understand?
There are indeed a large number of software programs for designing websites. But I can assure you that you won't have to pay a single penny for them. Why go for a paid and complicated software program when you already have everything you need at home?
Yes, brace yourself because all you need is... Notepad (see next figure)!
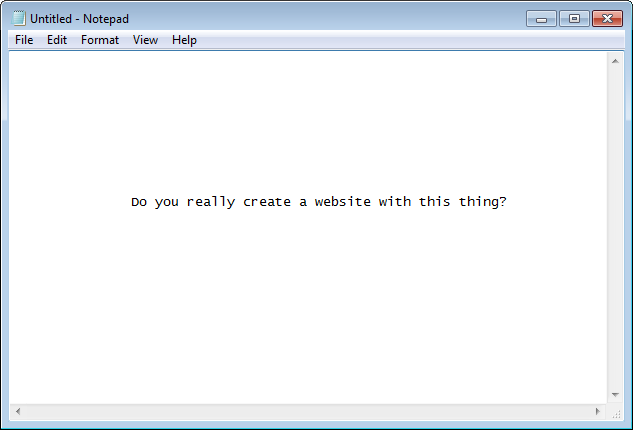
Strange but true: you can quite well design a website just using Notepad, the text editing software included as default in Windows.
However, more powerful software is now available and no one really uses Notepad any more. These website design programs can be classified as two categories:
WYSIWYG (What You See Is What You Get): these are programs that are very easy to use and allow you to create websites without learning any particular language. The best known of them include: Nvu, Microsoft Expression Web, Dreamweaver... and even Word! Their main drawback is the quality of the HTML and CSS code that is automatically generated by these tools, and which is often of rather poor quality. A good website designer will sooner or later have to know HTML and CSS, and this is why I do not recommend the use of these tools.
Text editors: these are programs for writing code. They can generally be used for other languages, not just HTML and CSS. They are proving to be powerful allies for website designers!
As you've gathered, I'm going to get you to use a text editor in this course. Here are a few tips, according to whether you're running Windows, Mac OS X, or Linux.
In Windows
There are plenty of text editors and I don't intend to mention them all. However, do have a look at Notepad++, one of the most widely used text editors in Windows. This program is simple to use and free.
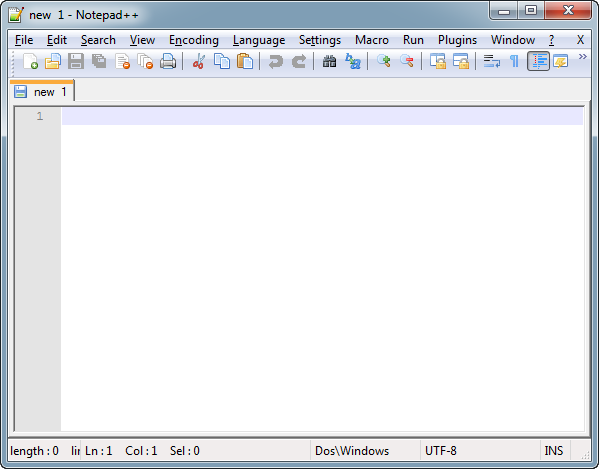
Here is what Notepad++ looks like when you launch it (see next image).
I suggest you follow these steps: choose theLanguage>H>HTML. This will tell the software that HTML language is about to be typed.
When you use the software, it will color your code to allow you to identify it more easily:

Other publishers are available in Windows. If you don't like Notepad++, you can try:
In Mac OS X
You can try one of the following programs:
In Linux
There are many Text editors in Linux. Some of them are installed as default, while others can be easily downloaded from the Download Center (in Ubuntu in particular) or via commands likeapt-getandaptitude. Here are some programs that you can test:
gEdit;
Kate;
vim;
Emacs;
jEdit.
Browsers
Why a browser is important
A browser is a program that lets you see websites. If you can read this, it means that your browser is open and you are displaying it. As I explained earlier, a browser's job is to read the HTML and CSS code to display a visual result on the screen. If your CSS code says "The titles are in red," the browser will display the titles in red. The browser's role is thus essential!
You wouldn't think so, but a browser is an extremely complex program. Understanding HTML and CSS code is indeed no small matter. The main problem, as you will quickly realize, is that browsers do not display all websites in exactly the same way! You'll have to get used to this and get into the habit of regularly checking that your website works properly on most browsers.
Browsers on computers
Downloading browsers
There are many different browsers. The main ones you should know are shown in the next figure.
Browser | OS | Download | Comments |
|---|---|---|---|
Google Chrome  | Windows | Google's browser, which is easy to use and very fast. | |
Mozilla Firefox  | Windows | The Mozilla Foundation's famous, renowned browser. | |
Internet Explorer  | Windows | Download | Microsoft's browser, which is installed on all Windows PCs. |
Safari  | Windows | Download | Apple's browser, which is installed on all Macs. |
Opera  | Windows | The eternal outsider. |
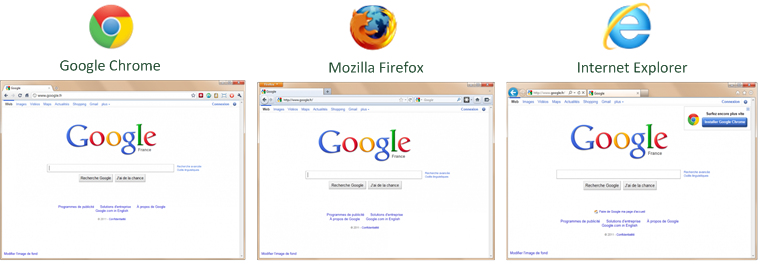
In the next figure, you can see a preview of some of these main browsers on the Google homepage.
Understanding the differences between browsers
As I said earlier, browsers do not always display web sites in exactly the same way. Why? This is because browsers do not always know the latest features of HTML and CSS. For example, Internet Explorer has for a long time lagged behind as regards some CSS features (and paradoxically has also been ahead in others).
Although each version supports new features, this becomes a problem for webmasters or developers like you who create websites, if users do not update their browsers.
Chrome has largely resolved this problem by setting up automatic updates without requiring user action. Many Firefox users forget to update, and Internet Explorer struggles to get users to update as the latest versions also require an update of Windows.
Sites like normansblog.de and caniuse.com provide an updated list of CSS features supported by the various versions of each browser (see next figure).
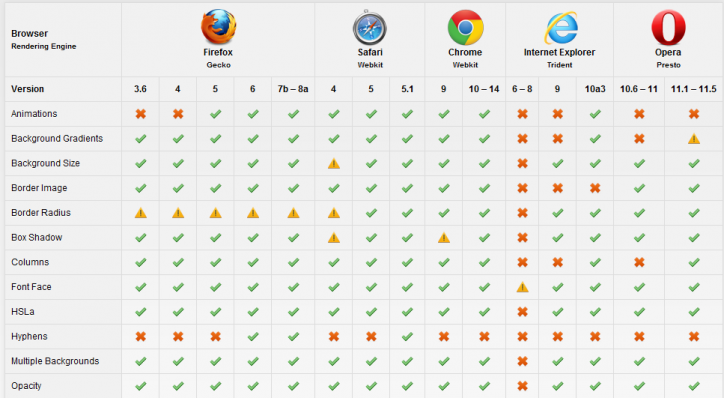 List of features supported by browsers
As you can see, it's... complicated.
The biggest concern most often lies in older versions of Internet Explorer (IE6, IE7 and IE8). You should check how your website looks in these older versions... Expect the unexpected! In particular, make sure that your website is displayed without errors, without trying to obtain exactly the same result in the old versions of these browsers.
Browsers on mobile phones
In addition to the browsers that I have presented, variants of these browsers are found on mobile phones, especially smartphones.
As more and more people now visit websites on their mobile phones, we should at least have some idea of how browsers work on mobile phones.
In fact, you won't be lost: most browsers on smartphones are the same as the ones on computers, in a lighter version suitable for mobile phones. Everything depends on the phone type.
iPhone: on Apple's iPhone, the Safari Mobile browser is used. This is a light but nevertheless very complete version of Safari for computers.
Android: Android mobile phones use the Chrome Mobile browser. There again, this is a version for mobile phones.
Windows Phone: Windows Phone includes... Internet Explorer Mobile! The principle is the same as for the above browsers: it is a version dedicated to mobile phones.
Blackberry: Blackberries are an exception to the rule as they have their own browser (there is no equivalent on computers). However, the most recent versions of this browser are based on a core common to Safari and Chrome (the Webkit rendering engine). As a result, the display is generally similar to that of Safari and Chrome.
Browsers for mobile phones support most of the latest features of HTML and CSS. In addition, the automated updating system of mobile phones ensures that users will most often have the latest versions.
You should, however, be aware that there are differences between these mobile phone browsers and it is advisable to also test your website on these devices! In particular, as the screen is much narrower, you should make sure that your website is displayed properly.
We'll trick out all the HTML content you learned in this course part with CSS in the next course part!
