Import images into Sketch
Using Images in Sketch
In this lesson we work with images in Sketch. Imported images are just a layer in Sketch, and manipulating images is an intuitive process.
The BabySittr Prototype
We're going to work on an app prototype to find babysitters. The app will let a user:
Log in.
See a list of existing babysitter bookings (if any).
Search for available babysitters (after entering date, time and duration).
View the profiles of matched sitters.
Select an available sitter.
Allow the sitter to confirm and show the booking as pending until then.
Allow the parent to text or call the sitter.
Creating a splash screen
Let's begin working with images by creating a splash screen for our BabySittr app.
Here is a preview of what we will create. Why not pause this lesson now to see if you can create it yourself in Sketch? You can download the image of the baby here (although using an alternative image is fine also).

Bringing Images into Sketch
To import an image into Sketch, you can either:
Copy and paste an image into Sketch
Drag the image into Sketch
Use the menu Insert > Image
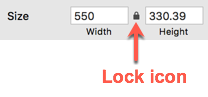
Large images can be a larger size than our Sketch artboard. Click on the image and change its size using the Size properties in the Inspector. I have changed the height to 550 pixels. Because the lock icon is showing as locked, the width will change automatically to preserve the height/width ratio of the image.
Steps to create the Splash Screen
Here are the steps I have taken to create this image:
Create an artboard for iPhone 8 (Insert Artboard > Apple Devices > iPhone 8).
Verify that the artboard is 375 pixels wide and 667 pixels high.
Download the image and import (e.g. copy and paste) it into Sketch.
Resize the image height to 667 pixels, and adjust the image position (drag the image) so that they baby is centered in the artboard.
Add a text layer for the 'BabySittr' heading and set the following properties in the Inspector.
Typeface: Avenir
Size: 58 pixels
Weight: Book
Color: White
Add a login button (a rectangle with radius of 10 pixels and a text layer with the text login centered in the rectangle).
Text properties (Typeface: Avenir, Weight: Heavy, Size: 17 pixels, Color: White)
Rectangle properties: Width: 134 pixels, Height: 36 pixels, Color: FE3B2C (hex), Opacity: 60%, Border color: 979797 (hex), Border thickness: 1 pixel.
Add a text layer for 'Create Account' with properties: Typeface: Avenir, Weight: Heavy, Size: 17 pixels, Color: White.
Grouping Layers
A large Sketch project can have dozens or hundreds of layers! This makes editing somebody else's file (or even your own) a real nightmare unless the layers are organized properly.
The most important part of organizing your layers is to group them into sensible groups.
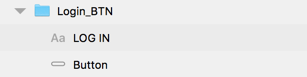
Let's create our first group. Select the two layers that comprise our login button :
The text layer for 'Login'
The rectangle behind this text layer

In the menu, click on Arrange > Group, and a group will be created. You can alternatively press CTRL and click and then choose 'Group Selection.'
There are several advantages to grouping layers in a sensible fashion:
You can show/hide the whole layer with one click.
You can drag or reposition the layer with one movement.
You can have fewer items showing in your Layer list and can more easily locate a given element.
You can copy and paste a group. To create a second button, you could copy and paste the existing button and then change the text. In this way, the second button will have the same properties (e.g. size, color etc) as the first.
Ordering Groups
We have mentioned already that the ordering of layers determines which layers are 'on top' of others and therefore which layers (if overlapping) are hidden by others.
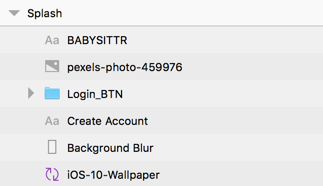
We have also discussed opacity, which is the 'see-through-ness' of a layer. Try dragging the Login Button layer above the 'pexels-photo' layer, and it becomes brighter. The button is no longer 'seen through' the baby photo layer.
For layers that do not affect each other, I try to order them from those that appear at the top of the screen down to the bottom.
Additional Resources
The Sketch file for this lesson
The ultimate guide to iPhone resolutions
