Plan Releases using Story Maps
Create Your Story Map
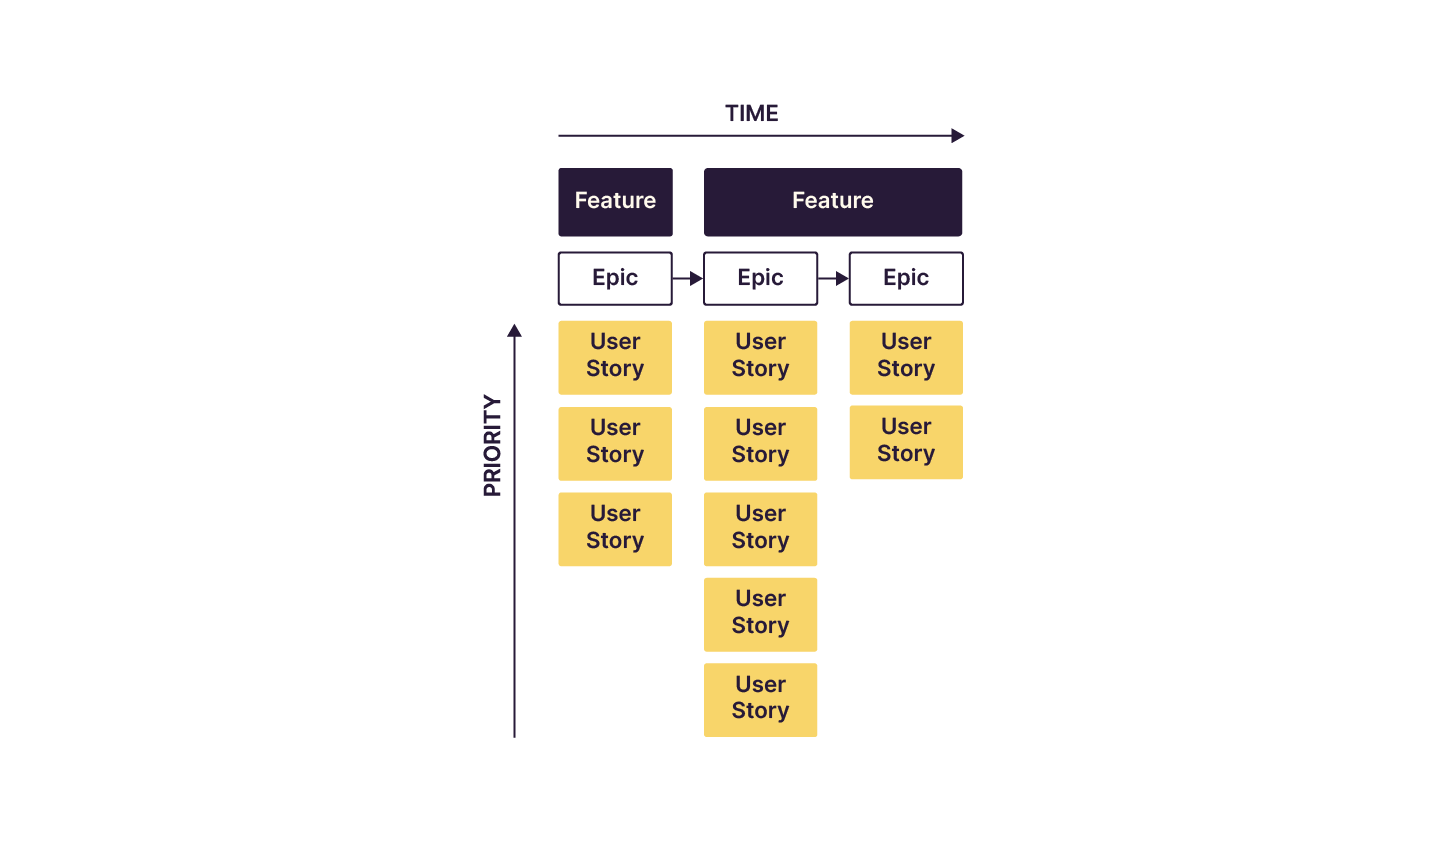
The first step to creating a story map is adding activities and tasks in chronological order to form the backbone of the story map.
The next step is to add the user stories from your product backlog. Do this by adding each story vertically underneath the task that it helps the user do.
Planning Releases
You can enhance your map further to sketch out which batches of user stories comprise a release, that is a set of functionality that makes sense to release at the same time.
In order to leverage your user story map to plan releases, adopt the following four step process:
Prioritize user stories.
Create swim lanes for each release.
Write a target outcome for each release.
Use sprint planning (story points and velocity) to calculate release dates.
1. Prioritize User Stories
The first step to planning releases is to prioritize the user stories.
Don't prioritize the backbone (i.e. the epics). Assume that all items are necessary. However, prioritize so that the highest priority user stories are toward the top.
You could visualize it like this:
You might be wondering why you would prioritize user stories (i.e. tasks) and not the epics (i.e. activities) in the backbone?
Agile consultant and author Jeff Patton describes it like this:
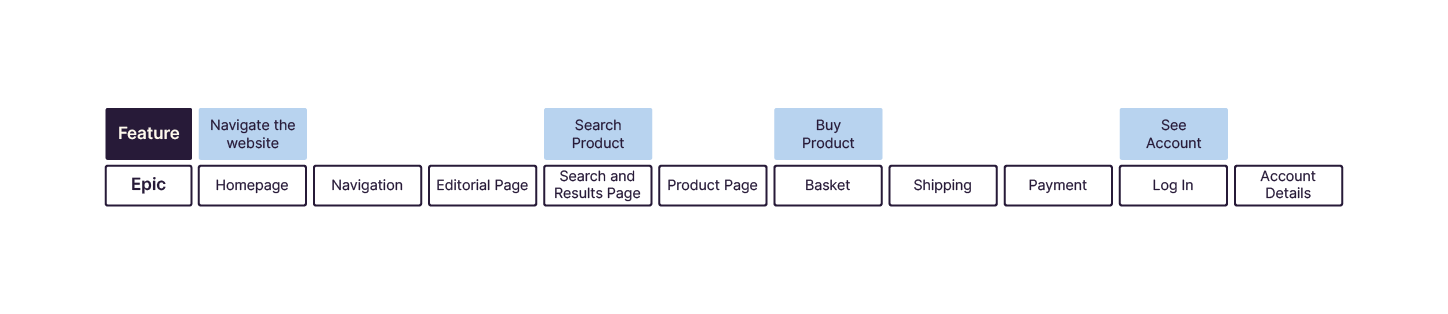
When it’s time to plan releases, it’s usually not important to prioritize backbone items against each other. For instance, if I were to make an e-commerce site, it might look like this:
Home Page
Product Page
Search Page
Shopping Cart
Shipping Page
Payment Page
Account
We can't ask for an order of priority; for the site to work and for users to buy products, we need all the elements. These items are essential – and we’ll need all of them to deliver a minimum viable product – an MVP. But you don't need to have every feature on every page to make the site work.
That pretty much explains why you prioritize user stories but not epics in your backbone!
2. Create Swim Lanes for each release
The next step is to plan your releases. The best way to do this is to draw lines (you can use masking tape!). These horizontal lines create "swim lanes" for each release.
Move your user stories (up and down) to form collections (or batches) that would be the most important to build.
In the following diagram you can see the swim lanes (the space between the lines) that defined release 1, 2, and 3.
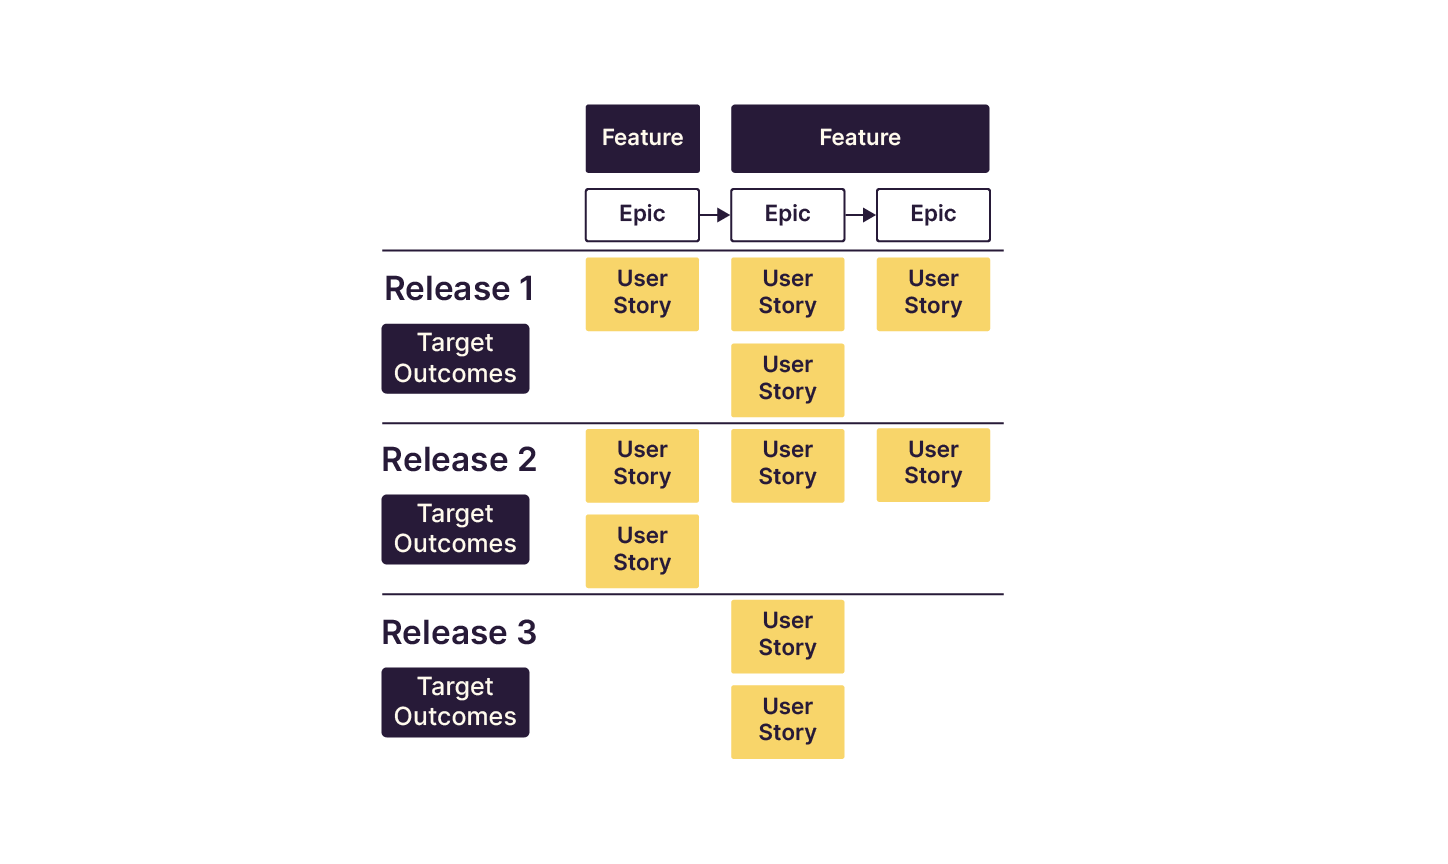
Remember that a release is a set of functionality that makes sense to deliver to users at the same time.
Let’s take a look at an in-depth example. For an e-commerce site, the customer must be able to find the product, add it to the shopping cart, choose a delivery address and pay. (Some of the user stories in the example are not essential to the proper functioning of the site, but they may represent a convenience for the customer.)
The release grouping of the feature Buy Product of our e-commerce site might look something like this:
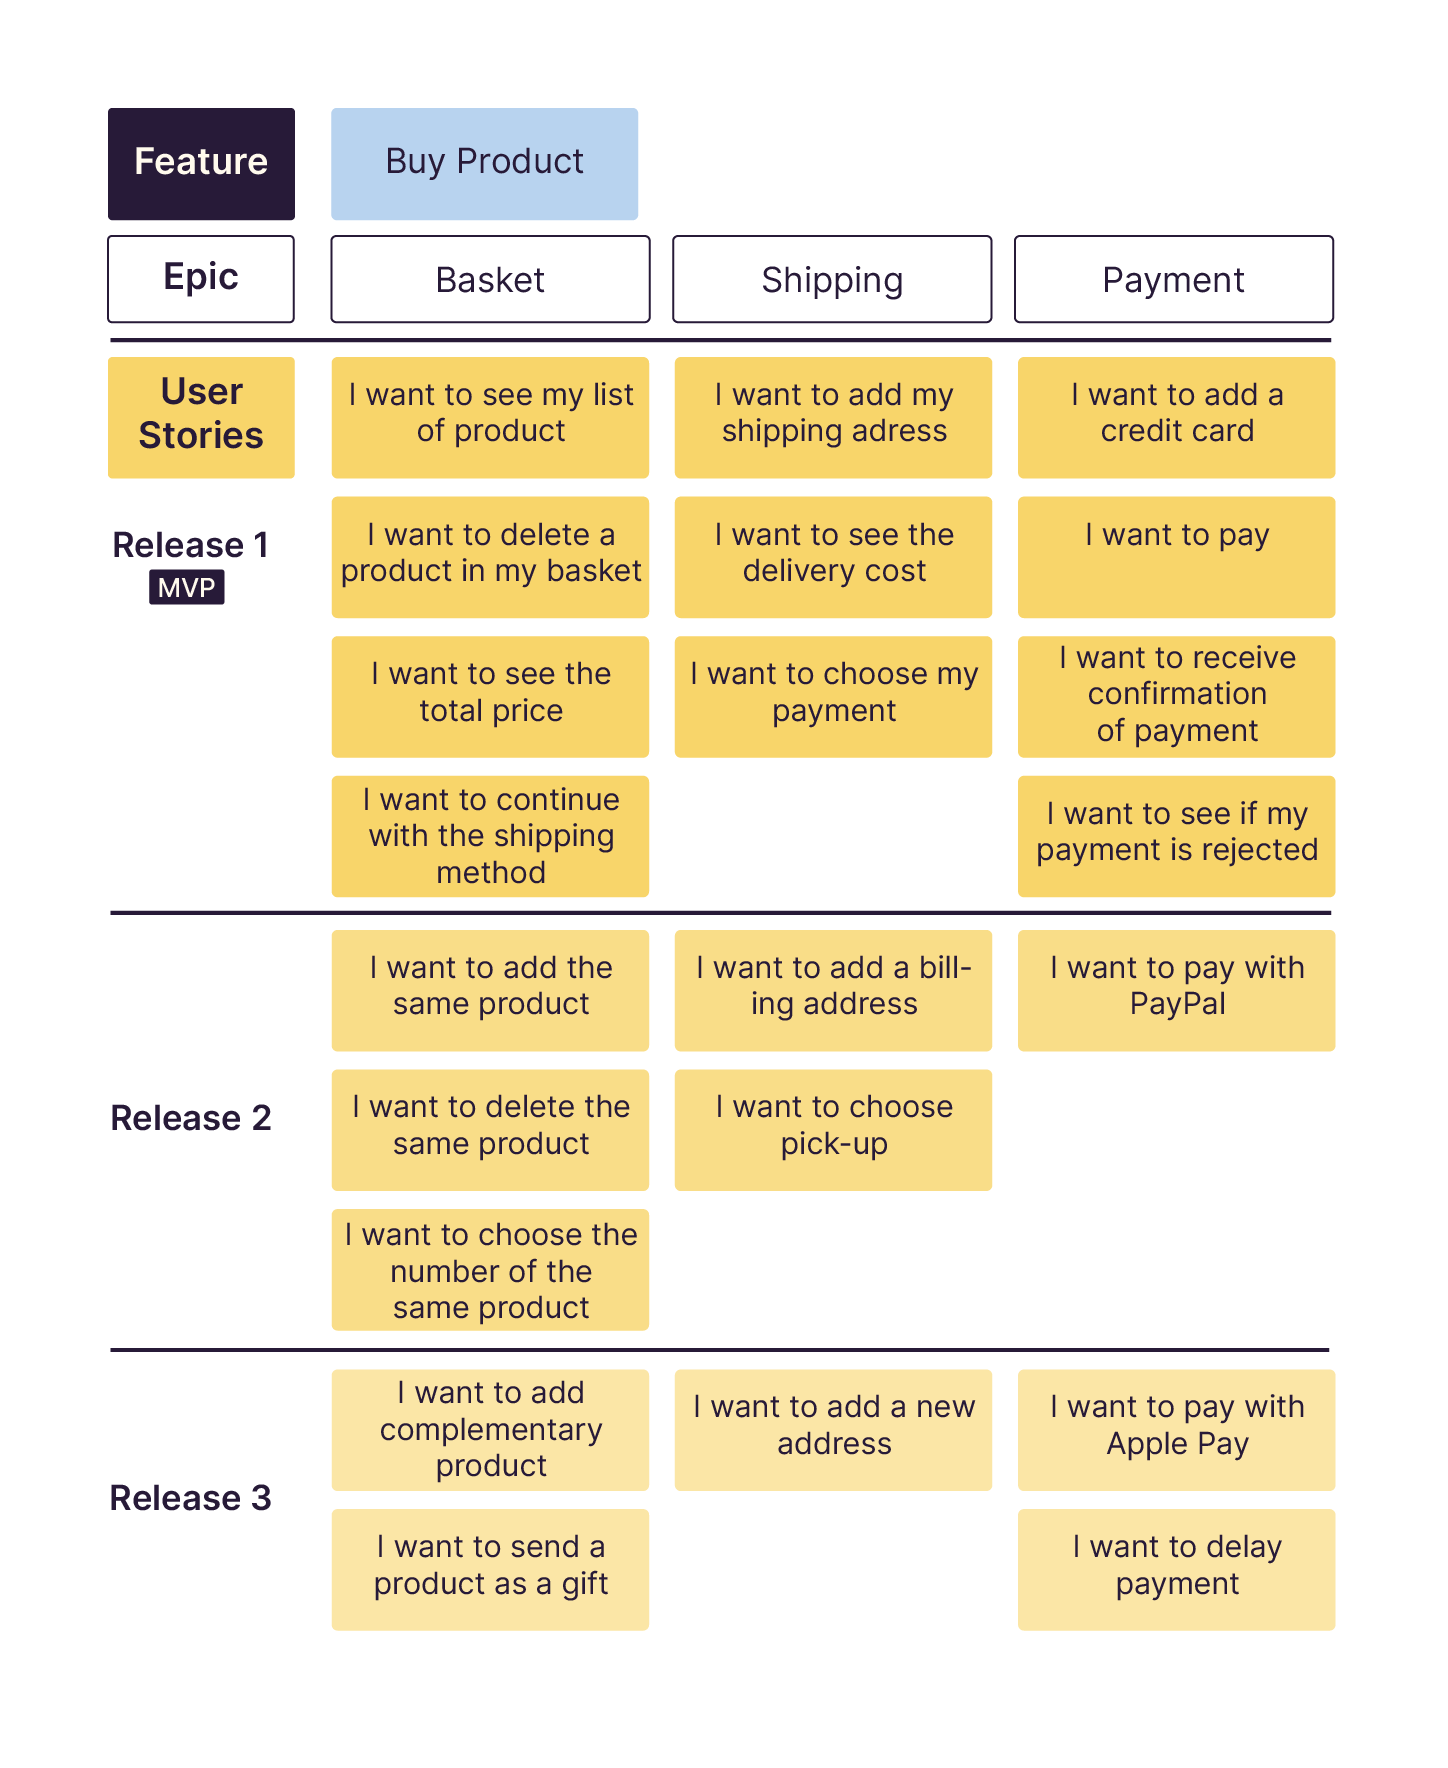
In the feature "buy a product", we have 3 EPICs: Basket, Shipping and Payment.
We've created 3 swim lanes. The first one is the MVP. It includes the essential user-stories to launch the e-commerce site. The customer needs to see the products, choose a delivery address and be able to pay by credit card. We can then prioritize user stories in future releases according to the priority given in each of the EPICs.
In the example above, several user stories make sense to be given to users simultaneously, but we have not yet answered the question, "How long will it take to deliver them?" It does not necessarily take the same amount of time to build each release (or each swim lane). All we are saying with this grouping is that these batches do make sense to give to our users at the same time!
3. Write a Target Outcome for each release
Target outcomes that you want to achieve for each release.
In the moving apartments example, it might be that:
Once the user stories in release one are complete, the user could determine how much moving would cost. This would be an example of a target outcome - "That user can determine cost of moving."
Once the user stories in release two are complete, you would know that it is possible on a certain date (e.g. Saturday 15th May). This would be another example of target outcome - that "The user can verify availability of services on their chosen date."
The target outcome is then written on an index card or sticky note and added to the user story map.
4. Use Sprint Planning to Calculate Release Dates
You saw in a previous chapter how to use story point estimates and velocity when calculating the number of sprints required to complete all of the user stories in a release.
Allocate user stories to sprints until the total points in the estimates hits the allowable limit (i.e. your team's velocity).
That gives release plan that is highly visual and based on Agile estimation techniques.
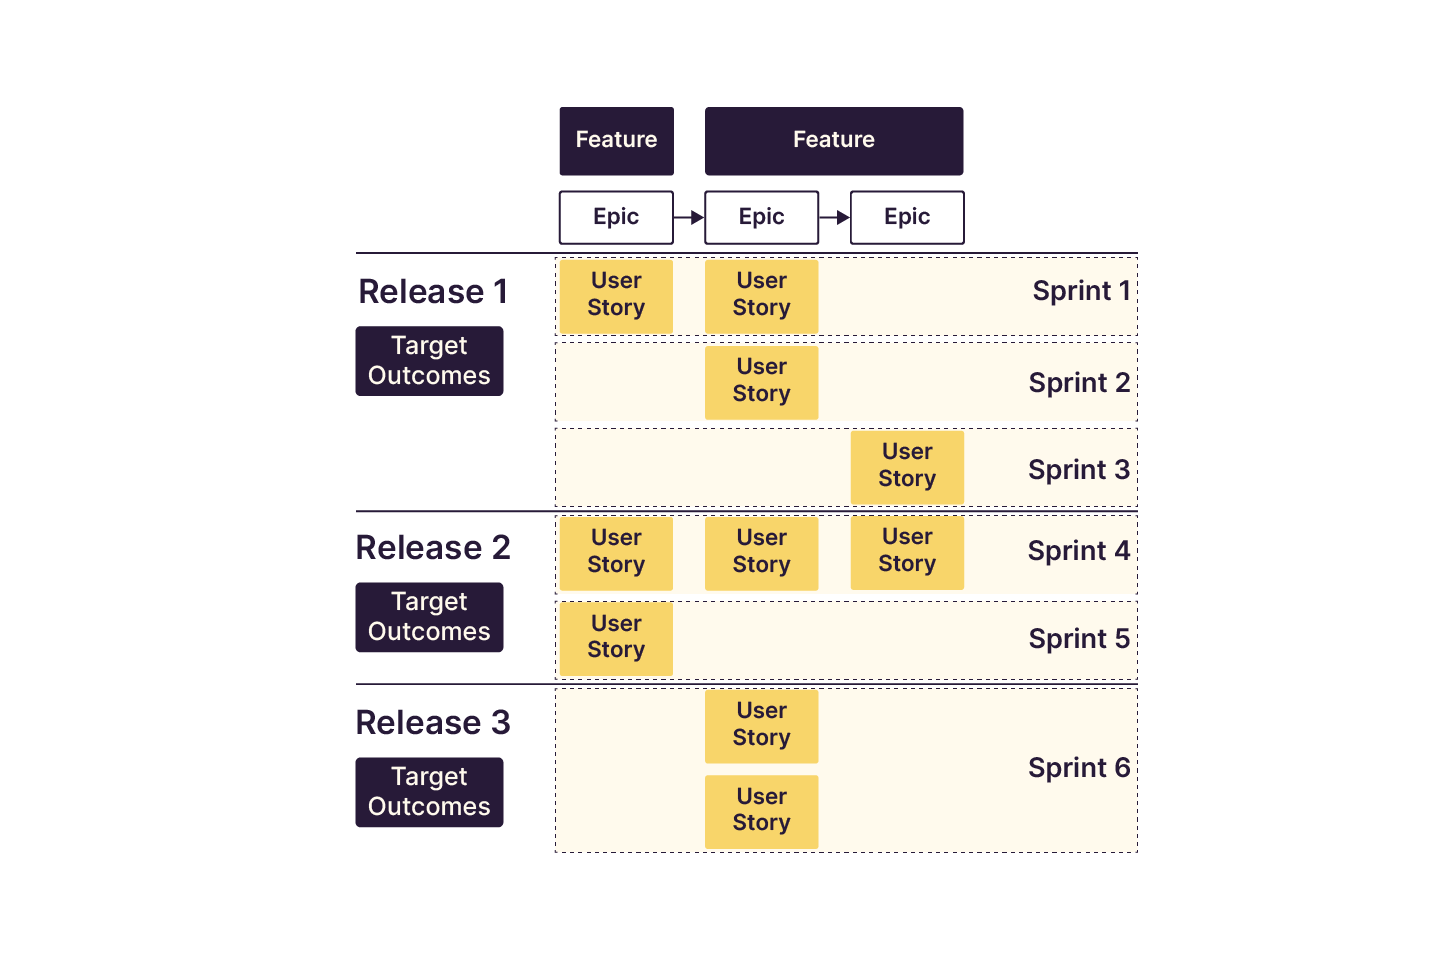
The user story map gives you the following information:
The first release date is after sprint three is completed (whatever date that is).
The second release date is set for after sprint five is completed.
The third release can be scheduled for after sprint six is completed.
Let's Recap!
In order to leverage your user story map to plan releases, adopt the following four step process:
Prioritize user stories.
Create swim lanes for each release.
Write a target outcome for each release.
Use sprint planning (story points and velocity) to calculate release dates.
If you have estimates for each story in points, and you know the team's velocity, you can calculate delivery dates for the releases on your user story map.
You can use your story map to communicate valuable information. We'll take a look at how to do that in the next chapter!
