Set up the Space and Prepare Materials
Design thinking workshops should be dynamic, collaborative, and fun. The space you create can help ensure this happens. Often it's a matter of rearranging a bit of furniture.
Breaking out of the box
Traditional learning environments have rows of desks facing forward with the teacher in the front of the room. While this is fine for a lecture, workshops are more guided by the learn-by-doing mentality. You may want to shake up the classroom to foster collaboration.
Foster collaboration
Consider arranging desks so that they face each other. Ideally, there will be big tables surrounded by chairs so that participants can easily communicate with each other. It's more important for participants to see each other than the facilitator. After all, it's going to be the participants who are doing the heavy lifting by coming up with ideas in the workshop!
For larger workshops, break into groups of no more than six people. This will give participants a better chance of hearing others and being heard. Listening is just as important as speaking in these exercises!
Set-up your space in advance
You also want to create an environment where participants can spread out a bit (there may be some role-playing later) and make a bit of a mess. If there's furniture you need to protect, consider covering tables with plastic tablecloths or paper ones they can write on.
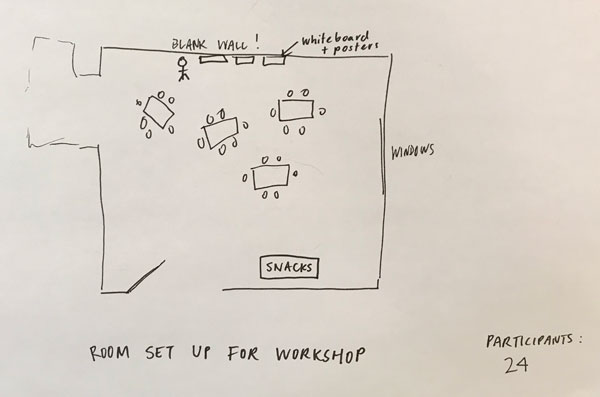
If you are renting or borrowing a space for the workshop, schedule a meeting in advance and explain how you intend to rearrange the room. You can use a sketch to help communicate your thoughts which will be even beneficial if you are trying to accommodate more people.
Whatever you do, remember to put the room back to how you found it after the workshop!
Gather materials
While preparing for your workshop, gather materials that encourage play! For most workshops, it's refreshing to use non-digital tools. Anything is fair game. However, you may want to limit materials to ones that aren't a disaster when it comes to cleaning up. (like glitter!)
Gathering raw materials
Here's a checklist of materials to consider:
A computer, tablet, or projector for the facilitator to present process and visuals (optional).
Oversized white sticky notes to hang on the wall (warning: these are surprisingly EXPENSIVE! Save them for occasions when the company is footing the bill. 😉 Plain paper and tape works too!)
Large roll or sheets of paper to cover the tables with or to hang on the wall.
Tape that won't take paint off the walls (either painter's tape from the hardware store or Japanese washi [paper] tape work well).
Colorful sticky notes – lots! (be aware, some brands don't stick as well as others).
Markers (this makes it easier to see what is on each sticky note and keeps participants from overthinking things or trying to be too perfect).
Pencils, crayons, pens (different materials can bring unexpected joy to participants as it reminds them of being a kid again).
Paper: white computer paper, colored construction paper if you have it (the cheap stuff works best!).
Tape (helpful for prototyping).
Scissors.
Colorful dot stickers (for voting).
A playlist! (Consider what kind of vibes you want for different phases of the workshop; Stanford's d.School has created playlists on Spotify).
Create your own list and keep adding to it (GoogleVentures shares their materials checklist on the Sprint website).
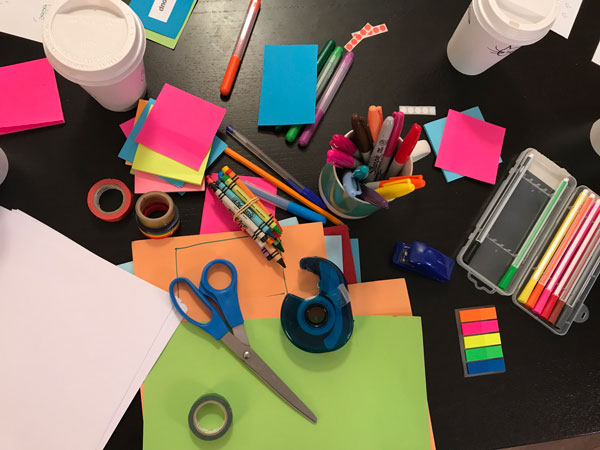
Many of the tools above will be used to help foster collaboration and for participants to prototype ideas through simple materials.
Prepping Activities in Advance
In the interest of time, consider which "posters" or visuals you can prepare in advance. Some facilitators may choose to introduce themselves and the project (and process!) through a slide deck they prepare in advance. Everyone has their own style! Just keep in mind that you don't have to spend a lot of money to be creative.
Depending on the activities you've decided on in your agenda, you also may want to prepare a few other materials before your workshop to help guide participants through activities:
Design thinking process (it's nice for participants to have a visual point of reference whether it's posters or a presentation).
Templates for exercises (empathy map, experience map, plus/delta – more in part 2)
Colored card deck (in part 2 you will see this as a tool for mixing different ideas; consider what information goes on each card).
Introductory materials or research materials
Workshops can take many directions, so don't try to do it all. Also, realize preparation can take a significant amount of time. Fortunately, organizations like IDEO and the d.School at Stanford share many resources shared through Creative Commons that can assist or inspire you.
The d.School Crash Course in Design Thinking condenses a larger workshop into 1 hour. The entire video lasts 1 hour 20 min. If time allows, and you're serious about design thinking, it's worth watching it in its entirety. At a minimum, watch the first part.
Taking care of your participants
Last but not least, don't forget about food and drinks. If you're starting your workshop in the morning, you'll probably want to have coffee. ☕️ Keep everyone hydrated with water too. In order to help keep energy up, have healthy snacks 🍏 🍎 🍊 🍌 – something easy to set up and clean up.
Prepare for sprints
Sprints have a similar approach to design thinking but use a more formulaic approach to each of the five days. As they point out in the video below, the majority of the work happens during the workshop.
Setting the stage for sprints. [3:58 min]
It's worth noting that if you work for Google, you have more luxury in terms of workshop space. You also have all of the necessary materials at your fingertips. For the first few workshops, you may have to get more creative with space and tools. Still, it's great to be inspired by the pros!
Let's recap!
The workshop environment should be arranged to help foster communication, ideally with participants sharing a table or workspace and facing each other.
Bring lots of materials so that participants can get creative. Working with raw materials can be a refreshing and stimulating change of pace.
Consider which materials you need to prepare in advance, from agendas to posters. These materials should help create a collaborative environment.
Most of the work should happen during the workshop as long as teams have the necessary tools and materials are available.
