Create a Second Activity

In the first part of this course, we created an Activity, which allowed us to recover a user's first name and start a game. In this next part, we will create a second Activity which displays the game content. The first Activity will launch this new Activity when the user clicks on the play button.
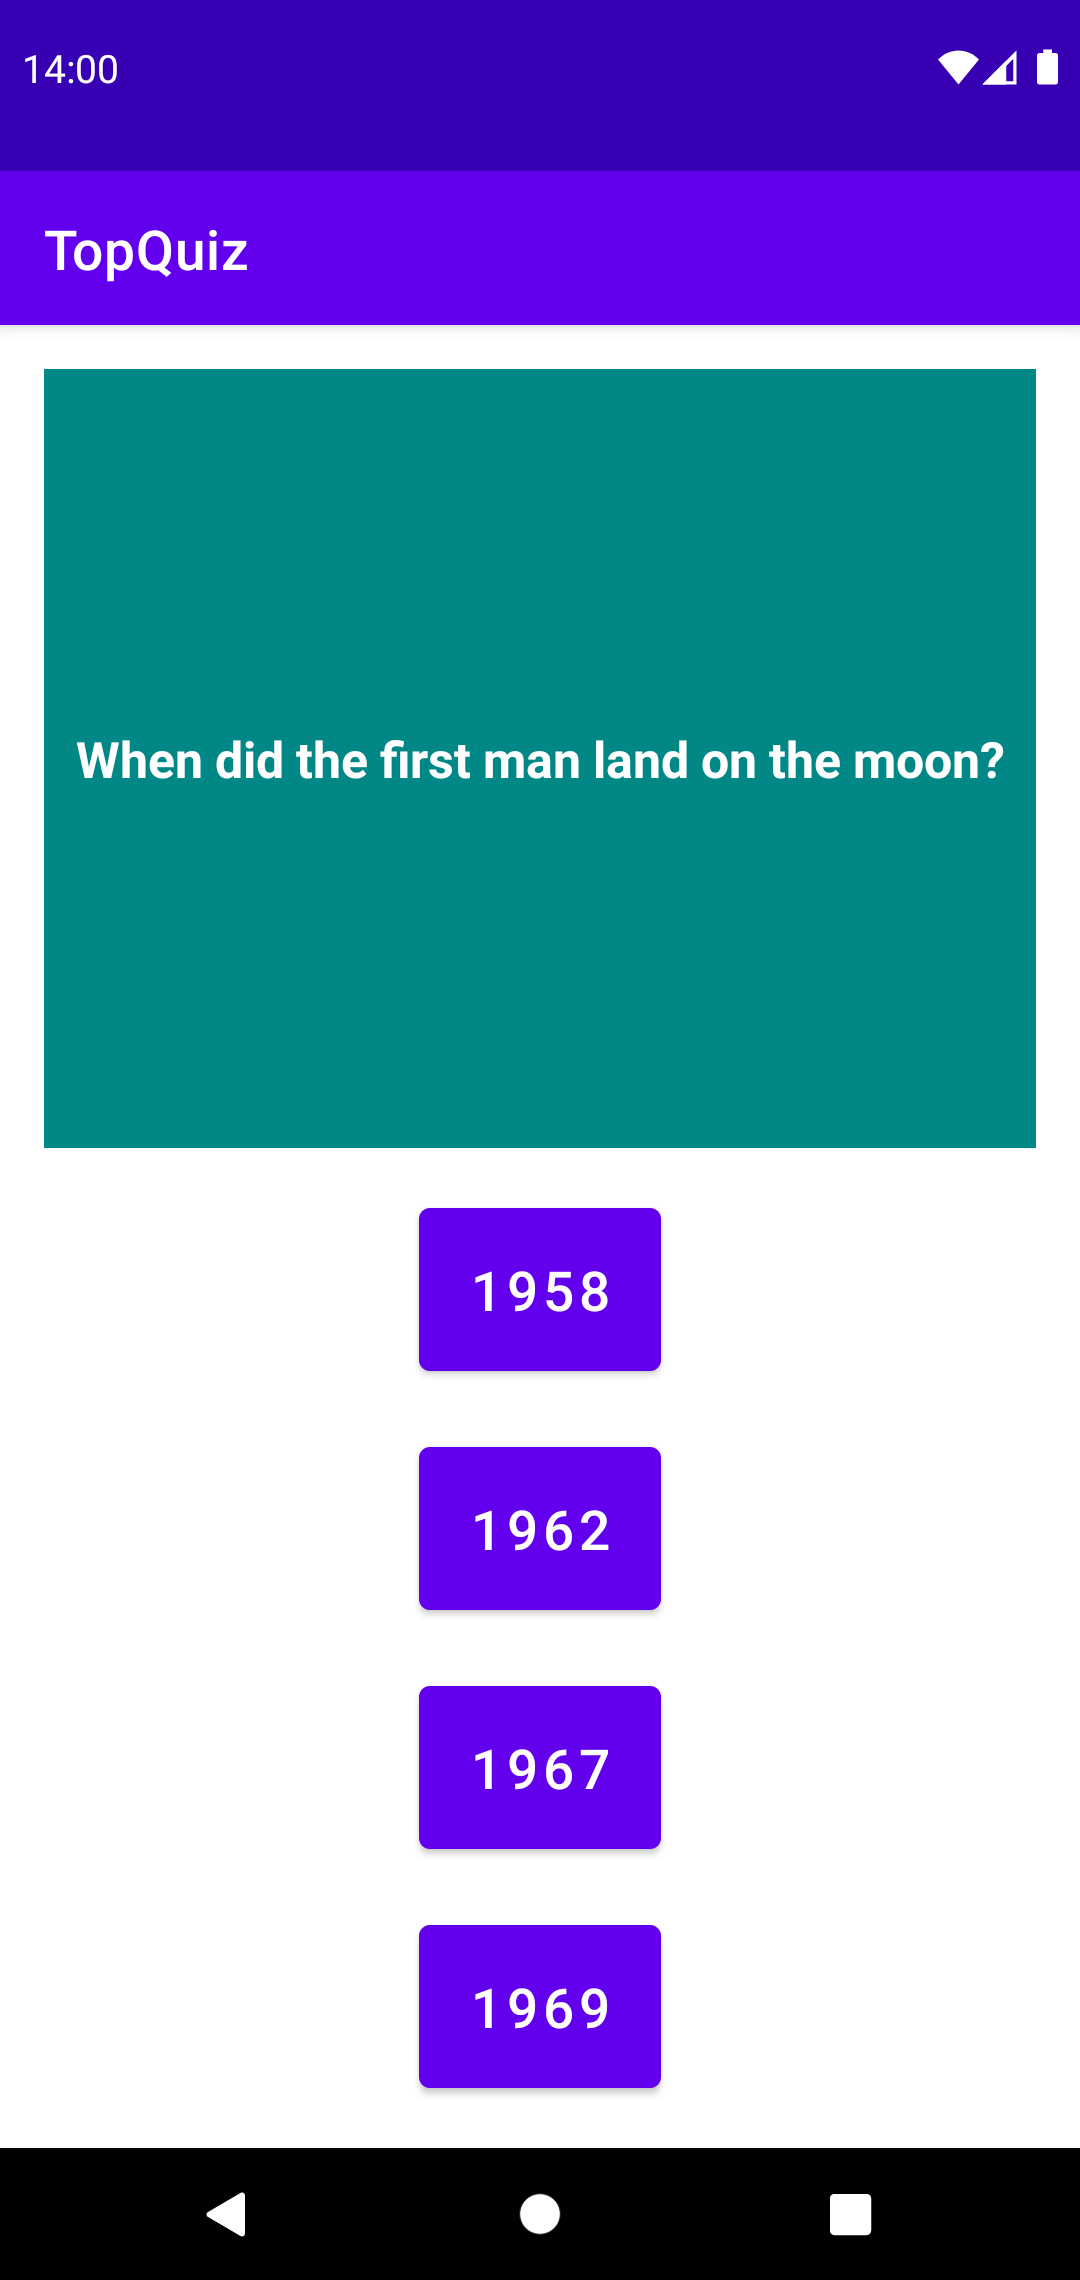
You may be wondering how the game works. That is a legitimate question. It's very simple: TopQuiz will ask a series of four questions, chosen randomly from a set. Each question will have four possible answers. For example:
Creating a New Activity
Create the Activity Files
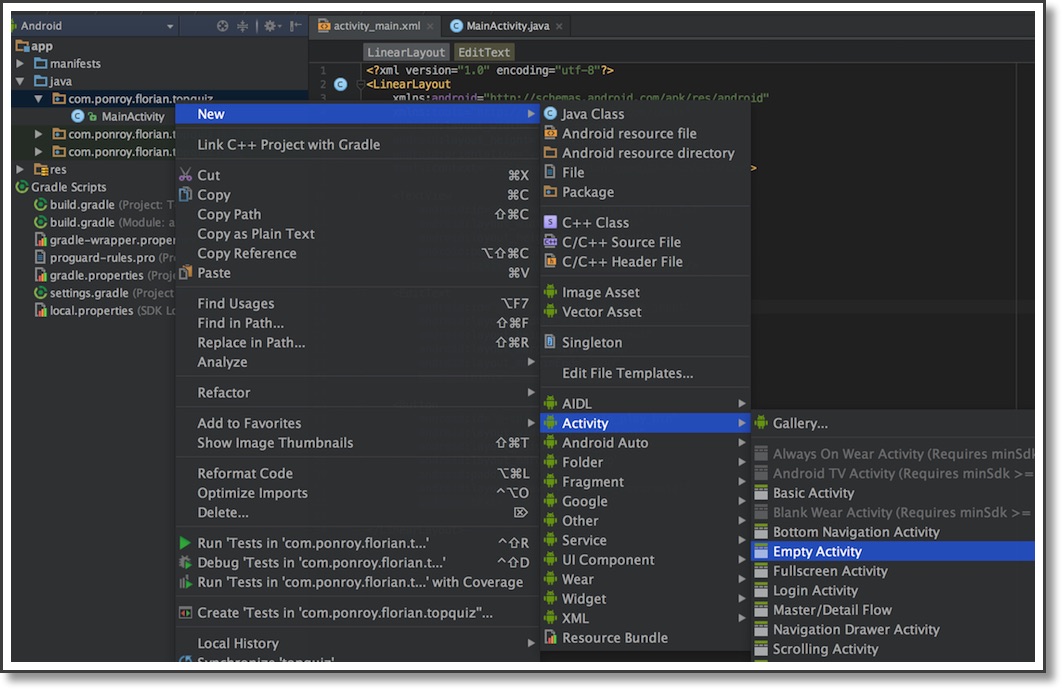
As a reminder, an Activity is usually composed of a Java class and an associated layout file. Position your cursor in your project tree and hover over the directory which contains the MainActivity class we created in the previous chapter. Right-click on it and select New > Activity > Empty Activity.
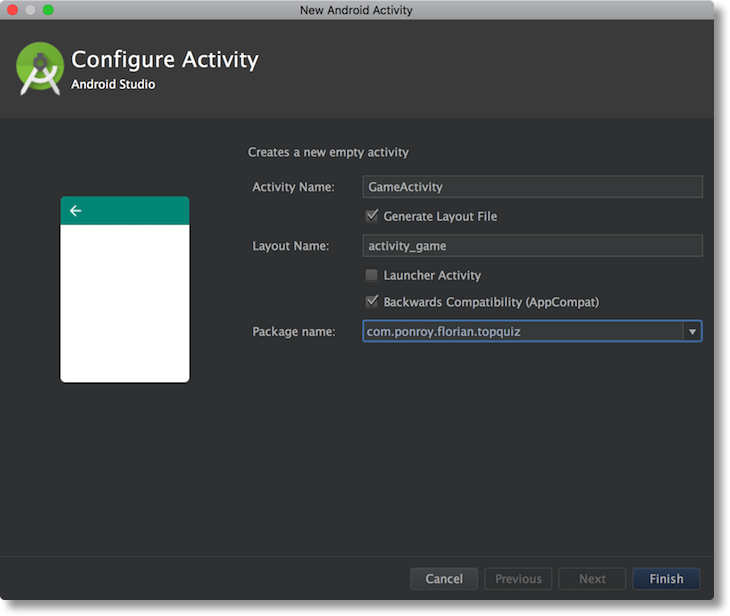
Android Studio displays a new window. This window allows you to configure the Activity's name and its layout file. We know this Activity will handle the game logic, so we will call it GameActivity. Leave the following settings:
Generate Layout File is selected
activity_game as the generated filename
Backwards Compatibility (App Compat) is selected
Click the Finish button.`
Create the Layout
The interface of this new Activity will contain the following elements:
A question
Four possible answers, each represented by a button
To do this, open the file activity_game.xml located in the res / layout directory, and change the code as follows:
<LinearLayout
    xmlns:android="http://schemas.android.com/apk/res/android"
    xmlns:tools="http://schemas.android.com/tools"
    android:layout_width="match_parent"
    android:layout_height="match_parent"
    android:orientation="vertical"
    tools:context="com.ponroy.florian.topquiz.GameActivity">

    <TextView
        android:id="@+id/activity_game_question_text"
        android:layout_width="match_parent"
        android:layout_height="0dp"
        android:layout_weight="2"
        android:textColor="@color/colorPrimary"
        android:layout_marginTop="5dp"
        android:layout_marginBottom="5dp"
        android:layout_marginStart="15dp"
        android:layout_marginEnd="15dp"
        android:textSize="18sp"
        android:textStyle="bold"
        android:gravity="center"
        android:text="Question?"></TextView>

    <Button
        android:id="@+id/activity_game_answer1_btn"
        android:layout_width="match_parent"
        android:layout_height="0dp"
        android:layout_margin="5dp"
        android:layout_weight="1"
        android:textColor="@color/colorAccent"
        android:background="@android:color/white"
        android:textSize="20sp"
        android:text="Answer1"/>

    <Button
        android:id="@+id/activity_game_answer2_btn"
        android:layout_width="match_parent"
        android:layout_height="0dp"
        android:layout_margin="5dp"
        android:layout_weight="1"
        android:textColor="@color/colorAccent"
        android:background="@android:color/white"
        android:textSize="20sp"
        android:text="Answer2"/>

    <Button
        android:id="@+id/activity_game_answer3_btn"
        android:layout_width="match_parent"
        android:layout_height="0dp"
        android:layout_margin="5dp"
        android:layout_weight="1"
        android:textColor="@color/colorAccent"
        android:background="@android:color/white"
        android:textSize="20sp"
        android:text="Answer3"/>

    <Button
        android:id="@+id/activity_game_answer4_btn"
        android:layout_width="match_parent"
        android:layout_height="0dp"
        android:layout_margin="5dp"
        android:layout_weight="1"
        android:textColor="@color/colorAccent"
        android:background="@android:color/white"
        android:textSize="20sp"
        android:text="Answer4"/>

</LinearLayout>
You should recognize some attributes, such as margin, text, or identifiers assigned to these elements. Remember that the identifiers are mandatory - they allow you to reference the elements from code and update them dynamically. There are some new ones to check out here, too.
The android:textSize attribute allows you to specify a font size.
The android:textColor attribute lets you specify which color to use for a text field or a button's text. To assign a color to an element, you can choose between three possible values:
A hexadecimal value, for example
#990000FFfor a slightly transparent blue (AARRGGBB).A resource defined by Android, for example
@android:color/white.A resource defined in your project, for example
@color/colorPrimary. You will find the corresponding value for this resource in thecolors.xmlfile located in the res/values directory.
The android:background attribute takes the same parameter as textColor , but allows you to specify the background color of any View element (button, text field, layout, etc.).
The android:textStyle attribute is used to specify the style to use for a font. You can choose between bold, italic, or normal (the default).
Finally, the last new attribute is android:layout_weight . This attribute only applies to elements within a LinearLayout. It allows us to specify the weight of one element in relation to the others. If you assign an identical weight to each element (e.g. 1), all elements will have the same size (width for horizontal, height for vertical). If you change one of the element's weight to 2, it will grow twice as large as the others.
When using the layout_weight attribute for a given element, you must specify a height or width equal to 0dp, depending on the orientation. For example, if the orientation is vertical, the height must be zero. If the orientation is horizontal, the width must be zero.
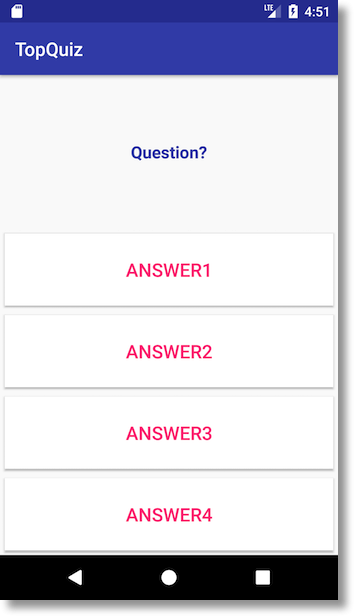
Try to vary the weight of the TextView element in the code above to see the result.
Once you're finished, you should see something like this in your preview window:
Connect the Views in Code
Now that the elements are defined in the interface, we can reference them in the code. We've done this before, so refer to the previous section for more details. But here's a quick reminder of how to connect interface elements to code:
Declare a private member variable for each item you want to reference (you should have a TextView variable and four Button variables);
In the
onCreate()method, connect each View using thefindViewById()method.
Launch the New Activity

Great, we have a new Activity, but how do we launch this thing? Remember when we began to implement the onClick() method in the MainActivity class? This method is called whenever the user presses the Play button. And that is where we will start our new Activity.
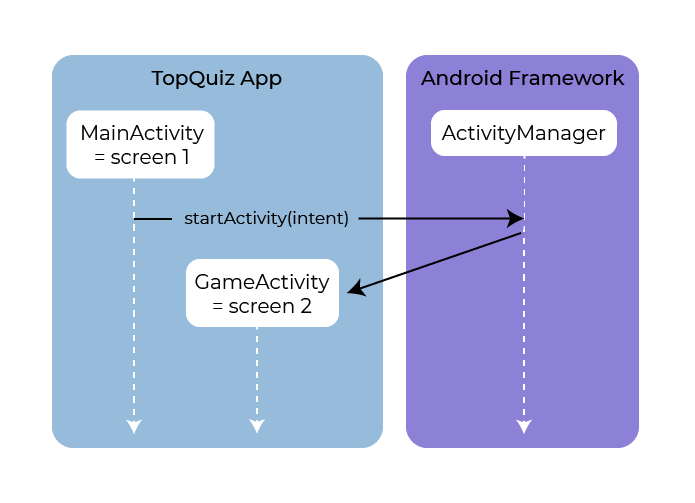
To start an Activity, Android provides the startActivity() method. This method has several signatures - the one that interests us is the following (and the simplest):
public void startActivity(Intent intent)This method allows you to communicate with the Android operating system by asking it to start a given Activity. To specify which Activity to launch, we use an Intent object. When the startActivity() method is called, the internal ActivityManager object inspects the contents of the Intent and starts the corresponding activity. This process is described in the diagram below:
We can create an Intent object in several ways. Among the many constructors of the Intent class, this is the one we'll use:
public Intent(Context packageContext, Class<?> cls)The first parameter corresponds to the Context of the application. We will use our current object (MainActivity) because all Activity objects inherit from Context. The second parameter is a class object, and when launching an Activity, the cls must be the class object which represents the Activity we wish to start.
You may think it's complicated to start an Activity, but in practice, it often requires a mere two lines:
Intent gameActivity = new Intent(MainActivity.this, GameActivity.class);
startActivity(gameActivity);
Add these two lines to the onClick() method, launch the application, click the Play button, and you will see the new Activity. To return to the previous Activity, use the back button at the bottom of the screen.
When you created GameActivity, Android Studio automatically updated the AndroidManifest.xml file located in the app/manifests directory. Android Studio added an Activity entry to the manifest. Every Activity must have a manifest entry which allows Android to find its class and launch it.
Delete GameActivity's entry in the manifest, restart the application, and try to play the game. What happens?
Let's Review With a Demo
You can see these steps in the video below:
Let's Recap!
To create a new Activity in a project, you need to:
Create the files.
Create the layout in XML.
Edit the Manifest to add an
<activity>element with its name.
The Intent mechanism allows you to launch new Activities using the
startActivity()method.
Your second Activity is now created. In the next chapter, we’ll take a look at a software architecture concept: Model-View-Controller.
