Define Your First Model
 In this chapter, we will focus on the model part of MVC. We will define and implement a model in our application, TopQuiz.
Create a Model
In our TopQuiz application, our data consists of:
The user's first name
The user's current score
The list of questions to display
The list of possible answers for each question
The right answer for each question
The model is not necessarily a single file: it can be a set of classes used to manage different data. In our case, it makes sense to create two distinct classes: one to manage user information and score, the other to manage all of the questions.
User Data Management
Start by creating a class called User, stored in the model package. To do this, right-click on the model package of your tree (assuming it exists already), then select New > Java Class.
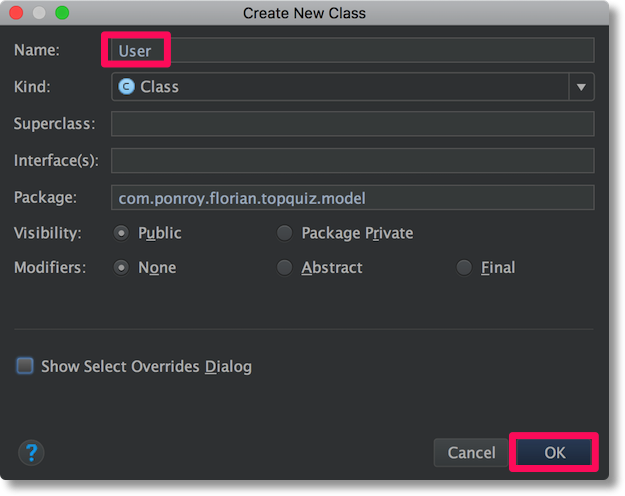
Specify the class name and leave the remaining defaults.
In this new class, add a variable named mFirstName to store the user's first name. Remember, it is good practice to prefix the variable's name to readily understand its scope. In this case, m means member. The reader will know (even without syntax highlighting) that this is a class variable.
And because first names are such classified pieces of information, we will make mFirstName private (with the private attribute). Then we need to add two public methods: one to access the value and the other to modify it (a getter and setter). In case you're writing these methods by hand, stop. Developers are lazy, right? So we'll ask Android Studio to do all this heavy lifting for us.
Place your mouse cursor on the line below mFirstName, press CTRL + Insert on PC or ⌘ + N on macOS, then select Getter and Setter. Since you have only one member variable, Android Studio selects it by default. If you had more than one, you could select every variable you wished to create getters and setters for. Click the OK button and rejoice.
Storing the Player's First Name
When the player has finished entering their first name, they click the Play button. This is an opportune moment to remember their first name in the data model.
Add a User object to MainActivity and initialize it in onCreate(). Memorize the player's first name when clicking on the button, i.e. in the onClick() method:
mUser.setFirstName(mNameInput.getText().toString());Let's Review With a Demo
You can see these steps in the video below:
Manage Questions
Like with the User class, create a Java class named Question. An instance of this class will contain a question, the four associated answers, and the correct answer. As a result, the class will contain the following three attributes:
private String mQuestion;
private List<String> mChoiceList;
private int mAnswerIndex;
The first is the question text, the second is the list of answer options, and the third indicates the correct answer's index within the previous list.
Use the build function of Android Studio to automatically create the constructor and corresponding accessors. Once these methods are generated, consider making your class more robust, in particular by making sure that the parameters are properly established. For example, verify that the response list contains at least one entry, and that the response index is between zero and the number of possible answers minus one.
Question Bank
Ideally, the questions should be different and in random order for every new game. We will create a specific Java class called QuestionBank, which will handle this list of questions for us. Here is the skeleton of the class:
public class QuestionBank {
    private List<Question> mQuestionList;
    private int mNextQuestionIndex;

    public QuestionBank(List<Question> questionList) {
        // Shuffle the question list before storing it
    }

    public Question getQuestion() {
        // Loop over the questions and return a new one at each call
    }
}
I hid the code for both methods. Try to implement them yourself before looking at the implementation on GitHub. You are free to develop it in your own way: my version is just one option.
Updating the Controller
Now that the model is available, we will be able to use it in the controller. The code we are interested in is located in the GameActivity class: this class will be in charge of displaying the questions to the user.
First, we will create the set of questions for the game and add them to a QuestionBank. If you would like to add your own questions to impress your friends and colleagues, please visit this site.
The cleanest solution is to create a method which generates the questions. Declare a QuestionBank member variable in your Activity, and add a method to return an object of that type. In this method, create as many questions as you want, add them to the QuestionBank, and return the object. For example:
Question question1 = new Question("Who created Android?",
                                  Arrays.asList("Andy Rubin",
                                                "Steve Wozniak",
                                                "Jake Wharton",
                                                "Paul Smith"),
                                  0);

Question question2 = new Question("When did the first person land on the moon?",
                                  Arrays.asList("1958",
                                                "1962",
                                                "1967",
                                                "1969"),
                                  3);

Question question3 = new Question("What is the house number of The Simpsons?",
                                  Arrays.asList("42",
                                                "101",
                                                "666",
                                                "742"),
                                  3);

return new QuestionBank(Arrays.asList(question1,
                                      question2,
                                      question3));
As a reminder, the code used to initialize the Activity is in onCreate(). All you have to do is initialize your QuestionBank:
mQuestionBank = this.generateQuestions();Let's Review With a Demo
You can see these steps in the video below:
Let's Recap!
A model allows you to store data and reuse it later on.
You can prefix the class variables with m and the static class variables with s to identify them more easily in code.
The model is implemented, and the controller is updated to use this new model. Perfect! 😎 In the next chapter, we’ll implement the game logic in the GameActivity class.
