Add custom borders to elements
Much like you can frame a picture and hang it on your wall, you can add borders to your HTML elements that frame them visually.
This element has an orange border, for example:

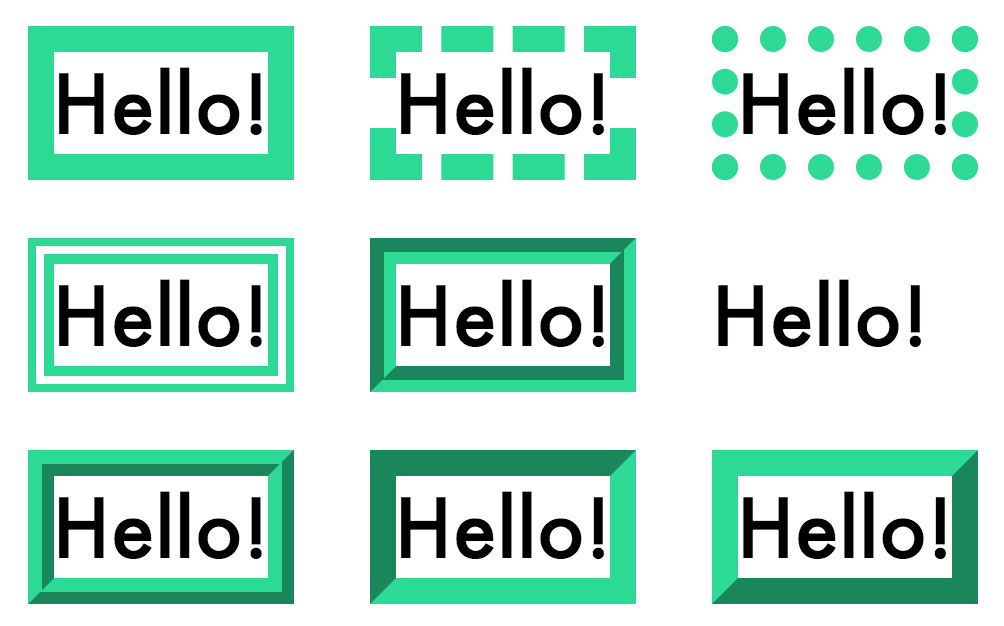
There are many different ways to adapt a border's style! Here are just some examples of what web borders in CSS might look like (you'll see all of them in this chapter!):
In CSS, you can control a border's:
width (thin, wide, 5px, etc.)
style (solid, dashed, etc.)
color (hex code, RGB value, etc.)
This results in a ton of border options that can spice up your elements.
You can also create borders around elements in either a shorthand or longhand way, depending on your preference. We'll explore how to do both in this chapter!
Border syntax
Before we look at border value examples, there are two general ways to set borders:
a longhand way where you list out each value in a different property (ex.
border-width,border-style, andborder-color).a shorthand way where you combine all values into one property called
border
Let's look at the shorthand way first. You can set borders in CSS using one simple property called border. In it, you will specify three border properties in the following order:
width
style
color
Here are three quick examples of setting borders using the shorthand method:
h1 {
    border: 5px solid red;
}

h3 {
    border: 1em dashed #A4036F;
}

p {
    border: thick dotted rgb(22, 219, 147);
}
You can also set borders the longhand way by specifying all border values as different properties. Here are the same three examples from above, written out the longhand way:
h1 {
    border-width: 5px;
    border-style: solid;
    border-color: red;
}

h3 {
    border-width: 1em;
    border-style: dashed;
    border-color: #A4036F;
}

p {
    border-width: thick;
    border-style: dotted;
    border-color: rgb(22, 219, 147);
}
You'll often set borders the shorthand way because it's faster and more concise. In the below sections, though, we'll write each property out the longhand way for the sake of clarity.
Setting border width
Border widths can be set as either pixel values, em/rem values, or using a word that CSS has already pre-defined, like "thin," "medium," or "thick."
As you saw above, the width will be the first value in the shorthand way to specify borders. However, it can also be set on its own with the border-width property.
I most often set borders using pixels, but you could also use em/rem in order to keep the border width proportional to the text. If an element has a font-size of16px, setting a border width of 1em means the border will be 16px wide. If a user has their font preferences set to a higher size, though, and you set your border size in em/rem, your border will grow or shrink accordingly (which would not happen with a pixel value).

p {
    border-width: thin;
}

p {
    border-width: medium;
}

p {
    border-width: thick;
}

p {
    border-width: 8px;
}

p {
    border-width: 1.5em;
}
Setting border style
In reality, you'll most often specify a "solid" border style. Depending on a certain style you're going for, though, you might choose a different border aesthetic. Here is the full list of possible options for setting borders in CSS:
solid
dashed
dotted
double
groove
hidden
none
ridge
inset
outset
The following image represents each border style, except "hidden." Based on the list above, guess which border style corresponds to each image below. Check the CSS code following the image to find out if you're right:

p {
    border-style: solid;
}

p {
    border-style: dashed;
}

p {
    border-style: dotted;
}

p {
    border-style: double;
}

p {
    border-style: groove;
}

p {
    border-style: none;
}

p {
    border-style: ridge;
}

p {
    border-style: inset;
}

p {
    border-style: outset;
}
You can even set specific border styles per side by using property names that specify the top, bottom, left, or right border:
p {
    border-top-style: dotted;
    border-bottom-style: dashed;
    border-left-style: solid;
    border-right-style: double;
}
This usually looks a little goofy, though:

Setting border color
Set border colors the same way you set most colors in CSS, using:
hex codes
RGB or RGBA values
color names
hsl values
If you're not sure about how to set these colors, check out this chapter on color theory from our introductory HTML and CSS course.
Like we saw with border style, you can even set a different border color per side by specifying whether you're talking about the top, bottom, right, or left border color.
p {
    border-top-color: #16DB93;
    border-bottom-color: #A4036F;
    border-left-color: #EFEA5A;
    border-right-color: #FE5E41;
}
The result looks like this:

Setting border radius
Lastly, you can also set rounded borders by using a property called border-radius using em/rem values, pixels, or percentages:
p {
    border-radius: 5px;
}
Despite all the fancy things you can do with borders, I advise you to keep your borders simple so that users can focus on the content itself.
Now, you may be wondering how to set additional space in between text and its borders. This often gives elements more room to breathe. Compare the left and right texts to see the difference:

This space is set using a different CSS property we'll see in the next chapter called padding. In the meantime, how about an interactive exercise? 👍
Your Turn
It's your turn to modify the code in this CodePen. Add a different border style, color, and width to each of the paragraph elements. One has already been done for you, but you can change it!
Recap
Each HTML element has a border.
To set the width of a border, use
border-widthand define the size with pixels, em/rem, or special CSS words (thin, medium, thick).To set the style, use
border-styleand choose a style from the list of available CSS words.To set the color, use
border-colorand use either hex, RGB, or RGBA color codes.To set width, style, and color all at once, use the
borderproperty.To set individual borders, use top, right, left, and bottom (ex.
border-top-style).To curve the corners of a border, use
border-radius.
