Refine your animations with Chrome's animation tool
Where's my palette and easel?
Throughout this course, we've built a lot of transitions and animations. And, for each one, I’ve said things like:
😀 Let’s set the duration to blah-blah seconds...
and then:
🤔 That’s feeling a bit quick/fast/slow/sluggish/blabbity blah...
followed by:
😈 Let’s make it some-seemingly random number of milliseconds faster/slower...
and finally:
😇 Now it’s feeling better/right/spot-on/a testament of perfection/insert-positive-affirmation-here.
And you might have thought to yourself:
Where on earth is he pulling blah-blah seconds from? Is blah-blah seconds really blabbity blah? But making it some-seemingly random number of milliseconds faster/slower makes it insert-positive-affirmation-here?
Really?
And the answer is….maybe? 😬
The fact of the matter is that there is actually no such thing as “right.” It is entirely relative; everyone’s a bit different. But only by a bit. As varied as we might seem, our preferences still tend to be pretty clustered. Someone might think that a menu should take 500ms to open, while someone else might prefer 400ms. But we’d probably have trouble finding someone who thinks it should take a full 15 seconds for the same animation to play out.
So, how do you make your animations “right?" How can you know what their durations should be? And when it still doesn’t feel “right,” do you know how much faster or slower they need to be?
The answer is a combination of experimentation and experience. As you gain experience as animators, designers, or programmers, you are creating and refining an innate sense of “right.” In other words, practice makes perfect. 😎
And practice could mean: plug a lot of numbers into your code, hit refresh, change those numbers, refresh again, squint at the monitor trying to figure out if it’s getting better or worse, change the numbers back, Ctrl-R, start to get antsy, change the numbers to a whole new set, refresh again, that’s looking better… maybe?
It’s taking years off of your life just talking about it. In this chapter, you’ll see how you can quickly experiment as we build an animation with the help of DevTools. 👨🎨
DevTools - demystifying animations
Chrome’s DevTools has a tool built into it that you can use to fluidly hone and polish transitions and animations. The tool is aptly named Animations.
But, before you can use the Animations panel, you need to get it open:
To open DevTools, hit Ctrl-Shift-I if you’re on Windows, and Cmd-Opt-I if you’re on a Mac. And once DevTools is open, click on the hamburger in the upper-right of the panel, go down to More tools, and click on “Animations.”

And there you have it. The Animations panel. Nothing too exciting is happening yet, but it does say that it is listening for animations, so let’s give it something to hear, and load a page with an animation on it:
There's an animated menu with the main box sliding open, and then the menu items sliding into place. As the animation plays through, a grey box wipes on, filled with some colored lines.
Fancy… and begging to be clicked on, so let’s give it a click:
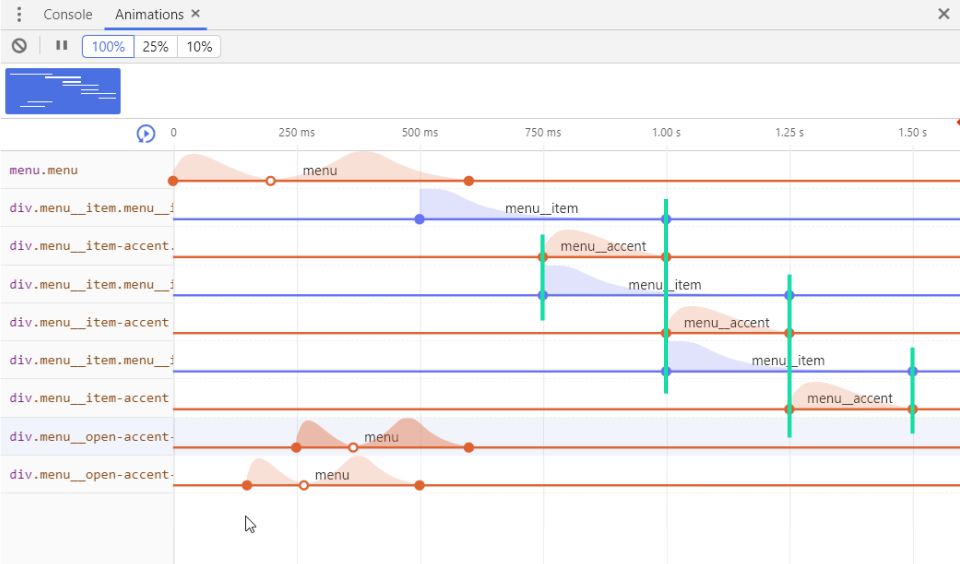
And boom! Our menu animation repeats itself, although the page hasn’t reloaded, and down in the Animations panel, a timeline of animated elements appears, with a playhead playing through the segments as the animation progresses.
What are those colored lines in the thumbnail image? It turns out that each line is representative of an animated element and gets its own layer in the timeline. If you hover over the element’s name or click its animation graph, Chrome highlights it on the page:
So, it looks like there's a menu element, with a div for each menu item, a handful of decorative elements to accent the animation, and menu items.
You can see where each animation starts and ends by each layer’s solid dots, as well as their acceleration curves (depicted as a speed graph where the peak of the profile is the maximum speed), and a static baseline.
The menu element with the .menu class applied to it starts at 0 seconds, and goes for about 600ms by the look of it. In fact, if you click on the layer, not only does the element get highlighted, its markup and styling also get highlighted in the Elements panel above:
With the styling of .menu revealed, you can see that it does indeed have an animation-duration of 600ms, as well as the default ease timing function, and a fill-mode set to both. It’s also using a set of keyframes named menu and a keyframe between the beginning and end, indicated by the hollow dot in the middle-ish of the animation.
The animations attached to the .menu__open-accent elements are still using the same set of keyframes as the main menu animation, which you can tell by the name sitting on top of the speed profile: menu. Only they have different durations and delays. Click on one and you’ll see exactly what its duration and delay are:
Scrub back and forth through the animation by click-and-dragging on the timeline. As you go through back and forth, you can get a really good idea of how the different elements are acting and interacting with one another:
And if you click on the play button located to the left of the timeline ticks, you can see the animation play through in real time:
But that’s only with the 100% option highlighted near the top of the panel. 100% indicates the playback speed. You can also choose to play back an animation at a quarter of its natural speed:
Or if you want to get some super slo-mo replay, set playback to 10% of normal speed:

In short, the animation panel can help you:
Quickly see all the pieces that go into an animation.
Gain an understanding of how they are being combined and staged to create the final product.
Figure out where things aren’t “right.”
Start to fix them!
So, beyond a better understanding of how animations are composed, how can DevTools help you improve your animations?
Let’s give the menu animation another play through:
Exciting, right? Only… no, it’s not. It’s actually (insert-negative-comment-here, which, in this case, could be stale, uniform, or boring… take your pick).
It’s not that it’s bad, but when you look at the timeline, those feelings are kinda quantifiable; everything is unfolding in an evenly incremented and procedural manner. Each menu item starts when the previous is halfway done, and their accent animations conclude at precisely the same moment. It all feels a bit too robotic and lifeless:
Okay, the animation isn’t the greatest. Got it. So, let’s hop back in the editor and change the delays and durations of the menu items, and hopefully make things look more organic.
Hopefully. But not certainly. Getting an animation dialed-in takes experimentation. And experimenting by going back and forth between your editor and browser is like trying to run through quicksand; it’s going to be a slow, frustrating experience, and you might get sucked into oblivion in the process.
So, rather than a fate of frustration and desperation, why don’t we just click and drag?
Adjusting animations - slip sliding away
That’s right, you can adjust animations simply by clicking and dragging on the elements in the timeline. Want to slow down an animation? Click on either its starting or ending dot and drag it left or right:
And just like that, the animation duration for the first menu item is changed, and the animation duration and delay values have been updated in the Elements pane.
By clicking the play button again, you’ll see that the menu now plays back using the updated duration.
So you can click and drag and tweak until things feel just right. That’s a whole lot quicker and easier than going back and forth between the browser and editor, right?
Beyond clicking and dragging the ends of the animations to adjust their durations, you can also adjust their delays by clicking and dragging the animation’s profile:
After moving an animation later or earlier on the timeline, its animation-delay value is updated in the Elements pane. And clicking on the play button will reveal the modified animation with its new delay:
But if you look at the source code, nothing’s changed. That means that if you were to hit refresh, everything would go back to the previously saved versions of your animations, and all of your tweaking would be lost!

What happens if you refresh the page at this point?
This is because when you are tweaking in the Animation panel, you are changing elements in the DOM, which is the browser’s rendering of your HTML, CSS, etc. So your changes made in the Animation and Element panels are only affecting the rendered interpretation of your code. If you want the version of your animation created in the Animation panel to persist, you’ll need to manually update your code to match.
Ugh…there’s a lot going on there. Durations, delays… that’s a lot to keep track of!
True. Thankfully, Chrome keeps track for you. Up in the Element’s tab, aligned to the right of the selector that contains the delay we just modified, is a link to its location in the CSS file. If you click it, DevTools will jump to the Sources pane and highlight it in the code. Then, if you right-click on the CSS file, you can choose Local Modifications from the context menu, which will open a Changes panel next to the Animations panel:

In the Changes panel, you can see what is called diffing. The original values are highlighted in red, and the updated values are highlighted in green in a changed property.
You can quickly see the properties that you need to update and what you need to update them to. So, once you have your animations the way you want them, you can pop over to this panel and use it to update your source code appropriately.
Assessing animations - that’s just, like, your opinion, man
Now that you know the ins and outs of the Animation panel, let’s get back to menu animations:

Right now, a few things feel off.
The menu items are coming in too late.
The menu item accents are also coming in a bit late.
The offset between the individual menu items animating in is too much. They feel like they are animating one-after-another, rather than staggered.
The duration for the menu__item animations might be too quick.
That is because the animation is filled with numbers I pulled out of my experience. They are values that I assigned, thinking they would be good starting points for the different animations. We’re not going in depth over what each animation’s durations and delays should be.
The opinions on what is and isn’t quite right are mine and mine alone. Different things might feel off/perfect to you. Instead, this is is where I am going to leave you to experiment on your own. Open the Animations panel, click, drag, tweak, and experiment to your heart’s desire. Once things are feeling just right for you, we’ll regroup and review:
Post mortem - to each their own
Back? Awesome! Hopefully you’ve got an animation that is feeling good to you. Here’s what I came up with:

On the whole, the main.menu animation is a bit slower, as are the .menu__item animations, which are now staggered more closely together.
Here is a time lapse of the process I used to arrive at the above set of animations:
The key word above being the process. Arriving at an animation that feels right isn’t something you do right out of the gate. Through experience and instinct, you can develop an idea of what animation values should be, but that’s just the starting point. From there, it’s a matter of trial-and-error until eventually arriving at a result you like.
For reference, here is the breakdown of the changes that were made to arrive at my final animation:
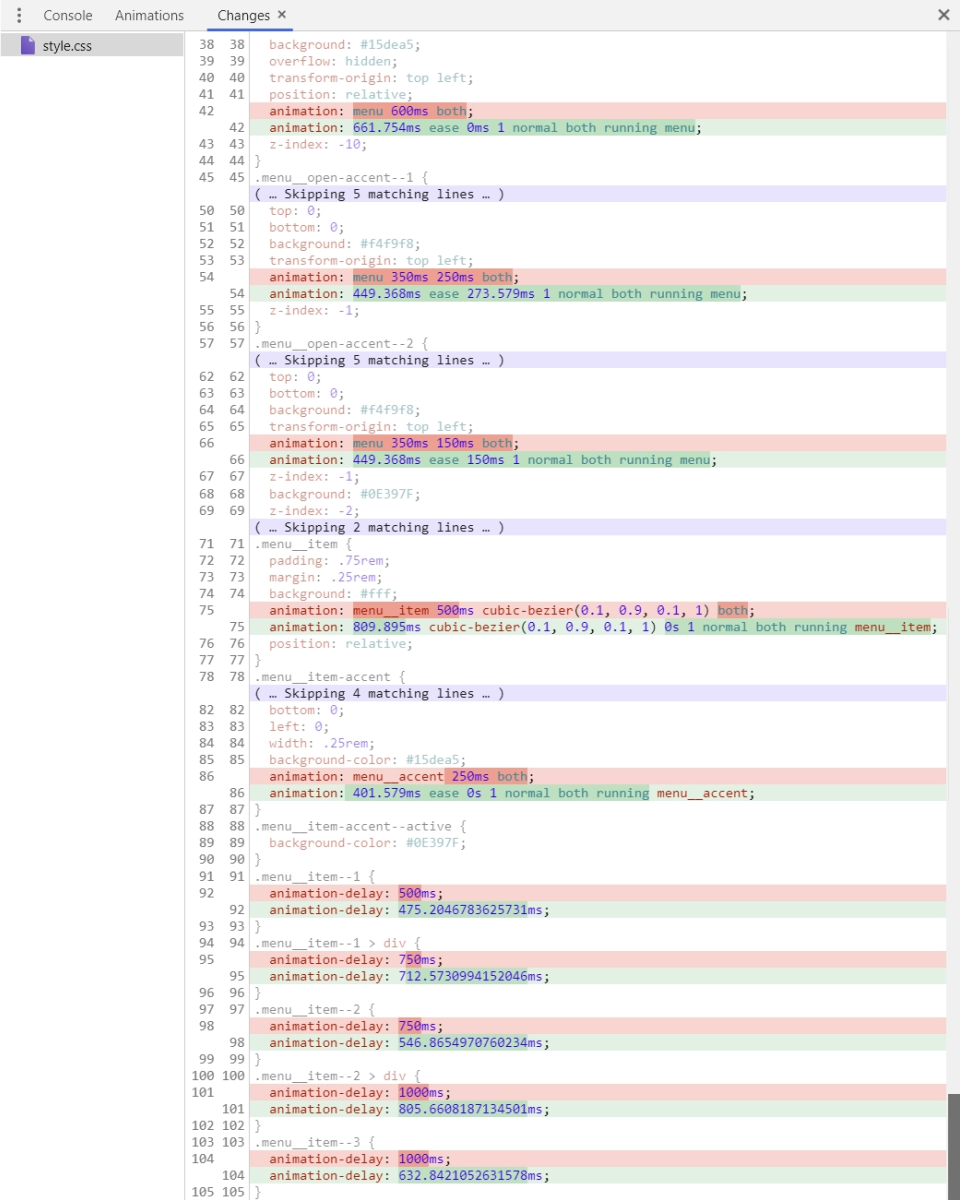
The durations have changed slightly, but the biggest differences are in the length of the delays. All of the .menu__item elements are coming in sooner, with .menu__item--1 a scant 25 milliseconds sooner, and .menu__item--3 nearly 400ms earlier.
On the whole, despite taking longer to unfold than it was originally, it feels more cohesive, sharper, and snappier to me. Here are those changes, integrated into the final code:
<div class="container">
    <menu class="menu">
        <div class="menu__item menu__item--1 menu__item--current">
            Home
            <div class="menu__item-accent menu__item-accent--active"></div>
        </div>
        <div class="menu__item menu__item--2">
            About
            <div class="menu__item-accent"></div>
        </div>
        <div class="menu__item menu__item--3">
            Contact
            <div class="menu__item-accent"></div>
        </div>
        <div class="menu__open-accent--1"></div>
        <div class="menu__open-accent--2"></div>
    </menu>
</div>
$cd-navy: #0E397F;
$cd-mint: #15dea5;
@mixin menu__open-accent($dur, $delay) {
content: "";
position: absolute;
left: 0;
right: 0;
top: 0;
bottom: 0;
background: #f4f9f8;
transform-origin: top left;
animation: menu $dur $delay both;
z-index: -1;
}
.menu {
min-width: 33vh;
display: flex;
flex-direction: column;
justify-content: space-between;
padding: 1rem;
background:$cd-mint;
overflow: hidden;
transform-origin: top left;
position: relative;
animation: menu 661ms both;
z-index: -10;
&__open-accent--1{
@include menu__open-accent(450ms, 275ms);
}
&__open-accent--2 {
@include menu__open-accent(450ms, 150ms);
background: $cd-navy;
z-index: -2;
}
&__item {
padding: .75rem;
margin: .25rem;
background: #fff;
animation: menu__item 810ms cubic-bezier(.1,.9,.1,1) both;
position: relative;
&-accent {
content: "";
position: absolute;
top: 0;
bottom: 0;
left: 0;
width: .25rem;
background-color: $cd-mint;
animation: menu__accent 400ms both;
&--active {
background-color: $cd-navy
}
}
&--1 {
animation-delay: 475ms;
> div {
animation-delay: 712ms;
}
}
&--2 {
animation-delay: 546ms;
> div {
animation-delay: 805ms;
}
}
&--3 {
animation-delay: 632ms;
> div {
animation-delay: 914ms;
}
}
}
}
@keyframes menu {
0% {
transform: scale(0,.07);
}
33% {
transform: scale(1,.07);
animation-timing-function: cubic-bezier(.73,.01,.2,.99)
}
}
@keyframes menu__item {
0% {
transform: translateX(-110%);
}
}
@keyframes menu__accent {
0% {
transform: scaleY(0);
}
}Your code might look similar, or very different. Either way, you’ve created an animation that feels right to you, and the only way to know if it works for others is to put it out into the world, listen to what people have to say, and then apply their feedback. Because this is the start of a journey.
Creating an animation not only checks off an item on a deliverables list, but it also builds and improves your aesthetic as an animator. Every keyframe, every tweak, every failure builds you up to be more successful in the future. Each and every animation you create makes you better at your craft.
You are an animator now. You bring websites to life.
How cool is that? 😎
All that remains in this course is the final activity! But before you dive into that, here’s a final exercise to help polish your animation skills.
Let's recap!
The key to great animations is refinement. Plugging in some numbers and hitting save is rarely enough.
Through experience, you can gain an idea of a good starting place for animation property values.
The Animations panel in DevTools lets you quickly and fluidly refine animations, allowing you to riff and experiment until you find just the right duration or delay for an element.
The Changes panel lets you see the properties that you've tweaked and what their new values are, so you can update your source code to match.
