
How do you know you're building quality software? How can you be sure that you can deliver what clients want and need? Do you want to minimize bugs, errors, and other issues that drive users and software developers crazy? Testing is the answer, and it goes beyond just checking your work - it drives software design.
The course will take you on a journey through automated testing, where you'll build and test your very own application. You'll find out why you test, how to choose tests using the testing pyramid, and write unit tests, integration tests, end-to-end tests, and acceptance tests using JUnit annotations and test-driven development!
You'll learn how to get fast feedback and sufficient coverage from your tests so you can release an application out into the world with confidence! Ready to build quality applications? Let's dive in!
Meet your teacher: Raf Gemmail
I am a proven technical leader, Agile coach, solutions architect, and full-stack polyglot with a Java engineering core. I have an outcome and a customer-centric mindset, with a history of helping both small and well-known organizations to design and deliver high-impact and data-intensive solutions.

I’ve been building software my whole life and have been fortunate enough to work with organizations such as the BBC and Booking.com. As a practitioner of London School TDD, I have led and coached many developers on their journey through making all delivery about what we have traditionally called testing. I look forward to helping you get started as well.
Write effective unit tests by using test automation best practices
Get the most out of this course
Welcome to this course on testing your Java applications. Before you dive into the content, check out some tips on how to get the most impact for your learning:
To summarize, the best way to get the most of this course is to:
Watch each video to understand why the concepts covered in each chapter matter.
Read the text below the video to learn how you can implement those concepts.
Practice along by following the step-by-step screencasts.
Test your understanding of key concepts through the end-of-part quizzes.
Get hands-on practice creating your own project through the peer-to-peer activity!
Use the testing pyramid to choose the right automated tests
What are tests?
Mistakes happen, especially when we’re “in a groove” or trying to get things out fast. Taking the time to check what we have done, especially in development, ensures that we’re sending out a quality product. It can also save us some embarrassment.
Take the case of the Ariane 5 rocket, which took rocket scientists 10 years to build 🚀...and exploded 40 seconds after launch. 😱 During the launch, a conversion error between two software programs occurred. And BOOM! 💥 Can you imagine what it felt like to be that engineer?
A little extra testing would have saved $7 billion.
I get what testing is in theory... but what does it mean when we're working with code?
Testing is how developers check that their software behaves as expected and solves the right problems. You can think of it as a team sport, where developers and everyone involved in building an application pitch in to ensure quality. But what do tests look like?
Manual tests versus automated testing
For much of the short history of software, many teams used manual testers (people) who are responsible for the quality of an application by checking running software as they use it.
Sounds pretty good to me. Isn’t that enough?
Since people can only do one thing at a time and occasionally make mistakes, manual testing is often slow and unreliable. It's also not very practical since nowadays many teams release a new version of their software several times a day.
The alternative is creating custom programs which run and check code in many different ways. We call these automated tests. Since this is code, it’s fast and can be run over and over again in seconds! There are many different types of automated tests which you can choose between, each with their own pros and cons.
Types of automated tests
The three most common types of automated tests are unit,integration, and end-to-end, as represented in the testing pyramid below. The testing pyramid was first introduced in the early 2000s by Mike Cohn, one of the founders of the Agile movement.

As you can see, there is a higher volume of tests at the bottom of the pyramid, followed by progressively fewer as you climb to the top. The tests take longer to run as you go up the pyramid but provide more comprehensive, realistic coverage. Let’s check out the value of each one!
Unit tests
The biggest section at the base of the pyramid is unit tests that test small units of code. More specifically, they check that each individual class keeps its promises.
These are extremely quick, which means you can run a lot of them without having to sit around and wait for results. If you’ve broken something, you know about it fast and early. Since they only test individual units of code, they can’t tell you if everything in your app is working together correctly. And that’s where some of these other tests come in.
Integration tests
The next step up on the pyramid, integration tests, are slightly slower than unit tests, so you don’t write quite as many of them. Integration tests check if your units (classes) are working together as expected - assuming your unit tests are correct, of course! Since integration tests check interactions between units, you make fewer guesses about how well the final application will work. You sacrifice a little speed for realism.
End-to-end or system tests
These are the slowest tests but simulate reality more accurately. They eliminate any remaining risk by proving your application works with users in the real world (assuming your classes and their integrations are correct). For example, these tests could check whether users can switch your application on or achieve a goal. You only want a few of these tests here, as the higher up you go, the slower your tests.
Isn’t accuracy more important than speed?
The time it takes tests to run impacts their value and the cost of mistakes. Slower feedback from tests, like those from the top of the pyramid, has a real dollar value. It also means developers have to wait a lot longer to find out if they’re on the right track. That’s pretty frustrating!
For something to be checked with an end-to-end test, it has to be usable by a real user. It needs a UI or some other interface into the world. That’s where end-to-end tests run! If you were adding a new feature to your app and waited for this test, it would mean that you would have to write all the classes, integrate them with the existing ones in your app, and put a user interface in front of them. That’s a lot of work! 😅 If your test fails, some bad assumptions might have been turned into code. Fixing this will need a lot more time and work than fixing a mistake you find while unit testing!
The testing pyramid is a guideline that helps strike a balance between testing speed and code confidence. When you release software, you want to reduce the risk of introducing new bugs which break it and impact your users (or spaceships 😉). The lower this risk, the more confidence you have. By following the testing pyramid, you’ll be able to provide cleaner, faster, and overall well-tested code.
What should you test for?
Knowing about tests and tossing a few into your code isn’t enough to provide real confidence that your programs will do what they should. Let’s go back to the Ariane 5 rocket failure. Do you think they didn’t test? Of course they did! It was tested for years! But no one thought of testing that particular issue.
Test for the unexpected
Why do mistakes like that happen? When you think of a problem you want to solve with software, it’s easy to imagine a happy path. This is where the software is used just the way you’d expect, without any issues.
For example, a user might click through your app in the right order, where nothing goes wrong and ends up with a fantastic result. Or, in the case of Ariane, a rocket blasts off perfectly, or within some expected margin for error!

However, reality doesn’t always fit in with your plans. There are always going to be sad paths. When the Ariane rocket blew up, it was down to an unexpected bug which caused something bad to happen.
In fact, there will always be more sad paths than you can think of. Maybe a literature student accidentally pastes the collective works of Shakespeare into a form, or the network goes down.
But how do I make sure my application will work if I can’t think of every sad path or bug?
If you test for the more likely ones, you’ll reduce the risk of something unexpected happening, and you’ll get fewer bugs creeping in through your vents. To ensure that your software solves its target goals, your tests must check a mix of both happy and sad paths.
You can make sure they do by working with the people on your team who also care about the problem you’re solving to identify those happy and sad paths. Get together someone to think about testing, someone to think about engineering, and a product owner.
It doesn’t have to stop there though! If you still have doubts, bring in real users and other experts if you can. To make sure that everyone gets it, try and create some examples of how your application would behave in different situations. It’s easy to misunderstand small details when you work by yourself. So, talk to people!
From this, you write test cases together. Test cases just say what you would expect to see when something happens in your software. An example of this would be: “When pressing the convert button, the user should see the price in dollars.” You can then test your application by comparing what you expect with actual results.
Test to make maintenance easier
Even if you miss some important test cases, having a good amount already in place can make fixing and maintaining code a lot easier. For example, I once led a team which built a video player for a large news site. We tested our application really well, and eventually released it. Except that users soon started complaining that their mobile data was being used up when they hadn’t watched any videos. It turned out that our helpful player downloaded the videos even when they weren’t being watched. We hadn’t tested for this!
With the example above, we were able to quickly fix the video player as we had existing tests which would tell us if any of our new fixes had broken something in the existing code. This gave us the confidence to release a fix, knowing that our player would still work.
Test to communicate
There were a number of developers who worked together on this player, and they used their tests to help them communicate. Yes, tests can help you communicate!
When you’re in the middle of building software, you have a deep understanding of the code, what it’s supposed to do, and how you’d check it. You also think of new things to look for, like negative numbers or dates in the past. It’s a little like being engrossed in a book - you know the context and importance of every interaction in the story. But if you were to take a random page and give it to someone else, they’d have no idea what was going on. It’s the same thing with code. Imagine if you got transferred to a different city, and another developer had to finish writing your code. Where would they even start?
Well, your test cases will describe how people expect the software to behave. Reading your tests not only captures what your code is supposed to do but also how it works and how much of it works. If you write tests, another developer - or even ‘future you,’ if you pick up the project back up months later - will be able to understand what you were trying to do, and be confident about making changes to the code you were writing.
In other words, in a professional environment, testing is more than just a way to fix code - it’s a whole mindset. 🕶 In fact, in the next chapter, you’ll see how to integrate that mindset into how you code.
Let's recap!
The test pyramid provides a pattern to help you write tests which give you confidence in your code as you make changes.
Test automation reduces the need for manual checks and when done right, can give you the confidence to fully automate the release of your software.
Unit tests check classes quickly and thoroughly to make sure they keep their promises.
Integration tests check that the classes and parts of your application which need to work together, do so by collaborating as expected.
End-to-end tests check that users would be able to solve their problems by using your app when it’s switched on. For a web application, you’d automate this with code which pretends to be the user clicking about within the user interface.
We’ll cover each of these in more detail within the coming parts. Now you're ready to get started with your first unit test in the next chapter!
Write your first JUnit test using TDD
Where do you even start?
Now that you know a little about unit testing, let’s write one! How do we do this? Well, with complex applications, the main concern is focusing on the system under test - in other words, the thing being tested!
Um...What is a system under test? 😮
Have you ever gotten your eyes tested? You’re usually plopped into a seat with a built-in gadget and with a big chart full of letters in front of you.

The optometrist will ask you some questions, have you read the chart, check our eyes using gadgets, give you a prescription, and send you on your way. They don't switch or change the distance of the chart or install a different gadget on the chair. Everything is set up and ready so they can focus on running their test, not on how it’s done. (You're the thing being tested! 😉)
It's the same thing with unit tests. The class you’re testing is your SUT. You use testing frameworks to help focus on your SUT so that running and reporting on the automated tests is handled by the framework.
Set up your build tools and frameworks
Before we can test, we’ll need a Java project. Let’s create one!
I’m going to show you how to write JUnit tests by building a very basic calculator. We’re going to start off by creating a class which can add two numbers, and we’ll do this by writing our JUnit tests first! So let’s get started and create a new Java project. See if you can follow along!
As you saw we had to make sure that the build tool Maven knew about JUnit before we could use it as we’re introducing third-party code which our own code uses. These are called dependencies. In the screencast, when we told IntelliJ to add a Maven dependency on JUnit, it updated a special file called pom.xml. Maven uses this to decide which version of JUnit to use and make sure that we use it only for testing. You should now also be able to run your tests outside of an IDE by typing.
mvn test
Get your files in order for JUnit
To create a unit test with JUnit for a class, you’ll start by creating another class. This new one will hold all of the tests you’ll use to check your original. This is usually created under the src/test/java folder of your project, and the test class is named after the one being tested. So, you'll find all the tests for the Calculator class in CalculatorTest.
Structuring your first unit test
Now that everything is set up to test, how do you actually do it? Well, you have to set up a test within the JUnit framework:

Let's walk through each of the steps in the image one by one:
Step 1: Import JUnit annotations
To turnCalculatorTestinto a new JUnit test, start by importing JUnit’s@Testannotation with the following code:import org.junit.*;.
Step 2: Place
@Testin front of a method
To create a test with JUnit, make a new class and add the@Testannotation above each method which performs your test.Step 3: Write a descriptive name
The method name should clearly describe what is being tested. It’s important to give your tests a name which describes what the test is checking for.
How do you actually structure the content of your tests? To write reliable tests, it makes sense to follow the popular acronym, AAA. (This has nothing to do with automobiles. 😉) It stands for arrange, act, and assert. The goal of this structure is to keep tests independent and avoid interfering with one another. And guess what? We're going to act, arrange, and assert as our next steps:

Let's go through each of the steps in the image above:
Step 4: Arrange - Set up the class under test
Arrange is another way of saying set up. When you write a unit test for a class, you start by setting up an instance of the class you are going to test. Do this by callingnewon it. This is called your class under test(CUT), or in other words, the thing you’re testing!Step 5: Act - Call the method you’re testing
Now that you’ve got your test arranged, you’ll act on this. Basically, you prod at it with your testing wand by calling its methods. The methods should do something which you can check for, or return a result.Step 6: Assert - Check the result with an assertion
Now that you know what you’re checking, you assert your expectations. You want to compare an expected value with the actual value returned by the method you’re testing. If they match, your test passes. If they don’t, you fix it so they pass. You do this by adding an assertion!
An assertion is a statement which calls out what you think should happen in your test. If an assertion does not turn out to be correct when the test runs, then it fails. It also fails the whole JUnit test. It's best to have only one assertion per test. This way, you immediately know which assertion is failing and can focus on fixing one thing at a time.
Now, that you know what the steps are, let's take a closer look at that image again:
In the image above, the result of calculatorUnderTest.add(1,1) is compared with the number 2 using assertEquals. Here, you’re testing the assertion that two values are equal. This is just one of the assertions JUnit makes available when you import org.junit (like in Step 1). assertEquals simply tests that the returned value from calculatorUnderTest.add(1,1) is the same as the value you expected to get back.
Okay, it's set up! But how do I run it?

Whether you’re using IntelliJ or Eclipse, you can now right-click on the test name and select Run. The above example was run using IntelliJ. Have a look at the green tick. Can you tell what it’s testing? 😎 Adding two positive numbers correctly! And it looks like the test has passed. ✅
Had the assertion failed because the add method was buggy, you would have seen something like:

You can see that the test failed (It has a round cross beside it) as the Actual (0 in this case) didn’t match the Expected value (2).
Using TDD: red-green-refactor!
You might have noticed that we started writing tests before anything else in the code. This follows a technique called test-driven development, or TDD. Using this technique means the code you build remains focused on passing those tests. Did you notice how writing the test before the code allowed us to describe what the add method would look like? From there, we just had to allow our IDE to create it for us. 🙃
Okay, I get the gist from what we did, but how exactly does this work?
Kent Beck, the creator of TDD, introduced many developers to the following pattern:

In this pattern, you loop through the following steps:
Write a failing unit test. 🔴
Write the code to make the test pass. ✅
Clean up the code without failing the tests. 🔶
Write the next test and repeat! 🔄
This is called red-green-refactor. Failed tests are described as red. Much like a traffic signal, red tells you to stop and make your code work.🚦When they pass, they are green. Green tells you to go and refactor. This simply means that you can try and make your code more readable or elegant without changing the way it behaves.
Because the test is already in place, it lets you know right away if you break any behavior, ensuring that you’re always focused on functionality first.
It turns out that if you write your code after your test, that code is easier to test. That’s because it’s made to be tested! Testable code is usually clearer code. Remember, try and keep your tests focused on one thing. As you write a focused test for each class, TDD encourages you to build software out of lots of little classes, each doing one thing well. This adds to the clarity of the code. It’s easier to follow one thing than 50. 😛
As you test software, you also learn about the code you need to build to pass those tests. This also shapes a minimal and modular design, meaning that your code isn’t clumped together in a few classes. Modular code is flexible and very easy to change. Why should you care if it’s easy to change? Any software you build at work will last for many years and continuously change as your users’ needs also change. This keeps you in a job! TDD makes the job easier. 😎
Try it out for yourself!
Have a go at adding a Calculator.multiply method! Remember to write your test first and make it go red before you write the code! You can clone the repository and add your own code to it!
git clone https://github.com/OpenClassrooms-Student-Center/AchieveQualityThroughTestingInJava.git
git checkout p1-c3-sc-1-to-3
Or use your IDE to clone the repository and check out the branch p1-c3-sc-1-to-3. You can now explore the examples from the screencast and try running the tests with mvn test.
Let's recap!
JUnit is a testing framework which helps you focus on validating classes.
To use JUnit, you need to add a testing dependency to your build tool.
Build software using red-green-refactor where you:
Start with red failing tests which describe what you plan to build.
Make the tests pass and go green by building the code in the most direct way.
Improve the readability of your code by refactoring it without breaking the test.
Now that you've got the basics down, let's make our tests more understandable in the next chapter!
Use TDD and Hamcrest to write easy to read code
Imagine you have a group of friends coming over, and you decide to order pizza. Before you proceed with the order, you might ask yourself: How many people want a pizza? What type of pizza do they want? Does anyone have special requirements, such as vegan or no tomatoes? How do you know which pizzas to get? Keep in mind, it might take half an hour for your pizza to get there. You’re all starving, so you don’t want to have to send it back and wait even longer. What do you do?
You could play it safe and buy more than you think you need, but you’ll spend way more money, have to wait longer for the pizzas to be prepared, and risk your friends not liking what you ordered. The longer you wait to find out you’ve ordered the wrong pizzas, the hangrier everyone will get. 😩 If you ask your friends what they’d like, there might be some upfront squabbling, but at least you won’t have to send any pizzas back.
Software is the same. There’s nothing so soul destroying as investing days in writing software which ends up needing to be re-written because it didn’t do the right thing. In other words, ordering the wrong pizza. 🍕The users of your software also lose out as they have to wait for even longer for their feature. How do you avoid these issues?
Use TDD to avoid the costs of misunderstandings
Test-driven development (TDD) helps you avoid this. As you saw in the last chapter, with TDD, you create a new automated test before writing your code. To avoid confusion about what the software should be doing, it is important that your tests clearly explain what they are testing. This keeps your focus on solving one problem at a time and helps others on your team understand what are trying to achieve!
Why should I do it that way?
Lots of studies have shown that it is hundreds of times more expensive to fix a bug, the later it is found.

Using TDD to communicate what you’re testing, catches bugs while you are still coding. Sometimes before you even turn on your PC. TDD can save you from coding the wrong thing, or misunderstanding a test case.
This makes sense, right? If you find out that your code is wrong as you’re writing it, you can fix it immediately. TDD helps you to do this by making your test cases readable to others and starting you off with the confidence that your code does what it’s supposed to! If it takes a year to find out that your application has mistakes, you might have to go on a bug hunt through the whole codebase! This will take much longer!
How can I make my tests meaningful enough to help avoid mistakes? This is code, right?
Writing easy to read tests with Hamcrest
Did you notice how the test in the previous chapter used JUnit’s assertEquals? Would you ever say "assert equals" in everyday life? Ever?
You: "Can I assertEquals that you're in good health?”
Your friend: ... 🤷🏻♀️
Would you assertEquals that the way we're talking is very robotic? Hey, people don’t talk like that! So why should your tests?
You want the tests to express what your software should be doing! Tests are tools for communicating with yourself in the future, as well as with others. If you understand how it should behave, then you know if it works!
You might be thinking that this is just code though. How are you supposed to get any clearer in an artificial language? There is a popular library called Hamcrest, which many Java projects use to make their test assertions a little more natural to read than JUnit’s assertions. It is designed so that your code flows naturally, and more closely resembles spoken language.
You can see the difference between Hamcrest and JUnit’s assertTrue in this example. assertTrue will only pass if the value you pass it is true. Let’s compare it with Hamcrest’s more expressive language:
Test case: A name is between 5 and 10 characters long. | ||
JUnit Assertions | Hamcrest | |
IN CODE |
|
|
READ ALOUD | “assertTrue name length greater than four and name length less than 11” | “assert that name length is greater than 4 and is less than 11” |
While JUnit assertions might look shorter, Hamcrest’s (aka matchers) read more naturally. You can describe simple and complex tests by putting them together in different orders, like the words you use every day. Having a rich vocabulary helps you express your ideas clearly. TDD is like thinking out loud when using matchers.
Let’s use Hamcrest to do some TDD!
Are you ready to have a go at using Hamcrest? Remember that test from the last chapter? Our calculator’s add method was tested with an assertEquals comparing two values. Let’s now add multiplication to the calculator:

Try reading this aloud. 🙄 Fortunately, Hamcrest has got our back here!
</p>
You’ll get Hamcrest’s most important matchers for free as they are included with JUnit 4. They just come together. If you use JUnit5, you’ll have to add a dependency for it as it’s no longer built into JUnit. Most projects still use JUnit 4 though.
Did you see the way we added more expressivity by combining the is matcher with the equalTo matcher? In the previous example, we also put an and matcher with isGreaterThan and isLessThan matchers. Hamcrest helps you express what it is that you intend to test. This helps to keep you focused.
Let’s be honest. The language is still a little robotic, right? You can’t get away from this since Java is a programming language. The important thing is that you have a language which flows and can be used to describe your intent a little more naturally.
Let me give you some other examples. Imagine I had a set of animals and wanted to test that it contained cats and dogs.
I write: assertThat(animalSet, hasItems(“cat”, “dog”)) or assertThat(animalSet, contains(“cat”,“dog”).
How natural it sounds is down to the matchers you use. These are just two of the many matchers provided by Hamcrest. They come in all shapes and sizes with lots of different vocabulary. Some of the more useful ones are:
Matcher | Example | What happens when your test fails? |
is() - Compares two values | assertThat(“a kitten”, is(“a kitten”) assertThat(“a kitten”, is( equalTo(“a kitten”)) | Expected: is "a dog" but: was "a kitten" |
equalTo() | assertThat(“a kitten”, equalTo(“a kitten”)) | Expected: "a dog" but: was "a kitten" |
not() | assertThat(“a kitten”, is( not( “a dog”) ) | Expected: is not "a kitten" but: was "a kitten" |
both(..).and(..) | assertThat(“a kitten”, both(is(“a kitten”).and(endsWith(“n”)) | Expected: (is "a kitten" and a string ending with "dog") but: a string ending with "dog" was "a kitten" |
Let's recap!
Test-driven development keeps your focus on solving one problem at a time.
By describing tests using clear language, you can catch any misunderstandings early.
The later you catch a defect or misunderstanding in your code, the more it will cost to correct.
Hamcrest matchers provides more readable assertions. You can put these together in different ways to clearly express what you are testing for.
Proper naming helps make our code easy to read and understand, but so do annotations! Intrigued? Find out more in the next chapter!
Create more powerful tests using JUnit annotations
“No cameras!” 📸 Has anyone ever said this to you?
Have you ever gone into off-limits areas at a museum? 🚫 Have you taken a picture where it wasn’t permitted? How did you avoid parking in the chief curator’s parking slot? Signs, right?
Signs can save you a lot of trouble by helping you do the right thing. Java also gives special signs called annotations which help you tell your code how it should behave. They start with an @ and each has its own special meaning.
You’ve already seen one! @Test is a JUnit 4 annotation which can be put before a method. With @Test, JUnit will immediately know that of all the methods in that file, this one is supposed to be run as a test. It will take the name of the method and make it the name of the test.
There are many useful annotations which come with JUnit, and I’ll introduce some of these to you. They can help make your tests super powerful and save you lines of code! To use these annotations, drop them into your test class, a little like putting up a new sign in a museum.
Let’s annotate!
I bet you’re dying to see JUnit’s annotations in action! Let’s dig in!
We’re going to add a few annotations to our CalculatorTest. The test class should be named after the class under test (CUT). Since we’re testing a calculator, let’s walk through a CalculatorTest which uses the basic annotations of: @BeforeClass, @AfterClass, @Before, @After, and some special spins on the @Test annotations:
public class CalculatorTest {
    private static Instant startedAt;
    private Calculator calculatorUnderTest;
We have added a static variable and class field to use in the example above. Now, let's check out @BeforeClass:
@BeforeClass
public static void beforeClass() {
    //let's capture the time when the test was run
    System.out.println("Before class");
    statedAt = Instant.now();
}
@BeforeClass will cause a method to run once before our first test. In this example, we store the time when the tests were loaded. Next is @AfterClass:
@AfterClass
public static void afterClass() {
    // Not the way to do it.  Just illusrating @AfterClass
    // How long did the tests take?
    Instant endedAt = Instand.now();
    Duration duration = Duration.between(startedAt, endedAt);
    System.out.println("Tests took" + duration.toString());
}
@AfterClass marks a method to be run once after our last test has completed. This will run even if the tests fail. Here we measure how long it took to run the tests.
Next is @Before:
@Before
public void setUp() {
    // Recreate the calculator before each test
    calculatorUnderTest = new Calculator();
    System.out.println("Before Test:" + Instant.now());
}
@Before marks a method so it can be run before each @Test. Here we make sure that we’ve created a new instance of Calculator.
Now we've got @After:
@After
public void tearDown() {
    // set calculator to null after each test
    calculatorUnderTest = null;
    System.out.println("After Test" + Instant.now());
}
@After marks a method to be run as soon as JUnit has finished running a @Test. This is often used to clean up things done in @Before. You’ve already seen the @Test annotation. Let’s look at some options to make testing even simpler:
As you saw, the assertion to test for an exception can be passed directly to @Test. Use the expected argument as well as the value of the exception class you expect to see being thrown.
@Test(expected=Exception.class)
public void add_returnsTheSum_ofTwoPositiveNumbers() throws Exception {
        Double expected = 3.0;
        Double sum = calculatorUnderTest.add(left:1.0, right:2.0);
        assertThat(expected,is (equalTo(sum)));
        //prentend this was from your code!
        throw new Exception ("We expect an Exception");
}
@Test(expected=<Exception.class> ) passes some options to @Test which allow you to test sad paths where you expect a particular exception to be thrown.
Let’s look at how tests can let you know if the methods they are testing suddenly become too slow:
As you saw, you can pass @Test the timeout argument with a value of the time, in milliseconds, which the test should not exceed. That way, your tests will tell you if you ever put a slow algorithm into your code!
@Test(timeout=1000)
public void add_returnsTheSum_OfTwoNegativeNumbers() throws Exception {
        Double expected = -3.0;
        Double sum = calculatorUnderTest.add(left:-1.0, right:-2.0);
        assertThat(expected, is(equalTo(sum)));
        // Let's timeout our test
        Thread.sleep(millis:2000);
}
@Test(timeout=1000) fails the test marked with this annotation if it takes longer than 1000ms (1 second). Can you see that the test is rigged to fail?
This is what happens when you run it:

Try and match up the printed messages (e.g., before class in the right panel) with the steps in the code above. Can you see which test failed?
It's your turn now!
Check out the repository and try running these tests for yourself.
git clone https://github.com/OpenClassrooms-Student-Center/AchieveQualityThroughTestingInJava.git
git checkout p1-c5-sc2-to-sc3
Or, use your IDE to clone https://github.com/OpenClassrooms-Student-Center/AchieveQualityThroughTestingInJava.git and check out the branch p1-c5-sc2-to-sc3.
You can now explore the examples from the screencast and try running the tests with:
mvn test
Let's recap!
JUnit’s annotations help you write clearer tests without unnecessary repetition.
Some common annotations are:
Annotation | When to use it |
| If testing method which should not be too slow, you can force it to fail the test. |
| Use this annotation to test if your class throws an exception. Don’t use try/catch to test for it. |
| Run a method prior to each test. This is a great place to set up or to arrange a precondition for your tests. |
| Run a method after each test. This is a great place to clean up or satisfy some post-condition. |
| Mark a static method so it runs before all your tests. You can use this to set up other static variables for your tests. |
| Mark a static method as being run after all your tests. You can use this to clean up static dependencies. |
Now that you know how to do unit testing, let's make it even easier by adding some effective plugins...in the next chapter! See you there!
Improve code confidence with build tools and test report plugins
Even with all this testing, how can you be sure you’re building quality software?
You do TDD, right?
Nice! Can you think of anything else you’d want to be sure of before claiming to have written high-quality code?
How about that other developers don’t have trouble reading your code? Or that you haven’t let a bug creep in between your tests? What about being sure that you haven’t chosen to use a dependency with known security issues? Do you want to be sure that you’ve tested enough to be true to the testing pyramid?
I’m sure that you answered "yes" to all of these questions. 😉 Fortunately, Java has been around for a while and has a bunch of tools that let you automate solutions for these issues. You can run automatic checks as part of the build. This goes beyond just automating your tests: you can add checks on the quality of your code and your tests!
With each small change you push out, the software then gets built automatically in a continuous integration environment, and checked!

This environment is usually, in some form or another, another computer dedicated to proving that all the tests and quality checks pass somewhere other than on local desktops (3). When things don’t work out, it helps to have reports to look at (5) - and we'll show you a few good tools for doing that in the sections below. You can use these to communicate with other experts and make your whole team aware of what has broken. We’re all responsible for the quality, right?
If things don’t work out, it is called breaking the build. A crime punishable by having to buy doughnuts! 🍩 Remember that you’re always working in a shared codebase, so breaking something in your codebase, breaks it for everyone. You should only release your code into the world when everything runs without breaking the build (6).
So, ready to check out some build tools and report generating tools? Or do you really want to be the one bringing in doughnuts to the office? 😉
Build tools
When you create a new class in Java, you’re just editing a regular text file with a .java at the end, and writing inside. IDEs are very good at telling you if there’s anything wrong with your use of the Java language, but they don’t really run that .java file. Java is a compiled language and needs the JDK‘s compiler to build the .java files into .class files, with instructions the JVM can efficiently run. In other words, since the build is done on your computer, you can only be sure that it works on your computer.
How can I be sure that it can be built by any other developer on my team? Or on any other computer?
You use build tools like Maven or Gradle that let you list which dependencies your code needs (E.g., JUnit v4 or Spring v5). It then compiles your code and runs your tests. Finally, it can package .class files so your working app can get shipped.
Any developer with access to your project and the same build tools can then build, test, and package your code. So the build tool runs your unit, integration, and E2E tests for you! 😀Wouldn’t it be great if it also ran those other quality checks we talked about? Stuff to make sure that your tests and code are well written? You guessed it. Both Maven and Gradle can do this, via some seriously cool plugins.
Configuring Maven can be an art in itself and there is a lot of fine documentation out there; however, that shouldn't stop you having a look at a project and some of the plugins you can use to report on the overall quality of your software.
Let's check it out:
It gets even better. Many of these tools come with useful reports and dashboards. This helps your whole team measure and understand the overall quality of your software. Many of my teams have even had large screens in our work area, displaying the health of our build.
Let's continue with that example code and see what the reports look like and where they live:
As you saw, we used a range of plugins to create a variety of reports. Let's look at them and why they are useful.
Surefire
If you’re using Gradle, just running Gradle test is enough to generate an HTML report. With Maven, you use the Surefire plugin to report on your tests and make an HTML report. This is great because you could put it on display for your whole team, and if something breaks, everyone will know about it!
Maven creates an XML report when your tests fail, but can be made to create an HTML report when you run:
mvn site
Maven places your reports in the target/site/surefire-report.html. It’s not the most stylish thing, but tells you how your tests did. See if you can figure out what failed:

Checkstyle
When you have lint on a jacket, you might use some tape to remove unwanted fibers which stand out. Checkstyle is a Java linting tool, which means that it looks at your source code and points out undesirable coding styles which stand out.
Who gets to pick what is desirable though? 🤔
It's a common practice for teams to have coding standards. This ensures that the code is consistent regarding important things like tabs versus spaces. This may seem silly, but without it, developers will spend half their time fighting their IDEs, and your code.
Checkstyle goes beyond tabs and spaces. It is highly customizable, and enforces styles of variable naming, class naming, indentation, bracketing, and much more. There are many preset configurations. You can even start by using the Java styles of Google and Oracle.
It’s also great at picking out gotchas. Take the following example on the left:
|
|


It looks harmless to follow your if by the thing it should execute when userValid is true. But imagine what would happen if I decided to log the transfer right before transferring the money? You can see that it might be easy to forget the brackets. This would call transferMoney even if the user wasn’t valid!
Not using {brackets} after an if is considered an anti-pattern. That is a bad habit you should avoid, as the long-term consequence can be unhealthy. You won’t contract an illness, but we’ve learned over time that certain anti-patterns can make your code unmaintainable.
To give you a feel for the many checks it can do, let’s talk about one of the more amusingly named ones. Cyclomatic complexity. Obviously, you know what this is, right?
...😰
I’m kidding. I remember once thinking that it was a reference to a washing machine feature. 😉
Cyclomatic complexity is a metric for measuring how many nested conditions (or ifs) your code has. Why is this important? The more nested “if.. then.. if.. then.. if..” type statements you have, the more paths you have to test. The number of combinations grows rapidly. So, a higher cyclomatic complexity points to a higher probability of bugs. Essentially, it is the number of possible paths the JVM could take through the lines of your code.
Checkstyle helps reduce the number of defects you produce. It does this by reporting on overly complex code and known bad practices, as you’re building it. Maven has a plugin you can use to add it to your build tool. You can even configure it to fail your build if the code isn’t good enough.
Start by running:
mvn checkstyle:checkstyle-aggregate
This produces a report, which is not particularly attractive. When you scroll to the bottom, you can see how your classes violated good practices:

It’s a bit hard to read at first, but the report also contains a link which teaches you about each type of violation. So in the case of FinalParameters, you can click through to documentation which will teach you that it’s safer to change add(Double left, Double right) to add(final Double left, final Double right) and why.
Jacoco
Another popular plugin for Java build tools is Jacoco. How do you know if you’ve tested enough? We talked about the many paths through your code when you have nested if statements. Every line of code used has the potential to go wrong.
Jacoco allows you to run your tests and check how much of your whole codebase was visited by your tests.
It’s a little like strapping a GPS to your back and then sending you out into a big city to go for a stroll. If I sent you for a walk through Paris and then measured the percentage of streets you walked, it probably wouldn’t be very many because it's a huge city. I’d need a few teams of testers to walk the main streets if I’m to get coverage.
There are three lessons in this little anecdote:
It’s hard to get confidence on a large software project, so try and keep your projects small and good at doing one thing.
Keep your code simple, and write lots of unit tests to target your complex classes.
Don’t let me strap a GPS on your back! 😎
Jacoco also has a handy plugin which you can integrate into your build.
When an HTML report is generated with mvn site, you can see target/site/jacoco has been created with HTML files. If you look at these, you’d see a summary showing the percentage of tested methods per class. You can drill even deeper to see something like the following:
 Can you see that the subtract() method in this example doesn’t have any tests? It’s all red. This can help you write tests where you’ve forgotten to.
FindBugs
FindBugs is another gem of a tool, which analyzes your Java code and helps you improve its quality. FindBugs is a little like Checkstyle, in that it performs static analysis of your source code to look for things you shouldn’t be doing.
Static analysis examines what your Java code looks like, and finds patterns so it can make a judgment about possible risks. This is a little like taking an online survey to check your health, but more reliable. FindBugs has a huge database of different types of known software bugs. It finds code doing things which were probably not intended, doesn’t follow good practices, and may introduce a security risk.
FindBugs has a plugin which you can integrate with your build tools. You can check for bugs with mvn findbugs:findbugs, or generate an HTML report with mvn site. Imagine that you had this buggy code which calls a method on null reference:
public Double subtract(final Double left, final Double right) {
    // What does findbugs think of this impossible situation?
    if (left==null && left.isNaN())
        System.out.println("Do not run this line of code");
}
FindBugs would report this as:

Okay, it’s a little vague, but if you click through the NP_ALWAYS_NULL, it will explain it:

As left is null, and left.isNan() gets called, this will blow up with a NullPointerException.
Other plugins
All of these plugins perform static analysis of your code and help you measure its quality. There are many more great plugins out there. If you’re interested, you can check out OWASP Dependency Checker, a security vulnerability scanner. OWASP provides great resources and guidance on building secure applications; it would be well worth checking out OpenClassrooms’ OWASP course!
There’s more. You should also check out PMD, another bug finder similar to FindBugs. My top tip would be to look at SonarQube, which does all the things we’ve seen here but in one very visual place. It does involve a little more setting up, though.
Try it out for yourself!
Clone the repository below, and run Maven commands in its README.md. See if you can fix some of the issues!
git clone https://github.com/OpenClassrooms-Student-Center/AchieveQualityThroughTestingInJavaB
Or use your IDE to clone https://github.com/OpenClassrooms-Student-Center/AchieveQualityThroughTestingInJavaB
You can now explore the examples from the screencast and try running the tests with:
mvn clean test site
Remember to have a look at the README. 😉
Let's recap!
The process of compiling code, running tests, and verifying the quality of your software is collectively known as a build.
You can verify the overall quality of your Java projects as part of the build by using plugins for your build tool (E.g., Maven or Gradle)
Generating human readable and visual reports about the health of your codebase lets everyone on your team know how well or badly you are doing. Remember that the whole team is responsible for the quality of your software.
Maven has several useful plugins which gives you confidence in your software and helps report on them:
Plugin | What does this give us? |
Surefire Plugin | Provides XML and HTML reports of JUnit tests. |
Checkstyle | Provides XML and HTML reports of conformance to agreed coding styles. |
Jacoco | Provides HTML and XML TEST COVERAGE reports describing how much of your code is tested. Can be used to fail a build if we don’t have enough tests! |
FindBugs | Performs static analysis by inspecting code for patterns which look like they are introducing bugs. |
Phew! You've already got a lot of testing under your belt. Check what you've learned via the Part 1 quiz, and I'll meet you in the next part to work on more advanced testing techniques!
Test your codebase using advanced unit testing techniques
Label your tests with advanced JUnit annotations
When you’re looking for something in a book, you can usually check the contents page and jump to the right chapter. 📖 If you have to read through every page to find what you need, it either has a bad index or is not structured well. The same is true for your tests. Let's check out some ways to make your tests readable.
Use @Category to label similar tests
JUnit 4 comes with some useful annotations which let you label your tests, a little like marking which chapter or topic they fall under. If someone asked about where to find your tests on say, temperature conversion, you could find all of them quickly by labeling them with the same category name. JUnit4 provides @Category for this very purpose. Every class or method you want to label gets annotated with @Category.
Check out this ConversionCalculator test with line numbers on the left:
@Category(Categories.ConversionTests.class)
public class ConversionCalculatorTest {

        private ConversionCalculator calculatorUnderTest = new ConversionCalculator();

        @Test
        @Category({Categories.FahrenheitTests.class, Categories.TemperatureTests.class})
        public void celsiusToFahrenheit_returnsAFahrenheitTemperature_whenCelsiusIsZero() {
            Double actualFahrenheit = calculatorUnderTest.celsiusToFahrenheit(celsiusTemperature: 0.0)
            assertThat(actualFahrenehit, is(equalTo(operand:32.0)));
        }

        @Test
        @Category({Categories.TemperatureTests.class})
        public void FahrenheitToCelsius_returnsZerpCelsiusTempurature_whenThirtyTwo() {
            Double actualCelsius = calculatorUnderTest.fahrenheitToCelsius(fahrenheitTemperaure:32.0);
            assertThat(actualCelsius, is (equalTo(operand:0.0)));
        }

        @Test
        public void litresToGallons_returnsOneGallon_whenConvertingTheEquivalentLitres() {
            Double actualLitres = calculatorUnderTest.litresToGallons(litreVolume:3.78541);
            assertThat(actualLitres, is(equalTo(operand:1.0)));
        }

        @Test
        public void radiusToAreaOfCircle_returnsPi_whenWeHaveARadiusOfOne() {
            Double actualArea = calculatorUnderTest.radiusToAreaOfCircle(1.0);
            assertThat(actualArea, is(equalTo(PI)));
        }
}
Have a look at line 1. All the tests in the ConversionCalculatorTests class have been marked as conversion tests. Line 7 additionally marks one test as a Fahrenheit test. Lines 7 and 14 mark two tests as also being TemperatureTests.
@Category has one slightly annoying restriction: The labels you use should be classes or interfaces. So to label tests as Fahrenheit, you first create an interface which contains all your labels, like below:
public interface Categories {
    interface TemperatureTests {}
    interface FahrenheitTests {}
    interface ConversionTests {}
}
Then mark your class or test with Categories.FahrenheitTests.
This is how you run just the FahrenheitTests using Maven:
mvn -Dgroups='com.openclassrooms.testing.Categories$FahrenheitTests' test`
And the results look like this:

Use the @Tag to categorize tests more easily
So far we’re focused on JUnit4 features. JUnit5 has recently been released, and you’re most likely to see both JUnit4 and JUnit5 in the workplace today. As a Java engineer, it will be up to you, and your team, to decide which to use on new projects. A company’s standards can take a while to change, but fortunately, junit-vintage-engine is a dependency which allows you to migrate your JUnit4 tests to Junit5 more easily.
New versions always bring improvements. Take @Tag from JUnit5 for instance. Using @Category to label your tests meant that you had to create an empty interface each time. Well that’s a waste, isn’t it? It only exists to be used in your annotations. @Tag is way better. You think of a label and use it. @Tag(“fahrenheitTest”) would “just work!™” You also get to describe your tests in plain English, so when they fail, you’re not left staring at a test name like CalculatorTests and wondering what it was about the calculator that you wanted to prove!?
I've highlighted how you can use the @Tag annotation along with two other great annotations: @DisplayName and @Nested. Let's look at the most interesting bits step by step:
( 1 )
@Tagmarks all the tests as ConversionTests.( 2 )
@DisplayNamelets you name your tests so they're readable for anyone.( 3 )
@Nestedlets you group tests in an inner class.
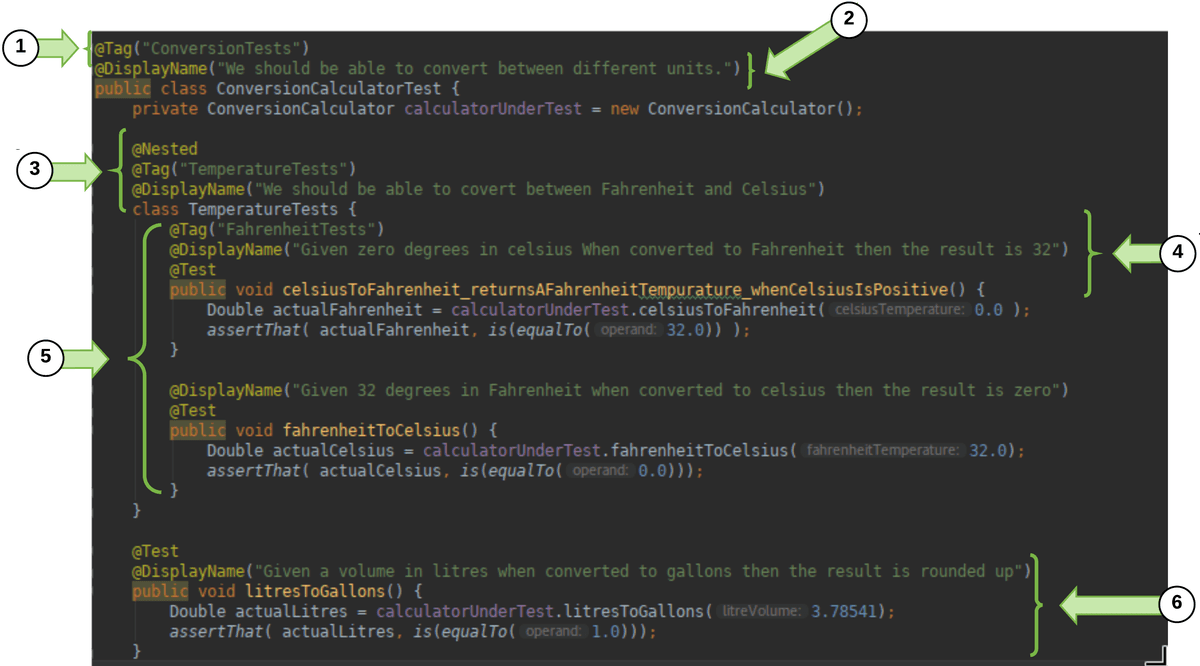
( 4 ) You can add
@Displaynameand@Tagto each@Testand@Nested block.( 5 ) Many tests are grouped into
@Nested. This way one failing test would fail the whole group.( 6 ) Other tests can be separated out (and remain untested).
When that JUnit5 test runs, the results also read more naturally!!

To get started, import the JUnit 5 annotations.
import org.junit.jupiter.api.DisplayName;
import org.junit.jupiter.api.Nested;
import org.junit.jupiter.api.Tag;
import org.junit.jupiter.api.Test;Try it out for yourself!
Have a look at the code and see if you can TDD a conversion from miles to kilometers. Use the @Tag to tag these tests with distance. Also, use the @DisplayName tags to make the test meaningful in the test report.
Clone the repository below and run Maven commands in its README.md.
git clone https://github.com/OpenClassrooms-Student-Center/AchieveQualityThroughTestingInJavaC.git
Or use your IDE to clone https://github.com/OpenClassrooms-Student-Center/AchieveQualityThroughTestingInJavaC.git
Use @RunWith to designate a test runner
@RunWith is how you decide which class runs your test for you and makes your annotations work.
Hold on, doesn't JUnit just do this for me?
Spot on! Yes, it does. Do you remember our first JUnit tests? @Test was all we needed to mark those methods as tests. JUnit4 and later are designed to just work and start reporting on assertions made in methods marked with @Test That's all that's needed to make all those other great annotations, like @Before and @After work too!
But...a special class called BlockJUnit4ClassRunner is used to make your test run and be able to provide reporting information for plugins like Surefire. This type of special class is called a test runner. It's also the reason you can use all those other great annotations we've shown you!
Will JUnit 5's runner know what to do with my JUnit 4 annotations?
Yes. If you work on a project using JUnit 5, you can use its Vintage test engine to support all of JUnit4’s runners. If you're interested in seeing this in practice, check out the JUnit team's examples on GitHub.
So, what can I do with a runner?
Many custom runners exist to help make test writing even easier. All you do is stick an @RunWith(UsefulRunner.class) before your test class. Just replace UsefulRunner with one of the runners you want to use.
You can use custom runners such as Suite.class in JUnit4 to help you use new annotations which better organize or empower your testing. The Suite runner groups a number of test classes so they are associated, and can pass or fail together.
This can be helpful if putting your tests into groups like TemperatureSuite, ArithmeticSuite, etc.
Isn't this similar to @Category and @Tag?
It is! The difference here is that your Suite is a test itself, which reports as having passed or failed. @Category and @Tag are simply about grouping which tests you run.
Let's see this in action:
Many custom runners exist to help make your test writing even easier. All you do is stick an @RunWith(UsefulRunner.class) before your test class. Just replace UsefulRunner with one of the runners you want to use. Here are some examples:
@RunWith(Suite.class)

This lets you group tests into a suite so if one fails, the whole suite fails. Be careful not over complicate your suites!
@RunWith(MockitoJunitRunner.class)

Once you use this runner, you can use the annotation @Mock. @Mock creates a pretend (or mock) ConversionCalculator which our class under tests needs. A mock allows us to focus on testing Calculator by itself. We then set up how it behaves with when and test how it’s used with verify:

@SpringJUnitRunner
The popular Spring framework has its own runner which helps us create mocks of classes which Spring would usually be responsible for creating and destroying. You can read about it here!
@Ignore
Have you ever been working hard on a project, but had someone next to you who just talked and talked and talked? And you couldn’t get anything done because you were so distracted? You might have felt bad, but I bet you wished for a mute button.
I’ve had tests which were like that! Ones which failed and gave me lines and lines of red text, which I had no idea what to do with. Obviously, it’s best to fix the test if you can. However, we live in a world where things need to get delivered to keep our businesses afloat. If the test was badly written or you don’t even know what confidence it’s supposed to be giving you, just tell it to shut up! You can do that with JUnit’s @Ignore.
For example sticking the following annotation before your @Test would stop a test from running and make it clear, why! For example: @Ignore(“Disabled as this fails every Tuesday and it seems to be re-testing unnecessarily”). Make sure you say why you’re ignoring it and promise to come back and fix it later!
Try it out for yourself!
Checkout the JUnit 4 project here. See if you can solve the little challenge in the README!
Let's recap!
We can describe what a test is about using JUnit4’s @Category and JUnit5’s @Tag
@RunWith can be used to point at a custom JUnit runner which gives us more useful annotations.
@Ignore can be used to silence less than helpful tests.
Apply principles for writing good tests
Have you ever had to care for a plant? You may not have a green thumb, but you probably know something about caring for a plant. You know that they need water, but not too much. You know that they need sunlight, and not to put it in your closet. What else? Soil? You’re unlikely to dump a plant with its roots onto your coffee table and expect it to survive. Depending on the plant, you remember and follow certain principles when you need to. These aren’t rules, but rather guidelines.
Software engineering has many great principles to help you avoid silly mistakes and write better code. Two great engineers, Tim Ottinger and Brett Schuchert, who wrote chapters of the book Clean Code, came up with an acronym which described principles they used to teach others how to write great tests: F.I.R.S.T.
Write great tests with the F.I.R.S.T. principles
F is for fast
How fast is fast? You should be aiming for many hundreds or thousands of tests per second. ⚡️Does that sound like a little too much? Not if each unit test only tests one class.
You'll know if your test isn’t fast when you start running it! According to Tim Ottinger, even a quarter of a second is painfully slow. Tests can build up - especially if you have thousands of them! I’ve known test suites which took hours, which makes it not feasible to run them regularly.
Let’s have a look at some real tests and what this looks like in the code:
As you saw, it's important to keep an eye on how long your tests take to run and investigate the outliers. Where you accidentally become dependent on slower dependencies, such as disks, try to abstract them away by using fakes in place of the real thing!
I is for isolated and independent
Have you ever needed to work through a complex problem by breaking it down into small pieces you could work on separately? Sometimes this makes it easier to stay focused and work your way through any issues. One issue = one cause of the problem = one solution. Tests are the same. When they fail, you want to understand why.
The arrange, act and assert principles we talked about earlier in the course, can help you here. Think about what happens if each test arranges its own class under test, and does only one assertion per test. This ensures that your tests are using separate data: you can isolate them from interfering with one another. There is very little overlap at that point, and so your tests remain independent.
As you can see, it’s easy for tests to fail due to no cause of their own when they are linked through a shared dependency. Unlike code, when you’re testing, it can be okay to repeat yourself if it preserves the isolation of your tests.
R is for repeatable
If you write a test which gives you confidence, it should tell you the same thing, no matter how often or where you run it. Sometimes tests become flaky and have to be run several times to make them pass.
Often when a test is not repeatable, it's because of a change made by one test impacting a later one. An example might be that one test writes a file to a local disk and that data gets queried by a second test, which then passes or fails depending on how smoothly the first write went. It might take a day of debugging the second test to realize the underlying problem was the first!
This doesn’t really fill you with much confidence. How can you be sure that this one pass is any more correct than the four previous failures? If you want to make your test repeatable, avoid any two tests leaking into each other. Remember that arrange from above? That’s where you make sure you start your tests with the new classes and data your tests depend on. Using those build tools discussed earlier in the course will ensure that you can build and test your software just as reliably on any environment - meaning your tests won’t fail for that reason!
In testing, these new classes, and the data that tests depend on are known collectively as test fixtures.
Let’s see this in action:
Did you catch the twist at the end? Our tests ran perfectly on Windows, but it was only through running them on another environment that we realized how easy it is to break the repeatability of our tests.
S is for self-validating
This was clearly thought up by a bunch of engineers. 🙂 Hands up if you think you know what self-validating means?
It validates...itself? 🤷🏽♂️
What it means is that running your test leaves it perfectly clear whether it passed or failed. JUnit does this and fails with red, which lets you red-green-refactor. Also, there is no such thing as an acceptable failure; something you hear from time to time. If you can’t rely on a test, it shouldn’t run. That’s what @Ignore is for! 😉
By using a testing framework like JUnit, utilizing assertion libraries, and writing specific tests, you can ensure that if a test fails, there will be clear and unambiguous reporting that tells you exactly what passed or failed.
Let’s see this in action:
T is for thorough and timely
Now, according to Clean Code, T originally stood for timely. The idea was that your tests should be written as close to when you write your code as possible. By writing your test when you write your code, both the code and test can be designed to respect F.I.R.S.T.
In his book Clean Code, Tim Ottinger wrote:
“Testing post-facto requires developers to have the fortitude to refactor working code until they have a battery of tests that fulfill these FIRST principles.”
If you test first, you’re set up to thoroughly test your code, because it’s made for it. So let’s do that in the IDE and let a thorough and timely testing discipline help us build sound and well-tested code:
Today the T is often considered to stand for thorough, meaning that your code is tested extensively for positive and negative cases. Since the best way to write thorough tests is to make sure you’ve written thoroughly testable code, they point to the same outcome.
So...what should I be testing for?
To drive the design of your code through TDDing, and build that base of your testing pyramid, you want to ask some of the following questions:
Have I got a happy path test for each scenario I’ve coded?
Have I thought about negative paths for these scenarios? What if a vampire’s date of birth was after his death, due to resurrection? Could my system cope with this? Assuming you work in Transylvania? 🦇
Does each exception I throw get tested?
Is there a scenario where I don’t change the type of data I’m testing with, but can cause it to do something unexpected? What if I pass it a null or an empty string?
Did I remember security first? Sadly, it always comes as the last item on the list. Can this code only be run by the users who should run it? What if it’s not?
Asking such questions, and combining your tests with the other tiers of the pyramid can give you the confidence that you’ve been as thorough as possible.
Remember that principles are there to guide you. As you make choices in your software design, you can lean on them to remind you of what you should be considering. In the end, the choice is up to you.
Good tests keep on giving, and a bad test becomes something you can’t really trust. This defeats their purpose. If you follow the F.I.R.S.T. acronym, you’re all set to score yourself a strong foundation on the testing pyramid.
Try it out for yourself!
Now that you've seen examples of the F.I.R.S.T. principles, have a look at the tests and try running them yourself:
git clone https://github.com/OpenClassrooms-Student-Center/AchieveQualityThroughTestingInJava.git
git checkout p2-c2-1-to-5
Or use your IDE to clone httphttps://github.com/OpenClassrooms-Student-Center/AchieveQualityThroughTestingInJava.gits://github.com/OpenClassrooms-Student-Center/AchieveQualityThroughTestingInJava.git and look at the branch p2-c2-1-to-5. Check out the README.md and see if you can add a test case for the division of two double values.
You can now explore the examples from the screencast and try running the tests with:
mvn test
Naming your unit tests
Naming conventions go hand in hand with F.I.R.S.T. and are incredibly important for building readable code. How do you decide what you’re going to call your unit tests? The class name is easy; you typically group tests by the CUT, so the test class and class are named for one another. For example, MyClassTest would test MyClass. Easy, right? What about the method names?
For a long time, developers (particularly Java developers) had a horrible habit of following this same convention when writing unit tests. What does the method testAdd() tell you about the test? Well, you know it tests add, but is this a happy or sad path assertion? Am I testing negative numbers, positive numbers, or just checking that the method exists? More importantly, does it prove the test cases I’ve been working towards? I can’t tell by the name of the test, and so I definitely won’t be any wiser if it fails!
Developers have come up with a number of naming conventions for tests. Java typically uses camel case, which is a mixture of upperCaseAndLowerCaseLettersWithoutSpaces. However, when you’re writing tests, your goal is to communicate with people, and have test results you can talk about in the real world. Therefore, this rule usually falls by the wayside. Below are a few styles which exist to make tests clearer. For each method name construction style, you can see the important components which should go into creating your method names:
MethodName_StateUnderTest_ExpectedBehavior
Example: add_twoPositiveIntegers_returnsTheirSum()
Variant: Add_TwoPositiveIntegers_ReturnsTheirSum()
Note: This is not camel case, so the question of whether to start each new chunk with a capital is up to you.
MethodName_ExpectedBehavior_StateUnderTest
Example: add_returnsTheSum_ofTwoPositiveIntegers()
Variant: Add_ReturnsTheSum_OfTwoPositiveIntegers()
itShouldExpectedBehaviorConnectingWordStateUnderTest
Example: itShouldCalculateTheSumOfTwoPositiveIntegers()
Variant: testItCalcultesTheSumof..
givenStateUnderTest_whenMethodAction_thenExpectedBehavior
Example: givenTwoPostiveIntegers_whenAdded_thenTheyShouldBeSummed
Variant: givenTwoPositiveIntegerWhenAddedThenTheyShouldBeSummed()
You’re free to mix it up as long as you are consistent, and have proved that your reason for change gives everyone who reads your tests greater clarity.
Remember, these are just a few of many styles you’ll see out there! While the styles in rows three and four read more naturally, in my opinion, the first two are great when you’re building a strong test base and want to be sure that you’ve thoroughly tested each method. This is because the first argument is the method name, and the second is forcing you to consider all the different types of input you may encounter. The example above, for instance, focuses on two positive integers. What about having one negative, or one null? Writing your tests can then help drive the situations your code for.
The underlying goal across all the naming styles is to ensure you clearly communicate what you’re testing. You’ve already seen that JUnit5 lets you use the @DisplayName attribute to better name your tests. This complements a good method name, and allows you to make sure you clearly communicate what you’re testing. Whatever you pick, or find in a project, remember to be consistent.
Let's recap!
Make sure your tests have names that clearly describe what they are testing. Pick a style and stick to it!
Use the F.I.R.S.T. principles to keep your tests:
PRINCIPLE | What does this mean? |
Fast | Even half a second is too slow. You need thousands of tests to run in less than a few seconds. |
Isolated and independent | When a test fails, you want to know what has failed. Test one thing at a time and only use more than one assertion if you must. |
Repeatable | You can’t trust tests which sometimes fail or sometimes pass. You need to build tests which avoid interfering with one another and are self-sufficient enough to always give the same result. |
Self-validating | Use the available assertion libraries, write specific tests, and let your testing framework take care of everything else. You can trust it to run and present clear reports on your tests. |
Timely and thorough | Use TDD and write your tests as you write your code. Explore the full breadth of things your method could do and write lots of unit tests. |
Improve class design by protecting against the unexpected
Have you ever been certain about a particular restaurant’s opening hours? You’ve been there a million times. Then one holiday you're hungry and want to eat there, but you suddenly realize that you don't know if they're open or not! 😦 What do you do? You ask Google!
Writing a test for situations which are outside of the ordinary is a little like asking the great oracle of Google. You get to define and prove how your software would respond to those irregular situations. By doing so, you get to avoid the pain of being surprised by unexpected failures in real life! Remember the Ariane rocket unexpectedly turning to its engineers yelling, “surprise!” in the first chapter? 😛
Up until now, we’ve only covered the more intuitive and obvious sad paths like trying to add a null to a number. You want to have great unit tests, right? This involves considering a range of unusual situations in which your app might be used and testing for them. How do you come up with these? Fortunately, testers before us have thought about this, and there are several different types of unexpected scenarios you should consider when writing tests. Let’s dive in!
Leverage edge cases for sad paths
Edge cases are test cases designed to handle the unexpected at the edge of your system and data limits.
What’s the edge of your system? And why are we talking about data limits?
This happens when the data you're working with pushes your code to the extremes of either your business rules or Java’s own types. Let's take each of these in turn.
Edge cases from business rules
First, consider working in a company which streamed music to people over the internet. To listen to music without the annoying interruption of commercials, your users might need to have a paid subscription for that month. What happens when a listener starts playing a two-minute song, one minute before their subscription expires? Perhaps they have a quota of how many songs they can listen to at a time; what happens if two songs are started almost simultaneously - will they listen to both? Such rules define limits of how your software is used, based on the needs of your business.
Edge cases from technical and physical limits
The biggest positive number an integer can hold is about 2,147,483,647. This special number is stored in Integer.MAX_VALUE. If you were building a calculator, what do you think would happen if you added 1 to this? 1 more than the maximum? This type of edge case is a boundary condition.
Simply adding 1 to a large number can counter-intuitively result in a very small negative number. Don't believe me? Let's prove it!
To see what Java thinks about it, use jshell. Here’s an example of what you’d see. The value on the second row after the ‘⇒’ is the answer to Integer.MAX_VALUE +1.

Wow! That is a really small negative number! I only added one! How should your calculator deal with this? There's a new question to ask your product owner!
When you’re having fun with puzzles, the last thing you want is for this situation to stump your users. You might want to avoid this sort of error by throwing an exception if either argument is more than half of MAX_VALUE. Or, you might choose to use different data type, such as a long. Before deciding on what to do, you need to recognize that the edge case exists.
How can I find good edge cases to test for?
Good questions to ask when looking for edge cases are:
What would be a wacky value to pass to this method, which is still legally allowed by its defined type? E.g., Passing a null, empty or insanely long string to Interger.parseInt(String)
Will my app be working in a few years? Do my business rules allow for increasing volumes of data (e.g., larger collections)? Do I have counters or strings which will grow to present problems later?
If writing a method, ask the question, "What could I try to do to break it?" Does it take any arguments which I could try to pass with unusual values? Such as nulls, incorrectly configured objects, or empty strings, for instance.
Do I need to code with some level of precision for my test cases (e.g., two decimal place accuracy)? How should my code behave if it has to round several times? For example, divide by two and round;
@Testdivide by two and round again. Would it still be accurate enough?
To help you get your head around these, let's work through an example:
When you start testing your edge cases, remember that if it fails and there’s no solution, figure out a graceful way to deal with the failure. Always consult with your team and product owner. You don’t get to make up what happens by yourself. 🙂
Use corner cases for your sad paths
Have you ever had a really bad day? One of those where everything seems to be going against you? Your train might have been delayed, or perhaps you were stuck in traffic? 🚧 That morning cup of coffee might have fallen out of your hands. ☕️ Even the internet is against you! 📡
Your software has to run in that same real world, which is filled with imperfections, glitches, and best efforts. When you release your code, it will run on a computer of some sort, far away from your desktop. Unexpected things might happen. Engineers sometimes joke that the cloud is only someone else’s computer! (The providers still use a real computer to run their cloud on.) Reaching their computers will depend on global internet infrastructure for connectivity. Your code also depends indirectly on the operating system in which your JVM runs. If you think about it, there are a lot of working parts. Every now and then one will go wrong despite all your best efforts.
You can’t always predict what might go wrong, but there are questions you can ask to help test your code for situations which might affect your ability to keep commitments. Making a bad mistake can affect your company’s reputation and may even affect its revenue! Worse than that, it might affect the day of a real user out in the world.
There are so many possibilities, where do I even start? 😧
Good question! Below are some questions to ask when looking for corner cases. Remember, not all corner cases will make sense to test. You’ll want to identify some and then prioritize which ones need to be handled. Check them out:
What happens to my user’s data if the program crashes?💥 Do you leave incomplete data somewhere? Is that okay?
How might my code violate any legal responsibilities? 📃
How might my code break any business promises or agreements? 📊
How does my program handle external issues?
What if we had a random network outage?
What if the server ran out of disk space? 💾
What if there was an issue with a service we rely on?
What happens if my user does the same thing twice? 🔁
Will it behave as expected?
What should it do?
If other services I rely on (perhaps a database or Google) become slow, what happens to the rest of my software? ⏱
There are many more questions you’ll ask depending on your application. There's no hard and fast rule for coming up with corner cases, but brainstorming different situations your method will encounter is one way to help you come up with those questions.
Let's recap!
Edge cases are test cases designed to gracefully handle the unexpected at the edge of your system and data limits.
Corner cases test unlikely situations which your application might find itself in.
Understand your business rules and technical limits to help brainstorm questions to guide you in defining those less likely test cases.
Use Mockito to mock collaborators when doing TDD
A punching bag, a crash test dummy, and a race car simulator. What do these three have in common? Other than taking a pounding, they are stand-ins for something real. For example, a punching bag allows you to practice boxing without having to punch someone. 🥊 A crash test dummy allows engineers to measure the safety of their cars without hurting actual people. 🚙 A racing car simulator helps you safely practice being a world-famous driver, but with infinite retries! 🏎
In software testing, you typically use a stand-in actor to play the part of a class you need to use; this is called a test double. Essentially, you use some code that pretends to be the thing you need for your tests.
We showed you some mocks in the first chapter. They are one example of a test double, which plays an important role in unit tests. Imagine a magic putty you could turn into either a punching bag or a crash-test dummy. Mocks have that kind of versatility when it comes to pretending to be other classes and interfaces. Pick the thing you want to mock, define it, and say “presto!” They also allow you to test how you used the mock, so you can be sure its acting was suitably convincing.
Develop a process for mocking
Consider the following approach to help you stay mindful and always on the lookout for mocking opportunities:
Identify a single behavior you’re testing with your class under test (CUT).
Question which classes are needed to fulfill that behavior.
Consider all classes, other than your CUT candidates, for mocking.
Eliminate any which are used for little other than to carry values around.
Set up the required mocks.
Test your CUT.
Verify that your mocks were used correctly.
Let’s consider where you might use a mock. Look at the following code which contains a lot of unnecessary testing:
public class CalculatorServiceTest {

    Calculator calculator = new Calculator();
    // Calcualtor IS CALLED BY CalculatorService
    CalcualtorService classUnderTest = new CalculatorService(
        calculator );

    @Test
    public void add_returnsTheSum_ofTwoPositiveNumbers() {
        int result = classUnderTest.calculate(
            new CalculationModel(ADDITION, 1, 2).getSolutions();
        assertThat(result, is(3));
    }

    @Test
    public void add_returnsTheSum_ofTwoNegativeNumbers() {
        int result = classUnderTest.calculate(
            new CalculationModel(ADDITION, -1, 2).getSolution());

        assertThat(result, is(1));
    }

    @Test
    public void add_returnsTheSum_ofZeroAndZero() {
        int result = classUnderTest.calculate(
            new CalculationModel(ADDITION, 0, 0).getSolution());
        assertThat(result, is(0));
    }
    ...
}
Can you see how the CalculatorService test for an addition calls back to a real Calculator instance? This test definitely gives us confidence that Calculator and CalculatorService work well together, but it looks to me like we’re testing two classes here! In fact, since would have already tested Calculator in CalculatorTest, we are essentially testing it twice!
What’s wrong with that?
When unit testing, you need to focus on making sure that your class under test fulfills its own promises. Remember the F.I.R.S.T. and keeping tests isolated principles? One unit test, one unit tested.
So what do I do now? CalulationService has one responsibility to get right: solving calculations defined by CalculationModels . That’s it. You can test for happy and sad path situations without retesting the Calculator. The Calculator, on the other hand, is not the class you’re testing, but something to help your CUT test do its job. This is called a collaborator, and it’s a prime candidate for a mock.
To replace Calculator with some mocks, you’ll need to use Mockito, the most popular mocking library on the JVM. Let’s get it up and running! We'll start with a bad example of a test which doesn't use mocks, and rewrite it to mock its collaborators:
In the screencast, we started with a bad test, which seemed to repeat scenarios already tested within our calculator. As you saw, this was easily resolved by rewriting our tests to use a mocked Calculator to test for a happy path response.
Did you notice how easily we used Mockito by annotating the class with @RunWith(MockitoJUnitRunner.class) and used the @Mock annotation above our declaration of the Calculator field? That’s all it took to turn it into a fake.
Our goal was to test if CalculationService can create a CalculatorModel which contains the answer given back to it by the calculator. As demonstrated, this doesn’t mean that we need to re-test calculating the response! In fact, we didn’t even need a real calculator at all. The Calculator class had its own unit tests.
By using our mocks, we were able to focus on testing that CalcualtorService could turn a CalculatorModel into a solution!
Mocking happy paths
Have a look at the CalculatorService test, which collaborates with an instance of the Calculator class.
public class CalculatorServiceTest {
    @Mock
    Calculator calculator;

    CalculatorService underTest = new CalculatorService(calculator);

    @Test
    public void calculate_shouldUseCalculator_forAddition() {
        // ARRANGE
        when(calculator.add(-1, 2)).thenReturn(1);
        // ACT
        int result = classUnderTest.calculate(
            new CalculationModel(ADDITION, -1, 2).getSolution());
        // ASSERT
        verify(calculator).add(-1, 2);
    }
}
At line 10, Mockito’s when() method is used to set up our Calculator mock, so that it knows what it should do when its add(int, int) method is given certain arguments. In our example, we use when() to respond to calculator.add(-1, 2). We tell it what to return with thenReturn(1).
Simply put, by declaring when(calculator.add(-1, 2)).thenReturn(1), our test can use a CalculatorService without needing a real Calculator instance! Well, at least for a test which attempts to prove that we use a calculator to solve "-1 + 2."
This is just an informed assumption about how calculator should behave. We can trust this assumption, as it’s ideally verified by a test case in the CalculatorTest unit tests. If there wasn’t a Calculator test which covered this educated guess, it would make sense to add it!
At line 15 above, we use the verify() method to make sure that we really used our calculator mock! Don't worry. I'll explain this!
Testing how you use your mocks
When you use mocks, you want to be sure that you use them realistically. That is that you're capturing the real behavior of what you’re mocking.
What if you had a method which took a List<Calculation>, and returned a List<CalculationModel>? These are just classes created using the responses from the collaborator. How do you check that your collaborator was actually called once for each calculation?
If you want to ensure that you're using the calculator correctly, you can use verify(calculator).divide(4, 2) to make sure you called it once. It's better to be specific, but if you didn’t know what those arguments were going to be, or if you didn’t care, you could replace them with Mockito’s any()
verify(calculator).divide(any(Integer.class), any(Integer.class))Being more specific makes sure that you don’t end up getting false confidence.
As you saw, you can use times() to ensure that you only called the divide method once.
If you were testing a method which called the add method multiple times, you could test this by passing the value of 3 to the times() method:
verify(calculator, times(3)).add(any(Integer.class), any(Integer.class))That any() can also be replaced with some other real value.
Mocking exceptions
You can also use Mockito to test how you respond to exceptions thrown by your collaborator. Imagine that calculator was asked to divide by zero. This would result in an ArithmeticException being thrown by our calculator. Mockito is so cool that it even lets you fake this! You can also throw a variety of action types to test the resiliency of your software before it fails in the real world with real users.
This process is identical to a happy path; however, instead of .thenReturn, use .thenThrow(new IllegalArgumentException("An Exception Reason")).
Simply put, by using the following declaration, our CalculatorService will receive an exception from our calculator when attempting to use it to divide two by zero:
when(calculator.divide(2, 0)).thenThrow(new IllegalArgumentException("Cannot divide by zero"));Let’s see how we can test for this:
Can you see how this allows you to protect users from that horrible exception? The CalculatorService can now be tested to make sure it takes that exception and generates an appropriate error message in the CalculationResult.
Verify calling a collaborator
What if I wanted to test that by passing a null argument to the CalculatorService's calculate() method, it fails early and never calls the calculator?
If you expect your code to handle any bad arguments, it makes sense to avoid inadvertently sending those bad parameters to your collaborator. Well, Mockito has you covered again. You can use never() in much the same way as times() above. This is great for catching issues where your control flow doesn't act the way you intended it to. These can come back as bugs down the line!
verify(calculator, never()).add(any(Integer.class), any(Integer.class));Let's see this in action:
Did you see how I refactored from never() to use verifyZeroInteractions()? This method ensures that you don't have any collaborations with your calculator, and avoids the need to specify which arguments were used. It's sufficient to just declare verifyZeroInteractions(calculatorMock) to ensure you never used that mock in any way.
Using Mockito to discover the collaborators you need
Imagine your technical lead asked you to update that CalclationService so it could present user-friendly versions of large numbers. She gives you the example of showing the number 100020 as “100,020.” Let’s see how you can use mocking, interfaces, and the principles discussed earlier to deliver this without building the wrong behavior into CalculationService.
Did you see how you needed SolutionFormatter and so created a Java interface, followed by a mock to finish testing and understand how you’d want to use it? The story doesn’t end there. You would then implement the concrete version of that class using TDD, and it too would get its own tests. You might discover another collaborator to mock and repeat the process until you no longer have anything left to mock and can fulfill that behavior you’re testing.
Try it out for yourself!
See if you can run the tests in the repository. The code for this chapter is on the p2-c4-sc1-to-5 branch of the following repository:
git clone https://github.com/OpenClassrooms-Student-Center/AchieveQualityThroughTestingInJava.git
git checkout p2-c4-sc1-to-5
If you haven't already, use your IDE to clone the repository and check out the branch p2-c4-sc1-to-5 . You can now explore the examples from the screencast and try running the tests with:
mvn test
Remember to read the README.md on this branch for tips and details! Have fun! 😉
Let's recap!
In software testing, you typically use a stand-in actor to play the part of a class you need to use; this stand-in actor is called a test double.
A mock is a type of test double which also lets you test how its interacted with.
Mockito lets you declaratively define how your mock should behave.
When doing TDD, you can pinpoint where you need new collaborators. This means that when you come across behaviors which don’t naturally fit with your CUT, you can create new interfaces and mocks for them.
Mock more use cases with Mockito
Like any stage actor, your test doubles will be expected to take on a number of different roles, but they’ll need some advanced training to master the most difficult ones. In this chapter, we’re going to spend some more time with Mockito, and see how to make it perform when testing more complex scenarios. Let’s get started!
Using mocks to test how your collaborator was called
When we used Mockito’s when() earlier, we knew what values our mock would eventually get used to call its methods, by our class under test (CUT). For instance, we could use the when() command using explicit values of 1 and 2 to stub out our add command:
when(calculatorServiceMock.add(1, 2)).thenReturn(3);If your CUT then called one of its collaborators which required the calculation to be defined in a CalculationModel, you might see a call similar to the following hidden deep in the code:
CalculationModel model = new CalculationModel(CalculationType.ADD, 1, 2);

calculationService.calculate(model);
If that code lives in your CUT, your test is not going to have access to the model instance that was created there. You would not even be able to define how your CalculatorService mock should behave using when(). Specifically, this means that you have no way to do a when(calculatorServiceMock.calculate(model))! Why? Because only the CUT has access to that model, since it created it.
If your test defines a mock’s behavior with when(), you need to have access to the actual objects which the mock gets called with. When these are deeper data structures and are created inside the CUT, you don’t have access to them.
So how do we define what our mock should do in such complex situations?
If you don’t have access to the actual object references which your mock class is called with, like the above CalculatorModel, the next best thing to do is use Mockito’s any() matcher.
You can use this in a when() statement in place of those arguments you don’t have access to like the CalculationModel instance! The behavior of a call to CalculatorService’s calculatorService.calculate(model) could instead be specified with when(calculatorService.calculate(any(CalculationModel.class))).
Your mock will just work whenever someone calls the method with any value: calculatorService.calculate(<with any CalculationModel>. ;)
Hold on! If I’m triggering my mock on any argument, how can I make sure that the mock was used correctly?
You’re right, if you’ve mocked a relationship with any(), the mock will respond to any value you pass it! Your tests might still pass, but your mock wouldn’t really represent the behavior of the real class! 😖 Sure, this works around your not having been able to use when() against the actual instance of CalculationModel.
This won’t give you any real confidence as your code may be working by coincidence. Fortunately, Mockito also has the ArgumentCaptor class, which allows you to check how your mock was called by the CUT after this has happened.
ArgumentCaptor is essentially an interceptor, which can be used to determine how your mocks were used by your CUT. As the name suggests, ArgumentCaptor catches and abducts the arguments you pass to a mocked method! Remember (when specified) how our mock should be called before the ACT part of our test? Well, with ArgumentCaptor, you can allow the code to use the mock in whatever way it likes. Once you get to ASSERT, you can interrogate the captive, and check how it was used with normal assertions.
Why would you want to do all this? Let’s have a look at some code to see what this looks like:

You can see that we used any() at line 104 when defining our mock. ArgumentCaptor is then used at line 111 by calling calculationModelCaptor.capture() within a verify. This captures the arguments used to call the mock.
To test how we used the mock in the ASSERT section, we then called calculationModelCaptor.getAllValues() to pull out the actual values which our test class used to call the mocked CalculatorService.calculate(). This allowed us to grab the actual instance of CalculationModel, which was used in the call to CalculationService, and test it explicitly with normal asserts.
ArgumentCaptor helps ensure that you use your mock according to its contract. When your CUT is responsible for creating complex nested classes and passing them to a collaborator, it’s easy to let a mistake slip. any() essentially says “anything goes!” With ArgumentCaptor, you get to hold up a stop signal and check that you’re happy with those complex data structures which were passed to your mocks. This can save you from setting up mocks which give you false confidence.
Let’s see all of this in action and test that our BatchCalculator creates the right CalculatorModel when it uses our CalculatorService:
Since you have to pass your argument captor to the verify method, you are forced to do more than one assert. While it’s a good principle to have one assert per test, you'll sometimes need more. If you find yourself in this situation, tend towards fewer.
Remember that the AAA principle is about the clarity of what is being tested and aim for the best you can do. In the worst case scenario, you won’t be able to quickly understand what’s gone wrong when something fails.
Mocking how a collaborator answers when called multiple times
So far, you’ve only seen collaborators which you mock once, test, and then throw away. Calling thenReturn() followed by a when() will only return a single answer. What if your code has to call a collaborator several times and gets a different answer back on each call?
For instance, do you remember the BatchCalculator we looked at earlier? This was a class which read lots of different calculations from a file and then called the CalculatorService to solve multiple calculations.
How would we test for multiple answers in a single test case?
Let's consider how to test the CalculatorService mock for a file with many different calculations. You could write a bunch of tests for files with only one type of calculation in each. That would work, but you want to make sure you could handle more than one. This matters when working with batches! The answer is Mockito’s Answer interface. It provides a method into which you can program the logic to provide a different answer each time your mock is called.
Instead of thenReturn(...), you can call either use: doAnswer(..).when(myMock.myMethod(any(MyType.class))) or
when(myMock(any(MyType.class))).thenAnswer(..) .
The argument you pass doAnswer(..) and thenAnswer(..) will be an instance of a class which implements Mockito’s Answer Interface, and provides a specialized implementation of T answer(InvocationOnMock invocation) method. You don’t really need to care about what InvocationOnMock does. All you need to do is return a different answer from this method each time it’s called.
We’re going to jump in and do that now:
Spying on real code which you can’t mock
Mocks can do a lot, but there are situations that Mockito won’t support. For instance, Mockito respects the existing type modifiers of Java classes, and in so doing, will not allow you to mock a final method on a class. This can be frustrating, but it’s good to accept that the author of your collaborator once declared the method as not being open to subclassing or any specialization. All we’re doing is respecting this.
So, how do I test these collaborations if I can’t mock my collaborator?
Spies are real classes which you can validate just like a mock. For instance, if you were adding the ability to calculate a statistical average to your CUT, you might use Java’s built-in IntSummaryStatistics class. This lets you sample integer values with its accept method, and then compute their mean with the getAverage() method. Sadly, getAverage() is marked final, and so is unmockable. Mockito would blow up with a horrible error if you tried! 💥
However, you can use Mockito’s spy to perform some programmatic espionage on it. Just like Mockito’s @Mock annotation and mock(YourRealClass.class) method, you get a very similar @Spy and spy(YourRealClass.class) method.
A spy is a partial mock, as it’s a real class and you can change its behavior by using Mockito. To understand this better, let’s compare spies and mocks:
Situation | Mock | Spy |
Create with the annotation | @Mock | @Spy |
Create with a method | mock(RealClass.class) | spy(RealClass.class) |
Calling someMethod after when(someMethod) .thenReturn(response) | Returns the provided response | Returns the provided response |
Calling someMethod() you’ve not defined with ‘when’ | The mock returns a null | The original method is called in the RealClass for a result |
Capturing arguments with ArgumentCaptor | verify(mock) .someMethod(captor) | verify(spy) .someMethod(captor) |
Mocking a final method or class | Mockito goes 💥 | Mockito goes 💥 |
As you can see, spies are essentially real objects which can be checked with verify. If you want, you can even change their behavior as you would a mock. Ultimately, they are a lot less fake.
Hold on, you mean a spy works with the real collaborator? Why would I ever use a mock again?!
It’s tempting to write unit tests which use real classes. If you don’t need to declare what the mock does, you’ll generally feel more comfortable about getting it right. Unfortunately, with each real instance of collaborator you integrate, you are compromising your F.I.R.S.T. principles.
Remember isolation and repeatability? Being explicit in defining what your tests should do, while removing a dependence on anything outside your CUT, allows you to write fast and targeted unit tests which prove your unit works as it should. There will still be other opportunities to prove that the pieces work together; remember the rest of the testing pyramid!
If you can’t mock, your next best bet is spying. Always try to maintain your isolation and use a mock first!
I’d like to give users the ability to calculate averages and use that IntSummaryStatistics class as a calculator. Are you ready to see how to use a spy to validate our collaboration with it?
As you saw, we used the spy class to turn our instance of IntSummaryStatistics into a partial mock. The test we implemented together made sure that the accept method was called as expected. Tests in our class don’t stop there. We should test returned values from the getAverage() method and explore other scenarios.
Doing static mocking
When working on the BatchCalculatorFileReader, we needed to write a unit test which read a file from the file system containing sums which were calculated together. To ensure that our test was repeatable and isolated, I had to avoid using a file from the file system. The collaborators we used for this were the static Java methods Files.lines(), which returned a stream of all the lines in a file and Paths.get(), which returns the full path to a resource.
As you might remember, static methods and variables are shared and made available on the class itself. You don’t even need to call new(). You can just call methods directly on the files and paths classes in this case. You can’t use Mockito here as you don’t have an instance of a class to mock. The logic to call Files.lines() and Paths.get() lives inside the CUT.
We're out of options! 😭 So, what can we do?!
Basically, the process here is to:
Try to rewrite your code to avoid using static methods.
If you can't do this, use a tool to mock static methods as a last resort.
Learn how to mock statics
It is often true that when something is hard to test, you need to stop and rethink the design of your software.
Sometimes you don’t have the option to change your code. Since we don’t live in an ideal world, there are times when you just have to work with the code given to you and don’t have time to refactor. In this situation, it’s okay to turn to PowerMock. This is the slow-draining kitchen sink of mocking. With great PowerMock comes great responsibility. It’s easy to create tight dependencies and tests which poke into all the wrong place. Having that power is also fun.
Sadly, PowerMock works by changing your Java code after it has been compiled. As you saw, when I ignored a slow test to respect the F.I.R.S.T. principles, PowerMock added as much as 2 seconds per test! Guess what? That slow test was the very same one we’re talking about here! Don't let that stop you. As slow as the test is, it does reduce some of your risks.
To add PowerMock to your project, add a Maven dependency to your POM, just as you did for Mockito. First, annotate your test with @RunWith(PowerMockRunner.class), and then, specify which class you’re going to static mock using @PrepareForTest({YourClassUnderTest.class}). After that, mark any classes you want to mock static methods on using PowerMock’s mockStatic() method. From there, it’s just like Mockito. You can use when and verify exactly as you would have with Mockito:

Wait! Can I just use statics methods and never call new again?
Nooo! 😱 While all these methods don’t need you to call new, sadly, this also means that you don’t have a way to control or verify how collaborations occur. For instance, you might not be able to test negative scenarios easily. In this case, it also makes it hard to change the implementation which your class uses for reading files. The call to Files.lines() is glued between the lines of your CUT, and so it becomes hard to test it for a range of behaviors.
You might think this is fine given the reduction in complexity. Let’s consider an example with more obvious consequences. Think about what would happen if you were calling Instance.now() the Java API for returning the current time. For every test that called this, you’d end up with a different instant depending on the time at which it was run. There goes the repeatability of your tests! Fortunately, there’s a workaround for this!
The secret is in Clock.fixed( Instant.parse("2019-01-01T00:00:00Z"), ZoneOffset.UTC)).
You can’t always know every handy workaround for testing every static you use, and most won’t have an easy approach to facilitate their testing.
The JDK can fake time using Clock.fixed( Instant.parse("2019-01-01T00:00:00Z"), ZoneOffset.UTC)).
This is the line which makes time travel possible! The value 2019-01-31T00:01:20Z is just a date and time. You can see the date to the left of the T, which is the 31st of January 2019. On the right of the T, you have the time, which is 00:01 AM and 20 seconds. The ZoneOffset ensures that we’re talking about the UTC timezone. Most software systems are built to store their data in UTC so that conversions can be made as needed. It stands for Universal Time Coordinated and is the same as Greenwich Mean Time.
If a call to a static is buried deep in one of your methods, how will you test that a method like Files.lines() was called correctly for all situations by your code? Do you remember watching me write a test which worked on windows but broke when run in another operating system?
Can I just test the final result instead of all these collaborations?
Yes, you can! But...isn’t that an integration test? 🤔
You can test a broad number of different scenarios to ensure that your CUT correctly uses a static method and that they collaborate towards returning an appropriate result. At this stage, it's on you to retest that you correctly integrate with the static method and you might end up retesting scenarios it’s proven against.
Other ways to avoid PowerMock
A common pattern is to build a small class around the class with the static method, so that you have a mockable API. Since it does nothing other than pass values to and from the static method, you have little risk of introducing an issue this way. Here’s an example:
public class FilesWrapper {
    public Stream<String> lines(Path path) throws IOException {
        return Files.lines(path);
    }
}
The wrapper here does nothing other than pass values onto Files.lines and returns the result. As with any other test, making sure you collaborate with it correctly and call its methods with sensible values reduces your guesswork and the risk of not covering all your bases.
As with many of the scenarios you’ve seen, one of the benefits of using mocks is that you can validate how you collaborated with other code you need to fulfill your job. This is that extra bit of risk mitigation which can help you.
Try it out for yourself!
See if you can run the tests in the repository. The code for this chapter is on the p2-c5-sc1-to-4 branch of the following repository:
git clone https://github.com/OpenClassrooms-Student-Center/AchieveQualityThroughTestingInJava.git
git checkout p2-c5-sc1-to-4
Or use your IDE to clone the repository and check out the branch p2-c5-sc1-to-4. You can now explore the examples from the screencast and try running the tests with:
mvn test
If you feel like having a go, see if you can update the BatchCalculatorTest to process a batch file with division, addition, and multiplication. You can use Mockito's Answers to make that test pass.
Have fun! 🙂
Let's recap!
Use ArgumentCaptor to capture the actual arguments which your mock is called with. This allows you to verify the correctness of a collaboration. Especially when your test class uses arguments which you have no visibility of in your tests.
Use Mockito’s doAnswer static method to set up a mock which needs to be called multiple times.
@Spyandspy()allow you to use real instances of a class, but call when and verify against it, treating it as a partial mock. Just remember that real classes break the isolation of your test.If you have to mock a static method use PowerMockito’s mockStatic.
Get some practice implementing subtraction using red-green-refactor
It's your turn!
You've finished your calculator app and placed it in the capable hands of the resident tech expert at the school. Hurrah! Only when you open your inbox, you find the following email from the product owner:
Hey,
I hope you're doing well. This is just to let you know that a student has reported a bug on the calculator app you created for us. Apparently, it doesn't allow you to subtract two numbers. Looks like we prioritized the multiplication, division, addition, and trigonometry, but forgot about subtraction! Here's what I need to you to do:
Create test cases for subtraction to the CalculatorActivityTest class and calculator class.
These should be put in a new source class: com.openclassrooms.testing.calculator.domain.CalculatorActivityTest
Add test cases to a new CalculatorServiceActivityTest class and implement the required additions in CalculatorService to support subtraction.
These should be put in a new source class: com.openclassrooms.testing.calculator.service.CalculatorServiceActivityTest.
You will have to provide support for subtraction in the Solver interface.
You'll want to include variety of happy and sad paths, but make sure you've got at least six tests. Also, be sure to follow the same code standards as the rest of the app. Your code should be succinct, readable, and have clear variable names. In other words, you shouldn't need comments to understand what's being done in the code. Here are a few additional tips:
Make sure you use mocking when needed. Specifically, mock your Calculator instance when writing CalculatorService tests.
Verify your mocks.
Structure your unit tests using the AAA method and use appropriate annotations.
Use a consistent naming convention that clearly labels what the test is for.
Use TDD, of course!
No need to reinvent the wheel! Your solution should be very similar for what we've done for multiplication, division, and addition. You find the code you need in this repository; you just need to checkout the p2-activity branch.
Sorry for the last minute job, but I'm sure you can do it!
Thanks!
LP
Looks like you've got your work cut out for you! Onward!
Check your work!
Check that the following elements are present:
mvn testshould result in all tests passing.Two new test classes exist:
The folder src/test/java/com/openclassrooms/domain should contain a CalculatorActivityTest class.
The folder src/test/java/com/openclassrooms/service should contain a CalculatorServiceActivityTest class.
Test cases for subtraction are added to CalculatorServiceActivityTest, and implemented in CalculatorService to support subtraction.
Test cases add support for subtraction in the Solver interface.
The Calculator collaborator is mocked with Mockito in the CalculatorService tests.
The behavior of a mock is defined using
when().The Calculator mock is verified using
verify().
There are a least six tests total, including at least one happy and one sad path.
@Testannotations are used to enable test methods.@Before,@After,@BeforeClass, and@AfterClassare used to set up and tear down fixtures.
Validate requirements using integration & end-to-end testing
Test how your units work together
Climb to the middle and the top of the testing pyramid
Where’s a great place to get a fantastic soy vanilla latte? How would you decide if your local coffee shop produces one that’s up to your standards? To be confident that their soy milk is up to scratch, you might ask to try some. You might also taste a little of their vanilla syrup. And their espresso, of course!
The quality of the individual ingredients matters, but does trying all the separate ingredients of a latte really tell you if the whole latte is any good? Of course not! We’d have to actually try the final product, which brings all those pieces together.
When checking if our app works, we’ve got to be just as thorough. So far, we’ve checked individual parts, but that means we’ve made a lot of guesses about how all those parts fit together; especially by using mocks wherever classes would normally collaborate. Now, we need to be sure that it continues to behave as expected as we put the code together.
Fortunately, by bringing our code together in different ways, we can test it for different things - and this is a job for tests a little bit further up the pyramid! Here is an overview of the types of tests that bring code together in more complex tests:
Pyramid | Test | Question being answered | Example |
Middle | Component integration tests | Do our unit tested classes actually play well together? | We’d write a JUnit test which checks that our CalculatorService can call methods on our ConversionCalculator, and to check representative happy and sad paths between these two classes. |
Middle | System integration tests (SIT) | How can we quickly test that our running application would collaborate with the outside world? |
|
Top | End-to- end user journey testing | Integration between our running app and a real user achieving real outcomes on the site. | Test that a user can log into our system, select a type of calculation, enter some values, and correctly convert them. |
You can see that each of these has very specific uses, that can help in different ways. Make sure you ask yourself: What test do I really need here? In the next few chapters, we’ll go over how to write and implement each of these tests in turn.
Acceptance tests
Hold on! I told you about acceptance tests which describe the business requirements.
Sure, I remember...but do you have an example? 😇
Okay, what about an acceptance test for a website with registered users? It might be something like: "logged in users should be able to delete their profiles so they can unregister from our site." This involves testing that a user can be logged in and use the application to unregister. Subsequently, we can assert that they are no longer registered users. This the sort of thing which would be decided when viewing your software as a commercial product. It's not directly testing any components, so much as our business' expectations. Acceptance tests are written in business language, but you implement them using the other types of automatic tests you've already seen.
As you can imagine, acceptance tests (also called business acceptance tests) are a source of great confusion among many engineers. Are these system integration tests? Yes. Are these end-to-end tests? Yes. What about unit tests? There are many opinions based on differing patterns you’ll see in the industry. So, where do acceptance tests live?
Traditionally, (manual) acceptance tests were the last thing tested, and always at the top of the pyramid against a running system. That was then. Some think that this is where they belong in the automated world, but manual tests at the end are dog slow. That's why many teams choose to write acceptance tests which run close to the system integration tier of the testing pyramid. Modern frameworks, such as Spring and Cucumber, make it easier to write them this way.
I don't get it. There isn't a fully running system at the integration tier! That means that we’re still making guesses about the user. Shouldn't we only use end-to-end tests? 🤔
To quote John Fergusson Smart, author of BDD in Action,
“The provenance of a test actually has little bearing on how it is implemented. For example, only a small part of the business focused acceptance tests would be implemented as end-to-end UI tests (the ones that illustrate typical user journeys through the system).”
Basically, acceptance tests can be implemented in more than one way. You don't have to use end- to-end tests exclusively. In fact, it's unlikely that you will. Martin Fowler, a founder of the Agile movement (who is far more of a proponent of the testing pyramid than John), clarifies this further, describing acceptance tests sitting across the testing pyramid:
“It's good to understand that there's technically no need to write acceptance tests at the highest level of your test pyramid. If your application design and your scenario at hand permits that you write an acceptance test at a lower level, go for it. Having a low-level test is better than having a high-level test. “
In other words, you need some tests that take your business level test-cases and run them as fast as possible. This way, you can have fast feedback you’re confident in. These tests might not be on the same level of the pyramid. They’ll probably have a bunk-bed between two levels. Our table can be completed with:
Pyramid | Test | Question being answered | Example |
Middle | Component integration tests | Do our unit tested classes actually play well together? | We’d write a JUnit test which tests that our CalculatorService can call methods on our ConversionCalculator, to check representative happy and sad paths between these two classes. |
Middle | System integration tests (SIT) | How can we quickly test that our running application would collaborate with the outside world? |
|
Between middle (SIT) & Top | Acceptance tests | Integration between business requirements and the needs of real users. | A test describing business requirements, not components. Implementation will vary. |
Top | End-to-end user journey testing | Integration between our running app and a real user achieving real outcomes on the site. | Test that a user can log in to our system, select a type of calculation, enter some values, and correctly convert them. |
But how do we decide when and where we actually need acceptance tests?
There isn’t a right answer. Here’s how I’d recommend you decide:
Ask whether the business behavior already has an end-to-end test which will use the methods and classes you’d need to deliver your acceptance test.
If the answer is no, you might need to write one.
After this, write all your business acceptance tests at the system integration level with as much realism as you can afford without slowing down your test. By realism, I mean real collaborators instead of test doubles. The reason for this is that having a representative test at the E2E level gives you the confidence to write faster, partially mocked, tests. It’s also better if all your acceptance tests are in the same place in your source code. This makes it easier to find them when trying to grow or understand your application.
What’s beyond the top of the pyramid?
If you were to pull out your telescope and gaze above the top of your pyramid, you’d be blinded by the chaos of the real world. For the most part, the pyramid tests predictable scenarios. As you hit the top and go into the world, it is only then that you really know how your product behaves. Fortunately, you’ll have a lot of confidence by the time you reach this point.
This doesn’t mean that you’re done with testing or can stop there. So what can you go on to test and learn and sense in the world? Check out these tests:
Test | Question being answered | Example |
Beta | What happens when I put a version of my app in front of real users? | If I release my calculator out to some real students at the local school, is it performant and usable? |
A/B testing | I have two great ideas for this UI or a complicated bit of code. Which one should I use? | You might release two versions of your application. One which sends all calculations to Google, and one which solves them itself. Compare which is better and more loved by your users. |
Smoke | Integration between your running application (all the code) and the platform it runs on. | The application is running on your production platform. Fast tests check that its configurations are correct and it seems to be handling a happy path or two. |
Why should you care about testing after your code is released? Building part of a system is your contribution to solving a bigger problem. A question you need to keep asking is what problem am I solving? As you solve that problem, you need to keep asking if you’re building the right thing. That is, are you correctly solving that problem in a way which works for your users, your business, and other software in the real world?
So, what does all this mean for our pyramid?
Here’s the final pyramid. It hasn’t really changed. You should just have a better feel for the types of things you’re trying to prove in your unit, integration, and end-to-end tests. Also, remember that testing is an activity you can continue and bring into the world.

This final pyramid still doesn't show everything and answer all questions:
Where on this pyramid would you put tests to check that your software is fast enough (performance testing)?
Or tests which make sure that it doesn’t fall over when a lot of people use it with a lot of data (load testing)?
What about tests that check if someone can exploit your software and gain access to data they shouldn’t (penetration testing)?
There are clearly many more types of tests you can do. What you actually choose to test beyond your units should come down to the question of what else you need to have the desired level of confidence that your system behaves as it should. In general, most good projects should have at least unit, component integration, and end-to-end tests. Anything you do above and beyond comes down to your business’ need for confidence.
Last thing: Tests don’t come for free. Remember that every test is like a puppy. 🐕 You need to commit to caring for it and invest time in giving it the on-going love it needs. Does your codebase have space to house another puppy? “Woof” said the test.
Let's recap!
For unit tests to be fast and thorough, they make many assumptions. Each mock is itself a guess about a collaborator.
Component integration tests validate that a small number of units can collaborate.
System integration tests validate that your units can collaborate in a partially running system. This is a compromise on the slower end-to-end tests.
With end-to-end tests, you run the whole system and validate your assumptions.
Acceptance tests run perpendicular to the pyramid and can cross layers.
Identify which integrations you are validating
How much imagination do our tests need?
Do you remember playing as a child? It’s a combination of imagination and props. If your goal was to have a laser sword fight, it helped to use an actual sword - or at the very least a stick. Costumes, sets, and flying droids can just be imagined. If you made them for real, you’d then never have had time to do any actual playing!
When you test your software using an integration test, you have to make similar compromises. It would be great to automate real humans to use your system every time you made a change! You’d definitely build the right thing! Manual testing tries to do this, but the reality is that it can slow down your whole development process. To strike a balance, we automate integration tests, using just the right mix of props (or real collaborators) to the imagination (or test doubles).
Let’s look at the different types of tests you could write and explore some examples.
Component integration tests
You’ve seen a lot of unit tests so far. Often using mocks. Component integration tests are pretty much the same thing, but you might not use a mock. A good way to understand this is by replacing the word “component” with “unit.” Does unit integration add some clarity?
You are testing the integration (the putting together) of the units you built and unit tested. As you saw in the earlier part of the course, naming things is one of the harder problems in software. It gets messed up a lot!
So let’s have a look at an example of such a test! We’re going to create an integration test for the CalculatorService, and make sure that it can be run anywhere.
Did you see how I named this CalculationServiceIT? The IT in the name stands for integration test. Ending tests in ‘IT,’ which is short for integration test, is a Java convention.
In terms of the actual test, it structurally resembles a unit test, but without mocks. Try to avoid retesting the CUT, instead, focus on getting assurance for some happy paths.
public class CalculatorServiceIT {

    // Set up REAL collaborators
    private Calculator calculator = new Calculator();
    private SolutionFormatter formatter = new SolutionFormatterImpl();

    // Set up the class under test
    private CalculatorService underTest = new CalculatorService(calculator, formatter);

    @Test
    public void calculatorService_shouldCalculateASolution_whenGivenACalculationModel() {
        // ARRANGE
        CalculationModel calculation = new CalculationModel(CalculationType.ADDITION,
                100, 101);
        // ACT
        CalculationModel result = underTest.calculate(calculation);

        // ASSERT
        assertThat(result.getSolution(), is(equalTo(201)));
    }
}
That’s it. Can you tell how it differs from the earlier unit tests? There’s not very much in there, is there? One thing which should stand out is that we didn't use any mocks on lines 4 and 5!
In such a test, you might have a happy path and handle an exception. You need just enough testing to have confidence that your units collaborate together. In our example, we focused on testing that a calculation is possible using real collaborators. The proof that we can actually do arithmetic has already been proven by our CalculatorTest, so there's no value in repeating that here.
If this works, you can trust your existing unit tests, and have greater confidence that the add, subtract, multiply, and divide methods all work when used by other classes!
Try it out for yourself!
Have a go at adding a missing component integration test which tests that exceptions thrown by our calculator are visible to our CalculatorService! Remember to write your test first, and make it go red, before you write the code! You can clone the repository and add your own code to it! You'll be using @Test(exepcted=IllegalArgumentException.class) and testing a scenario which attempts to divide by 0.
git clone https://github.com/OpenClassrooms-Student-Center/AchieveQualityThroughTestingInJava.git
git checkout p3-c2-sc1
Or use your IDE to clone the repository and check out the branch p3-c2-sc1. You can now explore the examples from the screencast and try running the tests with:
mvn test
System integration test
I know that I made a big deal about calling these system integration tests, but they can also be thought of as broader component integration tests, with more components.
Most importantly, they involve pulling together the parts of your system which prove that your application will run when all the pieces come together. You can also write system integration tests to prove how your application communicates with another running application.
This might mean that you’d have confidence that your real web application might handle someone submitting a form because you’ve guessed what this would look like. This type of system integration is called a subcutaneous test and can test an otherwise end-to-end test without the front end.
You might also prove that your code could talk to a database by starting a portion of your application, and using an in-memory database.
Writing a system integration test for a Spring application
Spring is the go-to framework used by Java developers to build web and other types of applications. It helps glue all your classes into a working application. System integration tests help by testing a working system. Frameworks like Spring help pull classes together into just such a system!
Let’s imagine that our Calculator application has been modified by a teammate, who didn’t test first, as a Spring-based web application.
You can clone the repository here:
git clone https://github.com/dreamthought/openclassrooms-java-testing.git
git checkout p3-c2-sc3
Or use your IDE to clone the repository and check out the branch p3-c2-sc3. Run it with mvn spring-boot:run. You can then see it in your browser at localhost:8080. Have a play around.
Let me show you how I run it:
Now that you can follow along, I’m going to write a system integration test for it, in the video below:
I named the test CalculationControllerSIT to make it clearer that this is a system integration test. In the real world, you’ll often find both your component integration tests and system integration tests grouped together in the code. It is normal to end both of these types of test with the trailing IT. As I said, the only difference is the breadth of real collaborators you’re using.
Let’s have a look at the annotations we used:
@WebMvcTest(controllers = {CalculatorController.class, CalculatorService.class})
@RunWith(SpringJUnit4ClassRunner.class)
public class CalculatorControllerSIT {

    @Autowired
    private MockMvc mockMvc;

    @MockBean
    private SolutionFormatter solutionFormatter;

    @MockBean
    private Calculator calculator;

    @Autowired
    private CalculatorService calculatorService;

    @Autowired
    private CalculatorController calculatorControllerUnderTest;

    @Test
     public void givenAStudentUsingTheApp_whenAreRequestIsMadeToAdd_thenASolutionSouldBeShown() throws Exception {
...

    }
}
Let’s get familiar with annotations we've used here.
@WebMvcTest
@WebMvcTest(controllers = {CalculatorController.class, CalculatorService.class})Spring can set up a pretend environment that lets tests act as though you have a running web server. First, use the @WebMvcTest annotation on line 1 and pass it the real classes you want the Spring framework to help set up mocks for.
In this case, we're going to use a real CalculatorService and a real CalculatorController. In a web application, the controller class has methods that usually make it the first bit of code the outside world talks to. In our code, it learns what it is you wanted to calculate, then gives a response back to your web browser in HTML. Since this is the class on the edge of our system that the browser talks to, it is where we’ll focus our system integration tests.
Use this annotation before a class declaration to tell Spring to help create instances of the specified classes and the mocks they need.
@RunWith(SpringJUnit4ClassRunner.class)
On line 2, you can see the @RunWith annotation. Here it is again:
@RunWith(SpringJUnit4ClassRunner.class)Like other class runners you've seen, the SpringJUnit4ClassRunner enhances JUnit tests so they provide handy features to help you mock and configure parts of your application.
@Autowired
Spring has the ability to create the classes your code needs so you don’t need to keep doing things like calling new CalculatorService(). The less routine code you can write in your tests, the more you can focus on testing that the public methods do what they are supposed to!
@Autowired tells Spring to give you an instance of a class and handle creating it, like lines 5, 14 and 17 above. For example, the following gives a real instance of a CalculatorService ready to use in your tests:
@Autowired
private CalculatorService calculatorService;
The reason you can do this here is that CalculationService class is marked with @Service. This tells Spring that you need one instance of this class, and it tells the reader of the code that it provides methods other classes can use.
We call those instances which Spring creates, Spring beans. The term bean is used a lot in Java, and you shouldn’t confuse it with its many other meanings. In this case, it's just a class which Spring has created and configured for you, so you don't have to.
For Spring to be able to create a class for you, it would usually have to be marked with @Service, @Component, @Controller , or @Bean.
Here are a few examples of Spring beans which we can autowire from your calculator application:
@Controller
public class CalculatorController {
}

@Service
public class CalculatorService implements Solver {
}

@Component
public class Calculator {
}
@MockBean
On lines 8 and 11, we used the @MockBean annotation before the Calculator and SolutionFormatter fields. Placing@MockBean before a field asks Spring's test runner to create a mock for us.
    @MockBean
    private SolutionFormatter solutionFormatter;

    @MockBean
    private Calculator calculator;
By declaring @MockBean Calculator calculator; we are given a mocked instance of the Calculator to use within this test. It's just like Mockito's @Mock, except that Spring will use this instance if it's needed by other @Autowire declared classes. For instance, the field of type CalculatorService on line 14 requires an instance of calculator to be passed to its constructor. Spring will auto-magically give it the calculator mock we've created here.
In our example, the CalculationService is a real instance of a CalculationService, but it happens to use the calculator mock, which we created above.
Marking the constructor of CalculationService with the @Autowired annotation asks Spring to look at the arguments passed to it:
    @Autowired
    public CalculatorService(Calculator calculator, SolutionFormatter formatter) {
        this.calculator = calculator;
        this.formatter = formatter;
    }
Basically, Spring will then find a class with an appropriate type and set it. In a Spring integration test, by marking a field as a MockBean, it becomes a candidate to fulfill any @Autowired dependencies in the system which is under test.
@Autowired MockMvc mockMvc
In line 6, Spring's test runner allows us to autowire a special class called MockMvc into our test. This is done just like the examples above, but it also gives us a special code-based web browser we can use to test a Spring app without starting the whole thing up. The MockMvc class will call your controller as though the application has actually been started and let you inspect how it responds in your tests.
Let’s have a look at the test!
    @Test
    public void givenAStudentUsingTheApp_whenAreRequestIsMadeToAdd_thenASolutionSouldBeShown() throws Exception {
        when(calculator.add(2,3)).thenReturn(5);
        mockMvc.perform(post("/calculator")
        .param("leftArgument", "2")
        .param("rightArgument", "3")
        .param("calculationType", "ADDITION")
        ).andExpect(status().is2xxSuccessful()).
                andExpect(content().string(containsString("id=\"solution\""))).
                andExpect(content().string(containsString(">5</span>")));


        verify(calculator).add(2, 3);
        verify(solutionFormatter).format(5);
    }
This is a subcutaneous test which mimics a user utilizing a web browser, without needing to launch the whole application or even a real browser! Our controller can respond to a request from a hypothetical browser which provides it with two numbers and a type of calculation.
In this case, line 4 used the fake mockMvc browser to pretend it's submitting a form. param("leftArgument", 2) and the next three rows submit form fields as though someone had done so within a browser.
We used the static post method on line 4 for this. The value "/calculator" should match up with another annotation in our CalculatorController marked @PostMapping. Here's the actual code which a browser would interact with:
@PostMapping("/calculator")
public String calculate(@Valid Calculation calculation, BindingResult bindingResult, Model model) {
        // Arrange
        CalculationType type = CalculationType.valueOf(calculation.getCalculationType());
        CalculationModel calculationModel = new CalculationModel(
                type,
                calculation.getLeftArgument(),
                calculation.getRightArgument());
        // Act
        CalculationModel response = calculatorService.calculate(calculationModel);

        // Present
        model.addAttribute("response", response);
        return CALCULATOR_TEMPLATE;
}
When a test calls mockMvc.perform(post("/calculator")), it is trying to connect with one of the methods in your controller. The post() method resembles the action of hitting a submit button on a form in a browser. The value you give it is called a path, and should match a method annotated in your controller with a @PostMapping and that path. It matches up with @PostMapping("/calculator") at line 1, above.
For other types of scenarios, you can get @GetMapping with the get() static method. And @PutMapping with the put() static method.
You can see that our controller resembles the test cases we wrote previously that call CalulationService.calculate(calculationModel) as we have done on line 10. This returns another CalculationModel with a solution. Spring then uses this model to show a response to the user. The code for this is in resources/templates/calculator.html.
Think of this as a web page that is used to take input from the user and show them the result. The file contains the following snippet, which only shows the solution if a response was calculated at line 2. This would replace the word Solution in line 4.
<div class="col">
    <ul th:if="${response}">
        <span id="solution" th:text="${response.getSolution()}" class="badge">
        Solution
        </span>
    </ul>
</div>
Since our focus is on testing, I'll go back to our test. Lines 8 to 11 ensure that a good response would be returned to our mythical browser and that it contains the above snippet with the solution to 2+3 present where we have a span with the id of solution.
Spring’s MockMvc instance, which we declared earlier in our code, allows you to pretend that your test is a browser that sends data to the controller. Without diving too far into how web browsers work, this test just means that you’re doing the same things a web browser would.
We did all of this without starting the application!
Try it out for yourself!
All this might seem a bit much the first time, but have a look at the code and try to follow it. There's really not much there. Check out the CalulatorControllerSIT and see if you can add a test to multiply two numbers.
You can clone the repository and add your own code to it!
git clone https://github.com/dreamthought/openclassrooms-java-testing.git
git checkout p3-c2-sc3
Or use your IDE to clone the repository and check out the branch p3-c2-sc3.
You can also explore the examples from the screencast and try running the tests with:
mvn test
Have a look at the README.md for tips!
Let's recap!
Component integration tests validate that previously tested units (the classes of your app) actually collaborate as their mocks did.
System integration tests are really just scaled up component integration tests, which test within a partially running system and examine integrations against other system level collaborators (like databases).
We wrote system integration tests which validated a Spring web application without a browser using
@WebMvcTestand the SpringJUnit4ClassRunner JUnit runner.
Fulfill business requirements with integration tests
From Detroit school to London school: A new type of TDD
You’ll remember Detroit school from Part 1: it’s how you learned TDD in the first place! But there’s another way: London school TDD.
Cutting through the fog: the origin and advantages of London school TDD
During the mid-2000s, London’s eXtreme Programming community became concerned that we weren’t sufficiently focusing on what our users needed. They organically came up with a style of TDD to help make sure that our tests really described the problems of our users and business. Remember those test cases we wrote with the other people who care about building the right software to help deliver our business’ goals?
How is this different from Detroit school?
Detroit school is mostly focused on unit testing at the class level. It’s up to the developer to make sure that these tests reflect the requirements they are trying to build towards. This testing is inside out, from the smallest units of code on out to what the user interacts with.
In contrast, London School TDD starts with the business requirements. Instead of focusing on what you do in the code, such as adding a user to the database, London School TDD focuses on what the user needs from your program. Phrasing requirements as “a user should be able to register," describes a program's behavior through user needs. In other words, you work with acceptance tests! This is why it’s also known as acceptance test-driven development (ATDD) or outside-in testing.
How does this methodology help you? You only do TDD for the classes you need to pass your acceptance test. This means a lot less wasted code. As TDD evolved, I remember seeing well-tested code which was started, but then left to rot in the codebase because something else became important. That is, sometimes it was never ever shown to a user.
How do I start outside and work inwards?
As we mentioned, your acceptance test is usually best placed in your integration tests or above as it describes a business need. Outside-in means that you start with the acceptance test and work down the pyramid, building necessary tests.
Start by asking :
What is our acceptance test?
Do we have an end-to-end test that represents this acceptance test?
Do we have an integration test that covers what’s needed for the end-to-end test?
Do we have unit tests that cover what’s needed for the integration test?
With each no, you write a test and ask what do you need to make that given test pass. Answer: more tests lower down the pyramid!

In writing each test, you dig a path from the outside of your code inwards, building only the bits you need. Write more tests until you’re sure you’ve covered the needs of your acceptance test.
Then you begin writing code, working up from the bottom of the pyramid, back to the top. When you build that working code, your unit, integration, and end-to-end tests all start passing. There will always be a bit of tweaking, but you’ll write fewer, more focused lines of code. You’ll still write lots of unit tests, but these will only be the ones you need.
Applying London School TDD
London TDD also encourages you to work in little cycles, one test at a time:

This is a little intense, so let’s break it down!
Steps 1 to 2 is where you take your acceptance test and write test cases for it. This would be failing E2E and integration tests! 🛑
Steps 3 to 6 say that you’d then TDD a method in a class, which helps build the actual code to satisfy that acceptance test. ✅
Steps 6 to 7 is the refactor loop we spoke about in earlier chapters, where you get to clean up your code without breaking the tests. 🌀
From step 7 onward
If your acceptance tests still fail, you need to continue writing more code and loop back around to step 3.
If you have enough so that it’s started to pass, go to step 8 and loop around to start a new acceptance test! 💫
That’s still pretty abstract, so we are going to build a calculator website together using these cycles! When fully built, this should add, subtract, divide, and multiply.
Oh, that sounds like a lot! Where do I even start?
If you start with addition, you'll have a manageable starting point. For example, you can create an acceptance test which says, “A user should be able to add two numbers and see their sum.” Remember, one test at a time!
What tests would you expect to end up with? Remember that there are no rights or wrongs as to what’s tested so much as the test cases you come up with. Let’s walk through it together:
Start by writing a red end-to-end test:
This test should not care what the web page looks like, but may automate visiting a web page, selecting two numbers, and hitting a ‘=’ button. For example, "A user should be able to add two numbers and see their sum."Run this red test below, and it fails because you haven’t built your web server:
TEST TYPE
TEST NAME
WHAT IS TESTED
Acceptance test
A user should be able to add two numbers and see their sum
A user visits a page, enters two numbers, hits ‘=’ and sees a result
Write one integration test for a web server you can send two numbers to:
TEST TYPE
TEST NAME
WHAT IS TESTED
Integration
GivenTwoNumbers
WhenAdded
ThenTheyShouldBeSummed
The server can start, and has a controller which will accept two numbers, and give them to the calculator class to add.
Pick your favorite framework to build a controller which you can send two numbers to.
Run your red end-to-end and integration tests: The server still does nothing with your numbers.
Now write a red unit test case for a new class and method: Calculator.add(Integer a, Integer b)
Create Calculator.add, and your tests are red:
TEST TYPE
TEST NAME
WHAT IS TESTED
UNIT
add_Sums_PositiveAndPositive
Calculator.add(1, 1)
UNIT
add_Sums_NegativeAndPositive
Calculator.add(-1, 1)
UNIT
add_Sums_NegativeAndNegative
Calculator.add(-1, -1)
UNIT
add_Sums_PositiveIntegerAndZero
Calculator.add(1, 0)
UNIT
add_Sums_ZeroAndZero
Calculator.add(0, 0)
Make Calculator.add work and all your test go green.
You can now clean up (refactor) your code and make sure the test stays green.
Move on to writing the next unit test case and build confidence in Calculator.add, making sure that your tests don’t fail. And the next. And the next. Thoroughly exploring the behavior of your add method.
Now write another integration test, and repeat steps 3 to 10!
INTEGRATION | GivenBadValues _WhenAdded ThenAnErrorIsReturned | The server starts; the controller validates the input and provides an error. |
UNIT | add_ThrowsException_AddingToNull | Calculator.add(null, 1) |
UNIT | add_ThrowsException_AddingNull | Calculator.add(1, null) |
Behavior-driven development & specification by example
Great! You’ve got methodology for focusing on users, but how can you make sure that everyone involved in making a product is on the same page? Back in the 2000s, another London-based engineer named Dan North asked himself the same question. He saw the value in working with product owners, experts, and teammates to come up with a shared understanding of test cases in plain English. So, he started naming tests to directly describe the acceptance tests he was trying to fulfill, or in other words, the specific behavior of the product in different situations. This approach became known as behavior-driven development or BDD.
Back in the day, Dan was writing normal JUnit tests (in Java), which clearly described what was being tested. These were essentially acceptance tests to drive the cycle of outside-in testing. At around the same time, another great engineer, Gojko Adzic, came up with a guide to creating better acceptance tests.
These acceptance tests used examples to specify how a system would behave. There are a number of ways to write such tests, but it's important that you define these test cases with product owners and specialists who are responsible for deciding if your code really works.
Who is it that has to accept that the work you've done is correct? It will vary from organization to organization, but your goal should be to find those people! Often your code will need to solve some problems in order for people in your business to accept it as complete. Get together and define those problems in the language they use. You might whiteboard the following:
THE FEATURE WE'RE BUILDING: Adding two numbers

WHAT DOES THE STUDENT WANT?
As a student I want to add two numbers so that I can solve tricky calculations

FOR EXAMPLE:
Assuming a student is using the Calculator when 2 and 5 are added, the student should be shown 7.
You can see that examples can describe preconditions for your test, what a user would do, and what should happen. It’s the arrange, act, and assert of your tests, but in plainer language than your unit tests! All you have to do is automate tests that use the very same language!
Oh man, that’s a lot of manual work, isn’t it?
Not so! You can use a popular tool called Cucumber to automate BDD style development. It helps you describe your scenarios in a natural language.
How does Cucumber work?
Cucumber describes a feature you’re going to build using a feature file. This is equivalent to a slice of your application that you will build incrementally. For instance, "supporting addition" might be a feature of your calculator.
Gherkin is the name given to the language used by Cucumber for testing. It’s a structure for describing how your software should behave in different situations. The Gherkin language describes (in English or your local language) a test scenario with a sentence of the form:
Given some preconditions
When some action
Then what expectations to assert
Here’s an example of a feature file for the calculator:
Feature: Adding two numbers
As a student I want to add two numbers so that I can solve tricky calculations

Scenario: Adding two positive numbers
Given a student is using the Calculator
When 2 and 5 are added
Then the student is shown 7
You can clone the repository and add your own code to it!
git clone https://github.com/OpenClassrooms-Student-Center/AchieveQualityThroughTestingInJava.git
git checkout p3-c3-sc1
Or use your IDE to clone the repository and check out the branch p3-c3-sc1.
Run the test with:
mvn test
So, what do the test results look like?

Write a Cucumber acceptance test
Okay, now let’s write one! First, I’ll show you how to add Cucumber to your project and set it up for testing with Spring:
As you’ve seen, you need a class to use the Cucumber JUnit runner, and then the @CucumberOptions annotation to specify a directory where your feature files live. This is the file which contains your Given, When, Then..
It’s time to write the test!
As you can see, Cucumber expects us to have a CalculatorStep class. This is an integration test of CalculatorService. Use @Given, @When, and @Then annotations to translate the feature file into code you can test.
Have a look at how @Given(...) matches the Given statement in the feature file:
@Given("a student is using the Calculator")
public void a_student_is_using_the_Calculator() throws Exception {
...
}
The {int} with the brackets in the @When annotation is called a placeholder. The value represents its primitive type. This is just a template to associate methods in your code with parts of your acceptance test. The following method is called with the values 2 and 5 in response to the line in the feature file that says, "When 2 and 5 are added:"
    @When("{int} and {int} are added")
    public void and_are_added(Integer leftArgument, Integer rightArgument) throws Exception {
    ...
    }
You can see how each of the parameters is passed as the leftArgument and rightArgument arguments to the annotated method.
It magically pulls the addition values out of that line of text and lets you use it in your test, so you know what to set up. In fact, you can have multiple scenarios in your feature file all using that same structure with different values for leftArgument and rightArgument. All of these will have test code sitting in wait. Aren’t annotations wonderful?!
Similarly, the @When can help you figure out what method to call. In this case, it shows us that we’re testing addition. It's in the sentence from our feature file: When 2 and 5 are added.
If you wanted to, you could add additional placeholders and generalize this further.
@Then gives a statement from the feature file, which tells you what result you should expect to see. This helps you assert for the right thing!
  @Then("the student is shown {int}")
    public void the_student_is_shown(Integer expectedResult) throws Exception {
        mockMvc.perform(post("/calculator").
                param("leftArgument", lastLeftArgument.toString()).
                param("rightArgument", lastRightArgument.toString()).
                param("calculationType", "ADDITION")
        ).
                andExpect(status().is2xxSuccessful()).
                andExpect(
                        content().string(
                                containsString(">" + expectedResult + "<")));
    }
As you can see, the sentence in our feature file defines a value which is captured with @Then("the student is shown {int}") and used to set the expectedResult variable. This is then asserted against at line 11. How clear is that feature file?!
If you remember our section on test naming, the evolution of test names owes a lot to Dan and his desire for clarity.
I bet you're wondering if there is a JUnit runner to make all of this work. There is! I've created an empty JUnit test and given it to the Cucumber.class JUnit runner. We also specify where our feature files live with @CucumberOptions.
@RunWith(Cucumber.class)
@CucumberOptions(features = "src/test/resources/features", plugin = {"pretty", "html:target/html-cucumber-report"})
public class CucumberAT {
}
Try it out for yourself!
Typically, with London School TDD, you’d write your acceptance test before your code, but sometimes someone else forgets to write the acceptance test first.
Just so you can get your hands on Cucumber, let’s assume that an acceptance test wasn’t written for subtract. See if you can write one! You should be able to copy the existing feature file and modify the@when so that it matches both "{int} and {int} are added" as well as "{int} and {int} are subtracted."
You can clone the repository and add your own code to it!
git clone https://github.com/OpenClassrooms-Student-Center/AchieveQualityThroughTestingInJava.git
git checkout p3-c3-sc1
Or use your IDE to clone the repository and check out the branch p3-c3-sc1.
Run the test with:
mvn test
Have a look at the README.md for tips!
Let's recap!
Behavior-driven development involves collaborating with your team, product owners, and other stakeholders to write business acceptance tests using business language. These become your first failing tests.
London School TDD or outside-in testing involves taking these acceptance tests and red-green-refactoring from system integration tests inwards towards the unit tests and classes needed to fulfill these.
CucumberJVM uses a non-technical feature file containing acceptance testing scenarios. These scenarios are automation testing by writing step definitions to match against the code.
Test your application's user journeys with End-to-end tests
When you look at an online map, you can quickly see the place where you start, the route to get you there, and your destination. That proves that you can get there. It’s a little like a unit tests, in that they tell you that the solution is possible!
But getting there is a different story and requires more detail. You need to get dressed and leave the house. Start your car with the appropriate key and drive down the first road on your route. There might be roadwork you didn’t see on the map. You then follow that route, dealing with other traffic and any real diversions. It’s not until you actually start the journey that you know for sure if the route is even appropriate.
Similarly, a few representative user journeys provide end-to-end confidence for applications and the services you build. A user journey, much like your route through town, is the journey of a typical user through your application or site.
But wouldn’t testing that requires a user to go through a site manually?
You can actually use automation here. If your user utilizes a mobile app, you’d automate a mobile interface. If your user utilizes a browser, you’d automate a browser.
Um, sure, but how do we automate a person clicking on a browser?
There is a very popular robot that can control browsers. And you can pull it into your project as a Maven dependency. It’s called WebDriver, and you can control a journey through a range of browsers (without downloading them) via another dependency called WebDriverManager.
End-to-end testing our calculator!
Our Calculator app now has a web interface, and we still haven't proven that a student can use our calculator to solve a basic calculation.
Let's start by creating a test that can control a browser using WebDriver! I'll work with you to grab the relevant dependencies and write a stub test which opens the browser.
What did you think? Did you see the browser open up?
At the top of the test, we used Spring's JUnit runner with @RunWith(SpringRunner.class).
This then allowed us to use the SpringBootTest annotation to start up our entire application, using the following to make our application reachable by a browser during the test: @SpringBootTest(webEnvironment = SpringBootTest.WebEnvironment.RANDOM_PORT)
This also sets the part of the web address of our server further down in the code where we set the field port:
    @LocalServerPort
    private Integer port;
When we ran the test, did you notice that the test opened up a running Chrome browser? We used WebDriverManager to set up our test to use a specific browser. WebDriverManager allows you to set up instances of a variety of browsers for use in your tests. Check out its documentation. In our end-to-end (E2E) test, we simply requested that a driver for the Chrome browser be set up in a @BeforeClass annotated method, as you can see here:
    @BeforeClass
    public static void setUpChromeDriver() {
        WebDriverManager.chromedriver().setup();
    }
In the @Before annotated setUp() method, we then created an instance of ChromeDriver using:
@Before
public void setUp() {
    webDriver = new ChromeDriver();
    baseUrl = "http://localhost:" + port + "/calculator";
}
Since our application runs locally, we set up baseUrl with a URL, as you would type into your browser, pointing at your local machine.
Later in the @After we checked if WebDriver has been set and close the browser with webDriver.quit() if it's open. This way, each of our tests will remain independent.
@After
public void tearDown() {
    if (null != webDriver) {
        webDriver.quit();
    }
}
You can even watch the tests run as they control and click around your browser!
Now, it's time to test that our calculator can multiply 2 by 16. We can now program our robotic test to behave as a student would! Let’s check this out, it’s so much fun! 🤓
Our test opens with a meaningful name about the student's objective and, as with our unit tests, starts with a block to arrange things for our test.
@Test
public void aStudentUsesTheCalculatorToMultiplyTwoBySixteen() {
    // ARRANGE
    webDriver.get(baseUrl);
    WebElement submitButton = webDriver.findElement(By.id("submit"));
    WebElement leftField = webDriver.findElement(By.id("left"));
    WebElement rightField = webDriver.findElement(By.id("right"));
    WebElement typeDropdown = webDriver.findElement(By.id("type"));
...
}
At line 4 we used webDriver.get(baseUrl) to navigate our browser to the calculator's form. This is just like typing something like http://localhost:8081/calculator in your browser. Did you see how it resulted in opening the calculator form?
Lines 4 to 8 used webDriver.findElement() to gain access to part of the form in the test. We passed it theBy.id() method with a value of an id in the HTML form such as <input type="text" id="left">.
Line 4 gives control of the left form field marked "First Value" in our browser, as you can see below:

Each relevant form field and submit button is then represented as an instance of WebDriver's WebElement class which we can then control in our tests.
Our test then goes on to act and fill out those form fields:
@Test
public void aStudentUsesTheCalculatorToMultiplyTwoBySixteen() {
    ...
    // ACT: Fill in 2 x 16
    leftField.sendKeys("2");
    typeDropdown.sendKeys("x");
    rightField.sendKeys("16");
    submitButton.click();
    ...
}
This fills out our form and submits it! For instance, leftField.sendKey("2") types the character "2" into the form field for the left value. submitButton.click() clicks on the submit button in the browser, as you would when filling in the form yourself.
Yes, our browser is being controlled, and all this from an ordinary JUnit test!
We must wait for our application to give us an answer, and place it next to the "=" in a span marked with the id, solution.

We need to wait for the solution to appear on our page and then assert that it is of the expected value:
@Test
public void aStudentUsesTheCalculatorToMultiplyTwoBySixteen() {
    ...
    // ASSERT
    WebDriverWait waiter = new WebDriverWait(webDriver, 5);
    WebElement solutionElement = waiter.until(
        ExpectedConditions.presenceOfElementLocated(
            By.id("solution")));

    String solution = solutionElement.getText();
    assertThat(solution, is(equalTo("32"))); // 2 x 16
}
Do this using WebDriver's WebDriverWait class which waits for an element.
On line 5, we created an instance of WebDriverWait and gave it the WebDriver and a value of 5 to get it to wait for 5 seconds.
To make our test wait 5 seconds for an element with the id of solution to appear on the page, we called our WebDriverWait's until() method and passed it the result of the static method ExpectedConditions.presenceOfElementedLocated() to which we passed a specifier that we wanted an element found using By.id("solution"). This will wait for our page to display a solution and then return a WebElement called solutionElement on line 6. This contains the value of our web page with the solution, using an id of solution.
Finally, we checked the result of our test and asserted that we get the value 32 back. On line 10, solutionElement.getText() returned the value 32 as a String. Line 11 is where we used Hamcrest to assert that we get back 32.
Try it out for yourself!
See if you can write an end-to-end test that tests that you’re shown an error message because one of your two numbers was empty.
git clone https://github.com/OpenClassrooms-Student-Center/AchieveQualityThroughTestingInJava.git
git checkout p3-c4-sc2
Or use your IDE to clone the repository and check out the branch p3-c4-sc2. Make sure you read the README file!
You can now explore the examples from the screencast and try running the tests with:
mvn test
Let's recap!
You can use WebDriver to write tests which remote control your browser.
WebDriverManager helps declaratively select which browser you want to test against. Without it, a lot more setup is required, as well as manual downloading of browsers.
You can retrieve parts of a web page as WebElement instances using
webDriver.findElement().You can use methods like
sendKeys()andclick()to interact with the WebElements in your browser.
Improve maintainability by using page objects
Avoiding the trap of fragile end-to-end tests
There’s a popular principle in software that you should always try to respect. It’s called the DRY rule and stands for don’t repeat yourself. This means that you shouldn’t write the same code twice. If you do, that’s a good time to clean up your code by refactoring. The same refactoring used in the red-green cycle - that is, without breaking the tests! Why? Simply because each repetition is more code for you to change if the behavior of your application changes. It’s also more code to go wrong.
Quite often when writing end-to-end tests, you need to visit the same page across multiple tests. Sometimes you need to click on a button or fill in a field. When these are one line statements, often in a different order, it’s easy to miss that you are repeating yourself.
Take this snippet:
    @Test
    public void aStudentUsesTheCalculatorToMultiplyTwoBySixteen() {
        webDriver.get(baseUrl);
        WebElement submitButton = webDriver.findElement(By.id("submit"));
        WebElement leftField = webDriver.findElement(By.id("left"));
        WebElement rightField = webDriver.findElement(By.id("right"));
        WebElement typeDropdown = webDriver.findElement(By.id("type"));

        // ACT: Fill in 2 x 16
        leftField.sendKeys("2");
        typeDropdown.sendKeys("x");
        rightField.sendKeys("16");
        submitButton.click();

        // ASSERT
        WebDriverWait waiter = new WebDriverWait(webDriver, 5);
        WebElement solutionElement = waiter.until(
                ExpectedConditions.presenceOfElementLocated(
                        By.id("solution")));

    }
This user journey was to test multiplication. Imagine you had other tests to validate journeys for different calculation types. That test could include the code to find page elements and interact with them in order to multiply. If you wrote more tests, you could quickly end up with similar logic in lots of tests.
The tests work, right? Isn't that good enough?
Let's have a look at the bit of our form where we selected the calculationType:
   <form action="#" th:action="@{/calculator}" th:object="${calculation}" method="post">
...
                    <div class="col">
                        <select id="type" th:field="*{calculationType}" class="form-control form-control-lg">
                            <option value="ADDITION" selected="true"> + </option>
                            <option value="SUBTRACTION" selected="true"> - </option>
                            <option value="MULTIPLICATION"> x </option>
                            <option value="DIVISION"> / </option>
                        </select>
                    </div>
...
                </div>
                <div class="row">
                    <div class="col">
                        <button id="submit" type="submit" class="btn btn-primary">=</button>

                    </div>


...
Now, imagine what would happen if we changed this from a drop-down to radio boxes? Or a designer wanted to restructure and modify the style of our site, creating new HTML pages. We’d see our tests break and have to find all the tests that think they know how our page works and change them!
I've seen people have to pay penance for scattering logic about their website across lots of tests. A few changes across a number of web pages can suddenly make a lot of brittle tests go bright red. 😳 The fix is not always that straight forward either.
Martin Fowler, a founder of the Agile movement and a great engineer whose writing you should vacuum up, introduced the PageObject model. It applies object-orientated programming to how we think of a web page. Rather than the code we had above, we’d put all those page-specific methods and selectors in one place. A selector is that By.Id("left") from the code above, which tells our test to look for <input id=”left">.
The previous tests were fragile since little changes to the HTML could break it, and this style would become increasingly brittle as our application grew. Let's create a PageObject for our calculator together so that we don't have those issues!
As you saw, we created a new class with each selector annotated using WebDriver's annotation@FindBy(By.id("a selector")). We created an instance of the CalculatorPage object, and then called WebDriver's PageFactory.initElements(webDriver, calculatorPage) using our WebDriver instance and PageObject; this factory turns our @FindBy annotated fields into WebElements based on the content in the page.
Did you see how much more readable our test was? Rather than messing around with selectors, we were able to call calculatorPage.multiply(2, 16) and let our PageObject remote control fill in the appropriate form fields!
What happened here?
Our PageObject allowed us to use object orientation to encapsulate the selectors of a page. That means that we created a class for the CalculatorPage and put a method in called multiply(). Any changes to either the process of multiplication, what its page looks like, or calculation in general, are all built into this one class. We can write lots of tests which include multiplication, but only have one place which defines how we control and interpret the UI.
Since you have all your knowledge about the behavior of a web page in one place, this also protects you from scattering dependencies on the structure of your web page through lots of tests. There is only one dependency on the structure of any given page; that is the page object which you have modeled from it!
Now it’s your turn!
Grab the code and add a test to see if the title is "Open Calculator." You want to use By.id("title") to get back WebElement. You can then call getText() on it to retrieve the title of the page to use in your assertion. Put those selectors and a getTitle() method into your page object.
git clone https://github.com/OpenClassrooms-Student-Center/AchieveQualityThroughTestingInJava.git
git checkout p3-c5-sc1
Or use your IDE to clone the repository and check out the branch p3-c5-sc1. You can now explore the examples from the screencast and try running the tests with:
mvn test
Avoiding the inverted pyramid
You are now armed with all the tools to test at each tier of the pyramid but beware. It’s easy to get seduced by the dark side of testing. Rather than picking what seems easy today, consider an approach that will allow you to have continued confidence in your automated tests.
It's easy to stray from the balance between timely feedback and confidence by writing more tests towards the top of the pyramid, slipping into the anti-pattern known as the inverted pyramid.

Have you ever thought about changing a screenplay when you were hoping for a plot twist in your favorite show? Probably not. When we talk about a new feature in an application, it is just as unnatural to talk fundamental code changes, especially when you can just say things like “Display a read-only error to the user.” While this is the right language to use, as it describes behavior in a user interface, it may lead you to pick the wrong test: hearing this, most will immediately think of writing an end-to-end test. But if you have an existing integration test proving you can show errors to the user, a simple unit test would be enough.
The further you get along in an application, the easier it is to default to tests higher up on the pyramid. The more end-to-end tests you write, the slower your feedback gets, and the longer it takes for developers to know they are on the right track. You may even convince yourself that it’s faster to do manual testing! Telltale signs you can look out for, which indicate that your pyramid is starting to invert:
Your tests often break, and it’s normal to have to re-run them until they pass.
Your tests are unreliable to the point where you need to manual test just to be sure.
Your integration and end-to-end tests are so slow, you’ve had to make them run separately. You may do this for a good reason, but if they are taking hours, you must question what you can push down to your unit tests.
Your team has stopped caring whether all the tests run.
New unit tests are not being written, or only have a handful of happy path tests.
Many bugs are found through manual testing, or by users soon after a release.
Stay vigilant! But if you make a mistake, don't worry. On a healthy team, the person who breaks the tests either brings in doughnuts or gets shot with a nerf gun. This is the environment you want to create. 🙂
Let's recap!
PageObject models allow you to use object orientation to encapsulate the selectors of a page and provide meaningfully named methods which let you perform web driver operations on that page.
Using the PageObject model protects you from scattering dependencies on the structure of your web pages.
Beware the inverted pyramid. It’s easy to be lured into testing everything at the end-to-end tier of the pyramid. These tests rapidly slow down, and can become unreliable.
Review what you've learned
Congratulations! 👏 You've made it to the end of this course. You now have all the knowledge you need to:
All that’s left is to put your newfound skills to use; first by taking the end-of-part quiz, and then by continuing to write great tests for your applications! 🙌
Contributors
Instructor
Created by

