Build the Data Model of Your MVC Application
Design a Data Model
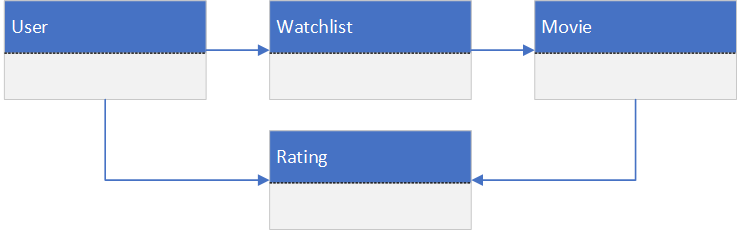
Let’s return to our basic model design and start thinking about how to refine and improve it.
Here’s what we started with:
Let’s start adding the properties you might expect for each data entity and see how the design holds up. For the user entity, you don’t need much right now. You need an email and password for the login, and since we’re using Entity Framework and Identity to manage the user accounts, these properties will already be present in your user object, along with an Id property, which uniquely identifies each user object. The Id property also serves as the primary key in the corresponding database table.
Each of the other objects should have a primary key as well, so each object should have an Id property.
The requirements stated that each user would have only one watchlist that would contain multiple movies. Given this information, does the watchlist need any properties of its own? You know it belongs to a user, and it contains movies, but we haven’t indicated if it needs any additional properties. With this in mind, you could potentially remove the watchlist as a separate entity and instead make it a list property of the user entity - a list of movie objects.
Here’s an alternative design to consider:
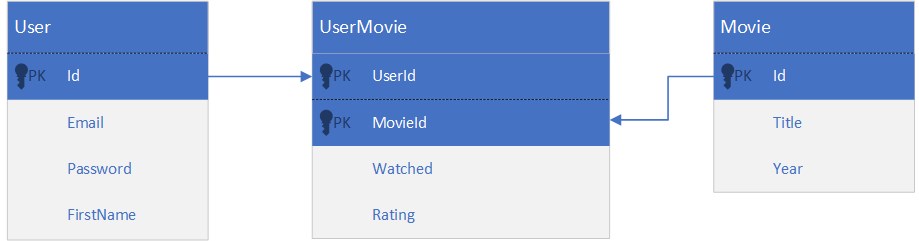
In this design, we’ve added some properties to the entities and removed the Watchlist entity completely, placing it within the Ratings entity. Use the Id properties from the User and Movie entities as a composite primary key for the Ratings entity. This uniquely identifies a Ratings entity as belonging to a specific user and movie. This type of relationship is also known as a many-to-many relationship in database terms, meaning that many users can watch and rate the same movie, and many movies can belong to the same user. So how would you code this model?
Code the Model Classes
There are two primary entity classes: Movie and User. You also have another entity class, UserMovie, that represents the many-to-many relationship between the other two entities in the database.
Every entity class must have a primary key, usually represented as a property named Id or something similar. So let’s start coding the model classes with the Movie class. It needs an integer Id property, a string title, and an integer year to start. Add this class by right-clicking the Data folder, then choosing Add > Class. Name the class file Movie.cs, and click the Add button. Then add the necessary properties to the Movie class, as shown below:
public class Movie
{
    public int Id { get; set; }
    public string Title { get; set; }
    public int Year { get; set; }
}
Next is the User entity. This one is a little trickier. Since the project includes individual user accounts, there are already user account objects embedded in the project courtesy of ASP.NET Identity. They are created using a class called IdentityUser, which is found in the Microsoft.AspNetCore.Identity package. The IdentityUser class contains all of the important information to permit secure user logins, such as username, email, password, phone, and others. But it does not contain fields for personal information such as first or last name, address, city, state, etc. Fortunately, this is a class you can extend to another class of the design that can contain any additional fields you want to include.
There’s one other thing I should mention before you add this class. ASP.NET Identity already has an object called User that is reserved for accessing the currently logged in user account. So you don’t want to name your user entity class User. Instead, let’s call it ApplicationUser. So, add another class to the Data folder, call it ApplicationUser, and then modify it to include the following:
1. The class must extend Microsoft.AspNetCore.Identity.IdentityUser.
2. It must have a constructor that invokes the inherited object’s constructor - if you have not used this syntax before, this is how it should look:
public ApplicationUser() : base()
{
}
3. It should have at least a string FirstName property.
We’ll come back to our ApplicationUser class in a moment. Right now, let’s build the UserMovie class. Add this class to the Data folder, and then add its properties as shown below:
public class UserMovie
{
    public string UserId { get; set; }
    public int MovieId { get; set; }
    public bool Watched { get; set; }
    public int Rating { get; set; }
}
The UserMovie class has that composite primary key we talked about before. The primary key is comprised of two properties: UserId and MovieId. The UserId property corresponds to the Id property that exists in the ApplicationUser class, which it inherited from IdentityUser. The MovieId property corresponds to the Id property in the Movie class. To complete the UserMovie class, you need two more properties. These properties use the virtual keyword and represent the relationship between the UserMovie object and the ApplicationUser and Movie objects.
public virtual ApplicationUser User { get; set; }
public virtual Movie Movie { get; set; }
Now that the Movie and UserMovie classes are complete, let’s go back to the ApplicationUser class. You need to add a virtual property to represent the user’s watchlist. This would be a collection or list of UserMovie objects, specifically, all the UserMovie objects containing the user’s Id. Update your ApplicationUser class to include this property, and initialize it in the constructor, as shown below:
public class ApplicationUser : Microsoft.AspNetCore.Identity.IdentityUser
{
    public ApplicationUser() : base()
    {
        this.Watchlist = new HashSet<UserMovie>();
    }

    public string FirstName { get; set; }
    public virtual ICollection<UserMovie> Watchlist { get; set; }
}
The data model for your project is now complete. Compile the code by building your project (choose Build > Build Solution or press Ctrl-Shift-B). If there are any errors in your code, correct them as required, and rebuild the project. Continue until there are no compile errors.
You now have a completed data model for your Watchlist application, but you don’t have a database that reflects this new model. In the next chapter, we’ll update the database to match your code.
Let's Recap!
In this chapter,we refined the data model for the Watchlist application, moving away from the original conceptual design a bit, and finalized a design that lets users create individual watchlists as well as individually rate their movies, while still being able to see average ratings across all users.
You coded the entire model as C# classes in the project, and now you’re ready to translate that model to a relational database.
In the next chapter, we’re going to finish linking the application to its database, then perform a code-first migration to solidify the data model in database form.
