Scaffold Your MVC Application Layers
What Is Scaffolding?
ASP.NET Scaffolding was introduced as a new feature in Visual Studio 2013, and remains an important part of the .NET Core development platform.
ASP.NET Scaffolding is a code generation framework that lets you quickly add templated code that interacts with your data models. Using scaffolding to generate the MVC controllers and views for your data models can significantly reduce the amount of time required to develop all of the standard data operations for your project, as well as the HTML/Razor pages to view that data.
Scaffold Controllers and Views With Entity Framework
Before we scaffold your controllers and views, you need to add one additional class. It doesn’t represent a specific entity in the database, but rather, a mixture of elements from different ones. It's called a view model, and you need it to set up your watchlist properly for viewing. The watchlist is a collection of user and movie Id’s in the UserMovies table, and you need to make it readable, and user-friendly. That’s where the view model comes in.
Add the View Models
Add a new class called MovieViewModel to the Models folder. Then edit the class to include the movie’s Id, title, year, whether it’s in the user’s watchlist, whether the user has watched it, and user rating (if any).
public class MovieViewModel
{
    public int MovieId { get; set; }
    public string Title { get; set; }
    public int Year { get; set; }
    public bool InWatchlist { get; set; }
    public bool Watched { get; set; }
    public int? Rating { get; set; }
}
Scaffold a Model Entity
Now it’s time to scaffold the Movie class. I’ll walk you through this process in the screencast below. You’ll use this a lot when building MVC apps, so make sure you learn the process. You can also follow along using the steps outlined in the text below.
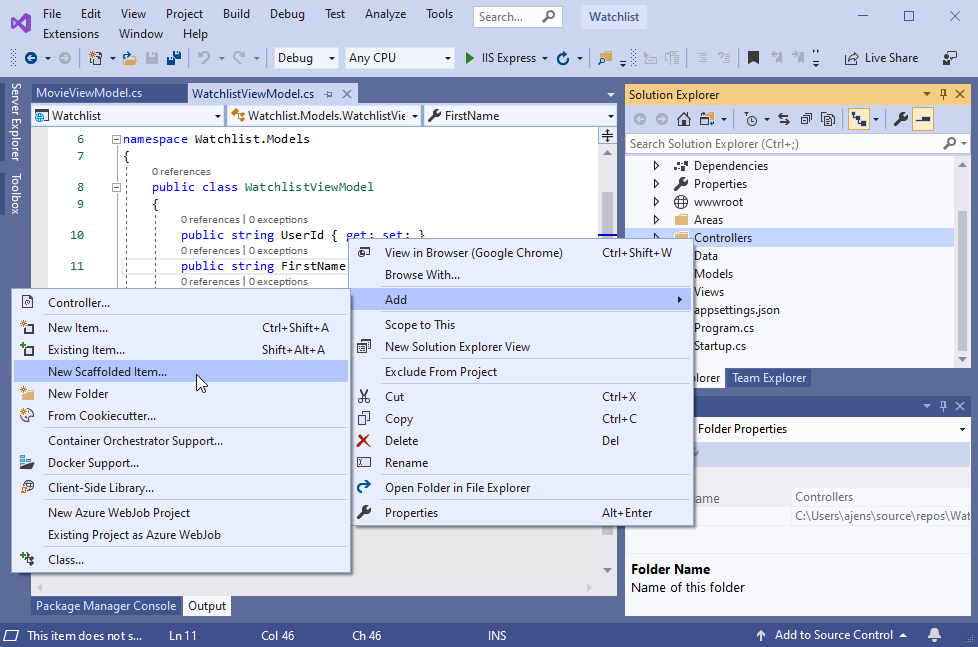
To scaffold controllers and views for a data entity, right-click the Controllers folder, then choose Add > New Scaffolded Item.
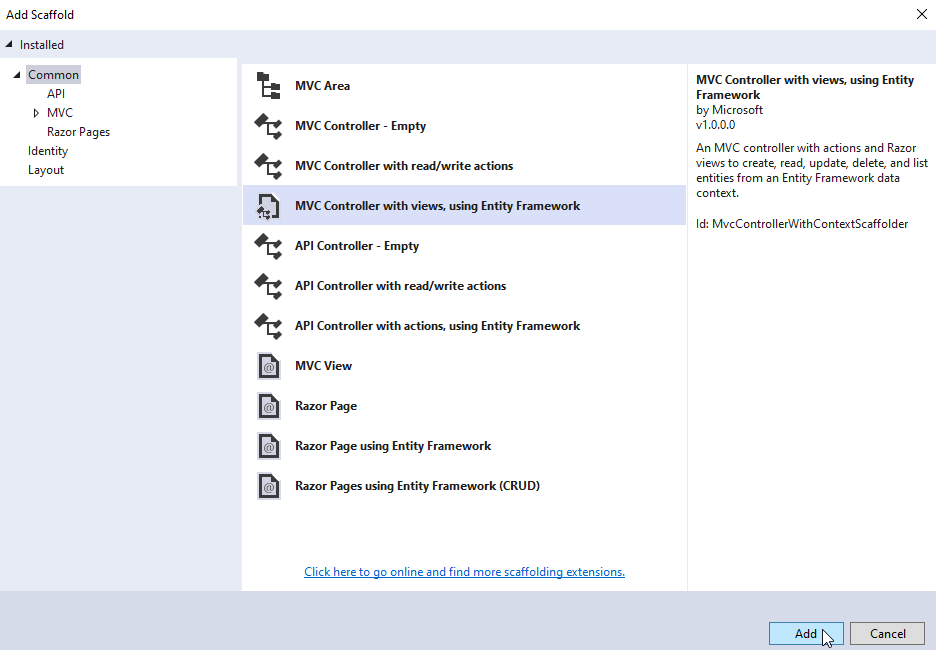
There are many scaffolding options for you to choose from, but we’re interested in scaffolding an MVC Controller with views, using Entity Framework. Select that option, then click the Add button.
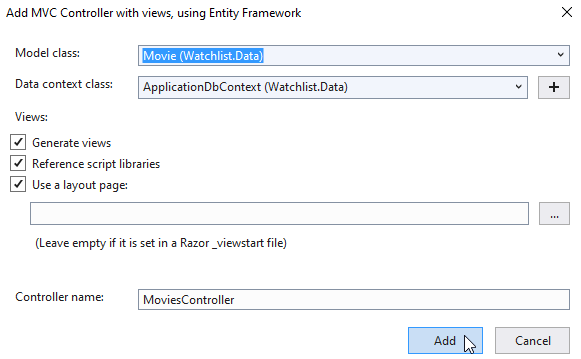
Now you get into the specifics about the scaffolding process. Select the model class from which you’re going to scaffold the controller and views (this will be the Movie class), then select your database context class (ApplicationDbContext), and set the controller name (MoviesController). Make sure all three boxes are checked - you want to generate views, reference the script libraries such as jQuery and Bootstrap, and use a layout page (In this case, the default layout page is fine).
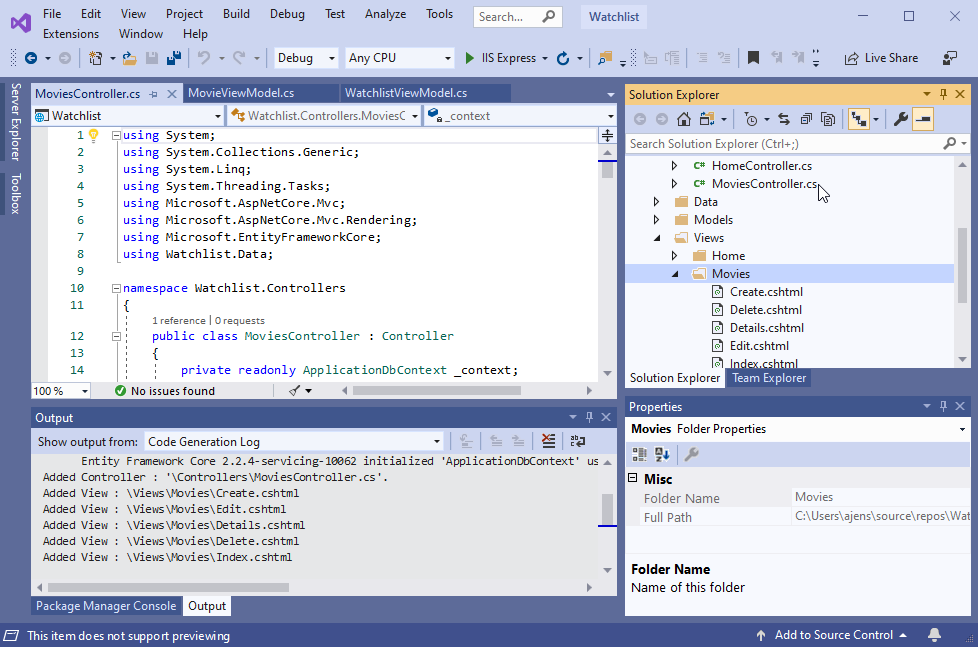
When the scaffolding process completes, you will see a new MoviesController.cs file under the Controllers folder, and a new Movies folder under the Views folder in your project.
These new additions will all work as they sit right now, and we’ll test them later in the course. But right now, you have a little more scaffolding to do.
Scaffold Individual Components
You've already scaffolded a complete controller with views using Entity Framework for the Movie class. Now I’m going to show you how to scaffold on a smaller scale; for example, when you need to add an item or two, not an entire set of CRUD operations.
Add a Watchlist Controller
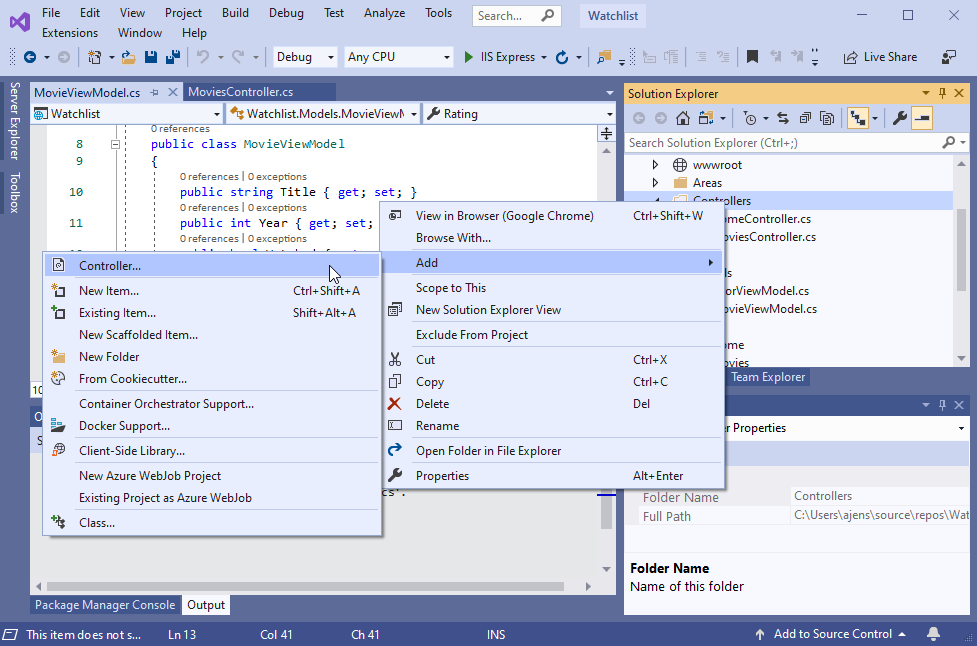
Let’s add a new controller that you can use to generate and display your watchlist. This will be custom code and not something generated from a template, so you need to start with a new, empty controller. To do this, right-click on the Controllers folder, then choose Add > Controller.
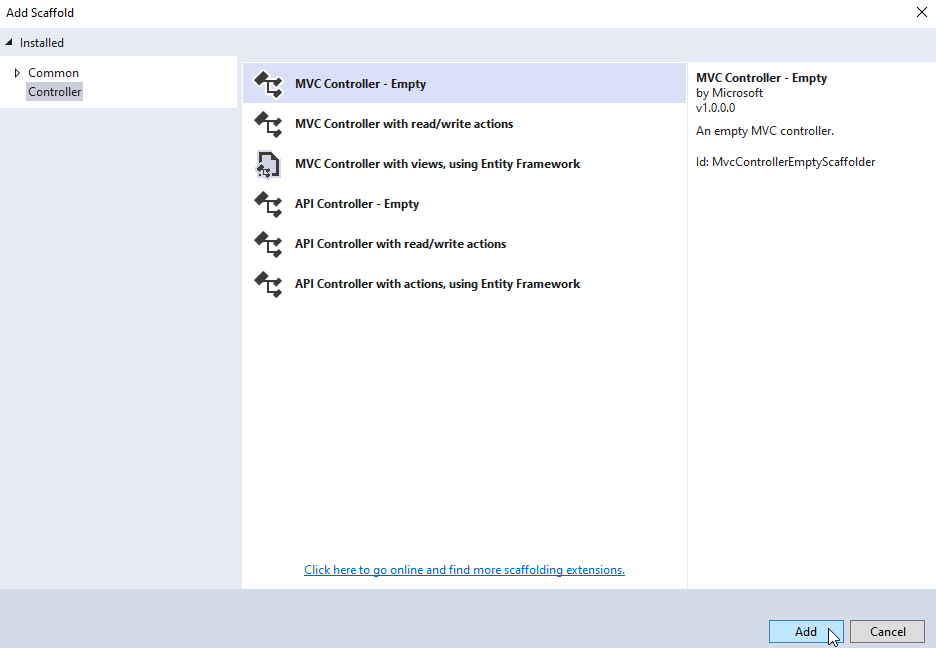
The next window is similar to the one showing your scaffolding choices in the last section, but this one has fewer items. You're interested in the first one: MVC Controller - Empty.
Now it’s time to name the new controller. Call this one WatchlistController.

Add a Default View
Now that you’ve added an empty WatchlistController class, you need to add a single view to display the watchlist.
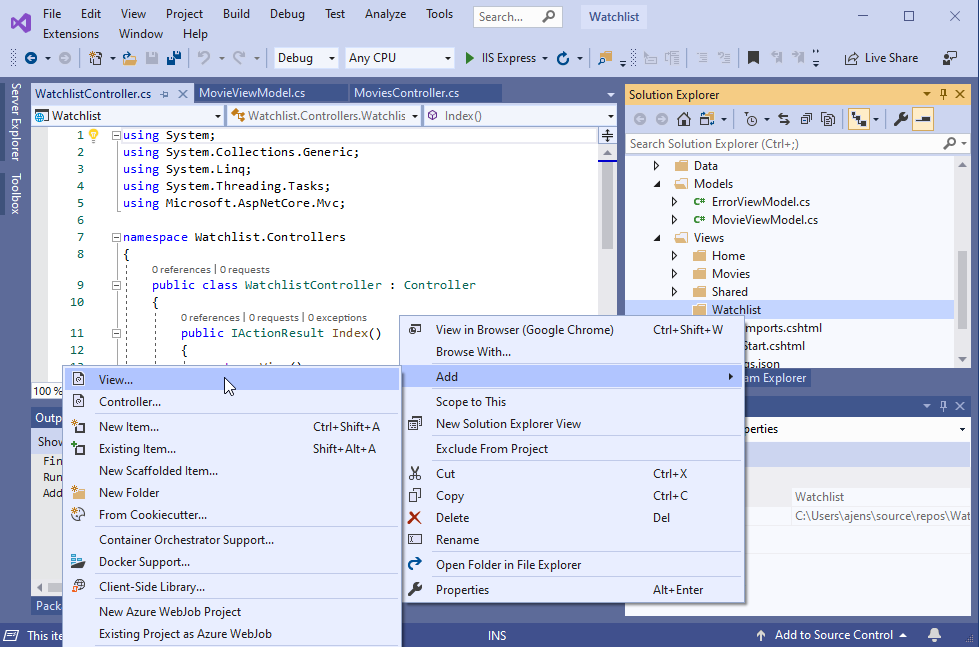
Add a new subfolder within the Views folder called Watchlist. Then, right-click on the new Watchlist folder, and choose Add > View.
This is where you can define the types of view you want to add to the project. You know that the watchlist is a list of movies as well as additional information like ratings - but it is always a list of items. Therefore, you need to build a list view.
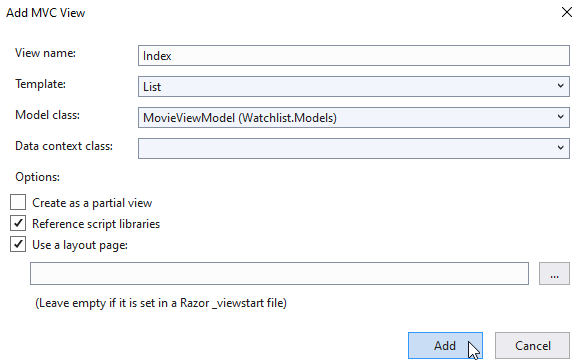
Name this new page Index, so that it is the default page that will be displayed whenever the WatchlistController is invoked. For the template type, select List. For the model class, select MovieViewModel class you created earlier. Then, remove anything present in the data context class selection. You don’t want this tied to the database directly because the data will be in a view model, not a data (database) model. Finally, make sure the Create as a partial view is not selected. Check Reference script libraries and Use a layout page, then click Add.
You now have a new controller and view to handle the creation and display of the user’s watchlist. But neither does anything yet. You need to construct the watchlist, and that means adding some custom code to the WatchlistController.
Edit the WatchlistController
You built WatchlistController as an empty controller, so the only thing in it is a method called Index, which will open the Index.cshtml view just added. To populate that view with the watchlist data, you need to add some things to this controller.
Get the Database Context
First, you need access to the database through the database context object, ApplicationDbContext. ASP.NET Core uses dependency injection to provide instances of important objects for use within controllers. So to get access to the database context, you need to ask .NET Core for it by adding it as a parameter in the constructor for the WatchlistController.
You’ll need to add a few using statements to the top of your WatchlistController class:
using Microsoft.AspNetCore.Identity;
using Watchlist.Data;
using Watchlist.Models;
These will give you access to your data and model objects, as well as to .NET Core Identity, which you will need to retrieve the logged in user’s movies.
Next, to inject the database context into your WatchlistController, add the following code to the top of the WatchlistController class:
private readonly ApplicationDbContext _context;

public WatchlistController(ApplicationDbContext context)
{
    _context = context;
}
In the above example, there is a private readonly variable to hold an instance of the database context for this controller. Assign that object with the context object that is injected into the constructor.
This will give you the ability to retrieve the movies on the user’s watchlist. You need to be able to identify the user since the movies are associated with their unique Id. Therefore, you must retrieve the Id of the logged-in user to get their movies and generate the watchlist.
Get the Current User
To get the currently logged-in user, invoke the UserManager service from .NET Identity, which provides all the methods you need to get the user information. To get the UserManager service, inject it into the constructor, like the database context.
public class WatchlistController : Controller
{
    private readonly ApplicationDbContext _context;
    private readonly UserManager<ApplicationUser> _userManager;

    public WatchlistController(ApplicationDbContext context,
        UserManager<ApplicationUser> userManager)
    {
        _context = context;
        _userManager = userManager;
    }
}
Now that you have the UserManager service, you can write some code to get the user information. The best practice for doing this is to add a private method in the controller to call the service, then add a public HTTP GET request to retrieve the user Id.
public class WatchlistController : Controller
{
    private readonly ApplicationDbContext _context;
    private readonly UserManager<ApplicationUser _userManager;

    public WatchlistController(ApplicationDbContext context,
        UserManager<ApplicationUser> userManager)
    {
        _context = context;
        _userManager = userManager;
    }

    private Task<ApplicationUser> GetCurrentUserAsync() =>
        _userManager.GetUserAsync(HttpContext.User);

    [HttpGet]
    public async Task<string> GetCurrentUserId()
    {
        ApplicationUser user = await GetCurrentUserAsync();
        return user?.Id;
    }
}
Finally, you can call your new GetCurrentUserId method from the index method where you will be constructing the view model for the watchlist. Note the change to the index method signature from a synchronous method to an asynchronous task. This is required to call the methods from the UserManager service.
public async Task<IActionResult> Index()
{
    var id = await GetCurrentUserId();
    return View();
}
Construct the User’s Watchlist
That took some work, but it was necessary to build the watchlist for the current user and no one else. In the index method, insert the following highlighted code:
public async Task<IActionResult> Index()
{
    var id = await GetCurrentUserId();
    var userMovies = _context.UserMovies.Where(x => x.UserId == id);
    var model = userMovies.Select(x => new MovieViewModel
    {
        MovieId = x.MovieId,
        Title = x.Movie.Title,
        Year = x.Movie.Year,
        Watched = x.Watched,
        InWatchlist = true,
        Rating = x.Rating
    }).ToList();

    return View(model);
}
After retrieving the current user’s Id, a LINQ query retrieves all of the UserMovie records from the database in which the current user’s Id is present. Next, from the results of that query, select specific items such as the movie title, year, whether the user has watched it, and the user's rating. Then construct a list of new MovieViewModel objects using those selections. Finally, pass that list of MovieViewModel objects as the variable model to the view, where the data renders in a dynamic HTML file.
Let's Recap!
We covered a lot in this chapter!
You now have a Watchlist application with a complete data model, controllers that manage your data entities, and views that display your data.
You learned all about the scaffolding process and how it can be used to generate complete controllers with views based on a single model class, simpler (or empty) controllers without views, or views separate from the controller scaffolding.
You wrote a custom WatchlistController to manage the display of your users’ watchlists.
Part 2 has been exciting and packed full of new information. So take a few minutes to complete the quiz here at the end of this part of the course, then go ahead and begin Part 3.
