Extract the View
User interfaces are an essential part of any application because, well, the user interacts with them. If a user finds the interface tough to manage or understand, they view (no pun intended) the entire application in a bad light. Also, styles and features change over time.
Plus, today’s demands require applications to run on every mobile device imaginable, requiring responsive design. That is, a way to know the screen dimensions and orientation (portrait or landscape) so the best possible configuration of controls can be generated. It's best to handle responsive design through HTML and CSS.
I thought this was a Java course! How much do I need to know about HTML and CSS?
Only a little bit. You’re right, prettying up the layout is beyond the scope of this class. However, separating the user interface layer, to allow for the CSS and HTML to vary independently of the rest of the code is the architectural change we are after.
To keep up with these changing demands, we need to put the interface into its own layer.
We will fix this in our application by doing the following:
Examining the existing architecture and code to see where the problems lie (using our measuring sticks from Part 1).
Defining our solutions and applying them to our architecture.
Applying our solution to the code.
Examine the Existing Architecture to See Where the Problems Lie
Let's start by looking at the current architecture:
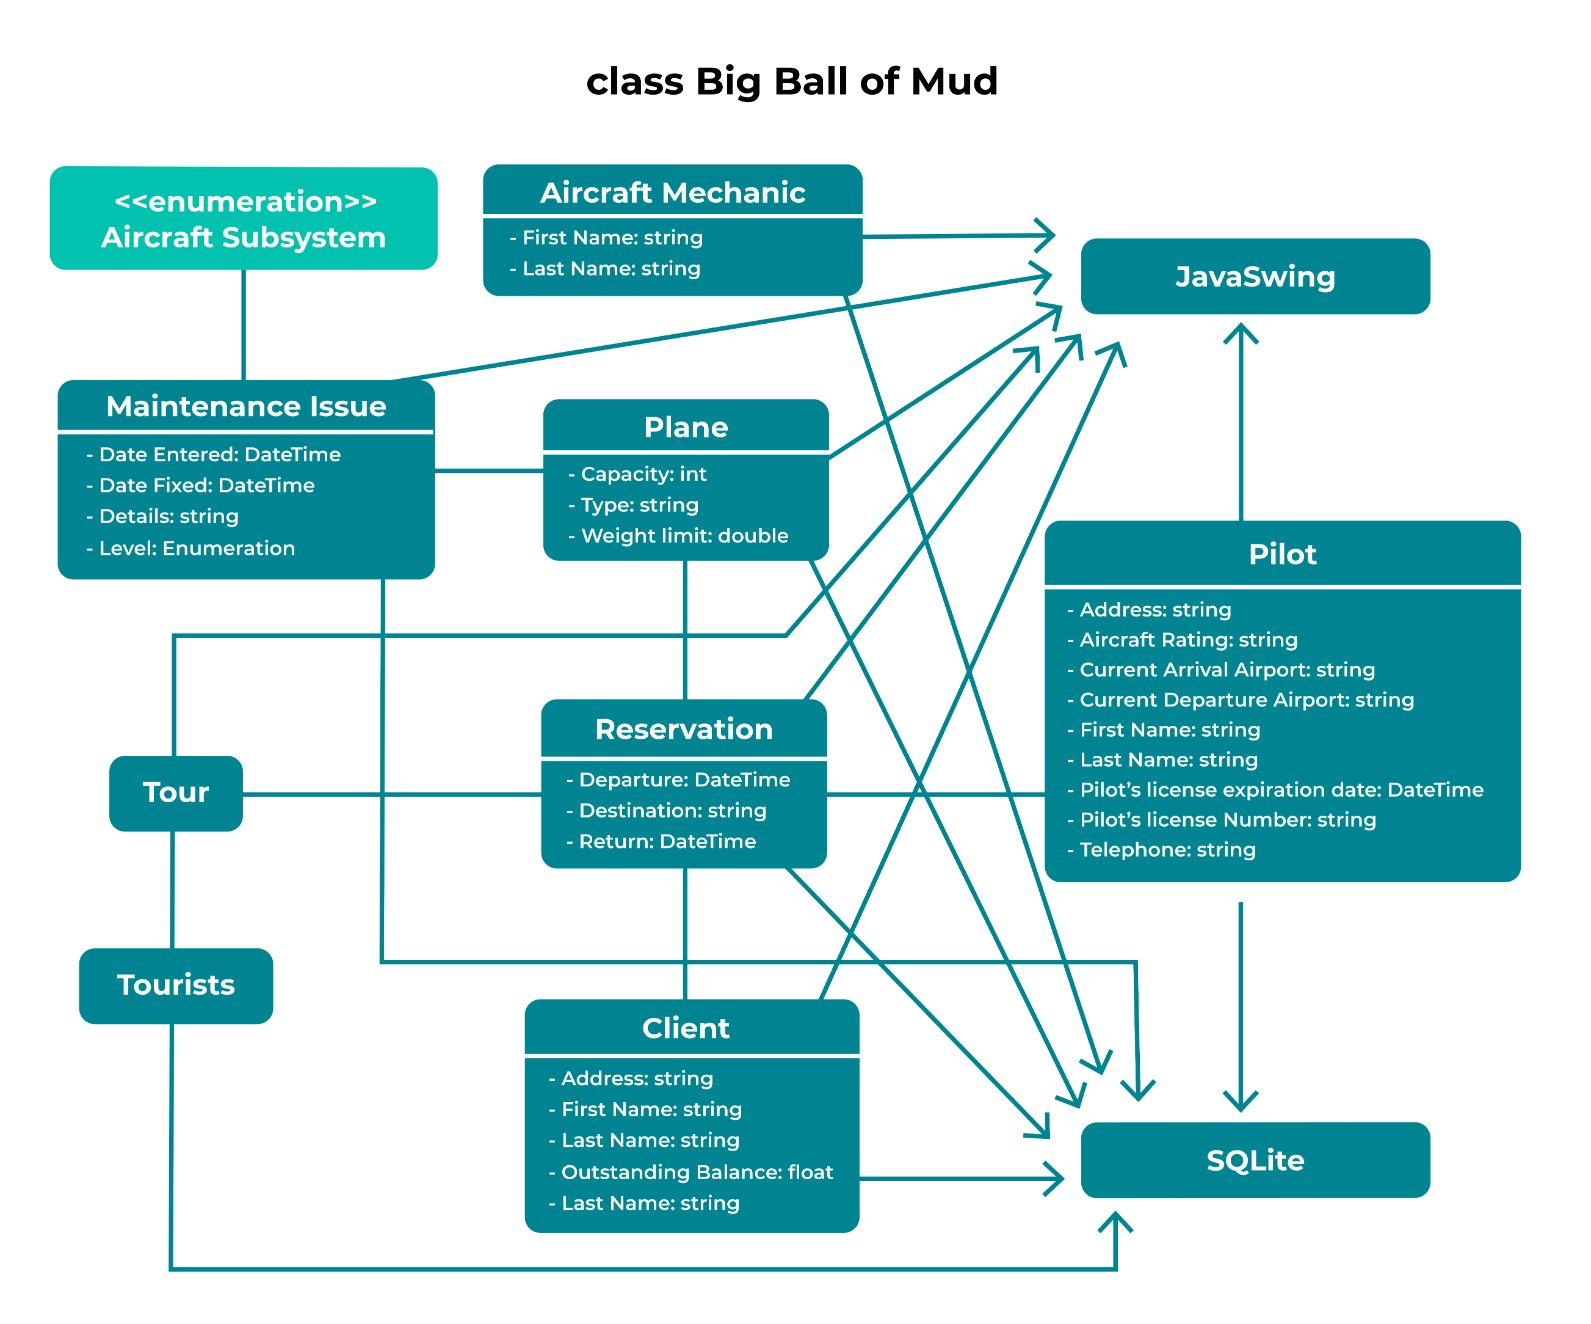
We see that anything that the user interacts with (client, reservation, plane, pilot) has a direct connection to some set of Java Swing components. Let’s look more closely at one snippet from the client class:
public static void fillTableWithData(JTable table) {
   	 table.setModel(buildTableModel());
	}

	private static DefaultTableModel buildTableModel() {
   	 ResultSet rs = DairyAirDb.getResultSet("SELECT * from clients");
   	 try {
   		 ResultSetMetaData metaData = rs.getMetaData();
   	 	Vector<String> columnNames = new Vector<String>();
   	 	int columnCount = metaData.getColumnCount();
   	 	for (int column = 1; column <= columnCount; column++) {
   	     	columnNames.add(metaData.getColumnName(column));
   	     	System.out.println("columnName: " + metaData.getColumnName(column));
   	 	}

   	 	// data of the table
   	 	Vector<Vector<Object>> data = new Vector<Vector<Object>>();
   	 	while (rs.next()) {
   	     	Vector<Object> vector = new Vector<Object>();
   	     	for (int columnIndex = 1; columnIndex <= columnCount; columnIndex++) {
   	         	vector.add(rs.getObject(columnIndex));
   	         	System.out.println("value [" + columnIndex + "][" + rs.getObject(columnIndex) + "]");
   	     	}
   	     	data.add(vector);
   	 	}
   	 	return new DefaultTableModel(data, columnNames);
   	 } catch (SQLException e) {
   		 // TODO Auto-generated catch block
   		 e.printStackTrace();
   	 }
    	return null;
    }
What is wrong here? Before jumping in and checking my answer, see if you can use some of our measuring sticks to analyze the code. Try using the SOLID principles and some of our key questions. As a reminder, those questions are:
Do I understand what it is trying to do? How it's doing it?
How easy is it to maintain? Make a change?
How easy it to test?
OK, are you done with your analysis? The big problem in this code is that it breaks the single- responsibility principle. The client class is not just holding onto client data, but it also needs to know how to interact with a Java Swing JTable object. It is generating the column headings, along with populating each row. That's way too much responsibility.
For example, what happens if we change the way we want to show the set of clients? This class will have to be fixed to show the data differently.
Plus, testing this method is tough. A JTable object needs to be built, even though a unit test shouldn’t require a newly constructed user interface. The result (i.e., the populated rows) is also contained in the JTable. Our unit test would have to query the JTable’s rows to validate correctness. 😱
And finally, if we wanted to change the presentation of client data just a little bit (like the width of the columns, or make some data appear bold), we have to go into this class, and modify how it builds each row and cell of the table. The functionality doesn’t belong here.
Define Our Solutions
The first half of our architectural change will follow the single-responsibility principle. The user interface and the application classes (client, reservation, plane) need to be separated. The client (reservation and pilot) class will no longer know anything about JTable. It will only be responsible for maintaining its own data. We'll start work on this by separating all the direct connections between our Java classes, and the Java Swing classes.
The second half of our change will be to pull the view into its own isolated layer. It will no longer be controlled by many different application classes.
After this modification, our architecture will look like this:
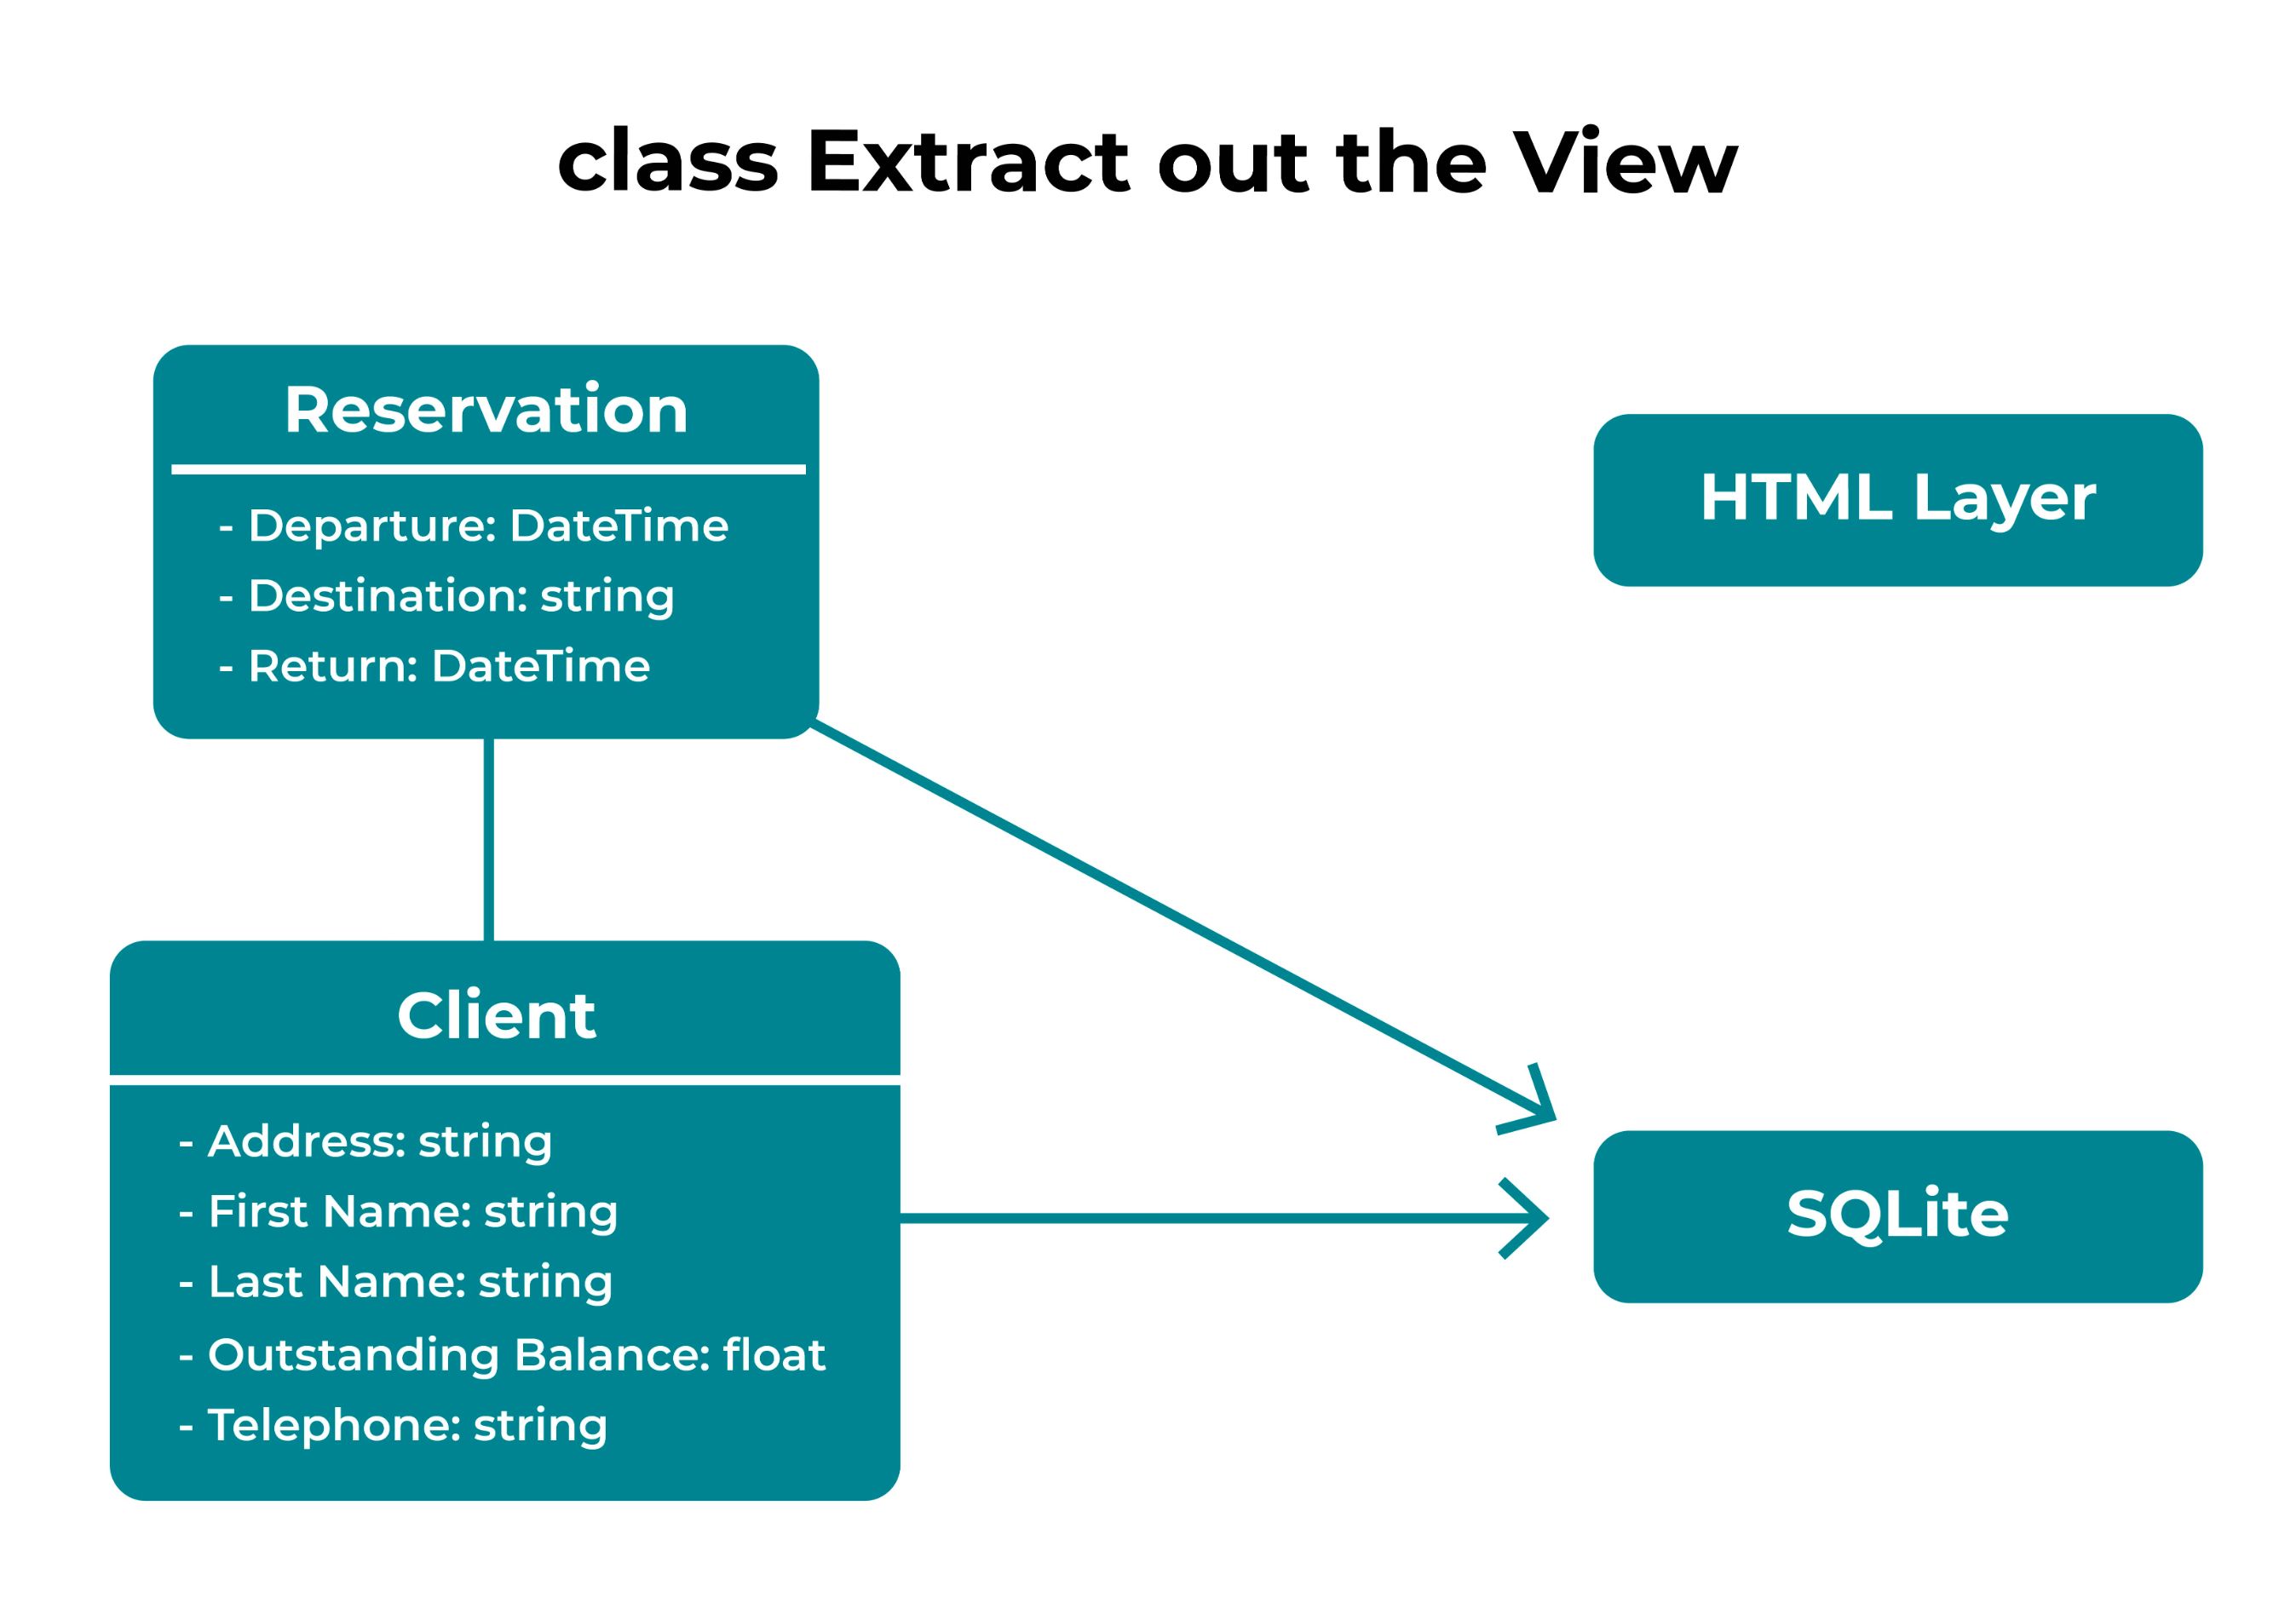
Notice there is no longer any direct connections between client or reservation to the view.
Apply Our Solutions
First, we need to separate those classes. An easy way to replace our Java Swing dependency is by using Spring Boot and the Thymeleaf rendering library. Using this, we'll convert the Java Swing interface into a web interface. We can start by building a new application. Go to https://start.spring.io:
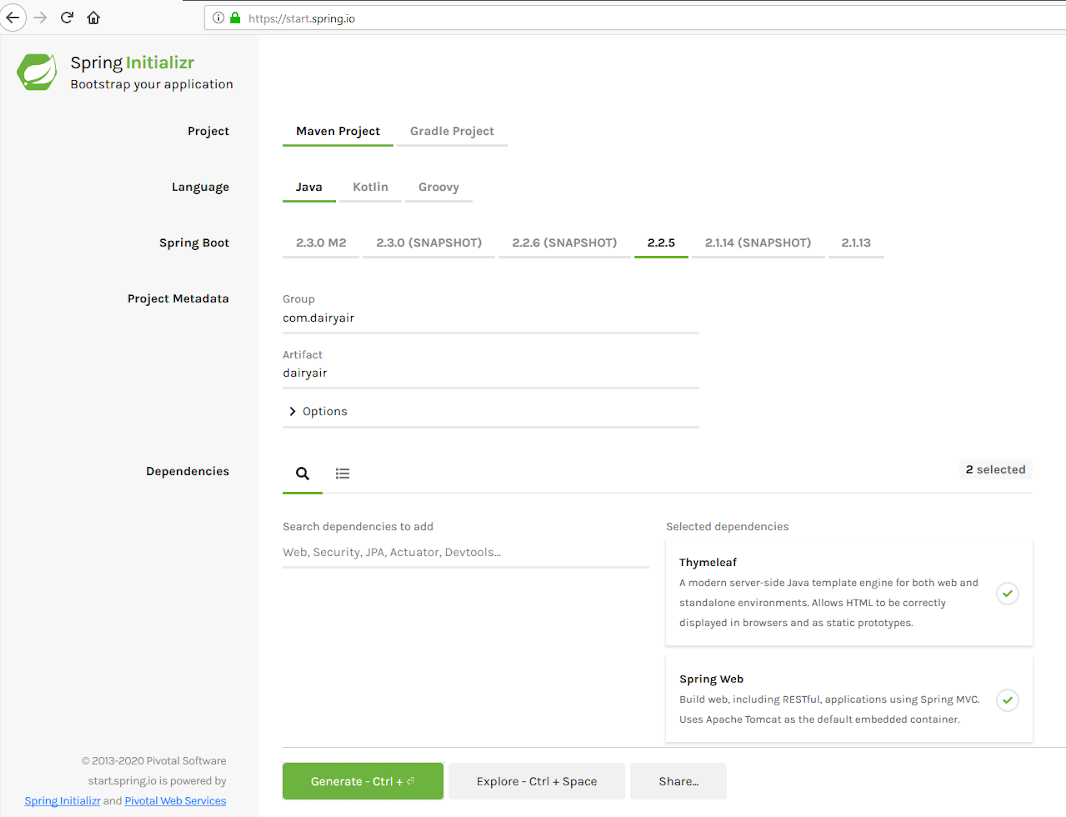
Now fill in the following information:
Project: Maven Project
Language: Java
Spring Boot: 2.2.5
Group: com.dairyair
Artifact: dairyair-mvc
Dependencies: Thymeleaf, Spring Web
When you're done, click "Generate."
Once the application is done, add a simple HTML user interface. Create the file index.html in the src/main/resources/templates folder. Have the file contain the following:
<!DOCTYPE HTML>
<html>
<head>
	<title>DairyAir</title>
	<meta http-equiv="Content-Type" content="text/html; charset=UTF-8" />
	<meta name="viewport" content="width=device-width, initial-scale=1">
</head>
<body>
    <a href="/index">
    <img th:src="@{/images/DairyAirLogo.jpg}" height="64" width="64"/>
    </a>
	<p>Welcome to Dairy Air</p>
</body>
</html>
Then, copy the file from here to src/main/resources/static/images/DairyAirLogo.jpg. Run the project. Connect with a browser by going to http://localhost:8080.
We now have a web application (which doesn’t do much), but has a separated view!
Separate Your Inputs
Interfaces consist of both an output side and an input side. On the input side, it is helpful if we think of the user interface as an event generator. Almost everything the user does with the interface should be an event that comes back to the controller.
For example, in the original implementation, we have some button event listeners. They configure the JTable object to show the corresponding set of items.
       JButton btn = new JButton("Clients");
        btn.addActionListener(new ActionListener() {
			@Override
        	public void actionPerformed(ActionEvent e) {
				Client.fillTableWithData(table);
        	}
        });
A little clunky. But it's expected when building up an interface with Swing.
Spring Boot will eventually do the connecting for us. But for now, we’ll just add some buttons to the UI, which will take us to pages (that don’t exist yet).
In the index.html file, add the following below the <p>Welcome to Dairy Air</p> line:
<p>Choose from the following</p>
<p><a href="/reservations">Reservations</a></p>
<p><a href="/clients">Clients</a></p>
<p><a href="/maintenance">Pilots Submit Maintenance Request</a></p>
<p><a href="/maintenance">Mechanics Update Maintenance Request</a></p>
Test the application again. You may notice that clicking on the logo, or any of the other buttons, results in an error page generated by Spring Boot. That is because these pages do not exist yet. Don't worry, we will add them shortly.
We have now completed the first steps in our MVC modification! We identified code that will not be easily modified, tested, or maintained. We introduced a view layer that is not directly controlled by our application classes. And we leveraged an MVC framework to make the work simpler.
Let's Recap!
Identify code that will not be easily modified, tested, or maintained.
Abstract out the view layer.
The layer is not directly controlled by application classes.
Think of the input side as an event generator.
Leverage an MVC framework to make refactoring simpler.
Now that we've extracted the view, let's move on to the model!
