Use Spring Security in Your Spring Boot App
You know that security is important. So how can you ensure that your application is secure? Spring Security!
Spring Security is an out-of-the-box framework for Spring that ensures a secure Spring Boot Application. Spring Security pre-configures easily customizable security functions to a Java application, and you can use it on any Java or Spring Boot application.
Essentially, Spring Security is a library of security functions you can add to your Spring, Spring MVC, Spring Boot, RESTful API, or single-page application on the Spring Framework. Also, integrating the Spring Security Framework is like importing a library of functions (and once again, you can add this library to any application on the Java platform).
Once you enable it on Spring Boot, it’s already autoconfigured to secure your application. However, based on the level of security you require, you can customize what you need to add or remove very easily. You can use Spring Security for securing login in, ensuring that the right users have the appropriate level of access to your app, and so much more! 😉
Identify How Spring Security Works
At a high level, your Spring application is made up of several modules that work independently of each other, and Spring Security is one of those. The Spring modules are like locked containers that allow other Spring modules to work together without getting in each other's way. When you add Spring Security, its primary job is to safeguard the HTTP requests processed through the web application. You see, every time a user clicks a button or information passes from one part of the web application to another, it sends an HTTP request. These HTTP requests are what you need to secure.
These HTTP requests to your web application go through three levels of protection after adding Spring Security.
HTTP firewall
Proxy design pattern
Filters
Let's explore each of these more in-depth.
Layer 1: HTTP Firewall
The HTTP firewall is at the front line. A firewall is a wall that allows communication to go out but is very selective about what goes in.

It's like the bouncer at a nightclub, selecting who gets into the club based on specific criteria. In an application, a firewall blocks suspicious things that are coming in - usually, bad requests. It throws away any HTTP request that looks suspicious right off the bat.
Layer 2: Proxy Design Pattern
Second, comes the proxy design pattern. That's just a nerdy way of saying there's an outside delegating authority that will manage its access to a protected resource, which is your web application.

It essentially classifies the HTTP traffic and sends them to the appropriate servlet filters in the filter chain.
OK, awesome...but what on earth are servlet filters? Or a filter chain? 😦
Spring Security contains an engine of servlet filters. In Java, a servlet is a program that runs on your web application. The filter part is where Spring Security’s primary function lies.
Spring Security calls each little security configuration (or ruleset) a filter. So, servlet filters in Spring Security are just a bunch of small programs that perform a security function on your web application.
Layer 3: Filters
Filters catch all of the HTTP requests that get into your web application and make sure they’re secure. Each filter provides a security configuration that you can add to your web application. A collection of these implemented servlet filters is called the Spring Security filter chain. 😄

So how does the proxy work with filters?
The proxy design pattern for Spring Security goes into a Java library of methods called the DelegatingFilterProxy class, where it invites Spring Security to your web application by including the filter chain in Spring Boot. The security filters are then added to create a security engine for the application.
What kinds of things can filters do?
Based on the complexity desired by the developer, it can provide simple to advanced security configurations against attacks. The Spring Framework also allows customizable servlet features required for the web application.
For example, say you have a filter that secures your login credentials. Once the HTTP call is made from the front-end and gets through the first firewall, DelegatingFilterProxy will classify and send the HTTP traffic through the filters that deal with your login credentials in the Spring Security filter chain, so the proper controls are in place.
So to sum up, Spring Security secures your web application’s HTTP requests by passing them through three layers:
First, the HTTP firewall blocks suspicious requests.
Second, the proxy design pattern (DelegatingFilterProxy) will take the rest of the HTTP requests and send them to the Spring Security filter chain.
Finally, the filters in the chain will take those HTTP requests and make sure that they follow the security rules in the filter.
So that's all excellent theory, but there's no better practice than setting it up yourself. Let's get started by making a new Spring Boot app and installing Spring Security.
Create a Spring Boot App With Spring Security
We’re going to create a new standalone Spring Boot application. This will gives you the baseline app you need to work with Spring Security throughout the rest of this course.
Integrating the Spring Security framework into a Spring Boot app is similar to importing a library of functions.
Use Spring Initializr to Create a Spring Boot App With Spring Security
First, set up a standalone Spring Boot web application. The Spring Initializr (yes, I spelled that right) is a GUI interface you can use to configure your Spring Boot application. The great news is that Eclipse is already equipped with Spring Initializr to make creating your Spring Boot app easier.
Let's Recap What We Did:
Click on File -> New -> Project.
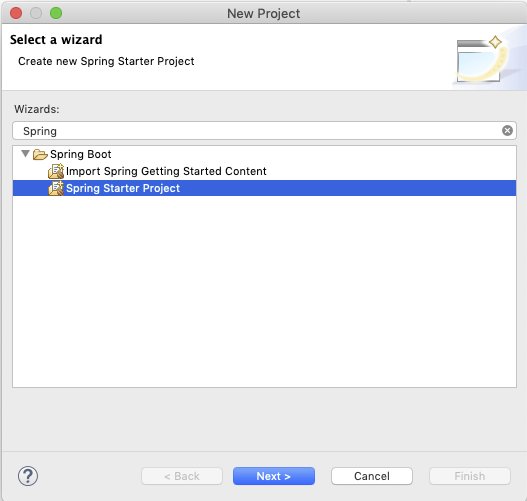
Look for the Spring Boot wizard. You can scroll or type it in the search box.
If you don't find it, go to Help -> Eclipse Marketplace.and search for the latest Spring Tools release. This includes Spring Boot support. Click Install, and restart Eclipse.
Now, on to the next phase:
Choose the Spring Starter Project to start the Spring Initializr, and click Next.
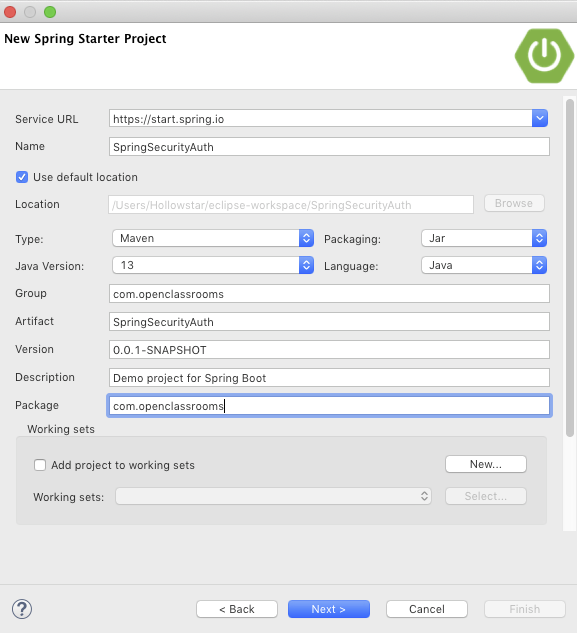
You will see that the wizard connects directly to the Spring Initializr URL. Now fill out the following:
Name: Choose a name. I called it SpringSecurityAuth.
Java Version: Choose the latest according to the JDK version you have installed on your computer. It defaulted at 8, and I chose 13.
Group: I will call it com.openclassrooms.
Package: To match my group name, I called it com.openclassrooms.
After you click Next, you will add your dependencies, which is an essential part of the project. Add the following dependencies by typing them into the search bar and checking the box next to the name. Add these three dependencies:
Spring Web
Spring Security
OAuth 2 Client
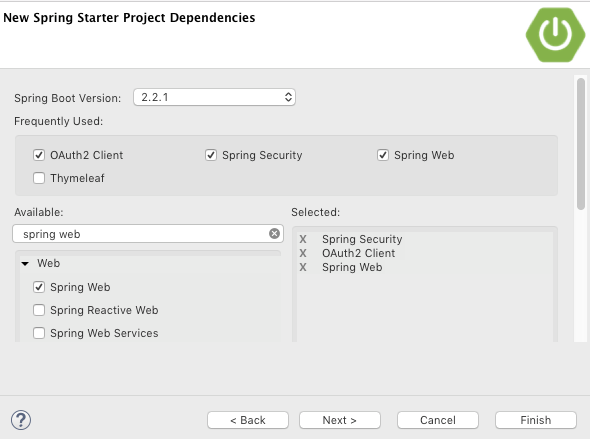
Click Finish when you complete it. Now you can grab a cup of Java as you wait for Eclipse to download your resources!

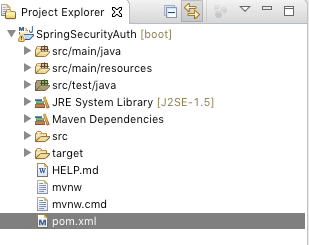
Click on Window -> Show View -> Project Explorer to see the Spring application project. If you click on the down arrow, you can see the file structure for your Spring app.
Manage Your Dependency Hierarchy in Spring
Thanks to Spring Boot, the Spring Initializr made a nifty little app, including the necessary files, so all you have to do is add your files, and you'll be on your way.
The Spring Framework runs on several different modules, which are different types of functionality that help Java developers pick and choose what they require for the Spring app. It also makes it easier to integrate other frameworks. For example, Spring Security is a module and includes Java classes used to implement the security functionality you will be using. The dependencies are the Java libraries that your Spring Boot app needs to run its functionality.
So, now you have created a Spring app using Spring Boot and added three dependencies to it on Spring Initializr: Spring Security, Spring Web, and OAuth 2 Client.
Wait, so why did we add those dependencies?
We added:
Spring Web to give you web layer functionality, hence making it a web application.
Spring Security to give you the security layer that begins doing its job before you even initialize the application.
OAuth 2.0 Client because you will use its special security protocol on your login form. We haven't talked about this, yet, but you'll use it in Part 2 of this course.
Let’s take a look at the dependencies. If you look in your Project Explorer on the left pane in Eclipse, you will find the pom.xml file in the target folder on the bottom here:
When you open up the pom.xml file, you will find your dependencies. A few more came implicitly with Spring Initializr. If you look carefully, they are dependencies used for testing.
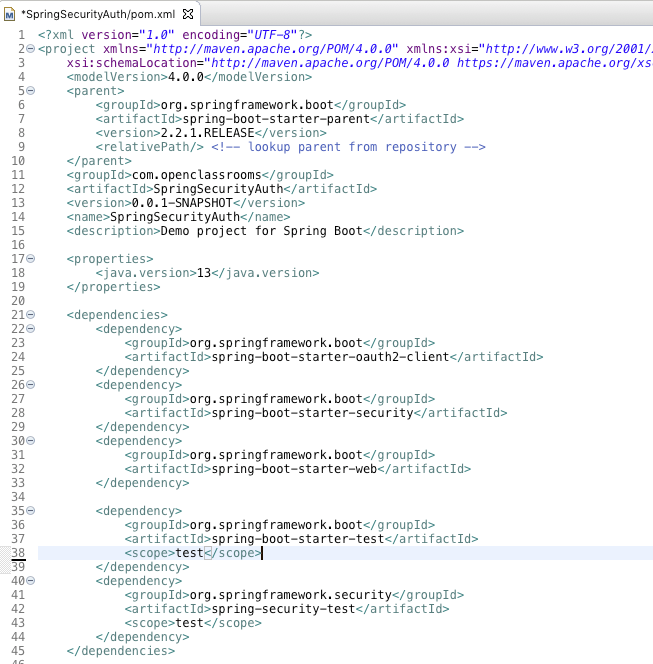
You may notice something interesting. OAuth 2.0 Client is the first dependency listed, followed by Spring Security and Spring Web.
Why is that?
Well, this is called the dependency hierarchy. The Spring Boot application requires that certain dependencies need to be injected and initialized before other ones. In this case, OAuth 2.0 is a foundation for security rules that will be added automatically, followed by the in package rules of Spring Security.
First, you want to open up your main class in src/main/java. It should be under your package name. Mine is called com.openclassrooms.
If you called your application SpringSecurityAuth, the main class will be called SpringSecurityAuthApplication. When you open it up, it will look like this:
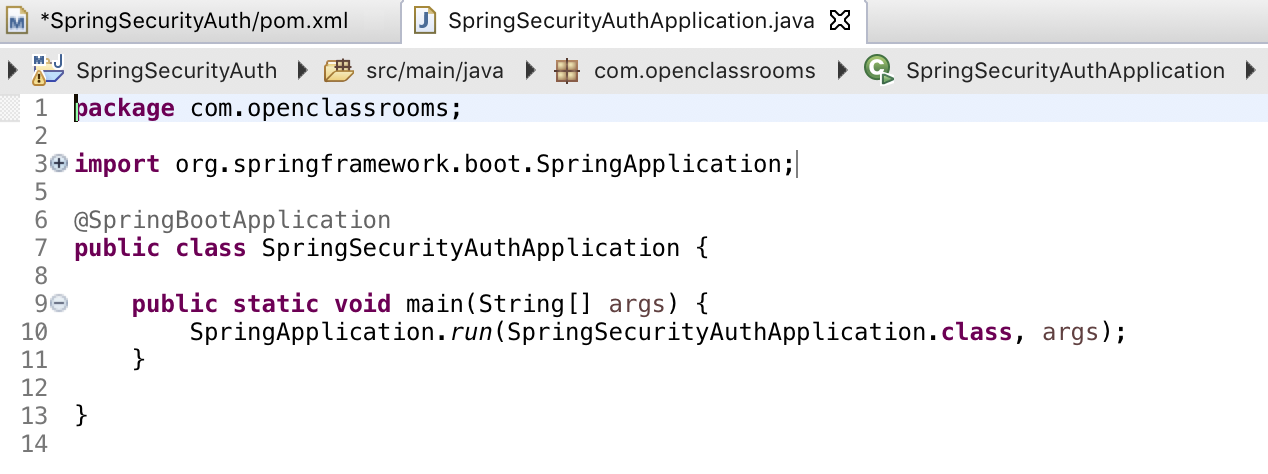
This will be your main method where your Spring Boot application opens up and starts.
Let’s Recap!
In this chapter, you learned the ins and outs of the Spring Security Framework. Here are some of its main features:
The Spring architecture works with Spring Security to add three layers of security to your web application:
HTTP firewall- catches the suspicious traffic coming to your web application.
DelegatingFilterProxy- routes the rest of the HTTP traffic to its designated security filter.
Security filter chain- the main security configuration that houses the security rules for the web application.
Spring Initializr is a tool used to autoconfigure a Spring Boot web application.
Dependencies are the main code libraries that you can import into your web application.
We added Spring Web, Spring Security, and OAuth 2.0 dependencies.
To use Spring Security, you need something to secure. Since, at one point or another, as a Java developer, you’ll have to obtain a login form and secure it, we’ll practice working with that in the next chapter.
