Configure OAuth 2.0 With OpenID Connect on a Spring Web Application
Now we are working on the final and most significant part of your login form. You will add OAuth authentication capabilities to your web application.
Set Up a Login Form to Work With OAuth 2.0 and OIDC
OK, this looks like you’ve got a great, big job ahead of you, but you can do it! You’ve already set up your form with the formLogin() method and in-memory authentication.
You also used configuration, WebSecurityConfigurerAdapter, and HttpSecurity libraries for your basic Spring Security login form. There won’t be much of a difference in how you start your login form with new security features.
You could use Twitter or Facebook as your authorization servers, but I don’t want to force you to make accounts you might not have. But, if you’re a developer, you’ll likely have or need a GitHub account!
To use our client web application with a GitHub login, you will need to register on GitHub to acquire a client ID and client secret. That’s basically like a username and password for your web app to connect to GitHub's authorization server with OAuth 2.0.
Start by going to the Github OAuth 2.0 Registration Page to register your account for an OAuth 2.0 application. On the registration page, put in your localhost address (localhost:8080) instead of an actual domain name. You can also put in a redirect URI, although GitHub generates it's own. This is the URL on your client web app that you are redirected back to after authenticating on GitHub.
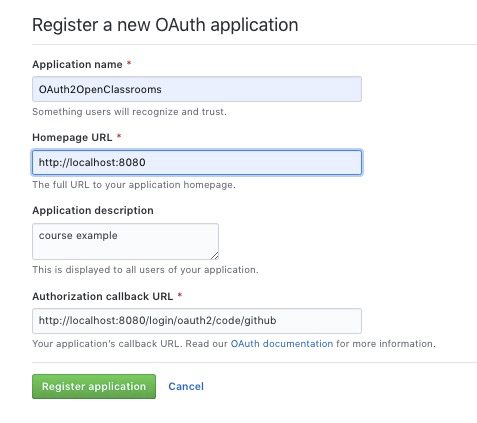
For example, I’ll put in the default http://localhost:8080/login/oauth2/code/github<http://localhost:8080/github> for my redirect URI. On success, you will get your own client ID and client secret. Save these for later.
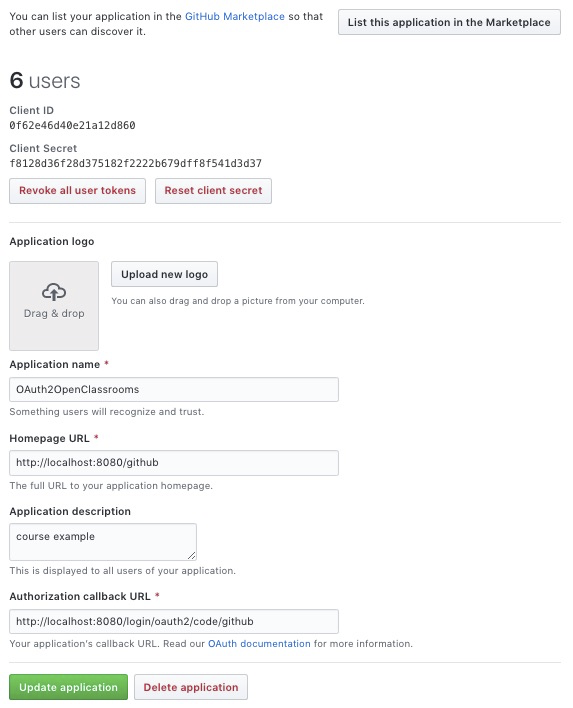
Once you have acquired your client ID and client secret, you can enter the details in your application.properties file in the src/java/resources folder. This will automatically direct your OAuth users to the proper authorization server with your client app.
To use GitHub as your OAuth 2.0 login, you can copy and paste this in your application.properties file, but make sure you replace the client ID and client secret with your own registration information provided by GitHub!
spring.security.oauth2.client.registration.github.client-id=<your client ID>
spring.security.oauth2.client.registration.github.client-secret=<client-secret>
All you do is just paste it in so your application.properties file should look like this!

OK, let’s break this application configuration file down.
The client web app sends the client id and client secret to GitHub to log your client web app in and create an OAuth 2.0 authentication form for your client app on GitHub’s authorization server.
Configure OAuth 2.0 to the Login Page
Now let’s add OAuth 2.0’s handy default login to your page. All you have to do is add the oauth2login() method to your security filter chain in the SpringSecurityConfig.java file.
@Override
public void configure(HttpSecurity http) throws Exception {
    http
        .authorizeRequests()
        .antMatchers("/admin").hasRole("ADMIN")
        .antMatchers("/user").hasRole("USER")
        .anyRequest().authenticated()
        .and()
        .formLogin()
        .and()
        .oauth2Login();
}
Note that I have added two more lines to what we’ve already got in the SpringSecurityConfig.java file. This brings up OAuth 2.0’s default login page with a link to the GitHub login page for the web application we registered. Like magic! ✨
I can make you a Spring Security magician T-shirt later, but let’s add a landing page for GitHub to your controller now. Check out the getGithub() method for a quick landing page:
@RestController
public class LoginController{

    @RolesAllowed("USER")
    @RequestMapping("/**")
    public String getUser()
    {
        return "Welcome User";
    }

    @RolesAllowed({"USER","ADMIN"})
    @RequestMapping("/admin")
    public String getAdmin()
	{
		return "Welcome Admin";
	}

    @RequestMapping("/*")
    public String getGithub()
    {
       return "Welcome Github user!";
    }
}
Note that I added a super quick mapping for a landing page after authenticating to GitHub. Now it should say Welcome GitHub user! after you authenticate. In the mapping, I put the /* wildcard URL in the RequestMapping for getGithub() because GitHub dynamically generates a redirect URL that corresponds with your Client ID.
Login With OAuth 2.0
Here is where you get some real login action going. Build and execute your web application by right-clicking on SpringLoginApplication -> Run as -> Spring Boot App. Now go to your browser and type in localhost:8080.
Wow…. this is interesting:
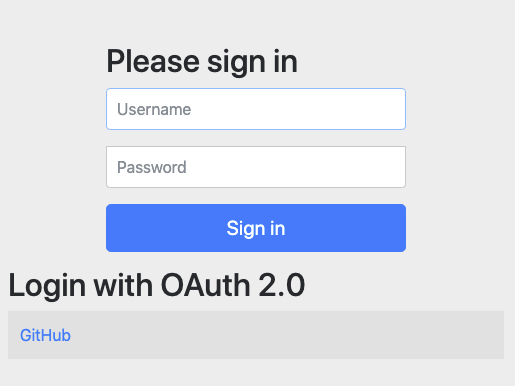
In addition to the Spring Security login form, you have now added OAuth 2.0’s default login form.
Now click on the super plain link to GitHub’s authorization server.
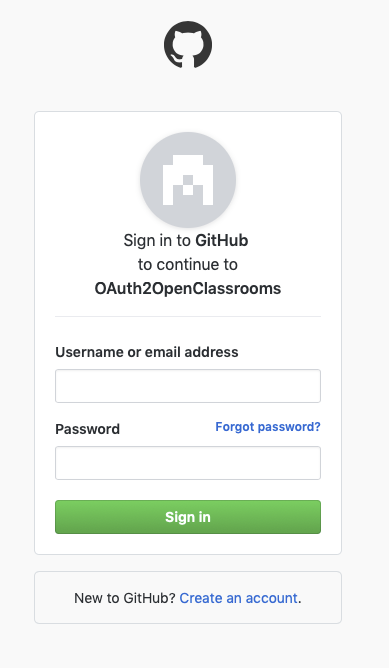
The page will take you to a link specific to your web application. I called mine OAuth2OpenClassrooms when I registered the web application on GitHub. Log in with your GitHub credentials.

You should end up on the landing page. It would be a good idea to give it a personal touch. Check out the next section on how you can do that.
Explore the Principal User Object
Let’s add the user’s name in your greeting instead of it just saying, “Hello, GitHub user.” How can you do that? Start by looking at the information sent from GitHub and find out what you can extract.
Let’s put in some code that pulls in the information from the principal. The principal is an object that is sent over to the client web app and holds various protected and unprotected user details. An example of protected resources would be specific user details and your access token. Unprotected resources hold information like your username so its more readily available. What’s interesting about GitHub, is that unprotected resources hold a lot of information. Let’s check it out!
Let's pull the Principal user in as the parameter that holds the Principal object in the getGithub() method. Typically, you can pull a username from a Principal using the user.getName() method, so I'll use that as well.
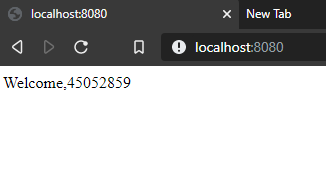
In the end, it should say Welcome, <my Github username>.
public String getGithub(Principal user){
    return "Welcome, " + user.getName();
    }
It looks like it was a no-go. It shows some sort of a number:
Well, I guess that doesn't work. 😠 Let's see what kinds of things there are available to print out from the Principal user. Add a line to the getGithub() method to see what was sent over in the Principal user object. You can do that by returning a printout of the Principal user object converted to a String form using user.toString().
Do you think a username will show up in the user.toString() printout? 😧
Let's find out.
public String getGithub(Principal user){
    return user.toString();
    }
This time the getGithub landing page is completely different. Look at all this information.
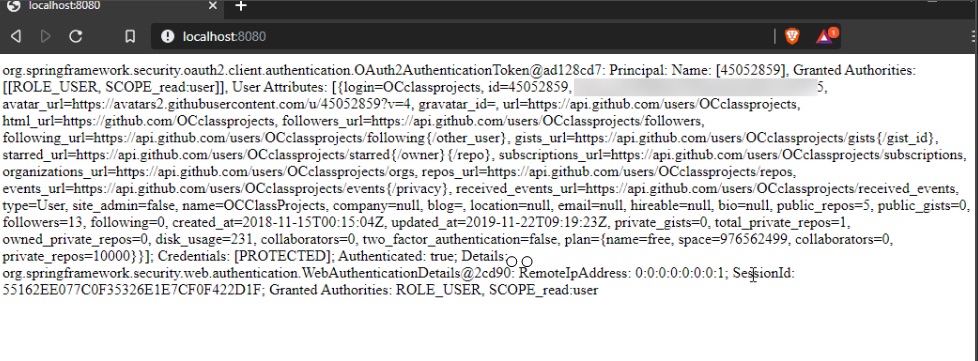
It looks like the console has all the information sent over from the principal. You can see that something called grant authorities has given me a user role, so that looks like the authorization was completed.
It shows the user profile information that I authorized when logging into my GitHub OAuth 2.0 application during authentication. If you remember, that was the scope. The scope is read-only profile information you authorize the client web app to have.
Pull Protected Resources From the Principal User Object
I want to see more important details. I want it to print out my full name and email address. Also, I want to see what my access token looks like, so let’s take a look at that too.
I also want to make this method readily available to use for other OAuth 2.0 IdPs, not just GitHub.
First, delete the entire getGithub() method in the BasicController.java class altogether. You can do that because you’re working with protected resources like the access token, and in the next section, the Base64 ID token. To get set up to input those protected JWT tokens, the authentication class will no longer be useful.
You need a new method for your LoginController class to work for your OAuth 2.0 logins. Call the method getUserInfo() because you want to give it a description that works with multiple IdPs, not just GitHub. You still use the principal as your parameter as it holds the user details returned from the authorization servers.
@RequestMapping("/*")
public String getUserInfo(Principal user) {
}
Now you have to figure out a way to input the principal’s different user attributes into memory and output them from memory. Two recommended ways to work with the string content is either with a HashMap object or a StringBuffer object.
In this example, I use the StringBuffer class with an instance called userinfo because it's a clean way to create arrays with strings to which I can add more user attributes.
public String getUserInfo(Principal user) {
    StringBuffer userInfo= new StringBuffer;

    return userInfo.toString();
}
Let’s create a getter method for your protected user info in the access token. This is where you can get your full name, email address, and access token information to add to your StringBuffer in the getUserInfo() method. Create two more methods to get this information.
These other methods return StringBuffer data from the Principal user object back to the getUserInfo () method.
The UsernamePasswordAuthenticationToken is a class that will get the username information after authenticating the token with the user using the getPrincipal() method. Then it will be added to the StringBuffer instance, usernameInfo. You can add this method under the getUserInfo() method.
 private StringBuffer getUsernamePasswordLoginInfo(Principal user)
	{
		StringBuffer usernameInfo = new StringBuffer();

		UsernamePasswordAuthenticationToken token = ((UsernamePasswordAuthenticationToken) user);
		if(token.isAuthenticated()){
			User u = (User) token.getPrincipal();
			usernameInfo.append("Welcome, " + u.getUsername());
		}
		else{
			usernameInfo.append("NA");
		}
		return usernameInfo;
	}
The OAuth2AuthenticationToken class has methods to use on protected resources such as the protected information in the user object. Create a token called authToken of type OAuth2AuthenticationToken and typecast the Principal object user to a protected token under this class.
private StringBuffer getOauth2LoginInfo(Principal user){
    StringBuffer protectedInfo = new StringBuffer();
    OAuth2AuthenticationToken authToken = ((OAuth2AuthenticationToken) user);
}
With the OAuth2AuthenticationToken class, the authorized client app (Authorized Client) has permission to access more protected resources like the access token. For this, the OAuth2AuthorizedClient class is used with methods that load authorized client services with the client ID and the user’s username.
But first, create a global private final variable for your LoginController class of type OAuth2AuthenticationToken and call it authClientService. Due to its secure nature, it will be set as immutable:
private final OAuth2AuthorizedClientService authorizedClientService;
Create a global public constructor for your BasicController class:
public LoginController(OAuth2AuthorizedClientService authorizedClientService) {
    this.authorizedClientService = authorizedClientService;
}
Assign your OAuth2AuthorizedClient object to your authorized client services methods. Notice that the loadAuthorizedClient method returns the client matching the client ID, and the principal name in the parameters.
Right now it returns protectedInfo, which does not contain anything.
private StringBuffer getOauth2LoginInfo(Principal user){

    StringBuffer protectedInfo = new StringBuffer();

    OAuth2AuthenticationToken authToken = ((OAuth2AuthenticationToken) user);

    OAuth2AuthorizedClient authClient = this.authorizedClientService.loadAuthorizedClient(authToken.getAuthorizedClientRegistrationId(), authToken.getName());

    return protectedInfo;

}
Take the StringBuffer information pulled from the principal user object with UsernamePasswordAuthenticationToken and OAuth2AuthenticationToken, and append the returned usernameInfo and protectedInfo, to userInfo in your getUserInfo() method.
public String getUserInfo(Principal user) {

    StringBuffer userInfo= new StringBuffer;

    if(user instanceof UsernamePasswordAuthenticationToken){
			userInfo.append(getUsernamePasswordLoginInfo(user));
		}
		else if(user instanceof OAuth2AuthenticationToken){
			userInfo.append(getOauth2LoginInfo(user));
		    }
		return userInfo.toString();
	 }
Now you have the information you need to print out the full name, email address, and access token. Use a HashMap variable called userAttributes for <key, value> pairs that match the attributes (the user details) with the key (title).
Go back to your getOauth2LoginInfo() method, and print out the information for the user when they log on. The name and email are attributes that are pulled from the principal. Now there’s the access token. Add it using the getAccessToken() and getTokenValue() methods and print that out too. The userToken variable is assigned the access token value, so it will contain the encrypted character string that is the access token. This is all appended onto protectedInfo, and returned to its function call in get UserInfo().
Let's see what happens when you authenticate with the Google login.
private StringBuffer getOauth2LoginInfo(Principal user){

    StringBuffer protectedInfo = new StringBuffer();

    OAuth2AuthenticationToken authToken = ((OAuth2AuthenticationToken) user);
    OAuth2AuthorizedClient authClient = this.authorizedClientService.loadAuthorizedClient(authToken.getAuthorizedClientRegistrationId(), authToken.getName());
    if(authToken.isAuthenticated()){

    Map<String,Object> userAttributes = ((DefaultOAuth2User) authToken.getPrincipal()).getAttributes();

    String userToken = authClient.getAccessToken().getTokenValue();
    protectedInfo.append("Welcome, " + userAttributes.get("name")+"<br><br>");
    protectedInfo.append("e-mail: " + userAttributes.get("email")+"<br><br>");
    protectedInfo.append("Access Token: " + userToken+"<br><br>");
    }
    else{
    protectedInfo.append("NA");
    }
return protectedInfo;
}
Will I be able to see this information?
Here is a screenshot of the results that I got.
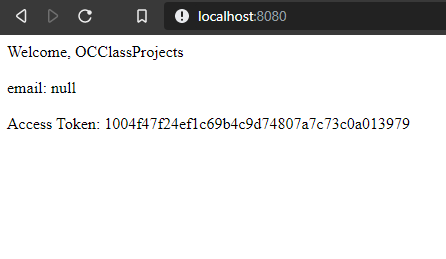
So why doesn't the email address show? 😭
When you pull information from Principal user object, you have unprotected and protected information in there. You can use some classes like principal and authentication to pull unprotected information. Classes that can pull protected information have a layer of abstraction and require more validation. GitHub puts email address information under the protected layer, so it is likely that the only way you can pull it is from the ID Token with an openid email claim in the scope.
This leads me to OpenID Connect. Let's go to the next section to check out how we can pull protected information from an ID Token by acquiring and decoding it!
Use Open ID Connect With Google
You learned a lot about OAuth 2.0 and how you can get some client information with the principal and the user details. But to tell you the truth, not all IdPs send over as much detailed information about a user as GitHub.
Let’s switch gears and talk about how it’s so essential to use OpenID Connect for authentication. Google is an excellent resource for OAuth 2.0, and it has excellent support for OpenID Connect.
It won’t take long to add Google to your OAuth 2.0 login form. First, go to the Google OAuth 2.0 Credential Registration and click on Credentials in the left pane -> Create Credentials -> OAuth client ID.
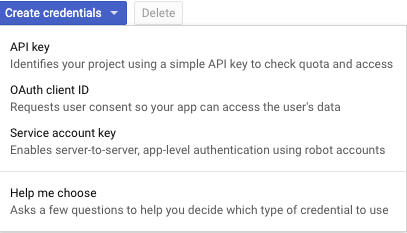
In the form, create a name for your OAuth 2.0 Client web application. To work on your localhost:8080 web server, set up your configuration like this:
Restrictions:
Javascript Origins: http://localhost:8080
Authorized redirect URI: http://localhost:8080/login/oauth2/code/google
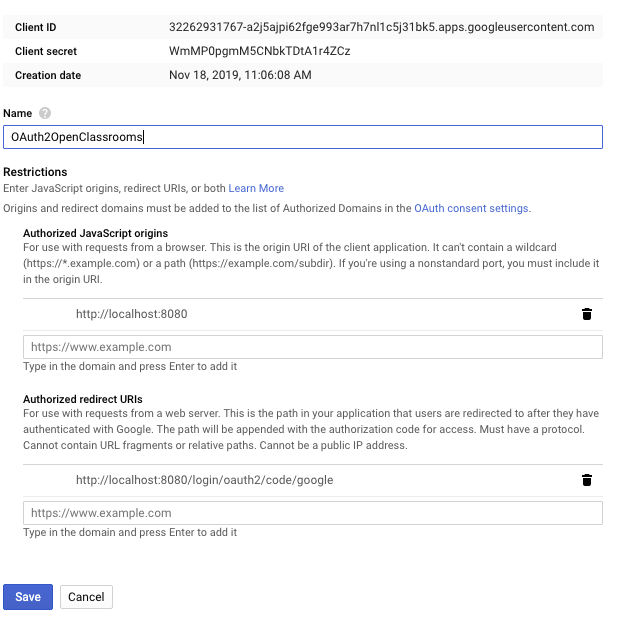
Save your Client ID and Client secret so you can put Google properties in your application.properties folder under your GitHub properties.
spring.security.oauth2.client.registration.google.client-id=<clientid>.apps.googleusercontent.com
spring.security.oauth2.client.registration.google.client-secret=<clientsecret>
spring.security.oauth2.client.registration.google.scope=openid,profile,email
The key to adding OpenID Connect to your initial request to the login server is the scope for openid and the claims. I added openid as the scope with profile and email as the claims. These claims should come back with the ID token and the access token in the Principal user object.
Now you have to add your ID token retrieval to your LoginController.java file. You do this in order for the openid scope to work.
Luckily, you can append some code to get your ID token in your getOAuth2LoginInfo() method. We have managed to pull in the Principal user details and access token. Now you have to get your ID token that holds your claim information.
The ID token is a protected resource, so add to your get Oauth2LoginInfo() method to retrieve it. Use the OAuth2User class to create a variable principal for your protected OAuth2AuthenticatedToken typecasted user object to retrieve the ID token and print out the encrypted character string. The getPrincipal() method gets all the information the OIDC classes need to make a new ID token.
OAuth2User principal = ((OAuth2AuthenticationToken) user).getPrincipal();
First, create a new getter method for your ID token. Return an ID token of type OidcIdToken, a class used to make ID tokens. DefaultOidcUser is a specific subset of OidcUser and ultimately, OAuth2User. By checking to see if principal is of this subset in the if statement, a variable called oidcUser of type DefaultOidcUser is created using the required information provided from the protected principal information of the overarching OAuth2User class.
private OidcIdToken getIdToken(OAuth2User principal){

    if(principal instanceof DefaultOidcUser) {
       DefaultOidcUser oidcUser = (DefaultOidcUser)principal;
       return oidcUser.getIdToken();
    }
    return null;
}
Now that you’ve sent your ID token back to your getOauth2LoginInfo() method, add some code so it knows what to do with it. Add the code directly below the following append statement in your getOauth2LoginInfo() method:
protectedInfo.append("Access Token: " + userToken+"<br><br>");
Start with the OidcIdToken class to create a variable idToken to hold your ID token. It gets assigned to the function call to getIdToken() that sends in the principal as a parameter.
OidcIdToken idToken = getIdToken(principal);
Now append the ID token character string to protectedInfo. The ID token holds the claims info that you requested in your scope. If you remember, you created your scope for Google with the values openid profile email. With openid as the required default, your additional claims were for verified profile and email information to authenticate your user.
In the code below, you have a HashMap for your claims which you retrieve using the getClaims() method specified in the DefaultOidcUser class:
if(idToken != null) {

    protectedInfo.append("idToken value: " + idToken.getTokenValue()+"<br><br>");
    protectedInfo.append("Token mapped values <br><br>");

    Map<String, Object> claims = idToken.getClaims();

        for (String key : claims.keySet()) {
        protectedInfo.append("  " + key + ": " + claims.get(key)+"<br>");
        }
}You have gotten to the heart of securing your login page with OAuth 2.0! I hope you enjoyed it because there are limitless opportunities in how you can set it up securely using token-based authorization and authentication.
Also, now that you’ve gotten through the lesson, you can add OAuth 2.0 and OpenID Connect as a skillset to your resume because you are now a Spring Security/OAuth 2.0/OpenID Connect ninja!
Let’s Recap!
You have gone through the following steps to create a default OAuth 2.0 login with OIDC:
Configure the OAuth 2.0 default login in the security filter chain.
Register your web application with GitHub and Google for a client ID and client secret.
Add the GitHub configuration to the application.properties file.
Extract principal user details and access token from GitHub.
Configure OIDC with GitHub in the application.properties file.
Extract principal, access token, and ID token from Google.
Decode the ID token to extract claim information.
Now there’s more. You’ve added some great options to authorize users to your web application, but how can you be sure that regular users can’t get on pages they aren’t authorized to see?
That’s important, so we should probably set up a test method to make sure you can stay on top of that! Let’s explore how you can create that method in the next chapter.
