Follow Spring MVC architecture to turn static HTML into a Thymeleaf template
As you might remember, MVC is a design pattern that divides the user interface of an application into three separate components:
Model: which contains the data to be displayed to the user.
View: which is a visual representation of the data (e.g., HTML).
Controller: which receives user requests and changes the state of the model.
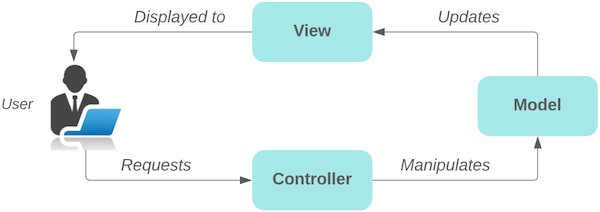
Let’s see how this pattern is implemented in Spring MVC.
Understand Spring MVC architecture
The architecture of Spring MVC consists of a few cleanly separated major components with well- defined responsibilities. You can configure any of these components if you want to. You can even replace them with your own own custom implementation. This flexibility and strength was the reason it became the most popular MVC framework in Java soon after it was released.
How does this work in web applications?
To understand that, you need to know how web apps work. The sole purpose of a web application is to serve web requests; in other words, receiving an HTTP request and then responding with an HTTP response. In fact, it's much like a marketing business that serves its clients. A request for a new ad comes in, and first, it is received by a director/coordinator responsible for following it until it is handed to the customer. The coordinator would start by finding someone who is specialized in the content type of the ad. They'd ask this person to come up with some ideas for content and then take those ideas to content creators like graphic designers or videographers. These people would generate the content for the client. Once that's done, the coordinator would hand the end result to the client.
Spring MVC follows a similar workflow to serve HTTP requests. Let’s have a closer look at how all of this happens:
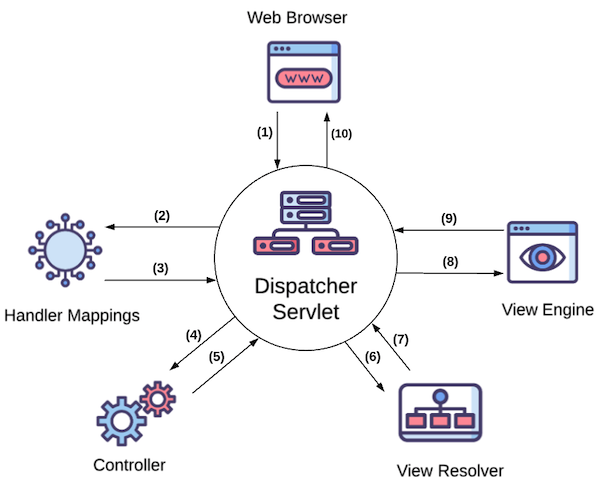
As you can see, the DispatcherServlet is at the center of how Spring MVC functions. It's just like the coordinator at the marketing company. First, it receives HTTP requests from the browser. Then it coordinates all the other major components of Spring MVC to go ahead step by step and produce a response for the browser. Let's look at each of these steps in more detail:
A request from a web browser is sent to our Watchlist application. For example, an
HTTP GETrequest to the URL/Watchlist. This request will be received by the DispatcherServlet.The DispatcherServlet asks handler mappings to see which method of which class is responsible for processing this request. A handler mapping is like a database or a person who has records of each person’s responsibility in a company. It also maps incoming requests to handler methods. A handler method is a method in a Java class that handles incoming HTTP requests. The Java class that contains these methods is called a controller class.
Handler mappings send back the handler method's details to the DispatcherServlet.
Now that DispatcherServlet knows which method is responsible for handling this request, it makes a call to that method. The HTTP request data will also be passed to the handler method as parameters.
The handler method (which is written by us) processes the input. For example, it loads the name of the movies in the user’s watch list based on the input, and returns two things to the dispatcher: the name of the HTML template (view), e.g.,
watchlist.htmland the data needed to render it (model), e.g., a list of watch list items.Dispatcher gives the view name to the view resolver to get the actual view content.
View resolver returns the actual HTML template content back. Note that views are also written by developers while other components are parts of the framework.
Dispatcher gives the model and view to the view engine (Thymeleaf template engine, for example).
View engine merges the view template with the data and produces plain old HTML and sends it back to DispatcherServlet.
Finally, DispatcherServlet sends the generated HTML back to the browser.
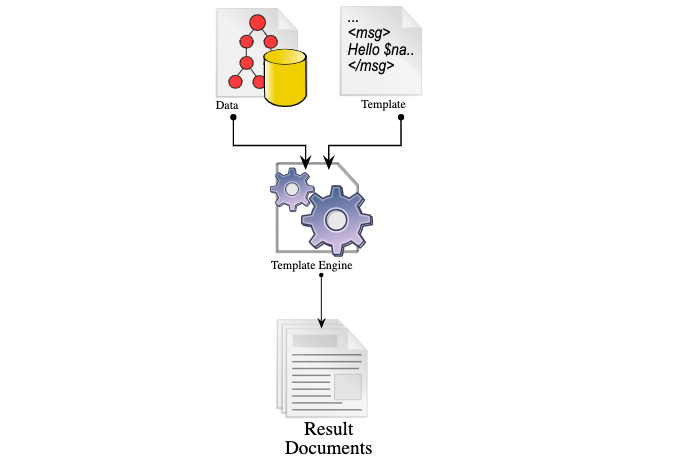
What's a template engine? 🤔
Have you ever seen a wedding invitation? It’s a beautifully designed card with all the information about the couple and venue and usually somewhere at the top also has guests’ names. Well, this is templating! Someone (or a computer + printer) took the invitation letters with blank names and the list of guests and produced a stack of custom invitation letters ready to be sent. The raw invitation letter without names is the template, the list of guests is the data or model, and the person or computer who merges these two to generate the actual letters is the template engine.
In the context of web applications, a template engine is an engine that parses HTML pages that contain special tags or attributes bound to variables at the server (templates). It resolves those variables into their values based on the data passed into it. Then it parses the page according to those values and builds a normal HTML page. We will use a template engine later in this chapter to render our first page based on the data provided at the backend.
Create your first dynamic page
We covered a lot of concepts! I hope you are as excited as I am to put all of these into practice and develop our Watchlist application. Once you have the overall flow in your mind, coding Spring MVC apps becomes something very fun to do. 🙂
As the very first step, we are going to make one value on the Watchlist page, the total number of items, dynamically provided from the server. Adding a new page or major functionality to a Spring MVC app usually involves two main steps:
Adding a handler method to a new or an existing controller class to handle the incoming requests and prepare and return the model and view name.
Creating an HTML template (view) to be rendered with the data in the model object after the request is processed.
Let’s take each step at a time!
Add the controller class and the handler method
So let’s start by creating the controller class first and add a new method to it. The end goal here is to have a method that handles the browser’s GET requests coming to the /watchlist URL in our application. Processing this request means adding a value to the model to be used when rendering the HTML in the next step. Each controller method as we discussed earlier should return two pieces of information, the model and the view name. These two are returned as an instance of the class ModelAndView. We will also use two annotations in this section:
@Controller - This annotation is put on top of a controller class and tells the handler mapping component of Spring MVC framework that the methods in this class could handle HTTP requests.
@GetMapping - This is a method-level annotation and means that the method can handle
HTTP GETrequests. It also accepts a parameter which is a URL. This information (HTTP method + URL) is collected by handler mapping to know which method is responsible for handling which incoming request.
The goal here is to create an HTTP request handler method that handles HTTP Get on URL /whatchlist. As you know, Java methods live in classes, so first create a Java class called WatchlistController.java under watchlist package and add the @Controller annotation on top of it. Now create a method to it called getWatchList(). For this method to receive GET requests coming at /watchlist path, add a @GetMapping(“/watchlist”) annotation to it. Now all you have to do is to create a model map and just add a specific number like 1234 to it and finally create and return a ModelAndView object.
package com.openclassrooms.watchlist;

import java.util.HashMap;
import java.util.Map;

import org.springframework.stereotype.Controller;
import org.springframework.web.bind.annotation.GetMapping;
import org.springframework.web.servlet.ModelAndView;

@Controller
public class WatchlistController {

	@GetMapping("/watchlist")
	public ModelAndView getWatchlist() {

		String viewName = "watchlist";

		Map<String, Object> model = new HashMap<String, Object>();

		model.put("numberOfMovies", "1234");

		return new ModelAndView(viewName , model);
	}
}
Our controller method is ready, and we are returning a viewName and model object just like any handler method should, but we haven't yet created the actual view, which is an HTML template. That's what we are going to do in the next step.
Add the Thymeleaf HTML template
One of the beauties of Spring MVC framework is the separation of concerns and therefore, separation of roles. It means that the view is normally designed by professional web designers who know how to make a website look good using HTML and CSS. The output will be some static HTML pages that will be handed to Java developers. It will be your job to bring them to life by adding templating elements to them which are backed by the controllers and the rest of the backend code.
In this course, we will take some static HTML pages that are already created and turn them into a dynamic web application. This will help us to stay focused on the main subject of this course, which is Spring MVC capabilities.
We will be using Thymeleaf to turn static HTML pages into dynamic templates. Thymeleaf is a template engine that relies on attributes that we add to existing HTML tags. These attributes will be interpreted by the Thymeleaf engine to replace the content of the tag with values generated based on the data in the model. For example, here is a Thymeleaf template snippet:
<h2 th:text="'Hello, ' + ${name} + '!'">This will be replaced</h2>The purpose of this template is to generate an h2 HTML tag with content, while part of the content is a variable called name. If you pass the value name=World, (this is the model in MVC terminology) to this template, and pass it to the Thymeleaf template engine, the following output will be generated:
<h2>Hello World!</h2>Thymeleaf engines process the statement inside the th:text attribute, and replace the contents of the <h2> tag with its result. You will see more examples of Thymeleaf as we develop our application.
The goal here is to create a dynamic page that displays the numberOfMovies value that we put in the model in the last step. Let’s see how to use Thymeleaf to do that.
To use Thymeleaf, you need to add it your Spring Boot project. Add the following dependency to the dependency section in your pom.xml file.
<dependency>
      <groupId>org.springframework.boot</groupId>
      <artifactId>spring-boot-starter-thymeleaf</artifactId>
</dependency>
Then add the watchlist-static.html to the srce/resources/templates folder in the project and rename it to watchlist.html. Add the Thymeleaf XML namespace to the <html> tag, and replace number 3 down in the page with <span th:text="${numberOfMovies}">. After fixing the Nav bar links, your HTML template file should look like this:
<html xmlns:th="http://www.thymeleaf.org">
<head>
	<meta name="viewport" content="width = device-width, initial-scale = 1, shrink-to-fit = no">
	<link rel="stylesheet" href="https://stackpath.bootstrapcdn.com/bootstrap/4.1.3/css/bootstrap.min.css">
	<title>Watchlist App</title>
</head>

<body>
	<div class="container">
 		<nav class = "navbar navbar-expand-sm navbar-dark bg-secondary">
            <a class = "navbar-brand" href = "homepage-static.html">Watchlist App</a>
            <button class = "navbar-toggler" type = "button" data-toggle = "collapse"
               data-target = "#navbarSupportedContent"
               aria-controls = "navbarSupportedContent" aria-expanded = "false"
               aria-label = "Toggle navigation">
               <span class = "navbar-toggler-icon"></span>
            </button>

            <div class = "collapse navbar-collapse" id = "navbarSupportedContent">
               <ul class = "navbar-nav mr-auto">
                  <li class = "nav-item">
                     <a class = "nav-link" href = "/">Home</a>
                  </li>
                  <li class = "nav-item active">
                     <a class = "nav-link" href = "/watchlist">Watchlist</a>
                  </li>
                  <li class = "nav-item ">
                     <a class = "nav-link" href = "WatchlistItemForm-static.html">Submit an item</a>
                  </li>
               </ul>
            </div>
      	</nav>
		<h2  class = "mt-4">Watchlist</h2>

		<table class="table">
			<thead class = "thead-light">
		        <tr>
		            <th class="text-left">Title</th>
		            <th class="text-left">Rating</th>
		            <th class="text-left">Priority</th>
		            <th class="text-left">Comment</th>
		            <th class="text-left"></th>
		        </tr>
		    </thead>
			<tbody>
				<tr>
		            <td>Avatar</td>
		            <td>7.8</td>
		            <td>LOW</td>
		            <td>Peter recommended</td>
					<td><a href="#" class="btn btn-info" role="button">Update</a></td>
				</tr>
				<tr>
		            <td>Inception</td>
		            <td>8.7</td>
		            <td>MEDIUM</td>
		            <td>YouTube trailer was just awesome!</td>
					<td><a href="#" class="btn btn-info" role="button">Update</a></td>
				</tr>
				<tr>
		            <td>The Emoji Movie</td>
		            <td>3.2</td>
		            <td>HIGH</td>
		            <td>The boss recommended, have to see it!</td>
					<td><a href="#" class="btn btn-info" role="button">Update</a></td>
				</tr>
			</tbody>
		</table>
		<hr/>
		<div >
			<div>Number of movies to watch:  <span th:text="${numberOfMovies}"> </div>
		</div>
	</div>

	<script src="https://code.jquery.com/jquery-3.3.1.slim.min.js"></script>
	<script src="https://cdnjs.cloudflare.com/ajax/libs/popper.js/1.14.3/umd/popper.min.js"></script>
	<script src="https://stackpath.bootstrapcdn.com/bootstrap/4.1.3/js/bootstrap.min.js"></script>
</body>
</html>
Now if you restart the application in Eclipse and hit http://localhost:8080/watchlist, you should see 1234 as the value for the number of movies. It might seem we did a lot for too little, but we were laying a foundation to build on. Let's make the list of movies dynamic as well!
Add a list to the model
If you look at the static version of the watchlist page, there’s a table that shows the list of the movies that the user wants to watch. It looks good, but surely that's not all! 😉 We want that table to be rendered dynamically from the data we have stored in our application. To do so, we need to take three steps:
Create an entity class to represent each row of the table.
In the handler method, put the collection of the entity into the model object.
In the Thymeleaf HTML template, loop through that collection and display the rows.
Let's make it happen!
First, create a new Java class called WatchlistItem with fields representing rows in the Watchlist table. Add standard getter and setter methods to it. At the end, add an id and static field called index to it to guarantee unique id generation for WatchlistItem instances. We'll do this id a bit later.
package com.openclassrooms.watchlist;

public class WatchlistItem {

	private Integer id;

	private String title;

	private String rating;

	private String priority;

	private String comment;

	public static int index = 0;

	public WatchlistItem() {
		this.id = index ++;
	}

	public WatchlistItem(String title, String rating, String priority, String comment) {
		super();
		this.id = index ++;
		this.title = title;
		this.rating = rating;
		this.priority = priority;
		this.comment = comment;
	}

	public Integer getId() {
		return id;
	}

	public void setId(Integer id) {
		this.id = id;
	}

	public String getTitle() {
		return title;
	}

	public void setTitle(String title) {
		this.title = title;
	}

	public String getRating() {
		return rating;
	}

	public void setRating(String rating) {
		this.rating = rating;
	}

	public String getPriority() {
		return priority;
	}

	public void setPriority(String priority) {
		this.priority = priority;
	}

	public String getComment() {
		return comment;
	}

	public void setComment(String comment) {
		this.comment = comment;
	}
}
Now it's time to add a WatchlistItem list and add it to the model. Open the getWatchlist() method in your controller class, and add some hard-coded values to an ArrayList and add it to the model. It's also a good time to fix the numberOfMovies, and set it the size of the list as its value. The getWatchList() method should something look like this:
package com.openclassrooms.watchlist;

import java.util.ArrayList;
import java.util.HashMap;
import java.util.List;
import java.util.Map;

import org.springframework.stereotype.Controller;
import org.springframework.web.bind.annotation.GetMapping;
import org.springframework.web.servlet.ModelAndView;

@Controller
public class WatchlistController {

	List<WatchlistItem> watchlistItems = new ArrayList<WatchlistItem>();

	@GetMapping("/watchlist")
	public ModelAndView getList() {

			String viewName = "watchlist";
			Map<String, Object> model = new HashMap<String, Object>();

			watchlistItems.clear();
			watchlistItems.add(new WatchlistItem(1, "Lion King","8.5","high","Hakuna matata!"));
			watchlistItems.add(new WatchlistItem(2, "Frozen","7.5","medium","Let it go!"));
			watchlistItems.add(new WatchlistItem(3, "Cars","7.1","low","Go go go!"));
			watchlistItems.add(new WatchlistItem(4, "Wall-E","8.4","high","You are crying!"));

			model.put("watchlistItems", watchlistItems);
			model.put("numberOfMovies", watchlistItems.size());

			return new ModelAndView(viewName , model);
	}
}
Iterate through a list in Thymeleaf
Now we have a list of WatchlistItems ready in our model object. Let's change the view to consume this list and render the Watchlist table dynamically.
For that, use a new Thymeleaf tag called th:each. The model attribute that contains the list is accessed using the ${} notation, and each element of the list is passed to the body of the loop via a variable very similar to for each construct in Java. The table inside watchlist.html should look like this:
<table class="table">
	<thead class = "thead-light">
        <tr>
            <th class="text-left">Title</th>
            <th class="text-left">Rating</th>
            <th class="text-left">Priority</th>
            <th class="text-left">Comment</th>
            <th class="text-left"></th>
        </tr>
    </thead>
	<tbody>
		<tr th:each="watchlistItem : ${watchlistItems}">
            <td th:text="${watchlistItem.title}">Avatar</td>
            <td th:text="${watchlistItem.rating}">7.8</td>
            <td th:text="${watchlistItem.priority}">LOW</td>
            <td th:text="${watchlistItem.comment}">Peter recommended</td>
			<td><a href="#" class="btn btn-info" role="button">Update</a></td>
		</tr>
	</tbody>
</table>Let’s recap!
Now it's time to stop and see what you remember:
What are the different elements of the Spring MVC architecture?
How do its components work together to fulfill a HTTP request?
What are the steps for creating a controller class with a handler method that puts values into the model object?
How do you turn static HTML into a Thymeleaf HTML template?
How do you add Thymeleaf attributes to HTML tags?
If it's a little fuzzy, go back through the chapter and review! 😇 Otherwise, meet me in the next chapter to get started on handling form submissions! 💪
