Create field validations for your forms
If you have ever registered on a website, you have probably encountered web form validation. Such forms give you feedback when you don't enter your data in the expected format.

This is called form validation — when you enter data, the web application checks it to see that it is correct. Form validation is necessary to make sure our application accepts only the data that’s usable, useful, and safe. For example, it would make no sense to leave the title of a Watchlist item empty or enter anything other than a number as a rating. Also, movie ratings are typically from 1-5 or 1-10, so anything outside this range would be meaningless to most...and perhaps an unintentional mistake from the user!
There are different types of validation, but in this chapter we will focus on field validation because it's awesome! 🤓
Use validation annotations
Field validation is about making sure a single field has the correct format. For example:
A field cannot be left empty.
Phone numbers should be in the xxx-xxx-xxxx format.
Email addresses should follow the conventional email format.
Passwords need to be between 8 and 30 characters long, and contain one uppercase letter, one symbol, and a number.
A currency field cannot be negative.
Spring provides a set of standard annotations that you can add to the command object to implement some of the common validations.
Annotation | Validates that... | On property of type... |
@NotNull | Property value is not null. | Any |
@AssertTrue | Property value is true. | Boolean |
@Size | Property value has a size between the attributes min and max. | String, Collection, Map, Array |
@NotEmpty | Property is not null or empty. | String, Collection, Map, Array |
@Max | Property has a value no larger than the value attribute. | Numeric fields |
@Min | Property has a value no smaller than the value attribute. | Numeric fields |
Property is a valid email address. | String | |
@NotBlank | Property is not null or whitespace. | String |
@Past / @PastOrPresent | Property is in the past or the past including the present. | Date types |
@Future / @FutureOrPresent | Property is in the future or the future including the present. | Date types |
As you might have noticed, we already have some field validations defined on the static HTML of the Watchlist item web form. Let’s see how we could use some of these annotations to implement some of the rules specified on our form. To implement validations, we need to change three points in the code:
In the command object, add appropriate validation annotations.
In the controller class, check the validation result before going ahead with the save operation.
In the HTML template, show the error messages that are returned by the Spring framework.
Let's see exactly how.
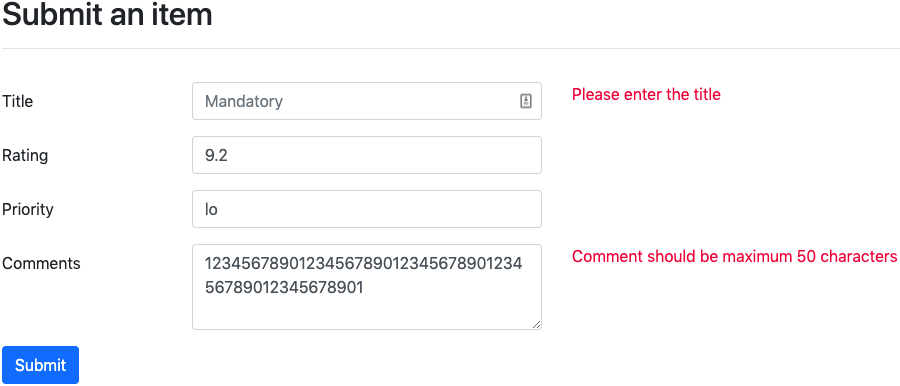
First, add @NotBlank to a title and @Size annotation to comment fields in the WatchlistItem class to reflect the rules we want to implement.
package com.openclassrooms.watchlist;

import javax.validation.constraints.NotBlank;
import javax.validation.constraints.Size;

public class WatchlistItem {

	private Integer id;

	@NotBlank( message="Please enter the title")
	private String title;

	private String rating;

	private String priority;

	@Size(max=50,  message="Comment should be maximum 50 characters")
	private String comment;
	// rest of the class unchaned
We also need to change the submitWatchlistItemForm(...) method in our controller class. First, add @Valid annotation before WatchlistItem parameter to let SpringMVC know that you want this field to be validated. Also, add another parameter called BindingResult to carry the result of validation operation. Finally, return to the form view in case there are any errors in the form. The rest of the method stays the same.
	@PostMapping("/watchlistItemForm")
	public ModelAndView submitWatchlistItemForm(@Valid WatchlistItem watchlistItem, BindingResult bindingResult) {

		if (bindingResult.hasErrors()) {
            return new ModelAndView("watchlistItemForm");
        }

        // rest of the method unchanged
Now it’s time to change WatchlistItemForm.html to show the error message if there’s been a validation violation. Use the th:error Thymeleaf attribute to load the error and set it as the <span> tag content. The title field will look like this:
<div class = "col-sm-4">
  <input th:field="*{title}" type = "text" class = "form-control" placeholder = "Mandatory">
</div>
<div class="col-sm-4">
	<span class="text-danger" th:errors="*{title}"> </span>
 </div>
The comment field will look like this:
<div class = "col-sm-4">
   	<textarea th:field="*{comment}" class = "form-control" rows = "3" placeholder = "Max. 50 chars"></textarea>
</div>
<div class="col-sm-4">
	<span class="text-danger" th:errors="*{comment}"> </span>
  </div>
Now restart the application in your IDE, open the form in your browser. Try to enter some invalid values for title and rating, and you should be able to see the error messages.
Use custom validation annotations
So far, the priority field has been a free format text where the user could enter anything. Gone are those days! Our client wants us to limit the values to L for low, M for medium, and H for high (case insensitive). He also wants to make sure that the rating field is a number between 1-10. It is not possible to implement these rules easily using any of the standard annotations. What can you do? 🤔
Standard validation annotations are enough for most scenarios, but not always. Sometimes the validation logic is just too complicated to implement using the standard annotations. Fortunately, you are not bound to the limited set of annotations provided by Spring, and you can develop your own annotations. These are called custom annotations. In this section, we’re going to implement the validation for the priority field using a custom annotation.
Each custom validation has two components that need to be implemented together:
The annotation itself.
The validator class where the actual validation logic happens.
Let's create a new annotation to ensure that the right value is entered for the priority field. Let's call it @Priority.
First, start by creating the annotation file. It’s like any other runtime field annotation plus a couple of Spring-specific elements added to it. Create a new @Priority annotation:
import java.lang.annotation.ElementType;
import java.lang.annotation.Retention;
import java.lang.annotation.Target;
import javax.validation.Constraint;
import javax.validation.Payload;
import java.lang.annotation.RetentionPolicy;
@Target ({ElementType.FIELD})
@Retention (RetentionPolicy.RUNTIME)
@Constraint (validatedBy= PriorityValidator.class)
public @interface Priority {
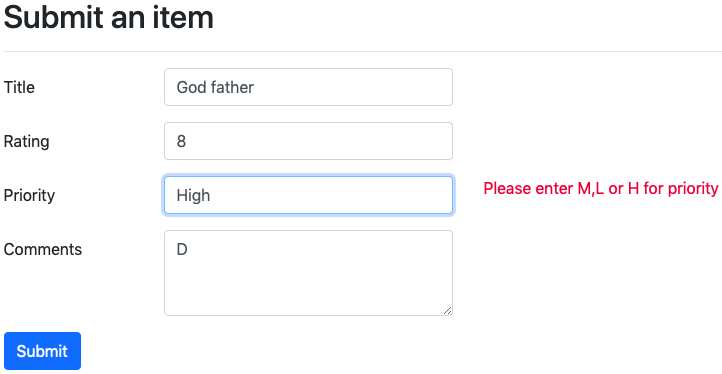
String message() default "Please enter M,L or H for priority";
Class<?>[] groups() default {};
Class<? extends Payload>[] payload() default {};
} Eclipse says that PriorityValidator doesn't exist. Let’s fix that! Create a new class and call it, you guessed it, PriorityValidator:
package com.openclassrooms.watchlist;

import javax.validation.ConstraintValidator;
import javax.validation.ConstraintValidatorContext;

public class PriorityValidator implements ConstraintValidator<Priority, String>{
	@Override
	public boolean isValid(String value, ConstraintValidatorContext context) {

		return value.trim().length()==1 && "LHM".contains(value.trim());
	}
}
The annotation is ready now, you just have to put it before the priority field in WatchlistItem class:
	@Priority
	String priority;
We also need to change our HTML template in order to show the error messages for the priority field. We use the th:errors element just like we did for the other fields:
<div class="pure-control-group">
    <label for="priority">Priority</label>
    <input th:field="*{priority}" type="text" placeholder="Integer 1-3">
    <span class="error-message" th:errors="*{priority}"></span>
</div>
Now restart the application, navigate to the form, and try and make sure you get the proper error message when entering anything other than L, M, or H into the priority field. You should see something like this:
Go ahead and implement the last remaining field validation left on the form to make sure that ratings entered for a movie are numeric values between 1-10. You can call it @Rating:
package com.openclassrooms.watchlist;

import java.lang.annotation.ElementType;
import java.lang.annotation.Retention;
import java.lang.annotation.Target;

import javax.validation.Constraint;
import javax.validation.Payload;

import java.lang.annotation.RetentionPolicy;

@Target ({ElementType.FIELD})
@Retention (RetentionPolicy.RUNTIME)
@Constraint (validatedBy= RatingValidator.class)
public @interface Rating {

	String message() default "Rating should be a number between 1-10";

	Class<?>[] groups() default {};
    Class<? extends Payload>[] payload() default {};
}

/********************************************/

package com.openclassrooms.watchlist;

import javax.validation.ConstraintValidator;
import javax.validation.ConstraintValidatorContext;

public class RatingValidator implements ConstraintValidator<Rating, String> {
	@Override
	public boolean isValid(String value, ConstraintValidatorContext context) {

		Double number;
		try {
			number = Double.parseDouble(value);
		} catch (NumberFormatException e) {
			return false;
		}

		if (number > 10 || number <1) {
			return false;
		}
		return true;
	}
}
And there you are! You've done it!
Let’s recap!
In this chapter, you saw:
How to use the standard validation annotations to validate the format of web form fields, by following these steps:
Adding the appropriate validation annotations in the command object.
Checking the validation result before going ahead with the save operation in the controller class.
Showing the error messages that are returned by the Spring framework in the HTML template.
How to implement custom validation annotations by implementing together:
The annotation itself.
The validator class where the actual validation logic happens.
Now, in your head, make sure you review the steps and have got them down. Once you do, go ahead and join me in the next chapter to implement some more field validations! 🙃
