Use cross-field & cross-record validations in your forms
In the previous chapter, you learned about field validation. In this chapter, we are going to look at two other types of validations: cross-field validation and cross-record validation! Let’s see how they work.
Working with cross-field validation
Tom, our client, has come to us and asked for a specific rule to be added to the application. The rule goes like this:
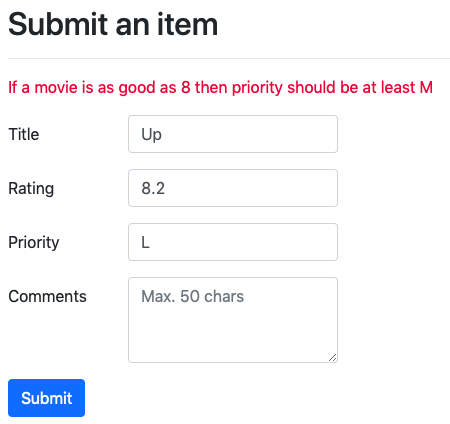
“If a movie has a rating of 8 or above, then the priority should be medium or high.“
Which is fair enough. If a movie is that good, then the question is why you haven’t seen it yet!? 😛
According to this rule, both the Rating and Priority fields on the form might be valid individually, but together they make up invalid data. This is a typical cross-field validation rule.
You are already familiar with the tool needed to implement it, well... almost! It’s the custom annotation we created in the previous chapter with a small twist. Instead of creating a field-level annotation, we will create a class-level annotation. It actually makes sense when you think about it because these rules do not concern any particular field on a form, rather their combination.
So, we are going to create a class level annotation that makes sure movies with a high rating also get high priority. As this annotation concerns making the user watch good movies first, let’s call it @GoodMovie.
First, create a new annotation and call it @GoodMovie. Don’t forget to make it a class-level annotation by setting its @Target to TYPE.
package com.openclassrooms.watchlist;

import java.lang.annotation.ElementType;
import java.lang.annotation.Retention;
import java.lang.annotation.RetentionPolicy;
import java.lang.annotation.Target;
import javax.validation.Constraint;
import javax.validation.Payload;

@Target(ElementType.TYPE)
@Retention(RetentionPolicy.RUNTIME)
@Constraint(validatedBy = GoodMovieValidator.class)
public @interface GoodMovie {

	String message() default "If a movie is as good as 8 then priority should be at least M";

	Class<?>[] groups() default {};
    Class<? extends Payload>[] payload() default {};
}
Then, create a new class called GoodMovieValidator to perform the actual validation operation on the WatchlistItem class type parameter.
package com.openclassrooms.watchlist;

import javax.validation.ConstraintValidator;
import javax.validation.ConstraintValidatorContext;

public class GoodMovieValidator implements ConstraintValidator<GoodMovie, WatchlistItem>{

	@Override
	public boolean isValid(WatchlistItem value, ConstraintValidatorContext context) {

		return !(Double.valueOf(value.getRating()) >= 8 &&  "L".equals(value.priority));
	}
}
Now let’s make the front end changes. Open WatchlistItemForm.html, and right before the title field, change the <span> with text-danger CSS class to show the global error messages if they exist.
<!-- Form levels error messages here -->
<div class = "form-group row ">
   <div class="col-sm-8">
		<span class="text-danger" th:errors="*{global}"> </span>
  	</div>
</div>
Your annotation is ready to use and your page ready to show the error message. All you have to is add the annotation to the WatchlistItem class:
@GoodMovie
public class WatchlistItem {
Now restart the application and form. Give it a try and make sure you get the proper error message when entering L for a movie with any a rating greater than 8.
Try it yourself challenge!
Before moving on to the next section, I invite you to get some practice by performing another cross-field validation: implement a new rule that forces users to enter at least 15 characters in the comment section for movies with the rating of less than 6. You need to have a good reason to watch a bad movie, don’t you?
😉
Cross-record validation
Tom, our client, has come to us and asked us to implement one more rule in the application:
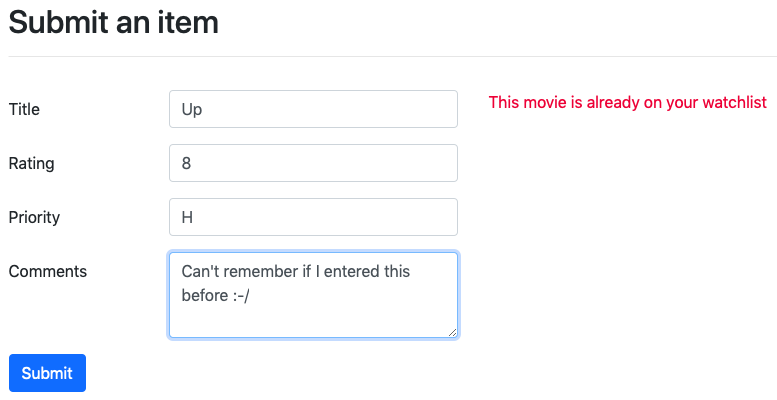
"Users are not allowed to enter any movie more than once."
It makes sense, but as you can imagine, we can't enforce it by looking at what the user has entered. Rather, we have to go back and check the rest of the data that's stored in our application. This is called cross-record validation. It's also sometimes called business rules.
There’s no annotation for this type of validation. We have to check the rules in the submission handler method form and add the error messages to the list manually. The good news is that cross-field validations are treated as global errors. So, what we created for showing global messages on the HTML template in the previous sections, works fine for this type of validation as well. Okay, let’s get started.
All changes will be in the controller class. First, we need a method that checks the validation rule, which is “Does a title already exist in the list of items?” Open the WatchlistController class and create a private method called itemAlreadyExists(...).
private boolean itemAlreadyExists(String title) {

		for (WatchlistItem watchlistItem : watchlistItems) {
			if (watchlistItem.getTitle().equals(title)) {
				return true;
			}
		}
		return false;
	}
Now we can call this method when a form is submitted. If the result is true, the condition is not met; then call bindingResult .rejectValue(...). This method causes an error message when the form is displayed to the user again.
@PostMapping("/watchlistItem")
	public ModelAndView watchlistItemSubmit(@Valid WatchlistItem watchlistItem, BindingResult bindingResult) {

		if (bindingResult.hasErrors()) {
            return new ModelAndView("watchlistItem");
        }

		if (itemAlreadyExists(watchlistItem.getTitle())) {
			bindingResult.rejectValue("title", "", "This movie is already on your watchlist");
            return new ModelAndView("watchlistItem");
		}

		watchlistItems.add(watchlistItem);

		RedirectView redirectView = new RedirectView();
		redirectView.setUrl("/watchlist");

		return new ModelAndView(new RedirectView("/watchlist"));
	}
And that’s pretty much it for the implementation of this validation. You can start the server now and try to enter two movies with the same title. You should see the error message against the title field.
Try it yourself challenge!
Now that you know how to implement this type of validation, why don’t you implement another rule that checks another cross-record rule? Implement one that prevents users from entering more than n items to the list. You can start by n=5 and after you test it, set it to a bigger number.
Let's recap!
In the past two chapters, we've looked at three different types of validations and the techniques to implement each one of them. The table below summarizes what you’ve learned:
Type | Scope | Example | Solution |
Field | The format of a single field. | Date should have yyyy/mm/dd format. | Field-level standard or custom validation annotation. |
Cross-field | The value of a field in relation to other fields on the form. | End date should be greater than start date. | Class-level custom validation annotation. |
Cross-record | The values of a form in relation to the rest of application data. | User names should be unique. | Manual check in the controller, and then a call to BindingResult.rejectValue(). |
Does that seem pretty anchored in your memory? Let's meet in the next chapter to find out how to do a few configuration tricks! 💫
