Organize your application code in three-tier architecture
Let’s admit it! Our application is not that big, but the codebase has already started looking quite messy. Figuring out where a particular functionality is located takes a bit of thinking, and we don’t even have ten classes in our application. 😬 Now imagine what would happen if we keep going to tens and even hundreds of classes - which is quite normal in a real-world application. It would be a nightmare to unit test, debug, or add new functionality. 😱
Fortunately, there is a widely accepted solution for this problem. It is called three-tier (or three-layer) architecture. According to this architecture, the codebase is divided into three separate layers with distinctive responsibilities:
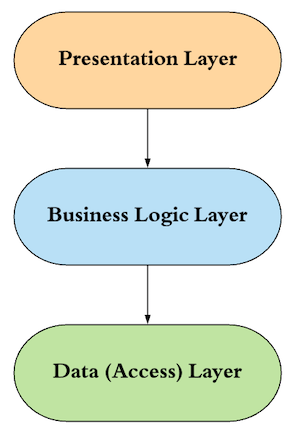
Presentation layer: This is the user interface of the application that presents the application’s features and data to the user.
Business logic (or Application) layer: This layer contains the business logic that drives the application’s core functionalities. Like making decisions, calculations, evaluations, and processing the data passing between the other two layers.
Data access layer (or Data) layer: This layer is responsible for interacting with databases to save and restore application data.
Three-tier architecture vs MVC pattern
If you are a little confused as to how these two architectural patterns (both containing three connected components) relate to each other, don’t worry, you are not alone! It’s a common confusion! Let's clear things up!
The MVC pattern is only concerned with organizing the logic in the user interface (presentation layer).
Three-tier architecture has a broader concern. It’s about organizing the code in the whole application.
Okay, so the presentation layer calls the business logic layer because it's above it. But what part of the presentation layer does that? Model, view, or controller?
The controller component of MVC is the connection point between the two layers:
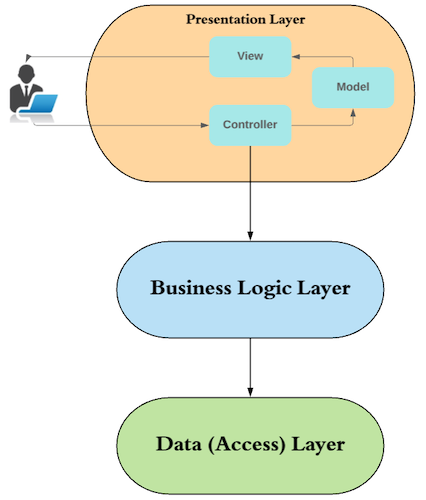
When a HTTP request is being processed, it calls the business logic layer. Based on the returned response, it updates the model, and chooses the right view to display to the user.
Let’s refactor!
So, how to turn our messy application into a well-structured one? Refactoring! 😀
Refactoring changes the design of an application without changing its functionality. It means that the inputs and outputs of the application remain exactly the same but the design of the code, or the way you generate that output is improved. We are going to change the design of our application according to the three-tier architecture without changing its functionality. In a Spring MVC web application, the three layers of the architecture will manifest as follows:
Controller classes as the presentation layer. Keep this layer as thin as possible and limited to the mechanics of the MVC operations, e.g., receiving and validating the inputs, manipulating the model object, returning the appropriate MovedAndView object, and so on. All the business-related operations should be done in service classes. Controller classes are usually put in a controller package.
Service classes as the business logic layer. Calculations, data transformations, data processes, and cross-record validations (business rules) are usually done at this layer. They get called by the controller classes and might call repositories or other services. Service classes are usually put in a service package.
Repository classes as data access layer. This layer’s responsibility is limited to Create, Retrieve, Update, and Delete (CRUD) operations on a data source, which is usually a relational or non-relational database. Repository classes are usually put in a repository package.
In our Watchlist application, all three layers are mixed with each other in one controller class. Let’s take the logic of service and repository layers out and put them in their own classes and packages.
Put service and repository layers in their own packages
The controller classes we have created so far contain the logic of all three layers and need to be broken down. But before touching our controllers, let’s do some housekeeping and organize other classes into packages based on what they do.
Create a new package called validation, and move these files into it
GoodMovie.java,GoodMovieValidator.java,Priority.java,PriorityValidator.java.Create a package config, and move
MvcConfig.javainto it.Create a package called domain, and move
WatchlistItem.javainto it.Create a package called controller, and move
WatchlistControllerinto it.
Now it’s time to create the data access layer of our application!
Create a package called repository and inside that create a class called WatchlistRepository. In WatchlistController, the watchlistItems list acts as our data store, so all the operations that are done on it belong to the data access layer. So move them to this class:
package com.openclassrooms.watchlist.repository;

import java.util.ArrayList;
import java.util.List;

import com.openclassrooms.watchlist.domain.WatchlistItem;

public class WatchlistRepository {
	private List<WatchlistItem> watchlistItems = new ArrayList<WatchlistItem>();
	private static int index = 1;

	public List<WatchlistItem> getList(){
		return watchlistItems;
	}

	public void addItem(WatchlistItem watchlistItem) {
		watchlistItem.setId(index++);
		watchlistItems.add(watchlistItem);
	}

	public WatchlistItem findById(Integer id) {
		for (WatchlistItem watchlistItem : watchlistItems) {
			if (watchlistItem.getId().equals(id)) {
				return watchlistItem;
			}
		}
		return null;
	}

	public WatchlistItem findByTitle(String title) {
		for (WatchlistItem watchlistItem : watchlistItems) {
			if (watchlistItem.getTitle().equals(title)) {
				return watchlistItem;
			}
		}
		return null;
	}
}
Create the service layer
So far, so good. We have a nicely defined data access layer. 🙌 But the service layer of our application is still missing. Let’s create that, and then clean our controller from anything that is not related to the presentation layer.
The service layer is the middle man between the repository (data access layer) and the controller class (presentation layer). It should provide the controller class with everything it needs to fulfill requests. In our case, the service layer should provide these services:
Getting the list of watch list items.
Adding a new or updating an existing
watchlistitem.Calculating the size of the
watchlistitemsList.
Let’s create a new package called service , and create a new class inside it called WatchlistService, and add methods for each the operations mentioned above.
package com.openclassrooms.watchlist.service;

import java.util.List;

import org.springframework.web.servlet.ModelAndView;

import com.openclassrooms.watchlist.domain.WatchlistItem;
import com.openclassrooms.watchlist.exception.DuplicateTitleException;
import com.openclassrooms.watchlist.repository.WatchlistRepository;

public class WatchlistService {

	WatchlistRepository watchlistRepository = new WatchlistRepository();

	public List<WatchlistItem> getWatchlistItems(){
		return watchlistRepository.getList();
	}

	public int getWatchlistItemsSize() {
		return watchlistRepository.getList().size();
	}

	public WatchlistItem findWatchlistItemById(Integer id) {
		return watchlistRepository.findById(id);
	}

	public void addOrUpdateWatchlistItem(WatchlistItem watchlistItem) throws DuplicateTitleException {

		WatchlistItem existingItem = findWatchlistItemById(watchlistItem.getId());

		if (existingItem == null) {
			if (watchlistRepository.findByTitle(watchlistItem.getTitle())!=null) {
				throw new DuplicateTitleException();
			}
			watchlistRepository.addItem(watchlistItem);
		} else {
			existingItem.setComment(watchlistItem.getComment());
			existingItem.setPriority(watchlistItem.getPriority());
			existingItem.setRating(watchlistItem.getRating());
			existingItem.setTitle(watchlistItem.getTitle());
		}
	}
}
Now create a package called exception and inside that package create a new class called DuplicateTitleException :
package com.openclassrooms.watchlist.exception;

public class DuplicateTitleException extends Exception {

}
Clean up the controller
Now, to connect everything, we need to change the controller class to call the service layer. You don't want anything that's not related to handling MVC operations. All the data manipulation stuff has to be delegated to the service layer. Let's get started!
Here's the code:
package com.openclassrooms.watchlist.controller;

import java.util.HashMap;
import java.util.Map;

import javax.validation.Valid;

import org.springframework.stereotype.Controller;
import org.springframework.validation.BindingResult;
import org.springframework.web.bind.annotation.GetMapping;
import org.springframework.web.bind.annotation.PostMapping;
import org.springframework.web.bind.annotation.RequestParam;
import org.springframework.web.servlet.ModelAndView;
import org.springframework.web.servlet.view.RedirectView;

import com.openclassrooms.watchlist.domain.WatchlistItem;
import com.openclassrooms.watchlist.exception.DuplicateTitleException;
import com.openclassrooms.watchlist.service.WatchlistService;

@Controller
public class WatchlistController {

	private WatchlistService watchlistService = new WatchlistService();

	@GetMapping("/watchlistItemForm")
	public ModelAndView showWatchlistItemForm(@RequestParam(required = false) Integer id) {

		String viewName = "watchlistItemForm";

		Map<String,Object> model = new HashMap<String,Object>();

		WatchlistItem watchlistItem = watchlistService.findWatchlistItemById(id);

		if (watchlistItem == null) {
			model.put("watchlistItem", new WatchlistItem());
		} else {
			model.put("watchlistItem", watchlistItem);
		}
		return new ModelAndView(viewName,model);
	}

	@PostMapping("/watchlistItemForm")
	public ModelAndView submitWatchlistItemForm(@Valid WatchlistItem watchlistItem,
			BindingResult bindingResult) {

		if (bindingResult.hasErrors()) {
			return new ModelAndView("watchlistItemForm");
		}

		try {
			watchlistService.addOrUpdateWatchlistItem(watchlistItem);
		} catch (DuplicateTitleException e) {
			bindingResult.rejectValue("title", "", "This title already exists on your watchlist");
			return new ModelAndView("watchlistItemForm");
		}

		RedirectView redirect = new RedirectView();
		redirect.setUrl("/watchlist");

		return new ModelAndView(redirect);
	}

	@GetMapping("/watchlist")
	public ModelAndView getWatchlist() {

		String viewName= "watchlist";

		Map<String,Object> model = new HashMap<String,Object>();

		model.put("watchlistItems", watchlistService.getWatchlistItems());
		model.put("numberOfMovies", watchlistService.getWatchlistItemsSize());

		return new ModelAndView(viewName,model);
	}
}
You can give the application another round of tests and make sure nothing has changed in terms of functionality. That’s the definition of refactoring! We changed a lot and improved the design of our application, but the behavior remained exactly the same. The benefit of such an effort is more maintainable and testable code.
Add a new feature
So far, we got the user to rate the movies and then showed it on the Watchlist page. But our client Tom has come up with a new idea! He wants to take things a step further, like seeing the rating pulled from an online database. Only if we can't find a movie by its title in the database can the user enter a rating.
Do we need to make a whole database of movies?! 😧
No! Fortunately there’s a web service called OMDb API that provides the general information of a movie including its IMDb ratings. In this section, you are going to see how to call an API from the internet and use the result to show some information on our application. Pretty cool, huh? 😎
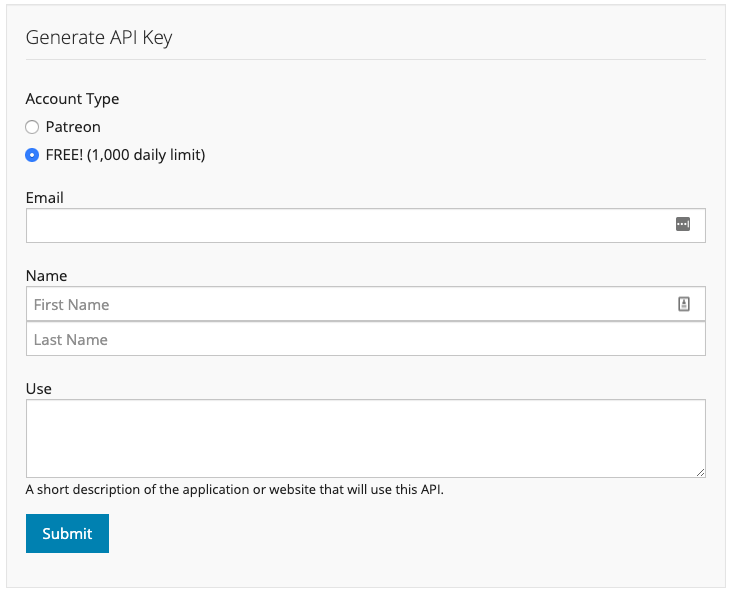
First, we need an API key which could easily get by filling out a small form on their API Key page.
And if you hit the API's URL with your API key and pass Twilight as the movie name, you get a response back like this:
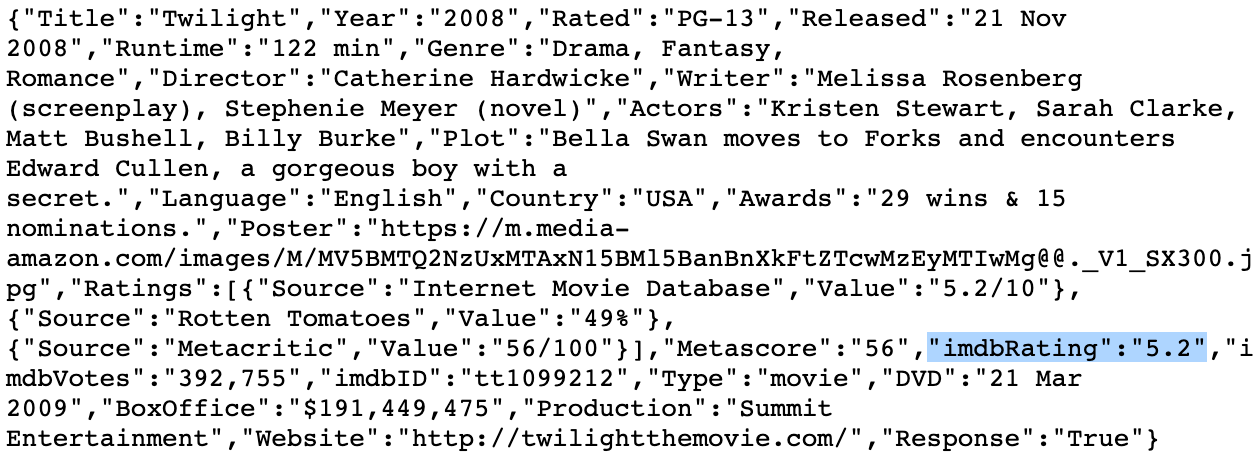
Now that we have an idea what the endpoint request and response look like in a browser, let's replicate that in our code, extract the IMDb Rating field of the response JSON programmatically, and use it when the Watchlist page is displayed.
Create a service to act as a client for the OMDb API URL. This service should have a method that receives the title of a movie and returns the rating as a String. So create a new class in the service package called MovieRatingService. We will use Spring’s RestTemplate helper class to hit the API's URL. RestTemplate is as a HTTP client, just like a browser but inside the code.
package com.openclassrooms.watchlist.service;

import org.springframework.http.ResponseEntity;
import org.springframework.web.client.RestTemplate;

import com.fasterxml.jackson.databind.node.ObjectNode;

public class MovieRatingService {

	String apiUrl = "http://www.omdbapi.com/?apikey=yourapikey&t=";

	public String getMovieRating(String title) {

		try {
			RestTemplate template = new RestTemplate();

			ResponseEntity<ObjectNode> response =
					template.getForEntity(apiUrl + title, ObjectNode.class);

			ObjectNode jsonObject = response.getBody();

			return jsonObject.path("imdbRating").asText();
		} catch (Exception e) {
			System.out.println("Something went wront while calling OMDb API" + e.getMessage());
			return null;
		}
	}

}
Use the getForEntity method of RestTemplate to send a GET request to OMDb API URL. The first parameter of this method is the URL, and the second parameter is the data type that we want the response to be converted to. As you saw previously, the response is a JSON, so we use ObjectNode to receive the response. By calling the path(..) method of ObjectNode, we can access any JSON attribute we want.
Now that the new class is ready, it’s time to add a new instance of it to WatchlistService.
private MovieRatingService movieRatingService = new MovieRatingService();Now change getWatchlistItems() method to call this method for each watchlistItem before returning the list to the controller.
	public List<WatchlistItem> getWatchlistItems(){
		List<WatchlistItem> watchlistItems = watchlistRepository.getList();
		for (WatchlistItem watchlistItem : watchlistItems) {

			String rating = movieRatingService.getMovieRating(watchlistItem.getTitle());

			if (rating != null) {
				watchlistItem.setRating(rating);
			}
		}
		return watchlistItems;
	}
That’s it! Now you can test it to see the rating of movies being loaded from the external API.
Let’s recap!
We've covered a lot here! First, you should now be able to explain:
How three-tiered architecture works, including the presentation layer, the business logic layer, and the data access layer.
How to refactor an application by using:
Controller classes as the presentation layer.
Service classes as the business logic layer.
Repository classes as data access layer.
How to call an external web API and integrate it into our app.
Now you're ready for the real fun part: dependency injection! See you in the next chapter! 😎
