Configure your Spring beans via XML and Java
In the previous chapter, you saw how dependency injection made it so easy to have loosely coupled classes for a unit testable application. That was only one of the possible ways of doing it. It is important to be familiar with other methods because as a Java developer, you might see them used in your job, or you might face them in books or online tutorials and articles. While these methods might look different on the surface, they all use the same underlying core capability of the Spring dependency injection framework.
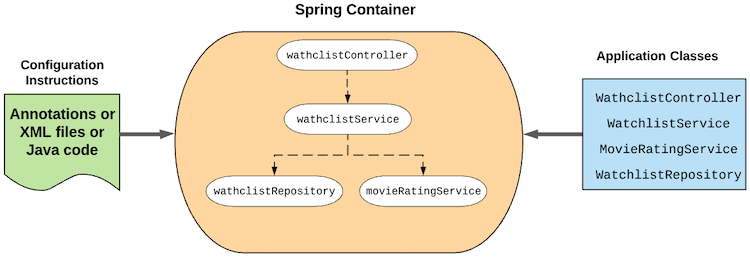
When a Spring Boot web application starts, it scans all classes annotated with @Service, @Controller, etc., and then creates an instance of each one of them with all their dependencies fulfilled from other beans. The Spring component that does this process and holds all of these instances in memory is called the Spring container or Spring context.
The process of introducing beans and their dependencies to Spring context is called bean configuration. Using annotations like @Service, @Controller, @Autowired, etc., is only one way of configuring beans. There are two other methods that produce the exact same result and you might very well encounter them in projects. One of them is called XML configuration and the other one is called Java configuration. Let’s see how they work.
XML configuration
When the very first version of Spring was released, XML configuration was the only option. In this method, you tell Spring where to find beans and their dependencies via an XML configuration file. Let’s remove the annotations we’ve added and replace them with an XML config file.
First, remove @Service and @Autowired annotations from WatchlistRepository, MovieRatingService, and WatchlistService. Then add a new XML file in /src/main/resources folder called app-config.xml.
<?xml version="1.0" encoding="UTF-8"?>
<beans xmlns="http://www.springframework.org/schema/beans"
	xmlns:xsi="http://www.w3.org/2001/XMLSchema-instance"
	xmlns:context="http://www.springframework.org/schema/context"
	xsi:schemaLocation="http://www.springframework.org/schema/beans
        http://www.springframework.org/schema/beans/spring-beans.xsd
        http://www.springframework.org/schema/context
        http://www.springframework.org/schema/context/spring-context.xsd">

	<bean id="movieRatingService" class="com.openclassrooms.watchlist.service.MovieRatingService">
	</bean>

	<bean id="watchlistRepository" class="com.openclassrooms.watchlist.repository.WatchlistRepository">
	</bean>

	<bean id="watchlistService" class="com.openclassrooms.watchlist.service.WatchlistService">
		<constructor-arg index="0" ref="watchlistRepository" />
		<constructor-arg index="1" ref="movieRatingService" />
	</bean>
</beans>
To have this file loaded by Spring, add this class to the config package:
package com.openclassrooms.watchlist.config;

import org.springframework.context.annotation.Configuration;
import org.springframework.context.annotation.ImportResource;

@Configuration
@ImportResource({"classpath*:app-config.xml"})
public class AppConfig {
}
That’s all. Feel free to run the application and see it working as before.
Java configuration
Java configuration is very similar to XML configuration. Simply replace the XML file with a configuration class . Inside the class, add methods with @Bean annotation. This tells Spring that the result value of the associated method should be added to the context. Let’s see how it works.
First, delete the app-config.xml file, then update the AppConfig class to look like this:
package com.openclassrooms.watchlist.config;

import org.springframework.context.annotation.Bean;
import org.springframework.context.annotation.Configuration;

import com.openclassrooms.watchlist.repository.WatchlistRepository;
import com.openclassrooms.watchlist.service.MovieRatingService;
import com.openclassrooms.watchlist.service.WatchlistService;

@Configuration
public class AppConfig {

	@Bean
	public WatchlistRepository watchlistRepository() {
		return new WatchlistRepository();
	}

	@Bean
	public MovieRatingService movieRatingService() {
		return new MovieRatingService();
	}

	@Bean
	public WatchlistService watchlistService() {
		return new WatchlistService(watchlistRepository(), movieRatingService());
	}
}
When a Spring Boot web application starts, it runs all methods annotated with @Bean in classes with @Configuration annotation and puts the result values as a beans inside the context. If you compare these two methods, you can see that for each <bean> element in the app-config.xml, there is a method annotated as @Bean.
Which method to use?
There’s always a hot debate about which method is better. You can do pretty much everything using any of these methods, so it comes down to personal taste.
XML configuration is rarely used with Spring Boot apps, and you mostly see it used with pure Spring apps. Some people like the Java style because it leaves all classes clean with no trace of dependency injection logic. For others, that’s its flaw; i.e., they prefer to see the classes and how they are wired to each other all in one place without having to check other files or classes. In the end, the most important thing is to be consistent throughout the application with whatever choice you make. For the rest of this course, we will stick with our original method, which is annotations, as it’s perhaps the most popular way of configuring beans with Spring Boot.
Try it out for yourself challenge!
To get more comfortable with changing dependency injection methods, go ahead and remove the config file we just added and add the annotations back.
Let’s recap!
In this chapter, we looked at and compared three methods of DI or Spring bean configuration:
Annotations, which is adding
@Serviceand@Autowiredannotation to services, etc.XML files, by which we define beans and their dependencies in a separate XML file.
Java code, by which we define
@Beanannotated methods in a@Configurationclass.
Now we can get into how to configure beans conditionally! Intrigued? Join me in the next chapter!
