Set up data validation to avoid errors in data entry
Grasp the potential of data validation
Data validation is a great way to help ensure that people entering data actually enter values they are supposed to. It is especially helpful when collaborating with others.
It often means that you provide people with a specific dropdown of values to choose from. Without this, they could have used similar words for the same thing, or have made a spelling mistake.
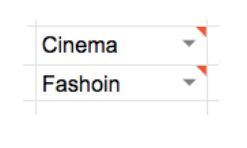
Thanks to data validation, anything else which is entered gets a warning saying it’s not valid. Check out the screenshot below: these two entries aren't valid, as you can see from the small red triangle on the top right side. Cinema isn't in the dropdown and Fashion is misspelled.
However, data can be validated or invalidated following other rules (called criteria) as well, such as whether it includes a specific word, or is a specific format. Read on to find out more!
Set up data validation
To set this up, you'll need to head up toDatain the main menu, and select Data Validation. The box below will pop up:
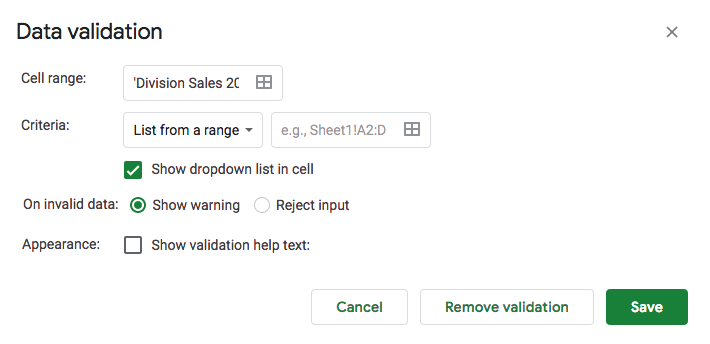
Start by defining the cell range that you want to apply the data validation to. It can be a single cell or an entire column, row, or table. Most often, this is a column of data, since each column and its value may be different.
Define criteria
There are various criteria that you can use to check your data against. The most common and most basic to set up is a list of items.
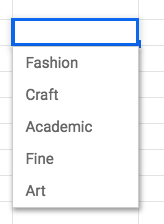
List of items
Type out a list of the options you want to show up in your dropdown directly in the data validation dialog box. Items must be separated by commas and no spaces.

Other criteria
Here is a table of the other possible criteria you could use.
Criteria | Description |
List from range | This is when you already have all of the items on your spreadsheet somewhere, and you want the dropdown to be generated based on this range. |
Number | This is when you want an error message to be generated if the value of the cell is outside of a particular range. You need to include the minimum and maximum authorized numbers. |
Text | Here you can specify whether text contains/does not contain/is a URL/email, and more. |
Date | This checks whether values are in date format and can also be greater, less than, or between a date you define. |
Custom formula | As with many things in spreadsheets, Custom Formula allows you to personalize away! |
Checkbox | This one is a bit different, it adds a checkbox to a cell, which a user can manually check or not.  |
Choose how to handle invalid data
There are also two ways to handle invalid data. You can set the validation to show a warning message or to go as far as rejecting the input.
Now that we’ve covered the theory of data validation, let’s see it in action.
Let’s recap!
Data validation helps ensure that the data is as accurate as possible.
Different types of validation criteria are provided in the data validation options, but a common one is generating a dropdown of a list of items.
List of items is arguably the easiest to use. This is when you type out a list of the options you want to show up in your dropdown, each separated by commas and no spaces.
There are two ways to handle invalid data, you can set the validation to show a warning message or you can reject the input.
Well done! We've covered the major basic features of data analysis in a spreadsheet, over to you to do the quiz and then we'll be able to move on to the fourth and final part of this course, all about data visualization!
