Create Calculated Fields in Tableau
In the previous chapter, you learned how to complete data cleaning tasks in Section E of the Data Source page. You even learned how to create a new column, which is also known as creating a calculated field in Tableau. Let's expand on that lesson!
In this chapter, you will learn how to create calculated fields using 3 different methods: (1) regex pattern-matching, (2) basic math operations, and (3) if/else logic.
For example, in the part2_practice_dataset.xlsx dataset, the Title column contains a lot of different information, including the title of the review and the vintage year (when the grapes were harvested). We can use the vintage year to calculate the age of the wine, which is a new column. Before we can use that information, we first have to extract the year from the Title column, and then create a new column for Vintage Year.
Let's use Regular Expressions (or RegEx) to extract the vintage year information.
REGEX Pattern-Matching
Set-Up Your Environment
Navigate to the first worksheet we created, named Sheet 1. Make sure that you have dropped the Number of Records field into visual, and that you can see the total number of records displayed (4,479). Rename that sheet to Number of Records.
Now drag the Title column from the Dimensions area and drop it into the Rows area above the visual workspace, as shown below.
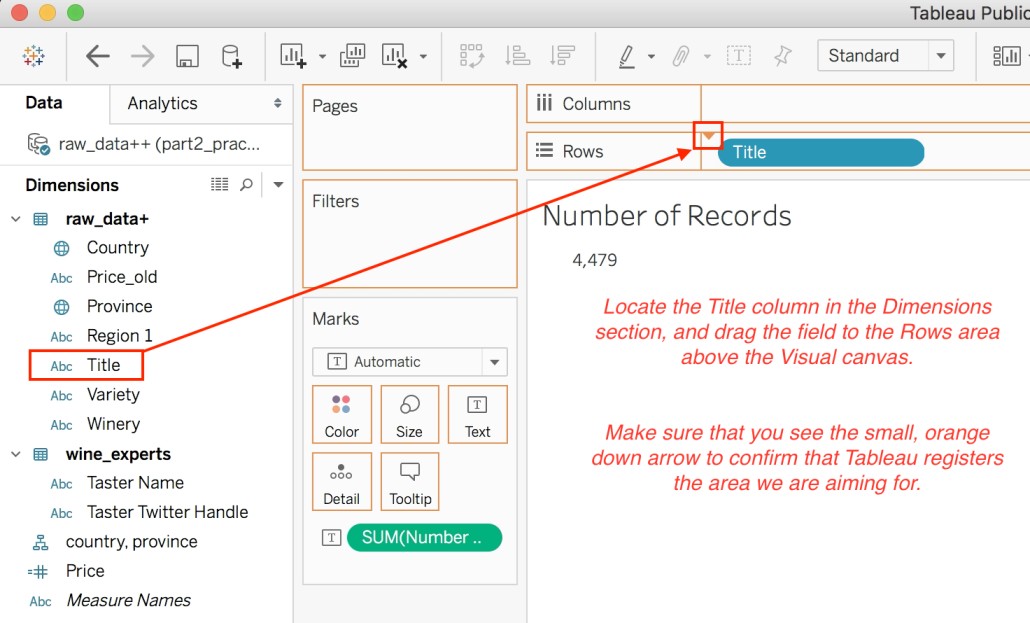
:o At this point, you may be wondering what all the different sections are of this new workspace, the worksheet. For example, what's the difference between the Dimensions and Measures sections? What's the Marks card? What about the Columns and Rows area above the canvas?
All those questions will be answered in the next chapter! Promise! :D
For now, let's focus on the lesson at hand: creating calculated fields to complete data preparation steps.
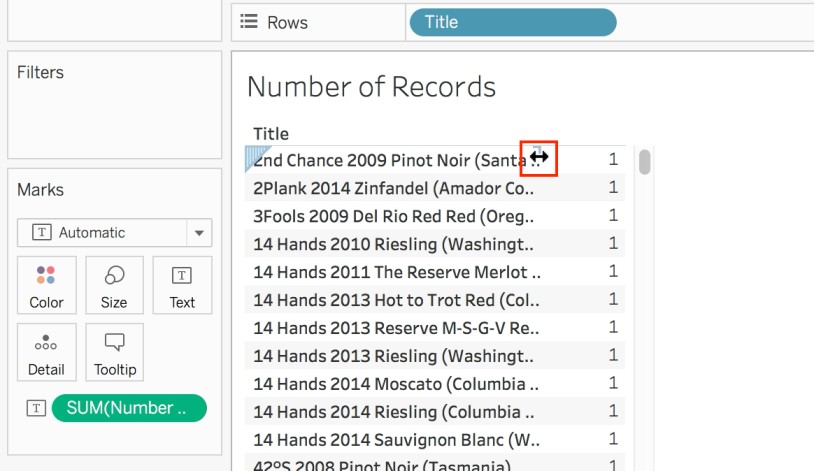
You should see a distinct, or unique, list of titles for the wine reviews dataset. You should also see a second column with the number of records, or rows, that contain the particular title in the column. Because the titles in our dataset are unique to each row (that is, each wine review), then we should only see a total of one (1) in the rows for Number of Records column.
If you want to expand the Title column in visual so you can see the full title, hover over the edge of the column to reveal the double-headed arrow. When you see that arrow, click and drag to extend the column, as shown below.
Extract Information
Remember, the main goal at the moment is to use regular expressions (or REGEX) to extract the vintage year information.
Now, what i s REGEX, exactly?
Well, it's a Tableau function REGEXP_EXTRACT() that uses regular expressions to help find substrings within string data values. REGEX functions will only work on a field that is a string data type, for example, email addresses or census codes!
To extract information using REGEX, you need to:
Create a new column (also known as a calculated field) from Title, where you extract the vintage year information using
REGEXP_EXTRACT(). REGEX will help locate the 4-digit year in the rows for the Title column and extract that information into a new column.Change the data type of the new column to Date (and format it to display the year).
Let's do it!
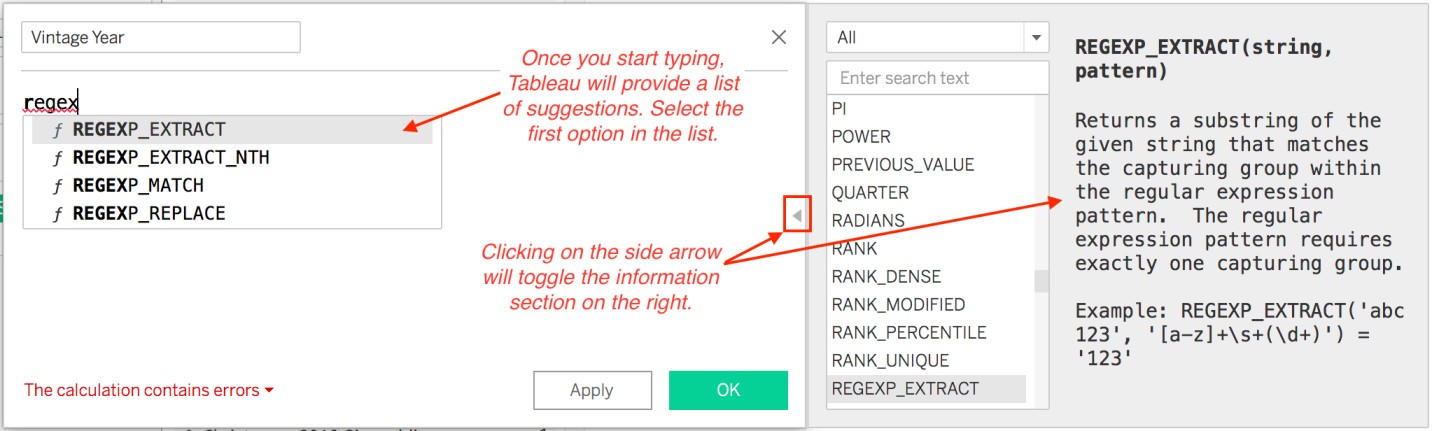
First, navigate to the drop-down menu next to the Dimensions section header in the worksheet, and select the Create Calculated Field... option. You should recognize the window that opens up on your screen from the last chapter. Name this column Vintage Year.
Start typing out "regex" in the code area of that window. Tableau will begin to list all available functions that contain the word regex. Choose the first option, as shown below. Also, make sure to expand the window to display the helpful information that Tableau provides (also shown below).
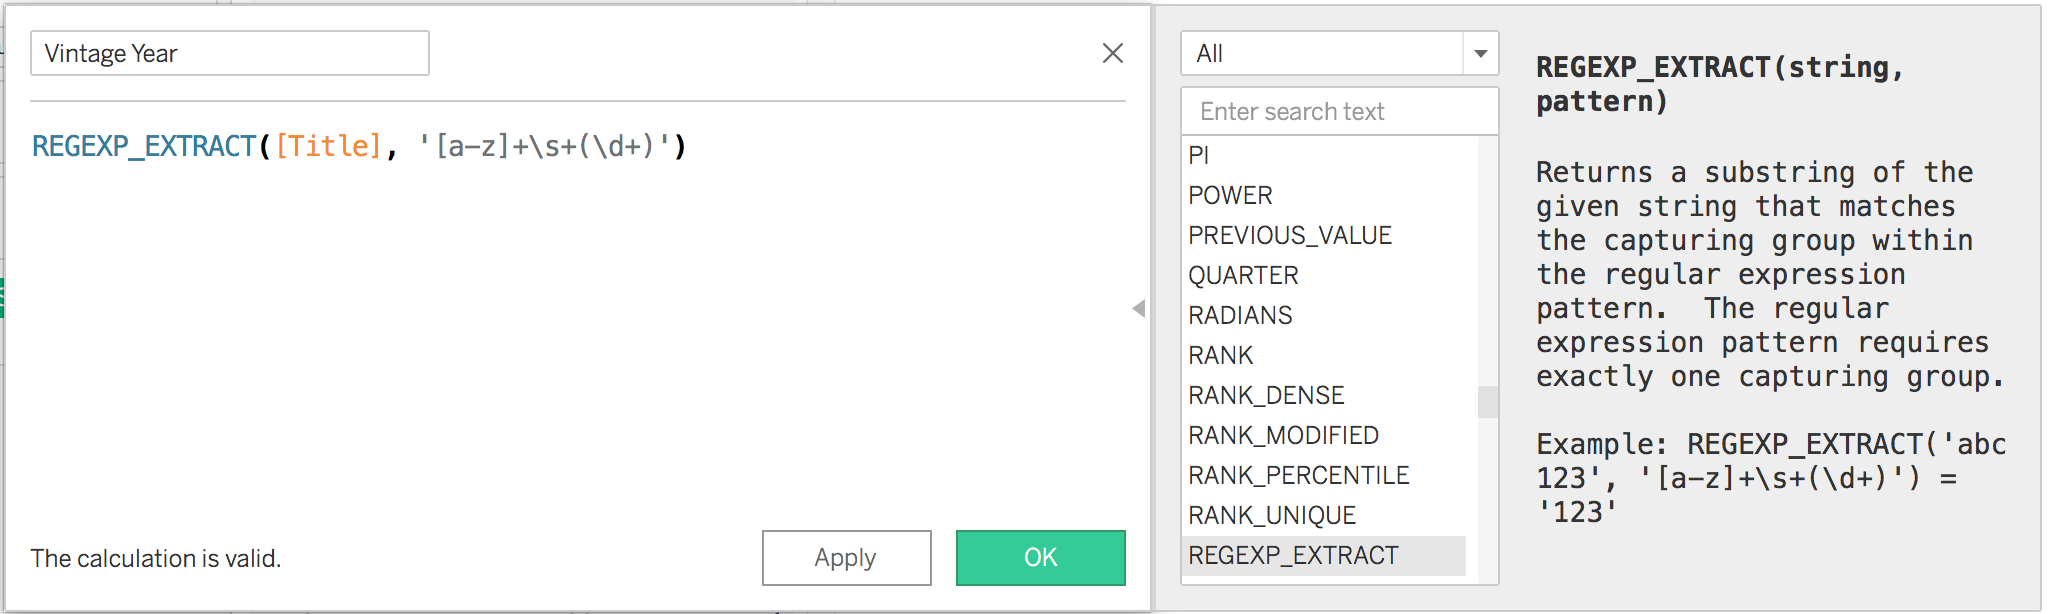
We will use the same REGEX pattern as the previous example for our code. Why? Because our Title is also an alpha-numeric expression!
However, in our code for the calculated field, we will reference the Title column (instead of hard-coding a string as done in the example). Make sure to type the following code for the Vintage Year calculated field exactly as shown: REGEXP_EXTRACT([Title], '[a-z]+\s+(\d+)')
Once your screen looks like the one below, click OK or Apply.
Now you should see a new field, Vintage Year, appear in the Dimensions section of the worksheet. Drag the new Vintage Year column and drop it into the Rows area, next to the Title column. You should see the new column appear in the table visual, in between the Title column and the number of records values.
To change the datatype of a field while you are in the worksheet page, simply find the column on the left-hand side of the screen, and select Data from the datatype icon menu, as shown below.
Now that Tableau registers the data values in Vintage Year as dates, you can see that the years have been converted to short dates (M/D/YYYY). However, this is not an accurate representation of the data that we extracted from the Title field! We need to format the Vintage Year field to display years rather than short dates. Let's do that!
Basic Math Operations
You're now going to learn how to create calculated fields with basic math operations, in particular, using the new field Vintage Year in the calculation.
Do you remember the reason why we extracted the vintage year information?
Let's do it!
IF/ELSE Logic
In many data analysis projects, you may have to create categorical labels that are based on numerical or conditional expressions in other columns. Luckily, Tableau has if/else syntax (code) to create categorical labels in a new column, which we will use on the Price column.
Ready to do it?
First, let's clear out the Rows area. Now drag the three fields Title,Vintage Year, and Age of Wine out of the Rows area and drop them anywhere on the left-hand side of the page, as shown below. By dragging them out, you are removing them from the workspace.
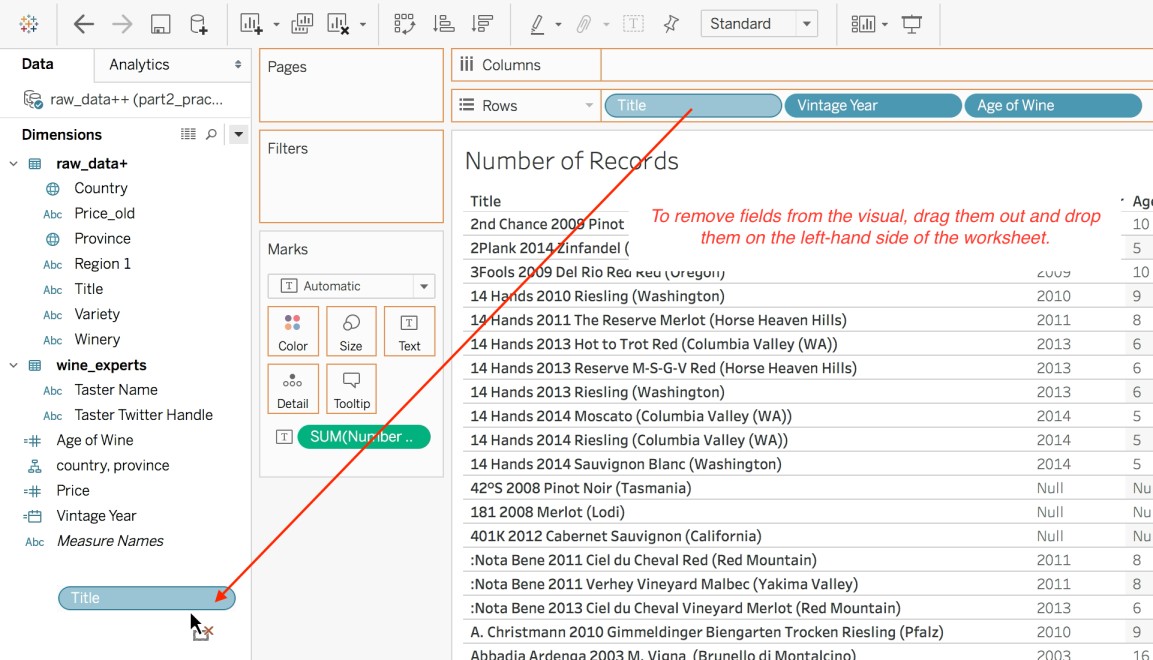
The only remaining field is the SUM(Number of Records) field located in the Marks card. Your visual should display the title Number of Records, and the number 4,479.
We want to create categorical labels based on the price of the bottle of wine, as follows:
If the bottle of wine is $50 or less, label it Affordable.
If the bottle of wine is between $51 - $100, label it Pricey.
If the bottle of wine is greater than $100, label it Fancy Expensive.
Let's see how to accomplish this data preparation task using Tableau's if/else logic:
Just as we did earlier, navigate to the drop-down menu next to the Dimensions section header in the worksheet and select the Create Calculated Field... option.
In the window that opens up, name the new calculated field Price Category.
In the code area, type the keyword IF and the name of the column that has the values needed for our conditional statements (Price column). Then, type out the logic that will determine which rows in the Price column should be labeled as "Affordable".
In our case, that logic is: <= 50, which is less than or equal to 50. Use the following line of code for the calculated field Price Category:
IF [Price] <= 50 THEN "Affordable"
To complete the code for the calculated field, finish it with the keyword END, which makes the calculation valid. Go ahead and click OK.
Summary
You learned how to create calculated fields to complete various data preparation tasks in Tableau.
You created calculated fields using three different methods:
REGEX pattern-matching
Basic math operations
If/else logic
You used the
REGEXP_EXTRACT()function in Tableau to extract the vintage year information in the Title field and place it in a new column.You used the
YEAR()function to extract the year value from a date field, and then used that value in a basic math calculation to create a new field, Age of Wine.You used Tableau's if/else syntax (code) to create categorical labels in a new column, Price Category.
In the last chapter of Part 2, you are going to discover the interface of the sheet! Finally! Let's do it!
