Set Up for Accessibility Testing

Who Is Responsible for Accessibility Testing?
Accessibility is a team effort! Every person in an organization needs to do their part in ensuring that products meet accessibility requirements. That includes developers, designers, product managers, content creators, and QA testers. Not everyone needs to be an accessibility expert, but everyone should know what accessibility considerations apply to their role. Visual designers should check their color contrast and pick accessible typefaces. UI designers should be mindful of different interaction modalities. Developers should make sure they are using accessible markup. Content creators should check that their materials are structured clearly and provide descriptions for images. Product managers should define accessibility requirements when planning a project and check that they are met.
Anyone can use the testing process outlined in the coming chapters. It’s common practice to do a thorough accessibility review at a specific stage in the project. But these testing methods can also be used on their own to perform smaller, more incremental tests along the way. It is better to test accessibility as you go and approach it as an iterative process.
Use a Holistic Accessibility Evaluation Approach
A sound accessibility testing methodology combines a range of testing techniques. No single approach will reveal every issue. Depending on the WCAG criterion you’re evaluating, you will need to use different tools. For a thorough evaluation, use a combination of automated, manual, and assistive technology testing. The testing guide located in the course materials provides detailed step-by-step instructions on what to look for to test each of the criteria. In the How to Test section of the guide, you’ll see headings for the three methods. Some requirements can be tested using all three, while others can only be evaluated using one of the methods. You’ll likely find yourself going back and forth between these methods. If an issue comes in an automated check, or if you come across some strange behavior when using assistive technologies, you’ll need to dig a little deeper by manually inspecting the code. Think of these methods as different facets that complement each other to create a complete picture.
Accessibility Testing Tools
Before you begin testing, download the following testing tools.
Chrome with the following extensions
WAVE Evaluation Tool (automated accessibility checker)
Axe (automated accessibility checker)
NVDA screen reader (PC users only)
Automated Checkers
There are many automated testing tools out there. Most of them will identify the same types of issues but may present them differently. Some will show them visually on the page, and others will present them in a list. The most important thing is that you find one that you like using. We’ll be using axe and WAVE in this course, but feel free to do your own research and find another tool.
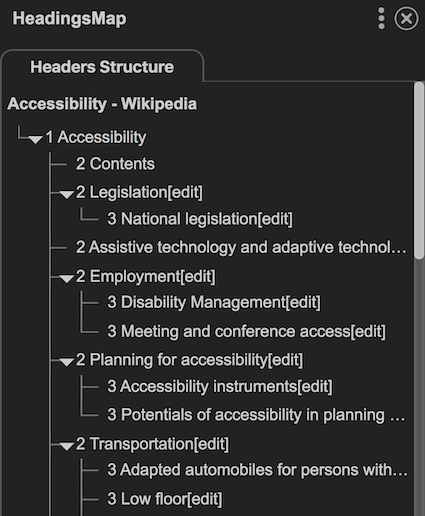
HeadingsMap
HeadingsMap is like the navigation pane in Microsoft Word. It allows you to see the heading structure on the page quickly. It will flag any instances of skipped heading levels and will give you a good general idea of how good the page structure is.
TPG Colour Contrast Analyser
TPG Colour Contrast Analyser (CCA) is a great tool for testing contrast. You can use it in any environment, whether you’re evaluating a mock-up, testing a web page or a document.
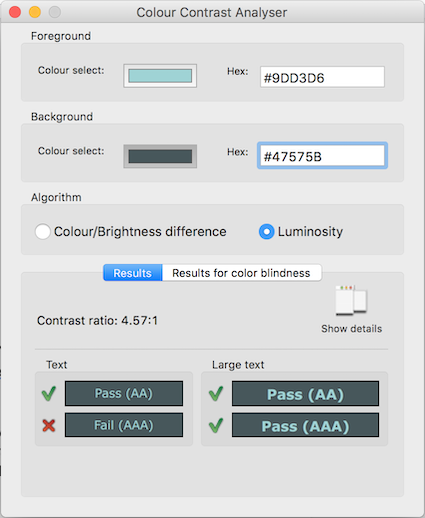
You can either use the eyedropper tool or input the exact hex values of your colors if you want the most accurate results. The tool will give you the exact contrast ratio and quickly show whether it meets requirements for regular and large text for both AA and AAA criteria.
Screen Readers
If you’re on a Mac, you can test with VoiceOver, which comes built in. If you’re working on Windows, you’ll want to use NVDA for testing. You can also use Narrator that comes built-in on Windows. Although JAWS is the most common screen reader, it’s expensive to purchase, which is bad for your pocket and your findings. Because your goal is to identify accessibility problems, you don’t want to use a fancy screen reader like JAWS, which is pretty good at glossing over certain problems to create a better user experience. NVDA is free, and you’re more likely to discover errors using it. Plus, it’s in second place when it comes to the number of people who use it.
You can also do screen reader testing on mobile. All smartphones come with a built-in screen reader: VoiceOver on iOS, TalkBack on most Android devices, and Voice Assistant on Samsung. Because screen readers work differently with touch gestures, it’s a great way to test a different mode of interaction.
Exercise: Prepare Your Testing Session
Before you begin testing, it’s good practice to set up your session:
Select the content you’re going to test. If you’re testing a website, you typically don’t need to look at every page to get an idea of how accessible it is. You can pick a few pages that cover the range of functionality. Ensure that the set is representative and includes different types of content, such as a home page, a regular content page, an interactive form, and multimedia, etc. I usually go for about 10-15 pages for a standard website, but this will depend on the project you’re working on. Open a tab for each page in a few different browsers. Most of the testing plugins we’ll be using in this course are in Chrome. If you’re on a PC, open Firefox to use the NVDA screen reader. If you’re on a Mac, open Safari to use with VoiceOver.
Have reference documentation handy. I always have the WCAG document open for reference, as well as other resources, such as the WCAG testing guide that I have prepared for you (download here as an MS Word Document or an OpenDocument).
Create a document where you will summarize your findings. I find the best approach is to have a reporting template that organizes findings by the WCAG success criteria. But it can also be as simple as an empty word doc where you can note things in point form.
Now that you’re done setting up your session, give some thought to how you want to report your findings.
Report Your Findings
You will want to share your findings with others, whether within your own team or others. There are two approaches that I find work best for summarizing findings.
WCAG Based Report
If you’re evaluating a site as a whole, it can be helpful to organize your findings based on WCAG success criteria. You can create a table with the following columns:
Success criterion name and number: identify the criterion by name and its reference number, and include a link to the WCAG document for convenience.
Overall status: I suggest using “meets requirements/requires minor fixes/requires major fixes” (as I mentioned in Chapter 1.3 using terms like pass/fail promotes the idea that WCAG can be used as a checklist).
Comments: Details about your findings along with specific examples, screenshots, and recommendations wherever possible. You may not always be able to provide recommendations, either because you haven’t come across an issue before, or it’s so complex that it could require a complete redesign. Don’t feel like you need to have a solution for every problem. When it doubt, describe the issue you’re encountering and who you think may be impacted.
For example:
Success criterion | Status | Comments |
1.1.1: Non-text Content (Level A) | Requires minor fixes | Insufficient alternative text Some images contain automatically-generated alternative text. This text does not provide sufficient information about the visual content. Example: the following image has the alternative text description “IMG7119.JPG.” [include screenshot] Instead, add a more meaningful description, such as “two people shaking hands.” |
You can have separate tables for each principle, or even for each guideline.
Task-Based Report
If you’re interested in evaluating the accessibility of specific tasks or workflows, it could be more helpful to do accessibility testing by task. Identify the steps and then go through them, noting which accessibility barriers may prevent users from completing those tasks. The context of the task can help the team understand the severity of issues and how they directly impact users. For example, if you have a newsletter sign-up form that has a submit button not accessible with a keyboard, you can note that this issue will prevent alternative navigation, screen reader, and braille users from being able to sign up for the newsletter.
Let’s Recap!
Use a holistic accessibility testing strategy, combining automated, manual, and assistive technology testing.
The HeadingsMap Chrome plugin can quickly show you the heading structure of your page, similar to the navigation pane in Microsoft Word.
TPG Colour Contrast Analyser is a great tool for testing contrast in any environment.
Using less sophisticated screen readers will be better for revealing accessibility issues.
You’re all set to start testing! Let’s begin by having a look at some automated tools.
