Create Model Objects With a ModelForm

Add a URL Pattern, View, and Template for Creating a Band
Time to create our bands! We'll represent them using model objects.
If we’re going to have a new form, we need somewhere to put it. Let’s think about what the URL path to our new form could be.
So far our Band related paths are:
‘bands/’ for the list of bands.
‘bands/1/’ for band 1, ‘bands/2/’ for band 2, etc.
We know that in the rest of this part, we’ll be adding views for creating, updating, and deleting bands. It would be nice if we could somehow fit them all under the ‘bands/’ path.
To create a Band , how about we use the path: ’bands/add/’? Let’s add it underneath the rest of our band-related URL patterns:
# merchex/urls.py

urlpatterns = [
  ...
  path('bands/', views.band_list, name='band-list'),
  path('bands/<int:id>/', views.band_detail, name='band-detail'),
  path('bands/add/', views.band_create, name='band-create'),
...
You know by now that giving our URL Patterns a name is useful for generating links in templates, so include name=’band-create’ .
Why ‘bands/add/’? Why not ‘bands/create/’?
The truth is, you can use any verb you like, as long as it makes sense to your users! I'm using a different verb partly to demonstrate that you’re free to build your URLs however is appropriate for your application.
I’ll let you go ahead and create the band_create view, and the band_create.html template, on your own. The template can just contain a simple <h1> for now. We’ll add the form in the next section.
Let Your Model Define the Form
Now that you know how to create forms in Django, the next step is to create a form that will allow users to create a new Band object.
Now, you might think that we would start by defining another form class, and for each field in our model, defining a corresponding form field, like this:
class BandForm(forms.Form):
   name = forms.CharField(max_length=100)
   biography = forms.CharField(max_length=1000)
   year_formed = forms.IntegerField(min_value=1900, max_value=2021)
   official_homepage = forms.URLField(required=False)
You could do that! But compare it to the model itself (trimmed down for comparison):
class Band(models.Model):
…
   name = models.fields.CharField(max_length=100)
...
   biography = models.fields.CharField(max_length=1000)
   year_formed = models.fields.IntegerField(
    validators=[MinValueValidator(1900),
           MaxValueValidator(2021)]
)
…
official_homepage = models.fields.URLField(null=True, blank=True)
Even though we are building two separate things - a model and a form - there seems to be a lot of duplicated information between the two. We’ve already defined each field in the model, specifying the data types (string, integer), and the rules (e.g., max_length ). Why should we have to define them in the form too?
Wouldn’t it be great if we could let the model define the form? That’s exactly what ModelForm s are for.
Generate a Form From a Model Automatically With a ModelForm
In listings/forms.py, we’ll define a new class that inherits from django.forms.ModelForm :
from django import forms

from listings.models import Band
...

class BandForm(forms.ModelForm):
   class Meta:
     model = Band
     fields = '__all__'
The new class contains a nested class, Meta , which specifies the model that this form will be for, and which fields from that model to include in this form (in this case, all of them).
Now let’s use our BandForm in the band_create view, passing it to the template:
# listings/views.py

from listings.forms import BandForm, ContactUsForm
...

def band_create(request):
   form = BandForm()
   return render(request,
            'listings/band_create.html',
            {'form': form})
And then render the form in the template:
# listings/templates/listings/band_create.html

{% extends 'listings/base.html' %}

{% block content %}

 <h1>Create new Band</h1>

<form action="" method="post" novalidate>
  {% csrf_token %}
  {{ form.as_p }}
  <input type="submit" value="Submit">
</form>

{% endblock %}
Take a look at our new page in the browser at http://127.0.0.1:8000/bands/add/:
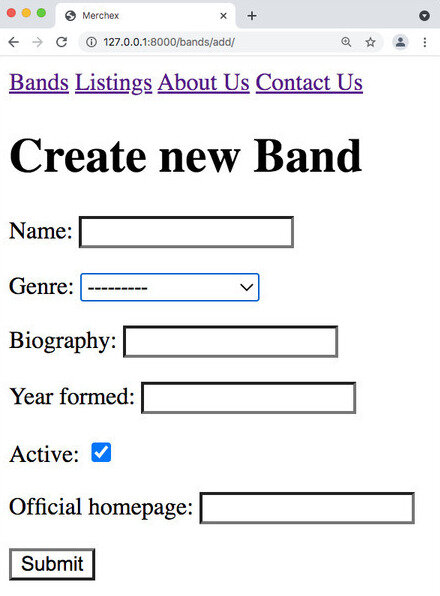
We just generated a form for our model without defining any form fields at all - we let the model do that for us! And here’s the best part: if we change the fields on the model, the form is automatically updated.
But we’re not done yet - we need to update our view to create a Band object from the values we submit in the form.
Update the View Logic to Create a New Object
We’re going to follow the same pattern that we did for the “Contact Us” form. Let’s recap on the lifecycle of this view pattern in “pseudocode” style:
The request is passed to the view function.
If this is a GET request:
This must be the first request to this page, and the user will expect to see a blank form ready for filling out. So, we create a new empty instance of the form and store it in a
formvariable.
If this is a POST request:
This is not the first request but must be a subsequent request to this page, together with some form values that the user will have submitted. So we create an instance of the form and populate it with the values sent in the POST request. This is stored in a
formvariable.If the form validation passes successfully:
We perform the action - whether that’s sending an email, creating an object, or any other action.
We redirect the user to another view, perhaps a confirmation page, or some other page that indicates that the action was successful. We stop executing this view function at this point. However:
If the form validation did NOT pass successfully:
The validation process has now added error messages to the relevant fields.
We allow execution of this view to continue to the next step below.
We now have a
formthat is either a) new and blank or b) populated with previously submitted values and relevant error messages. In both cases, we passformto the template so it can be displayed in the browser.
Here’s how that looks in Python, in our band_create view. Note that we handle the ’POST’ case first in the if statement and then handle ’GET’ in the else statement:
# listings/views.py

def band_create(request):
    if request.method == 'POST':
        form = BandForm(request.POST)
        if form.is_valid():
            # create a new `Band` and save it to the db
            band = form.save()
            # redirect to the detail page of the band we just created
            # we can provide the url pattern arguments as arguments to redirect function
            return redirect('band-detail', band.id))

    else:
        form = BandForm()

    return render(request,
                'listings/band_create.html',
                {'form': form})
Note that the form.save() method not only saves the new object to the database - it also returns that object, which means we can use it in the next step, where we immediately redirect to the newly created band.
Now we can fill out the form:
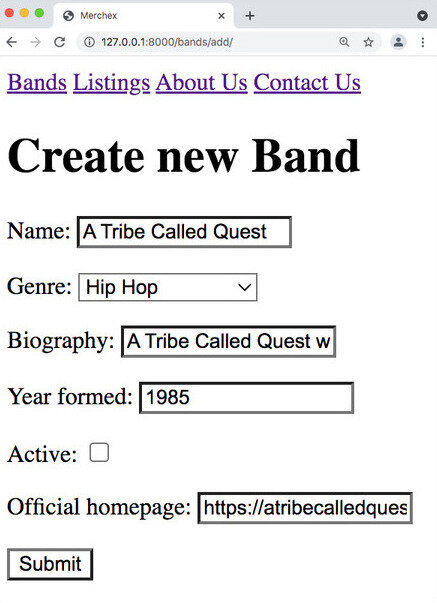
Then we are redirected to the detail page of the band we just created:

Our new page works, but it’s no use unless our users can actually find it. We need to link to it from somewhere.
How about linking from the Band list view?
# listings/templates/listings/band_list.html

...
   <h1>Bands</h1>

   <a href="{% url 'band-create' %}">Create new Band</a>
...
ModelForms are a powerful tool for creating models quickly and easily. If you need to check over any of the steps in the previous chapter, watch the screencast.
Exclude Fields From a ModelForm
It’s great that Django can generate a form for us, but what if the default form doesn’t quite meet our needs?
Well, you could build a form from scratch, like we did with the ContactUsForm , and use that. But it’s also possible to customize a ModelForm.
Let’s say we want users to be able to create a new band, but we don’t want them to be able to edit the active and official_homepage fields - we only want administrators to be able to edit those fields (which they can do in the admin site). We can exclude them from the form, like this:
class BandForm(forms.ModelForm):
   class Meta:
      model = Band
      # fields = '__all__'  # delete this line
      exclude = ('active', 'official_homepage')  # add this line
And then those fields will not appear in the form:
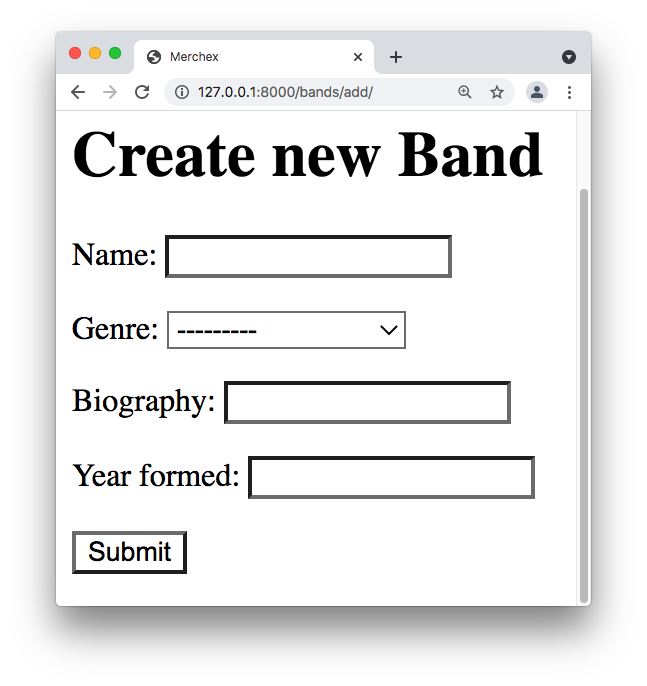
The form will still work, and we’d be able to create a new Band object without any errors, even though we’ve left these fields out - because active has a default of True , and official_homepage allows NULL values with null=True .
Enable Client-Side Validation
For both of the forms we created so far, we added novalidate to the form HTML:
<form action="" method="post" novalidate> This disabled client-side validation in your browser. Let’s re-enable it by removing novalidate from the band_create template:
# listings/templates/listings/band_create.html

<form action="" method="post">
Now try submitting that form empty:
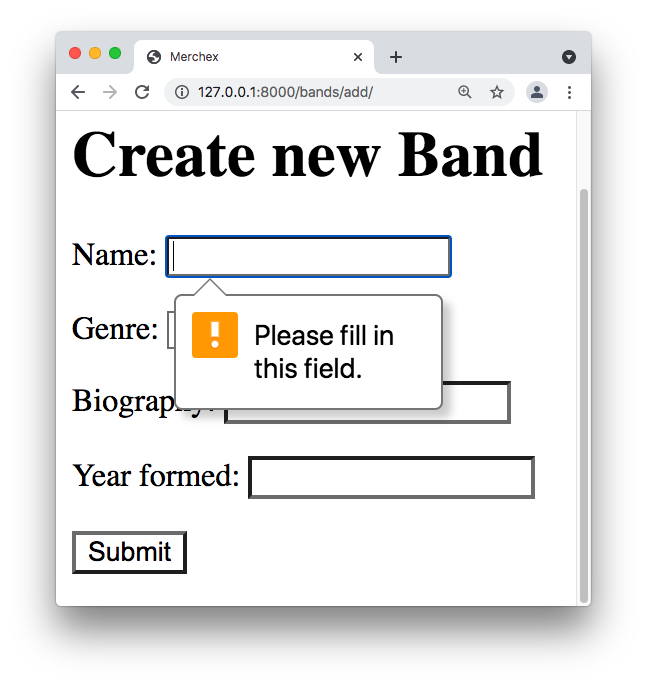
Client-side validation provides an improved user experience. It validates the data in the form before it gets sent to the server. If there is any invalid data, the form will display an error message and won’t submit the data until it is valid. This saves the user from making a “round-trip” to the server, only to find out they submitted invalid data.
So why did we disable client-side validation in the first place?
Well, if the form won’t submit until all the data is valid, then we can’t see what happens when we send invalid data to the server. Therefore, it’s not possible to demonstrate that the server-side validation is working.
But do we even need server-side validation if we have client-side validation?
Yes, absolutely. And this is an important rule to learn about web development:
“Never trust the client.”
Why not? We wrote the HTML for the client-side - can’t we trust it?
The problem is that any user could edit the HTML in the front end, remove the validation, and post whatever they want to the server! In fact, you can do it right now. Open the inspector in your browser (right-click and “Inspect” if you’re in Chrome). You can easily increase the maxlength attribute of this input to 10,000 or even 100,000!
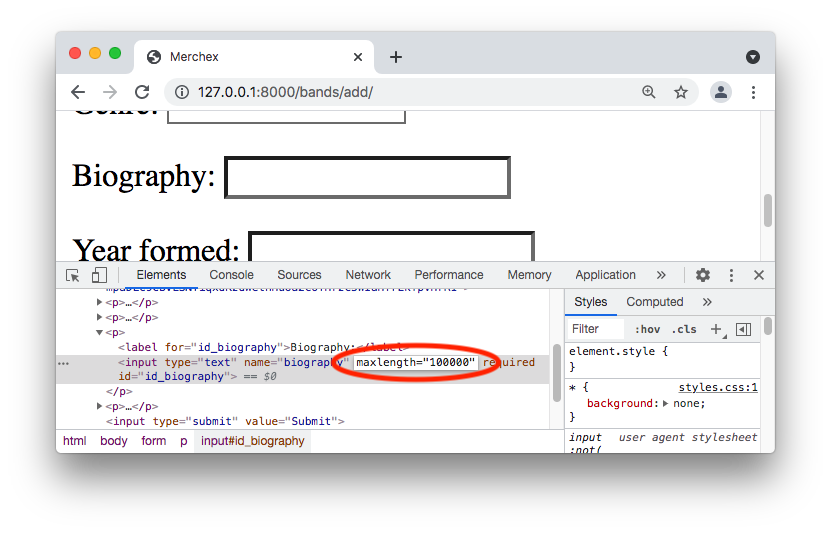
If we didn’t have server-side validation, a 100,000 character biography could be saved straight to the database. This probably wouldn’t crash the site, and would be more annoying than anything else. But you can imagine that a hacker might try to come up with other ways to exploit this lack of server-side validation.
Web application security is an important subject that every developer should learn about, but we can’t cover it all in this course. However, Django has many security best-practices built right into it, so you’re off to a good start just by using the framework.
For now though, remember:
You rely on server-side validation to ensure that you only accept valid data into your database.
Client-side validation improves the user experience, and while useful, should not be solely relied upon!
While we’re on the subject of security, now is a good time to explain what the {% csrf_token %} is in all of our forms. CSRF stands for cross-site request forgery, and it’s a method for tricking users into performing operations by making up (or “forging”) requests. The csrf_token prevents this from happening by generating a random token for every request. If a subsequent POST request does not include this exact token, Django knows that the request is a forgery and raises an error to halt execution.
Do we ever create a Form manually for a model, or do we always use a ModelForm ?
You should very rarely have to manually create a Form for a model from scratch, although nothing is stopping you from doing that. But then you would have to keep both the Model and the Form in sync with each other. Using a ModelForm in the first instance makes sense because you keep things DRY, and there is less code to maintain.
Now You Try! Add a ‘Create’ Page for the Listing Model
 Here’s your list of tasks for this chapter:
Add a “Create new Listing” page (URL pattern, view, and template).
Add a
ListingFormand use it in the new page to createListingobjects.Link from the listings list to the listing create page.
Re-enable client-side validation across all your forms.
Let’s Recap!
When building a form for creating new objects from a model, use a
ModelForm- it lets the model define the form fields automatically.Use a
ModelFormin the same way as aForm: create an instance of the form in your view and pass it to the template. Then handle both GET and POST requests in the view.Customize a
ModelFormby excluding some of the model’s fields from it, displaying only a subset of fields in the form.
Now that we’ve created a form that can create model objects, let’s see how to reuse that form for the next write operation, the ‘U’ in ‘CRUD’ - Update.
