Create a Login Page With a Function-Based View
Program the View to Log Users In
Excellent! We now have a means of storing different users in our database, but to know who these users are, we need to provide them a means of logging in to our site.
Let's build a view that will act as our login portal.
Step 1: Create the LoginForm
First, create a forms.py file to house the login form.
(ENV) ~/fotoblog (master)
→ touch authentication/forms.py
In this, create the LoginForm .
# authentication/forms.py
from django import forms

class LoginForm(forms.Form):
    username = forms.CharField(max_length=63)
    password = forms.CharField(max_length=63, widget=forms.PasswordInput)
You will also notice that we set the password field to use the forms.PasswordInput widget. A widget dictates how you want to display the field. As you may have guessed, the PasswordInput widget automatically hides the input from view by rendering a HTML <input> with type=”password” .
Step 2: Create the Login View
Now that we have our login form, let's include it in a view.
# authentication/views.py
from django.shortcuts import render

from . import forms


def login_page(request):
    form = forms.LoginForm()
    if request.method == 'POST':
        form = forms.LoginForm(request.POST)
        if form.is_valid():
            pass
    return render(request, 'authentication/login.html', context={'form': form})
Great! The LoginForm is now in the view, but as you can see, we don't actually handle the POST data yet.
Django comes with a suite of methods that can help save you time as a developer. You can use the login and authenticate methods from the django.contrib.auth module for authentication.
Here's how to implement these in a view.
from django.contrib.auth import login, authenticate  # add to imports

def login_page(request):
    form = forms.LoginForm()
    message = ''
    if request.method == 'POST':
        form = forms.LoginForm(request.POST)
        if form.is_valid():
            user = authenticate(
                username=form.cleaned_data['username'],
                password=form.cleaned_data['password'],
            )
            if user is not None:
                login(request, user)
                message = f'Hello {user.username}! You have been logged in'
            else:
                message = 'Login failed!'
    return render(
        request, 'authentication/login.html', context={'form': form, 'message': message})
Let's first look at the authenticate method. This method takes two arguments, the username and password fields for the user.
If the credentials are correct, it returns the user whose credentials we provided. Otherwise, it returns None .
The authenticate method alone doesn't handle logging the user in. For this, use the login method. It takes two arguments; the request object and the user who is to be logged in.
And there you have it! You now have a view that will allow a user to log in to the site.
Step 3: Add a Template
We have specified that we are using the template authentication/login.html in the login_page view. Let's build that now.
First, create the directories that will house the templates. We are going to add one to each of our apps and then one in the project root.
(ENV) ~/fotoblog (master)
→ mkdir -p  authentication/templates/authentication

(ENV) ~/fotoblog (master)
→ mkdir -p blog/templates/blog/

(ENV) ~/fotoblog (master)
→ mkdir templates
Then add the templates; first, a base template to be used project-wide and then the login page one.
# templates/base.html
<html>
    <head>
        <title>FotoBlog</title>
    </head>
    <body>
        <h1>FotoBlog</h1>
        {% block content %}{% endblock content %}
    </body>
</html>
# authentication/templates/authentication/login.html
{% extends 'base.html' %}
{% block content %}
<p>{{ message }}</p>
<form method="post">
{{ form.as_p }}
{% csrf_token %}
<button type="submit" >Submit</button>
</form>
{% endblock content %}If you have created a Django application using base templates before, the {% extends base.html %} pattern should be familiar to you. As we will use our base template across different apps, we put it in the project templates directory instead of in an app.
When APP_DIRS is set to True , Django automatically finds the templates/ directory when it's located in an app. However, as we are placing the base template at the project root, you need to specify it in settings.py for Django to find this directory.
To do this, alter your settings.py file like so:
# fotoblog/settings.py
...
TEMPLATES = [
    {
        'BACKEND': 'django.template.backends.django.DjangoTemplates',
        'DIRS': [
            BASE_DIR.joinpath('templates'),  # <--- add this line
        ],
        'APP_DIRS': True,
        'OPTIONS': {
            'context_processors': [
                'django.template.context_processors.debug',
                'django.template.context_processors.request',
                'django.contrib.auth.context_processors.auth',
                'django.contrib.messages.context_processors.messages',
            ],
        },
    },
]
...
This tells Django to search in the templates/ directory at the project root. It requires an absolute path, that is, from the root directory, so use the BASE_DIR constant to enable this.
Step 4: Add the URL to urlpatterns
The LoginForm is built and incorporated into the login_page view. You now have a template that you can use to generate the HTML page.
All you need to do is include the URL pattern in urls.py .
from django.contrib import admin
from django.urls import path

import authentication.views

urlpatterns = [
    path('admin/', admin.site.urls),
    path('', authentication.views.login_page, name='login'),
]
Step 5: View the Login Page
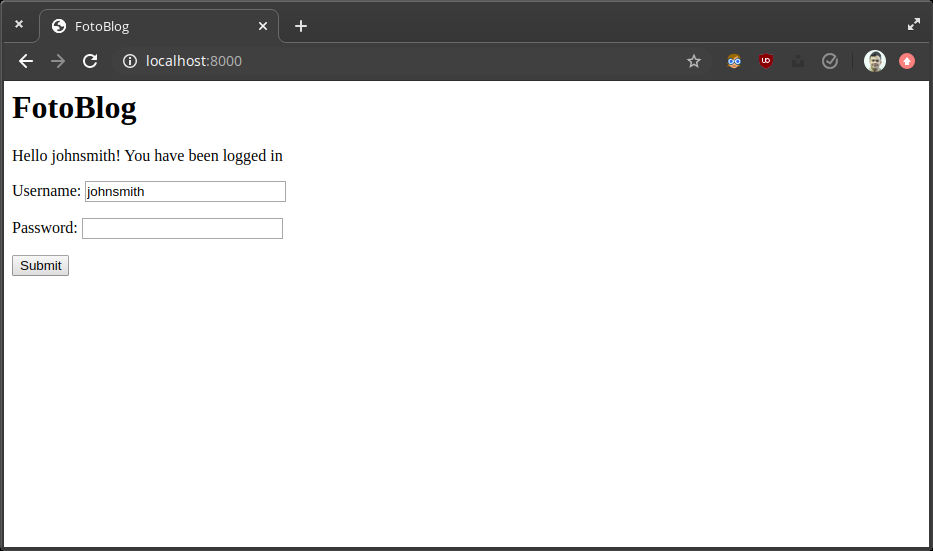
Great! Let's run the server to see the new login page.
It looks like the login page is displaying as it should. Now it's time to test it.
Test the Login Functionality and Add Log Out
In time, we will build a signup page to allow users to join the site, but for now, let's create a user in the Django shell and use it to test the login functionality.
Step 1: Create a User
Import your custom User model into the Django shell.
You can use the method User.objects.create_user to programmatically create users.
>>> from authentication.models import User
>>> User.objects.create_user(username='johnsmith', password='MyPa$$', role='CREATOR')
<User: johnsmith>
Step 2: Test the Login Functionality
Now that you have a user stored in the database, let's go back to the login page and try to log in.
Great, it worked! Let's try again with the wrong password!
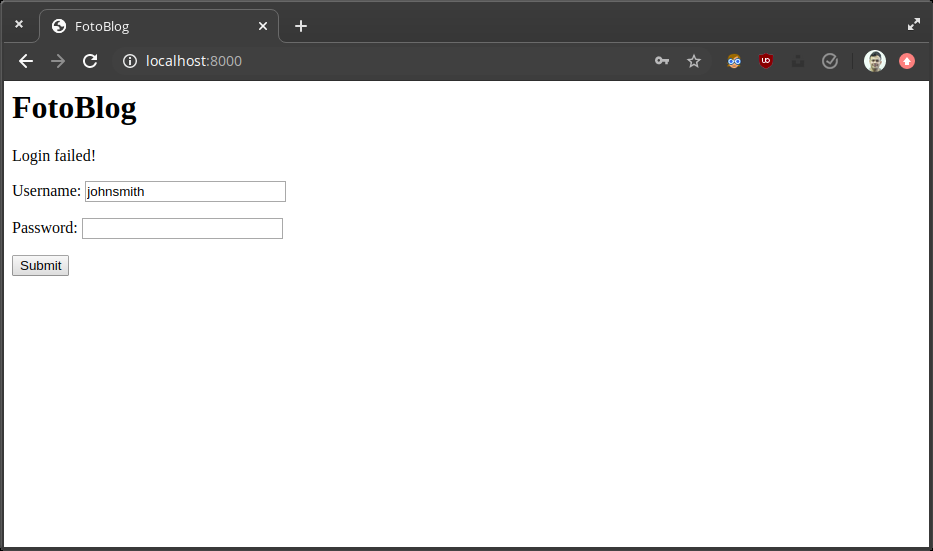
Perfect!
Step 3: Create a Logout View
Now that you can log in, it only makes sense that you should also be able to log out.
Let's add a logout view.
# authentication/views.py
from django.contrib.auth import authenticate, login, logout
from django.shortcuts import redirect, render

from . import forms


def logout_user(request):
    logout(request)
    return redirect('login')

def login_page(request):
    ...
For this, you use another method - logout - from django.contrib.auth .
The view instructs Django to log the user out. You then use the redirect function to redirect the user to the login page. The redirect function can take a view name as specified in urls.py .
Step 4: Add the Logout View to the URL Patterns
Now let's add this to the URL patterns.
# authentication/urls.py
urlpatterns = [
    ...
    path('logout/', authentication.views.logout_user, name='logout'),
]
Step 5: Add the Logout Template
Lastly, link to the logout page in base.html ; this way, it's available whenever a user is logged in, as long as you extend base.html .
# templates/base.html
<html>
<head>
<title>FotoBlog</title>
</head>
<body>
<h1>FotoBlog</h1>
{% block content %}{% endblock content %}
{% if user.is_authenticated %}
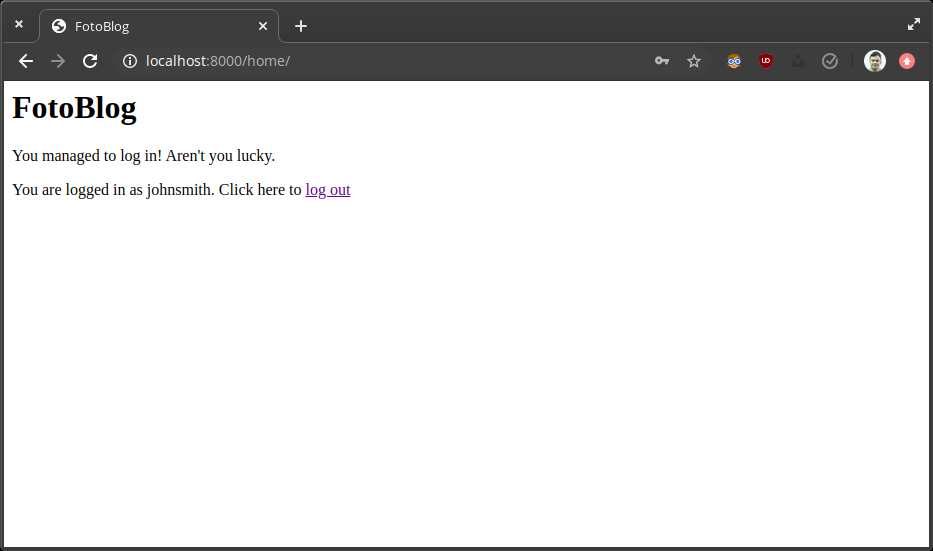
<p>You are logged in as {{ request.user }}. Click here to <a href="{% url 'logout' %}">log out</a></p>
{% endif %}
</body>
</html>The user object is always available to you in the template, representing the User object currently browsing the site. It is important to note that Django implements an AnonymousUser , so the presence of the user objects alone is not enough to tell if a user is authenticated.
To do this, you can use the user.is_authenticated method, which returns True if the user is authenticated, and False if not.
Try out the login and logout functionality now.
Restrict an Area of the Site to Logged in Users Only
Now that you can log users in and out, let's create a homepage to redirect to once logged in. As this page is not dealing with authentication, you will create it in the blog app.
Step 1: Add the View
First a view:
# blog/views.py
def home(request):
    return render(request, 'blog/home.html')
Step 2: Add a Template
Then a template:
# blog/templates/blog/home.html
{% extends 'base.html' %}
{% block content %}
    <p>You managed to log in! Aren't you lucky.</p>
{% endblock content %}
Step 3: Add the URL Pattern
Add a URL pattern to urls.py :
# urls.py
import blog.views

urlpatterns = [
    ...
    path('home/', blog.views.home, name='home'),
]
Step 4: Configure a Login Redirect
Now you need to tell Django to redirect to this page after a successful log in.
# views.py
def login_page(request):
    form = forms.LoginForm()
    message = ''
    if request.method == 'POST':
        form = forms.LoginForm(request.POST)
        if form.is_valid():
            user = authenticate(
                username=form.cleaned_data['username'],
                password=form.cleaned_data['password'],
            )
            if user is not None:
                login(request, user)
                return redirect('home')
        message = 'Login failed!'
    return render(request, 'authentication/login.html', context={'form': form, 'message': message})
Step 5: Test the Log In
Let's see what happens when we log in.

Nice, but what happens if I log out and try to access this page directly via the URL?
That's not supposed to happen!
You need a way to restrict pages so only users who are logged in can use them. Luckily, Django provides the login_required decorator, which does just that.
Step 6: Restrict Access to the Homepage
Let's use the login_required decorator on the home view by adding the following lines to views.
# blog/views.py
from django.contrib.auth.decorators import login_required


@login_required
def home(request):
    return render(request, blog/home.html')
For this to work, you need to tell Django which page to redirect to if the user is not logged in. Do this by setting the LOGIN_URL to the view name (or path) of the login URL pattern in settings.py .
# fotoblog/settings.py

LOGIN_URL = 'login'
Try to access the homepage again when not logged in. You will see that you now get redirected back to the login page.
Let's Recap!
You can use the
authenticatemethod to check a user's credentials and theloginmethod to log them in. Use thelogoutmethod to log them out.The user.is_authenticated method checks if the current user is logged in.
You can use the login_required decorator on a view to restrict parts of the site to logged-in users only.
Now that we have built a login system using function-based views, let's see how to harness the power of class-based views to make it even easier.
