Add a Blog Post Creation Facility

Create Multiple Models With One Form
Now that there is a way for users to upload photos let’s add one to create blog posts.
Sometimes when creating a form, you may want to create more than one model simultaneously. In this case, we want users to be able to create both a Photo and a Blog post at the same time.
Step 1: Create the Forms
To allow users to create models simultaneously, you need a form for each of the Photo and Blog models.
You made a ModelForm for the Photo in the last chapter, so let’s reuse that. Now let’s create one for the Blog model.
# blog/forms.py
from django import forms

from . import models


class PhotoForm(forms.ModelForm):
    ...


class BlogForm(forms.ModelForm):
    class Meta:
        model = models.Blog
        fields = ['title', 'content']
Step 2: Include the Forms in the Template
Now let's see how to include both these forms in the template. The view isn't created yet, but let's name the forms photo_form and blog_form .
We want both the forms to be submitted with a single button press to create both models simultaneously. To do this, include both of the forms individually under the same <form> tag:
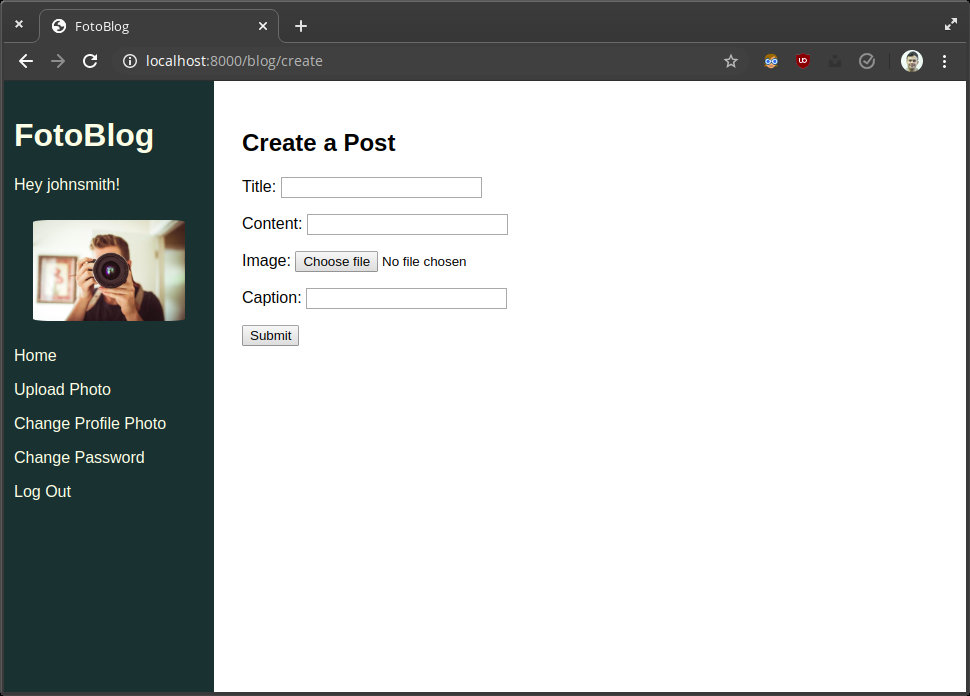
# blog/templates/blog/create_blog_post.html
{% extends 'base.html' %}
{% block content %}
    <h2>Create a Post</h2>
    <form method="post" enctype="multipart/form-data">
        {{ blog_form.as_p }}
        {{ photo_form.as_p }}
        {% csrf_token %}
        <button type="submit" >Submit</button>
    </form>
{% endblock content %}
Now that both the forms are in the same <form> tag, pressing the submit button will send the POST data from both forms at once. Let’s look at how to handle that in the view.
Step 3: Write the View
Before learning how to handle the POST aspect of the request, let's define the view to include both the photo_form and blog_form in the context and return the rendered template as part of the HTTP response.
# blog/views.py
@login_required
def blog_and_photo_upload(request):
    blog_form = forms.BlogForm()
    photo_form = forms.PhotoForm()
    if request.method == 'POST':
        # handle the POST request here
    context = {
        'blog_form': blog_form,
        'photo_form': photo_form,
    }
    return render(request, 'blog/create_blog_post.html', context=context)
Now, you can feed the POST data to the forms and then use the save() method to create the models.
# blog/forms.py
@login_required
def blog_and_photo_upload(request):
    blog_form = forms.BlogForm()
    photo_form = forms.PhotoForm()
    if request.method == 'POST':
        blog_form = forms.BlogForm(request.POST)
        photo_form = forms.PhotoForm(request.POST, request.FILES)
        if all([blog_form.is_valid(), photo_form.is_valid()]):
            blog_form.save()
            photo_form.save()
    context = {
        'blog_form': blog form,
        'photo_form': photo_form,
    }
    return render(request, 'blog/create_blog_post.html', context=context)
This view will now receive the POST request and create an instance of both the Blog and Photo models if both forms are valid.
Why not just use if blog_form.is_valid() and photo_form.is_valid() ?
Running the is_valid() method on a form does more than check the form’s validity. It also generates error messages for any fields that had an invalid input. These messages are displayed as feedback on the front end.
When you run an if condition_a and condition_b statement, Python requires both conditions to be “Truthy." If the statement resolves that condition_a is “Falsy,” it will immediately stop executing the line and skip to the next code block.
It means that if you have the statement if blog_form.is_valid() and photo_form.is_valid(), and blog_form.is_valid() returns False , then photo_form.is_valid() will never run, and it will not generate the error messages.
The current approach works great if all you want to do is create these models. However, we want to link both models to the user who has created them and populate the photo field for the Blog . Let’s adjust the view to account for this.
@login_required
def blog_and_photo_upload(request):
    blog_form = forms.BlogForm()
    photo_form = forms.PhotoForm()
    if request.method == 'POST':
        blog_form = forms.BlogForm(request.POST)
        photo_form = forms.PhotoForm(request.POST, request.FILES)
        if all([blog_form.is_valid(), photo_form.is_valid()]):
            photo = photo_form.save(commit=False)
            photo.uploader = request.user
            photo.save()
            blog = blog_form.save(commit=False)
            blog.author = request.user
            blog.photo = photo
            blog.save()
            return redirect('home')
   context = {
       'blog_form': blog_form,
       'photo_form': photo_form,
   }
   return render(request, 'blog/create_blog_post.html', context=context)
The view now updates all of the fields correctly before committing them to the database. The photo and blog will be linked to each other and the user who created them.
Step 4: Add the URL Pattern
Now add the new URL pattern:
# fotoblog/urls.py
urlpatterns = [
    …
    path('blog/create', blog.views.blog_and_photo_upload, name='blog_create'),
]
Step 5: Add "Create Blog Post" to the Sidebar
Finally, add the "Create Blog Post" link to the base template.
# templates/base.html
...
<p><a href="{% url 'home' %}">Home</a></p>
<p><a href="{% url 'blog_create' %}">Create Blog Post</a></p>
<p><a href="{% url 'photo_upload' %}">Upload Photo</a></p>
...
Then navigate to the new page and see how it looks.
Nice! You now have a way of creating blog and photo posts simultaneously, but there is no way of viewing them once they are created. Let’s add that next.
Add a View Blog Page
We are going to include blog posts on the homepage. We don’t want to have all of the text from every blog post though, so let’s add another page where a user can view a blog post in its entirety.
Step 1: Add the View for the View Blog Page
Now let’s add the view to see individual blog posts.
# blog/views.py
from django.shortcuts import get_object_or_404

@login_required
def view_blog(request, blog_id):
    blog = get_object_or_404(models.Blog, id=blog_id)
    return render(request, 'blog/view_blog.html', {'blog': blog})
Step 2: Add the Template for the View Blog Page
And then the template for the view blog page.
# blog/templates/blog/view_blog.html
{% extends 'base.html' %}
{% block content %}
    <h2>{{ blog.title }}</h2>
    <img src="{{ blog.photo.image.url }}">
    <p>{{ blog.photo.caption }}</p>
    <p>{{ blog.content }}</p>
{% endblock content %}
Step 3: Add the URL Pattern for the View Blog Page
Next add the URL pattern for the view blog page.
# fotoblog/urls.py
urlpatterns = [
    …
    path('blog/<int:blog_id>', blog.views.view_blog, name='view_blog'),
]
Step 4: Fetch the Blog Instances in the home View
Now that the view blog page is built, let's fetch the Blog instances for the homepage.
# blog/views.py
@login_required
def home(request):
    photos = models.Photo.objects.all()
    blogs = models.Blog.objects.all()
    return render(request, 'blog/home.html', context={'photos': photos, 'blogs': blogs})
Step 5: Update the home.html Template
And then display them in the template with a link to the blog post page.
# blog/templates/blog/home.html
{% extends 'base.html' %}
{% block content %}
    ...
    <h2>Blogs</h2>
    <div class="grid-container">
        {% for blog in blogs %}
            <div class="post">
                <a href="{% url 'view_blog' blog.id %}">
                    <h4>Blog Post: {{ blog.title }}</h4>
                    <img src="{{ blog.photo.image.url }}">
                </a>
            </div>
        {% endfor %}
    </div>
{% endblock content %}
Step 6: Test It Yourself
Wow! You added a lot of functionality! Take some time to create some blog posts, view them from the homepage, and then click through to see the content.
When you’re happy with the changes, move onto the next section, where you will learn how to include multiple different forms on the same page.
Let's Recap!
You can include multiple forms in a view, creating multiple models simultaneously.
If you render these forms within the same
<form>tags in the template, they will be submitted in the samePOSTrequest.You can populate both forms with the
request.POSTobject in the view and create multiple models from a single request
Now that you can create multiple models with a single form submission, you are ready to head into the next chapter on handling multiple forms on a single page.
