Create Many-to-Many Relationships

Link Users With Many-to-Many Fields
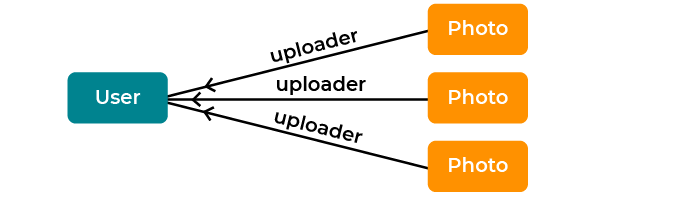
So far, we have used ForeignKey relationships for linking different model types together. These create one-to-many relationships. For example, the model Photo has a ForeignKey relationship to User via the field uploader . You can only link each instance of Photo to one instance of User , but you can link an instance of User to many different instances of Photo .
You can also use the OneToOneField to create one-to-one relationships. In this case, you can only link each instance of Model A to one instance of Model B, and vice versa.
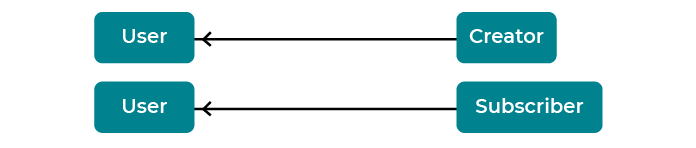
A common use case for one-to-one relationships is using profile models to extend the User model. In our case, as we have two user types - creators and subscribers - we may want to create a Creator and a Subscriber model, each with a OneToOneField relating to the User. These will contain information needed for each user, but that is only relevant to the creator and subscriber types.
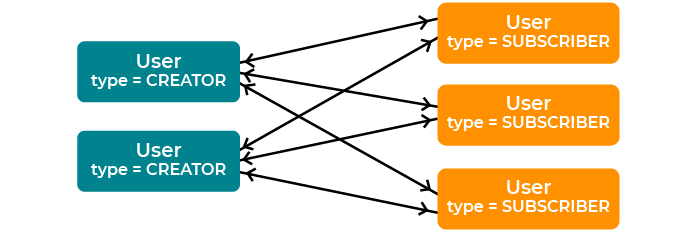
Finally, you also have the option of the ManyToManyField , which you can use to create many-to-many relationships. Suppose Model A has a ManyToManyField linking it to Model B. That means that it can be linked to many different instances of Model B, and also that an instance of Model B can also be linked to many different instances of Model A.
On our site, we are going to use many-to-many relationships to allow users to follow other users. We want a user to be able to subscribe to many different creators and to be subscribed to by multiple other users, so a many-to-many relationship is perfect.
Now to implement this pattern in our models.
Step 1: Update the Models
To facilitate a many-to-many relationship between users, you need to specify a ManyToManyField on the User model that links to another User . Let's call ours follows .
# authentication/models.py

    class User(AbstractUser):
    ...
    follows = models.ManyToManyField(
        'self',
        limit_choices_to={'role': CREATOR},
        symmetrical=False
    )
The first argument in the ManyToManyField is the model that you are forming a relationship with. In our case, it is another User model, which we reference with 'self' .
You can limit which users can be followed by using the optional limit_choices_to keyword. We only want to allow users with the CREATOR role to be followed.
In this special case, where both models in the many-to-many relationship are the same, you also have to specify whether the relationship is symmetrical. Symmetrical relationships are ones in which there is no difference between the two parties in the relationship, such as linking two friends. One user follows another, so you specify symmetrical=False . The symmetrical argument is not required if you link to model other than the one in which the ManyToManyField is declared.
Now make and run the migrations.
(ENV) ~/fotoblog (master)
→ python manage.py makemigrations
Migrations for 'authentication':
 authentication/migrations/0003_user_follows.py
  - Add field follows to user

(ENV) ~/fotoblog (master)
→ python manage.py migrate
Operations to perform:
  Apply all migrations: admin, auth, authentication, blog, contenttypes, sessions
Running migrations:
 Applying authentication.0004_user_follows... OK
Next, let’s see how to use forms to create the many-to-many relationships in a view.
Step 2: Creating Many-to-Many Relationships in a Form
To create the many-to-many relationship in the view, you first need to define the appropriate form. As the fields are on the User model, you can use a ModelForm .
Create a form that allows the user to select other users to follow.
# blog/forms.py
from django.contrib.auth import get_user_model

User = get_user_model()


class FollowUsersForm(forms.ModelForm):
    class Meta:
        model = User
        fields = ['follows']
Step 3: Create the View
Now handle the form in a view.
# blog/views.py

@login_required
def follow_users(request):
    form = forms.FollowUsersForm(instance=request.user)
    if request.method == 'POST':
        form = forms.FollowUsersForm(request.POST, instance=request.user)
        if form.is_valid():
            form.save()
            return redirect('home')
    return render(request, 'blog/follow_users_form.html', context={'form': form})
With ManyToManyField you can use the ModelForm.save() function to create the many-to-many relationship.
Step 4: Create the Template
Next, add the template as usual.
# blog/templates/blog/follow_users_form.html
{% extends 'base.html' %}
{% block content %}
    <h2>Follow Users</h2>
    <form method="post">
        {{ form.as_p }}
        {% csrf_token %}
        <button type="submit" >Confirm</button>
    </form>
{% endblock content %}
Step 5: Add the URL Pattern
Now add the URL pattern for the new page.
# fotoblog/urls.py
urlpatterns = [
    …
    path('follow-users/', blog.views.follow_users, name='follow_users')

]
Step 6: Add a Link to the New Page
Add a link from the sidebar.
# templates/base.html
…
{% if perms.blog.add_photo %}
    <p><a href="{% url 'photo_upload' %}">Upload Photo</a></p>
    <p><a href="{% url 'create_multiple_photos' %}">Upload Multiple Photos</a></p>
{% endif %}
<p><a href="{% url 'follow_users' %}">Follow Users</a></p>
<p><a href="{% url 'upload_profile_photo' %}">Change Profile Photo</a></p>
...
Let's see how that form looks.
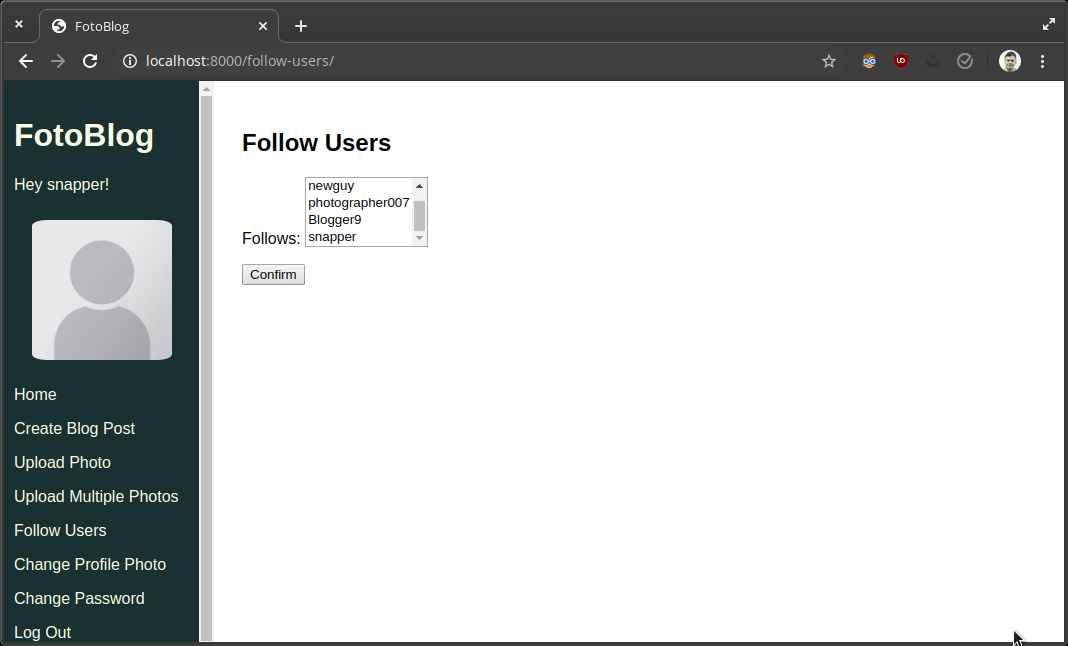
We’ve done it. The form contains all of the creators and allows the user to select and follow them. It also allows you to select multiple users by holding the CTRL/Command button; the form then stores them in a many-to-many field.
Next, let’s see how to store information about many-to-many relationships.
Store Extra Data on Many-to-Many Relationships With Intermediary Tables
Sometimes, you will want to store extra data on the relationship between two model instances linked by a many-to-many relationship.
Let's say you want to allow a Blog model to have multiple contributors and store a log of what each author has added.
To do this, create an intermediary table to store data on the relationship. When you use the ManyToManyField , Django produces this table on its own. All you are doing is creating it manually instead.
Step 1: Create the Intermediary Table
The intermediary table requires two ForeignKey relationships to the two models involved in the many-to-many relationship. For our application, one to the User and one to the Blog .
We are also going to add the field contribution to store information on which author contributed what.
Let’s see how this looks.
# blog/models.py
class BlogContributor(models.Model):
    contributor = models.ForeignKey(settings.AUTH_USER_MODEL, on_delete=models.CASCADE)
    blog = models.ForeignKey(Blog, on_delete=models.CASCADE)
    contribution = models.CharField(max_length=255, blank=True)

    class Meta:
        unique_together = ('contributor', 'blog')
We set the unique_together attribute in the Meta class to ensure that there is only one instance of BlogContributor for each contributor - blog pairing.
Step 2: Update the ManyToManyField to Use the Intermediary Table
Now add a ManyToManyField to Blog and tell it to use our intermediary table.
Do this by specifying the through keyword argument when declaring the field. You just need to point it towards the new model. For now, let's leave the old author field in place, but we will make it optional by allowing it to be null .
class Blog(models.Model):
    ...
    author = models.ForeignKey(settings.AUTH_USER_MODEL, on_delete=models.CASCADE, null=True)
    contributors = models.ManyToManyField(settings.AUTH_USER_MODEL, through='BlogContributor')
...
Now make the migrations.
→ python manage.py makemigrations
SystemCheckError: System check identified some issues:

ERRORS:
blog.Blog.author: (fields.E304) Reverse accessor for 'blog.Blog.author' clashes with reverse accessor for 'blog.Blog.contributors'.
    HINT: Add or change a related_name argument to the definition for 'blog.Blog.author' or 'blog.Blog.contributors'.
blog.Blog.contributors: (fields.E304) Reverse accessor for 'blog.Blog.contributors' clashes with reverse accessor for 'blog.Blog.author'.
    HINT: Add or change a related_name argument to the definition for 'blog.Blog.contributors' or 'blog.Blog.author'.
Oh no! Django doesn't seem happy with the changes! The reason you see this is because there is a clash in our reverse accessor.
Before adding this field, you could have used user.blog_set to access a QuerySet of a particular author's Blog instances.
But now if we want to do the same for the contributors field - by retrieving all of the Blog instances for a User for which the user is present in the contributors of the Blog instance - again, the reverse look up would be user.blog_set .
To get around this, give the field a custom reverse accessor by specifying the related_name argument. If you set this to contributions , you can then access all of the Blog instances with the User as a contributor via user.contributions instead.
Let’s update the model accordingly.
# blog/models.py
class Blog(models.Model):
    ...
    author = models.ForeignKey(settings.AUTH_USER_MODEL, on_delete=models.CASCADE, null=True)
    contributors = models.ManyToManyField(
settings.AUTH_USER_MODEL, through='BlogContributor', related_name='contributions')
...
And then try those migrations again.
(ENV) ~/fotoblog (master)
→ python manage.py makemigrations
Migrations for 'blog':
  blog/migrations/0003_auto_20210427_2325.py
    - Create model BlogContributor
    - Add field contributors to blog

(ENV) ~/fotoblog (master)
→ python manage.py migrate
Operations to perform:
  Apply all migrations: admin, auth, authentication, blog, contenttypes, sessions
Running migrations:
  Applying blog.0003_auto_20210427_2325... OK
Step 3: Update the View to Handle a Many-to-Many Relationship
Next, update the blog_and_photo_upload view to reflect the changes.
Let’s see how the view currently handles a POST request.
def blog_and_photo_upload(request):
    ...
    if request.method == 'POST':
        blog_form = forms.BlogForm(request.POST)
        photo_form = forms.PhotoForm(request.POST, request.FILES)
        if all([blog_form.is_valid(), photo_form.is_valid()]):
            photo = photo_form.save(commit=False)
            photo.uploader = request.user
            photo.save()
            blog = blog_form.save(commit=False)
            blog.photo = photo
            blog.author = request.user
            blog.save()
    ...
You can only store the relationships in the ManyToManyField once the model has been saved into the database.
In our case, we want to add the logged in user as a contributor once the blog instance is saved.
To do that, use the add method to create the many-to-many relationship. You can also specify the contents of the extra fields with the through_defaults keyword argument.
Let’s update the view to use the new ManyToManyField .
def blog_and_photo_upload(request):
    ...
    if request.method == 'POST':
        blog_form = forms.BlogForm(request.POST)
        photo_form = forms.PhotoForm(request.POST, request.FILES)
        if all([blog_form.is_valid(), photo_form.is_valid()]):
            photo = photo_form.save(commit=False)
            photo.uploader = request.user
            photo.save()
            blog = blog_form.save(commit=False)
            blog.photo = photo
            blog.save()
            blog.contributors.add(request.user, through_defaults={'contribution': 'Primary Author'})
            return redirect('home')

    ...
The contributor relationship has now been saved as a many-to-many relationship instead.
We have added the capability to add multiple contributors for a blog post, but we still need to migrate the old data stored in the author field to the new format. That is what you are going to do next.
Exercise: Migrate From a ForeignKey to a ManyToManyField Using a Custom Migration
Now that our new relationship is set up, you can migrate the data from the old one-to-many relationship to a many-to-many relationship.
To do this, you will need to:
Create an empty migration in the
blogapp.In the migration, iterate through each instance of the
Blogmodel. Add the value ofauthortocontributorswith a default contribution of'Primary Author'for each one.Run the migration. If you are happy with the result, delete the
authorfield onBlog.Make and run the new migrations. You should have successfully migrated all of the existing data to the new dataset!
Once you’ve written your custom migration, see how it matches up against the solution in the GitHub repo.
Let's Recap!
Use the
ManyToManyFieldto store many-to-many relationships.Many-to-many relationships are stored in intermediary tables.
To store data on a relationship, create custom intermediary tables with additional fields and point to them with the
throughkeyword.
Now that you’re familiar with many-to-many relationships, let’s check your model and form skills before moving on to the Django ORM and templates.
