Increase Your Efficiency Using Lists and Conditional Rendering

Loop Through Your Content
In code, you’ll often find that different lists of data are structured in the same way. Great news! 🤩 There's no need to strain over copying and pasting: you can just loop through your content and generate React components from it.
But what would that look like?
Use the map() Method
The JavaScript map() method passes over each element of an array. It applies a function and returns a new array containing the results of this function applied to each element.
For example, for a function that doubles the value of an element, it would look like this:
const numbers = [1, 2, 3, 4]
const doubles = numbers.map(x => x * 2) // [2, 4, 6, 8]
In our case, you can use it to transform a list of data into a list of components.
Let’s create a ShoppingList.js component for our plant shop.
In this file, declare a plantList variable, which contains a list of plants:
const plantList = [
    'Monstera',
    'Ficus Lyrata',
    'Silver Pothos',
    'Yucca',
    'Palm'
]
Below that, add the component itself:
function ShoppingList() {
    return (
        <ul>
            {plantList.map((plant) => (
                <li>{plant}</li>
            ))}
        </ul>
    )
}

export default ShoppingList
As you can see, for each entry in the array, it returns a <li> element.
Now import ShoppingList.js into <App /> and… fantastic! We have our list of components. 🥳
But what’s this big red error on my console?

Uh oh! Looks like the key prop is missing. 🙈
Define Your Key
Right, so what is the key prop, and why do we need to worry about it here?
React's documentation clearly explains this: key props help React identify which items have changed, are added, or are removed. Keys should be given to the elements inside the array to provide a stable identity.
So I can give my key prop any value I like?
Not quite! To avoid bugs, a key must follow these two rules:
It should be unique within the array.
It should be stable over time (the same source data should always have the same key= value).
Remember the virtual DOM in Part 1? The key is used to link a piece of data to the corresponding component in the virtual DOM, allowing for components to be generated.
There are various methods for generating unique key props:
The easiest and most reliable method is using the ID from data in your database.
You could also find a way to use the data value if you’re sure it will always be unique and stable over time.
As a last resort, you could define a string and combine it with the item index.
Since we don’t have an ID, we’ll combine the index and the plant name, which is a string:
function ShoppingList() {
    return (
        <ul>
            {plantList.map((plant, index) => (
                <li key={`${plant}-${index}`}>{plant}</li>
            ))}
        </ul>
    )
}

export default ShoppingList
And it's error free!
Give It a Go!
 On branch P2C3-Begin-1, you’ll find the codebase you need to start the exercise. In
 ShoppingList.js , you’ll see a list of plants imported from /datas , called plantList , and which consists of categories for each plant.
Try the following, using this list of plants:
Dynamically put together a new list that extracts the unique plant categories (which we’ll use later on).
There are various ways of creating a list of unique items but use the
reduce()orforEach()method.
Display the list of plant categories above the list of plants for sale.
The solution is on branch P2C3-Solution-1.
Contextualize Component Content
React allows you to create lists of components, saving developers vast amounts of time. But that’s not all! You can also use the JSX to render elements in components conditionally.
Remember that React allows you to evaluate a JavaScript expression in the JSX directly? That you can use curly braces to write a conditional to display one element or another?
Let's take this concept further, changing certain parts of our component depending on the context.
Create Conditions in JSX
You've already encountered the conditional operator. Now that we have a complete app to play around with, let's put it to work in our plant shop. 🤓
In our list of plants plantList.js , add an isBestSale category that corresponds to a boolean , which tells you whether a plant is a best seller. It looks like this:
{
    name: 'Monstera',
    category: 'Classic',
    id: '1ed',
    isBestSale: true
},
Now that we have our boolean, let's use a conditional to display different emojis according to whether it is a best seller or not. In ShoppingList.js , on the same level as the name, add:
{plantList.map((plant) => (
    <li key={plant.id}>
        {plant.isBestSale ? <span>🔥</span> : <span>👎</span>}
    </li>
))}
Which gives us:
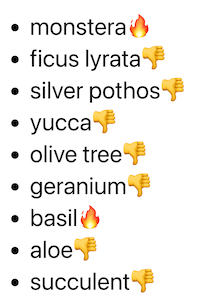
Great! It works!
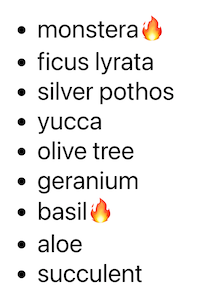
On second thought, it might not work as a sales argument. 🤔 Instead, let’s just put 🔥 for the best sellers and nothing for the others.
To do that, return null in the condition where you don’t want anything to be displayed:
{plant.isBestSale ? <span>🔥</span> : null}It works! 🤩
Do you know what, though? There’s an even easier way to write this – you can use && .
Placed between curly braces,&& goes before a JSX element and states that the element will only be generated if the condition is met. So you could write:
{plant.isBestSale && <span>🔥</span>}Which gives us:
Yay! It works!
Try Alternative Methods
React is very flexible, and there are other methods you can use to add context to your content. I’ll run through a few of these in the screencast below:
Give It a Go!
 You’ll find the codebase on branch P2C3-Begin-2. There's some CSS in
 ShoppingList.css so that everything’s a bit clearer. ✨
There's also a isSpecialOffer variable to true for plants on sale. Your mission is to render a div element that contains the word "Sale" depending on whether the plant is on offer. You can pass it the jh-sales class to add style.
Feel free to choose any of the methods from this chapter to create your conditional rendering.
You’ll find the solution on branch P2C3-Solution-2.
Let’s Recap!
Using a list of data, the
map()method creates a list of React components.The
keyprop is essential in lists of components.To avoid bugs, your
keyprop should:Be unique within the list.
Remain the same over time.
Best practice for creating a
keyis using the data’s uniqueid, and not using the item’s index.Conditional rendering is used to render one element or another in the JSX, according to the condition ‘if… else...’.
There are other ways of creating conditions in React, such as taking the conditions out of the JSX.
In this chapter, you’ve mastered two extremely useful ways of saving time in React with conditions and lists. Congratulations!
In the next chapter, we will look at an essential element for reusing components in React: props! Can’t wait to get PROPerly acquainted? Then see you in the next chapter!
