Set Up Your Emailing Campaign
In the last chapter, you saw that all email delivery solutions stick to a relatively similar structure with basic modules that tend to be the same across all tools: contact management, message creation, message delivery, and analytics. Let’s look at how these different operations work in practice.
So far, we’ve covered creating a campaign brief, writing content, laying it out, and some of the rules around HTML coding in the email production cycle. It’s now time to get this show on the road and complete the final few steps before hitting send.
Segment Your Contacts
Before sending out your campaign, you need to decide on your audience.
Import Your Contact List – or Don't!
You may already have your email addresses uploaded to the software you’re using. Or you may not. Generally speaking, before a campaign, you have three options:
Your email addresses come from elsewhere (e-commerce site, CRM system, etc.). In this case, you’ll need to import the file to your campaign management solution.
Your email addresses fall directly into your software. This may be the case if your delivery solution manages your sign-up forms.
Your email addresses automatically sync between your different information systems. This will be done by specialized integration modules (leading e-commerce software, for example, have various connectors to different ESPs) or using API (application programming interface).
Segment to Respond to a Specific Need
Having email addresses is all well and good, but specifically selecting those you want to target for your campaign is even better.
Most email solutions have developed segmentation systems to precisely define which contacts you want to find in your database.
This segmentation uses logical operators of varying complexity, depending on the sophistication of the solution that you’re using. In more advanced solutions, you can use SQL (the programming language used to manipulate databases).
Here are a few examples with the basic logical operators, which are “equal to,” “not equal to,” “or,” “and,” “greater than,” and “less than.”
Let’s start with a simple example. You want to select all of the female contacts over the age of 30 (approximately):
(TITLE = ‘F’) AND (BIRTH_YEAR > 1990)
If you’re no good at math or have a strong aversion to programming, don’t worry! This won't look like code within your ESP – you can do it all with a stylized graphical interface:

Let’s move onto a second example. In this one, we’re going to select either women or those over 30:
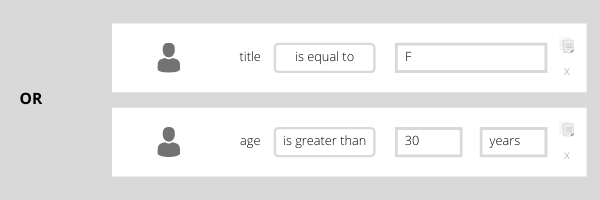
And finally, a slightly more complex example. We’re going to select women over 30 and men over 40:
[ (TITLE = ‘F’) AND (BIRTH_YEAR > 1990) ]
OR
[ (TITLE = ‘M’) AND (BIRTH_YEAR > 1980) ]

This is a relatively basic approach using only declared data. You could, of course, take this much further by also using behavioral data, for example, women over 30 who have not opened an email for two months and have not placed an order for four months.
The key is knowing what data is available in your email solution and the options you have regarding the amount of data you can segment.
Import Your HTML
If you’re not using your software’s built-in email builder (see part 3, chapter 3), you’ll need to import your HTML.
Depending on the tool you’re using, you can include this stage as part of the campaign creation process, or it may be in a separate section dedicated to the messages themselves.
Watch out: many platforms modify the code of imported emails and may disrupt their compatibility with different email clients. Depending on how your solution behaves, it might be a good idea to copy and paste the HTML code onto the platform rather than importing it.
Personalize Using Profile Variables
As you saw (in part 1, chapter 2), it’s important to make things personal for your recipient.
Carry out personalization using your software’s editor, which will give you access to the list of available variables.
For our purposes, a variable is a chunk of text that will change when you send the email.
For example, with ‘Hello ~NAME~’, the ~NAME~ variable will be automatically replaced by your recipient’s first name.
Different platforms format their variables in different ways. Here are a few examples:
~NAME~
[[NAME]]
@NAME
$NAME
Sometimes you might need your personalization to be slightly more sophisticated. For example, if you want to say “Dear Mr. Jones,” you also need to be able to say “Dear Ms. Jones.”
In most solutions, you’ll be able to do this using the conditions IF, ELSE, and ELSEIF. You’ll end up with something a bit like this (again, the syntax will be different for each tool):
{% if TITLE == "M" %}Mr.{% elseif TITLE == "F" %}Ms.
{% else %}Dear{% endif %} {{ SURNAME }}
Once again, your only limit is your imagination and the amount of data you have at your disposal (which depends greatly on how sophisticated your email solution is).
Modify Content Dynamically, According to Characteristics
With personalization, you’re displaying (with some subtleties) information contained in your subscriber’s profile. But it is possible to take things even further!
Conditional Blocks
A conditional (or dynamic) block is a change in content that affects a part of an email depending on the person receiving it. Within the context of managing a campaign, you have to plan all blocks and add code between them to only appear for the right recipients.
So what’s the technical difference between this and Dear Mr./Ms. SURNAME? None – it’s the precise goal that’s different. For example, if you want to change your content depending on whether you’re emailing a prospective or existing client, you’ll have something that looks like this:
{% if CONTACT_STATUS == "CLIENT" %}
… content for existing clients...
{% else %}
… content for others...
{% endif %}
This is a relatively simple example, but depending on the email platform you’re using, you might use more sophisticated techniques or more complex data.
Product Recommendations
Speaking of sophisticated techniques and complex data, let’s briefly consider product recommendations. This is a classic technique. Some marketing solutions will allow you to display products from your catalog that might be of particular interest to an existing customer by using their order history.
Scheduling and Configuring a Campaign
This is the final stage (apart from testing and checking, which we’ll look at next chapter). You have two main options here:
Hitting the big red button to send your campaign out straight away.
Scheduling your campaign for a time that works best for you (once your offer has activated, for example) or your audience!
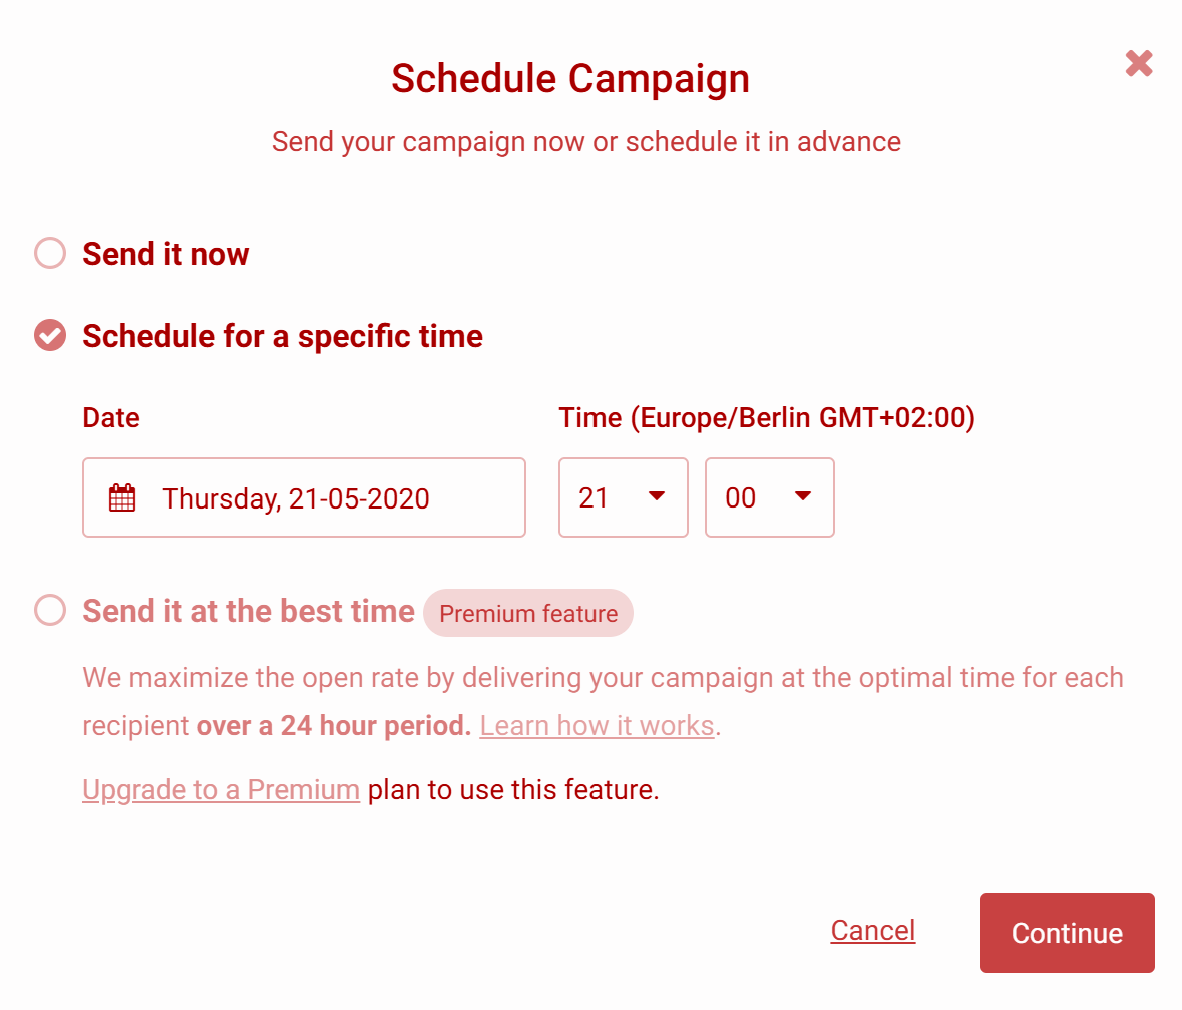
In the screenshot above, you’ll see that there’s a third option that lets you send your campaign at the best time. This technique is commonly known as Send Time Optimization (STO) and uses your contact’s response history to send them a message at the time when they will be most responsive.
It has been shown to boost response rates significantly - you may want to test this with your audience and see how well it works!
Let’s Recap!
Consider segmenting your contacts, and don’t forget to keep your data up to date.
Don’t forget to check that you have the data you need for the segmenting and personalization you want.
Take care when importing your HTML and check that the code hasn’t broken.
Use personalization variables to make your emails more personal.
The next chapter will look at how to test and check your campaigns to ensure they don’t contain any errors.
