Establish Communication Between Virtual Machines

Select the Correct Network Mode
When you create a VM, a virtual network card is allocated by default, allowing it to access the internet. However, you'll have to configure it if it doesn't work automatically.
This table shows what each network mode is best for:
Network mode | Example of when it should be used |
NAT | Only use one VM to download apps, carry out updates, or surf the internet. |
Bridged network | You want your VM to become a web server. It needs to be seen on the network as a physical machine with its own externally accessible IP address. |
Internal network | You are using several VMs to simulate private networks that do not have external access or access to the host machine. |
NAT network | Similar to NAT, several VMs need to communicate with each other (impossible in classic NAT mode). |
Private host network | Similar to an internal network, but when communication needs to be allowed with the host. |
Now that you understand all the network modes, let’s go back to our example from the first chapter. This was the context: you’re working on a multi-platform app for internal use only. The company has Android, Windows, and Linux machines, and you want to check if your app works properly in this complex environment. To function, it needs to be able to:
Regularly send requests to the other machines.
Retrieve database updates from a remote server which can be accessed via a URL.
Connect to the Internet in NAT Mode
Let's start by looking at an NAT network.
Step 1: Creating VMs
We’re going to create three VMs:
Ubuntu
Windows 10
Android
There’s no need to create a new Ubuntu or Android VM – you can use the ones from the previous chapter.
You can find the Windows 10 VM disk here to create the VM we did in Chapter 3.
Step 2: Configure the Network
NAT Mode
As previously mentioned, the default network mode is NAT. It allows VMs to access the internet (if their host is connected ), but not to communicate with each other.
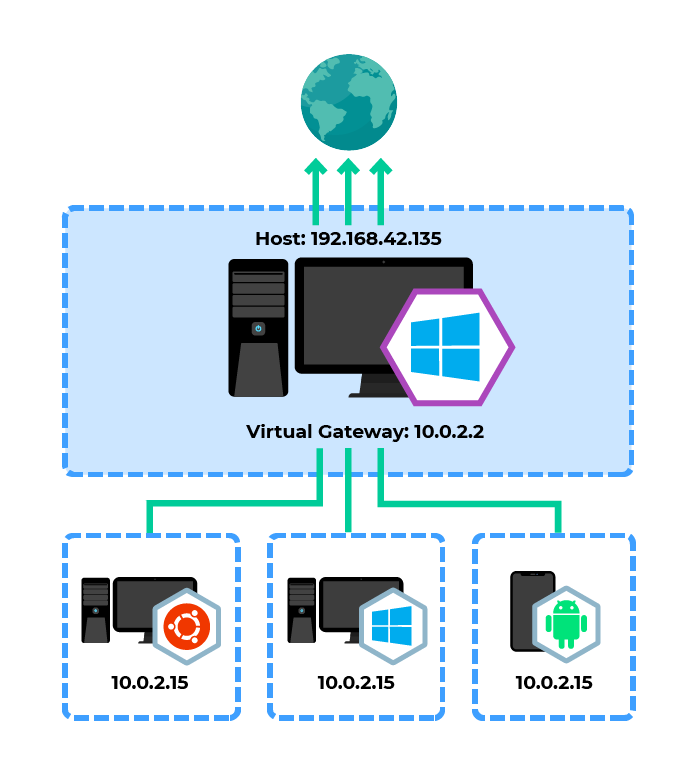
You can check this by looking at the IP address given to each VM.
It's important that our three VMs have the IP address: 10.0.2.15 and that they can access the internet. This also means that they are on three different networks as it is impossible to allocate the same IP address to three machines on the same network.
Internal Network Mode
The simplest way to establish communication between the VMs is to put them all on an internal network using the internal network mode.
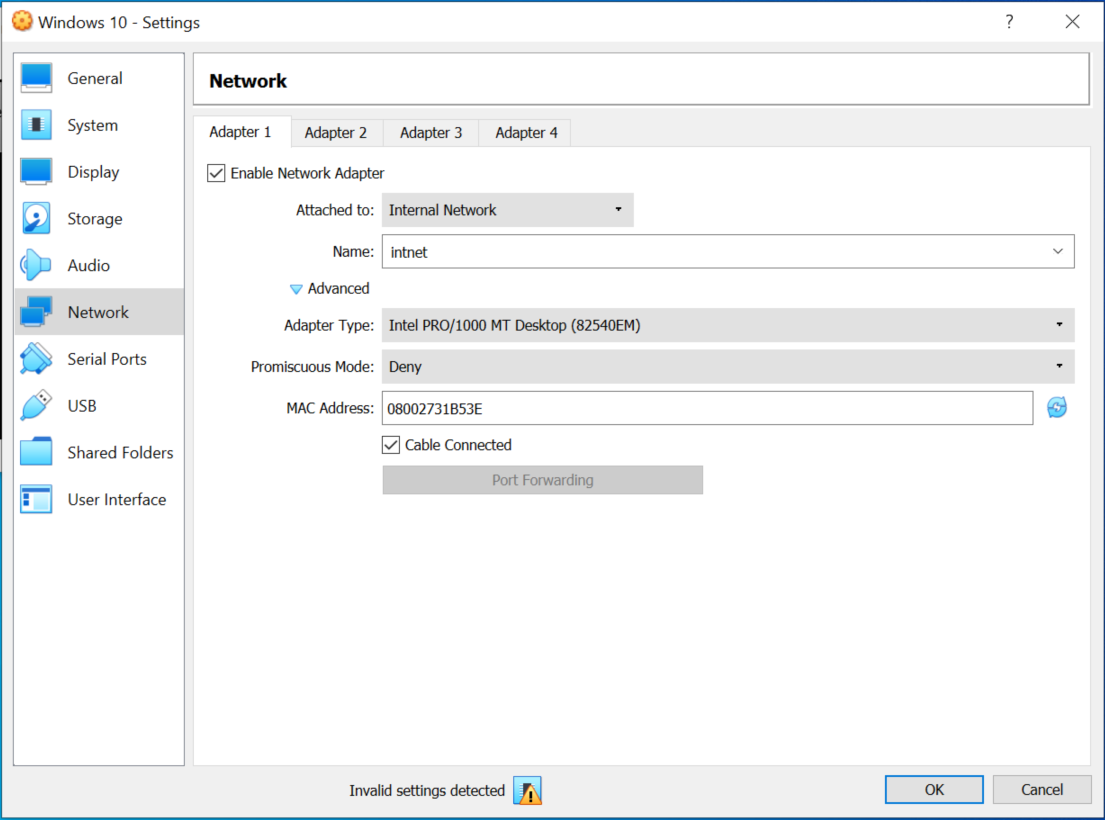
To do this, switch off your VM, and go to the Network configuration section.

In Network access mode, select Internal Network, and either leave the default name or choose another one.
In the Advanced section, you’ll see that you can also change certain settings:
Type of card – The virtual network card model that your VM will see.
Promiscuous mode – Allows the card to see all packets in transit on the network, not only those intended for it. Only activate this option in very specific cases for network tests.
MAC address – The MAC address of your virtual network card.
In our case, we don’t need to change these settings.
If you start your VMs now, you’ll see that they have not been allocated an IP address. Although they are on the same network, there is no DHCP server. Therefore, you will have to allocate an IP address manually.
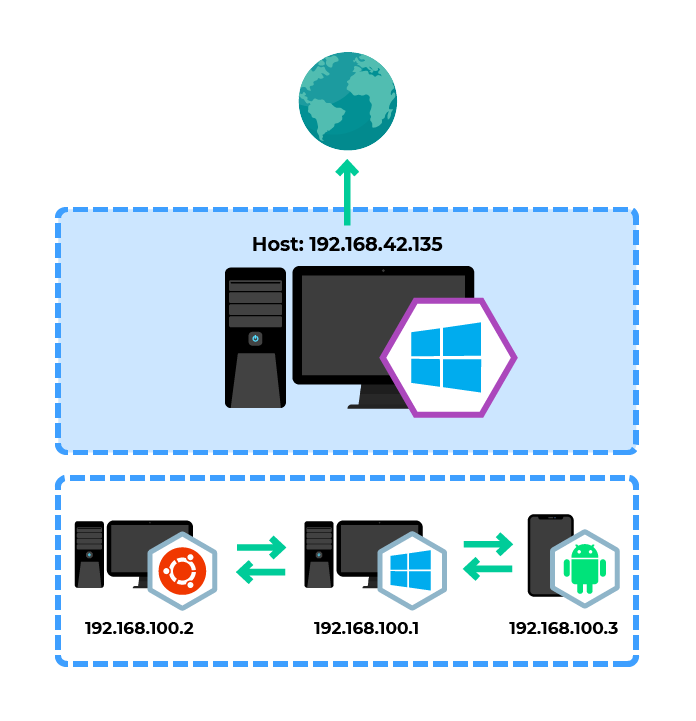
Let’s go through the configuration for the Windows VM (192.168.100.1) and the Ubuntu VM (192.168.100.2) and check the result with a ping:
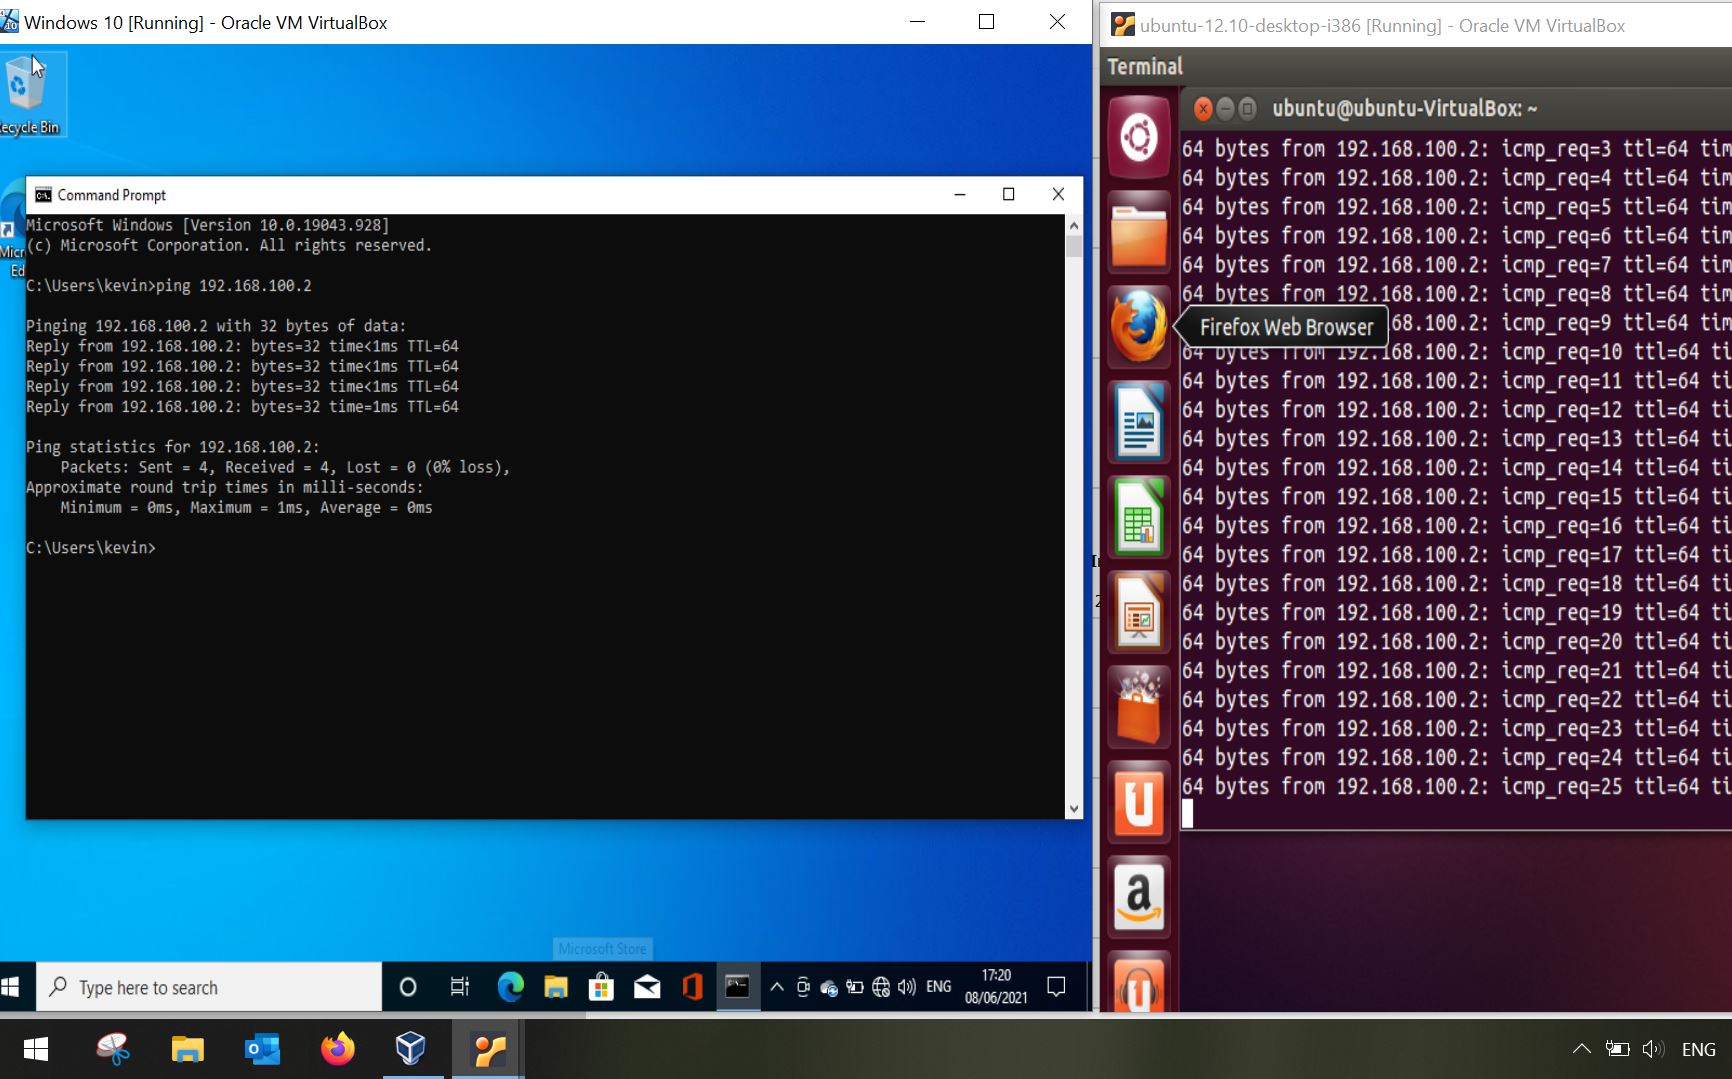
In internal network mode, the VMs cannot access the internet and cannot be seen from other networks.
Take a Closer Look at Setting Up the Internal Network Mode
Follow along with the short video below to see how I configure multiple VMs to use the internal network mode:
Bridged Network Mode
Use bridge network mode if you want to allow your VMs to access the internet, communicate with each other, and be visible externally.
Go back into the network configuration of each VM when they are powered off and choose bridged adapter mode.
You’ll see that you are asked to choose one of the host machine’s network cards. Choose the one that allows your host machine to access the internet.
Then launch your VMs. Once you’ve done this, check that your machine’s operating systems are configured to receive an IP address via DHCP automatically.
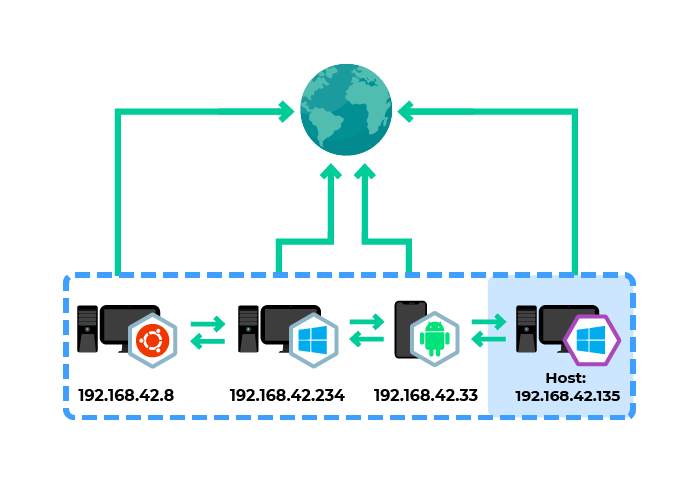
Your VMs will automatically receive an IP address on the same network as your host machine.
You can see this here: all of my machines are on the network 192.168.1.0/24, including my host machine (top left).
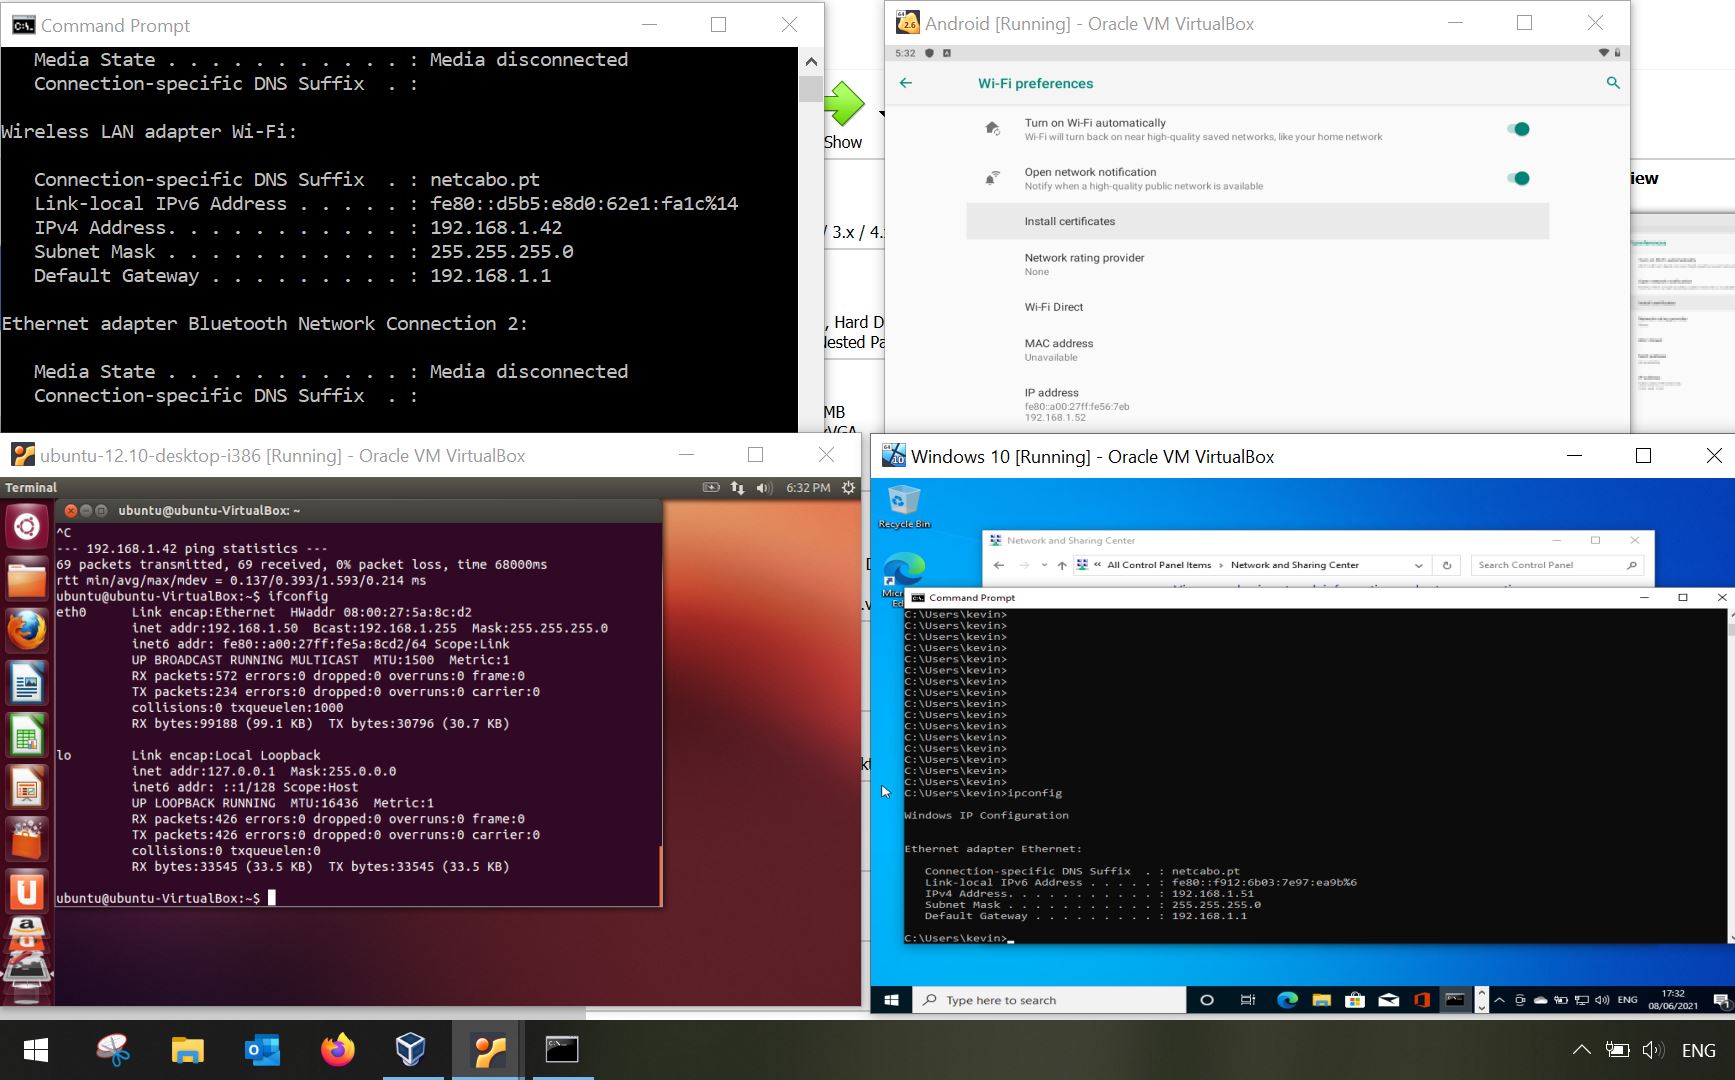
This means that they can all communicate with each other and access the internet.
Take a Closer Look at Setting Up Bridged Networking
Bridged networking mode is useful in a number of scenarios. Follow along with my video to see how to configure your VMs to use this mode:
This mode is perfect for our practical example, as it fills our two requirements:
The app undergoing beta testing must be able to issue requests to all the other machines regularly.
The app must update its database automatically using a remote server accessible via a URL.
We have now covered the main network modes. With this knowledge, you can configure the communication settings for your environment's needs.
Choose a Type 2 Hypervisor for Tests
As you've seen, you can do a lot with hypervisors such as VirtualBox, like installing several different operating systems, including Android and Linux. The connection options provide different ways to create simple networks, depending on your requirements.
So now, the next time you need to test operating systems, an app, or simple network architecture, you'll be able to use a type 2 hypervisor.
Let's Recap!
When creating a VM, a virtual network card is allocated by default.
You must mount the ISO onto the VM if using an ISO file. The installation will then begin when the VM is powered on
There are many different network modes you can configure your VM to use:
NAT - Allows VMs to access the internet (if their host is connected) but not to communicate with each other.
Internal network - VMs cannot access the internet or other networks but can communicate with each other.
Bridged network - VMs can access the internet, communicate with each other, and be visible externally.
You can use the VM settings menu in VirtualBox to edit each machine's network configuration.
You should now have a better idea of what each of the main network modes offers and understand when to use them.
Check your skills in the next quiz on type 2 hypervisors, and I will see you in part 3, where we'll look at type 1 hypervisors and transforming environments using virtualization.
