Turn Your Application Into a Single-Page App With React Router
Understand the Basics of SPA
Let travel back to the very beginnings of the World Wide Web. 🤖
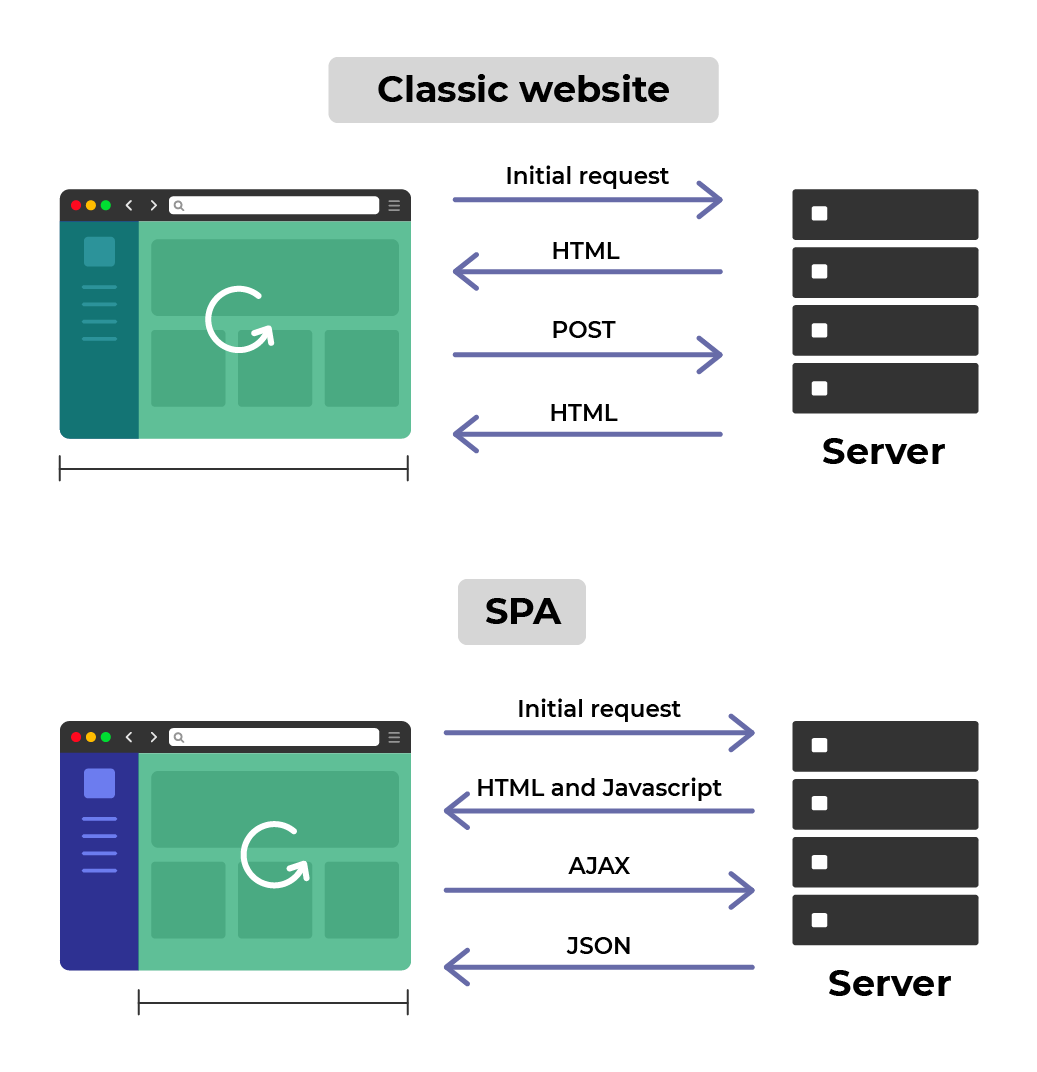
At that time, most websites consisted of a group of pages sent by the server, which rendered as users navigated through the site. For every interaction, like sending a form, the whole page had to be refreshed.
However, at the start of the new millennium, the concept of single-page applications (SPA) started to emerge. The main ideas behind this concept are:
Users only load a web page once (the famous
index.html).Rather than getting every page with an API call, you get them bit by bit, making user interaction much more dynamic.
As users navigate between different pages, JavaScript (in our case, React) manages the rendering of new pages within the same domain without needing the page to refresh completely .
Does that mean that SPA is better? Are all new sites coded to be SPA?
Well, no. Not all applications are SPA. There are certain drawbacks to be aware of when you code a website as a single-page application. In particular, your users will have to have JavaScript for your site to work, and search engine optimization (SEO) is harder for single-page applications.
The projects made with Create React App aren’t considered single-page applications as they lack a routing solution.
React Router
Unlike frameworks such as Angular, React does not directly provide a solution for managing your application’s routes. Not a problem, though – like with almost everything in React, the ecosystem quickly addressed this need, and now several routing solutions exist. We'll work with React Router (well-named, don't you think? 🙃) in this course.
What exactly is a route?
As you can see in the React Router documentation, a route allows you to conditionally render components if the URL path matches the route path.
You pass the path that the route matches as a prop, which takes care of rendering the children that are passed to it.
This library, created by React Training, provides access to all of the tools needed to manage client-side, in-app navigation.
So let’s get familiar with React Router. 🚀
Create Your First Routing File
Start by installing the library with yarn add react-router-dom . If you want to learn more about its configuration, read the React Router documentation.
You can now start using React Router! 🎉
So far, Home is the only feature, so let’s create a new component for the survey.
To do this, make a Survey.jsx file in pages . For now, let's keep the component simple:
function Survey() {
    return (
        <div>
            <h1>Survey 🧮</h1>
        </div>
    )
}
Your mission is to enable navigation between the homepage and the survey. 🕵️♀️
As you’ve probably already guessed, to do this, you’re going to use React Router and its Router and Route components.
Let’s start with the router. Place it at the root of the component tree to cover all of the routes that you define.
Now you have the index.jsx file at the project route:
import React from 'react'
import ReactDOM from 'react-dom'
import { BrowserRouter as Router } from 'react-router-dom'

ReactDOM.render(
    <React.StrictMode>
        <Router>
            <Home />
        </Router>
    </React.StrictMode>,
document.getElementById('root')
)
And now put all of the routes that will be accessible into the router.

So let’s create a route for the homepage and survey.
import React from 'react'
import ReactDOM from 'react-dom'
import { BrowserRouter as Router } from 'react-router-dom'

ReactDOM.render(
   <React.StrictMode>
      <Router>
         <Route path="/">
            <Home />
         </Route>
         <Route path="/survey">
            <Survey />
         </Route>
      </Router>
   <React.StrictMode>
)
If you head to http://localhost:3000/, you’ll see the homepage. It’s a different story for http://localhost:3000/survey, though… Uh oh! Both are rendering! It's OK. All you need to do is add the prop exact in your route for Home :
<Route exact path="/">
   <Home />
</Route>
It works perfectly! 🚀
However, it’s not really practical to type all of your URLs into the address bar to load the page. 🙈
Navigate With Links
So let’s create a header with links to different pages in the app.
In the /components folder , create a new /Header folder with an index.jsx file inside it, which gives you /components/Header/index.jsx :
import { Link } from 'react-router-dom'
function Header() {
   return (
      <nav>
         <Link to="/">Home</Link>
         <Link to="/survey">Survey</Link>
      </nav>
   )
}

export default Header
I used Link , which comes from React Router and behaves like an anchor tag. It is very important to use this to navigate so that your app is accessible (and not use redirections triggered by onClick ).
Let’s now use Header in index.jsx at the project root:
import React from 'react'
import ReactDOM from 'react-dom'
import { BrowserRouter as Router, Route } from 'react-router-dom'
import Home from './pages/Home'
import Survey from './pages/Survey'
import Header from './components/Header'

ReactDOM.render(
    <React.StrictMode>
        <Router>
            <Header />
            <Route exact path="/">
                <Home />
            </Route>
            <Route path="/survey">
                <Survey />
            </Route>
        </Router>
    </React.StrictMode>,
document.getElementById('root')
)You now have the app base with navigation – congratulations! Great work! 🚀
You’ve seen how to set up routing. Next, you’ll learn how to split your router when you have many routes to manage, for example, in a larger code project. Follow me in the screencast below!
Get Parameters in Your URLs
Navigation in the application is functioning well.
But what if I want to pass parameters? For example, when I do the survey, to get each question number from the URL?
Good question! The router allows you to get parameters. To do this, you simply have to write your route like this in the index.jsx file at the /src route :
<Route path="/survey/:questionNumber">
    <Survey />
</Route>
And then put a question number in components/Header/index.jsx :
function Header() {
return (
        <nav>
            <Link to="/">Home</Link>
            <Link to="/survey/42">Survey</Link>
        </nav>
    )
}
You get this parameter in survey/index.jsx using the hook useParams provided by React Router:
import { useParams } from 'react-router-dom'

function Survey() {
    const { questionNumber } = useParams()

   return (
       <div>
           <h1>Survey 🧮</h1>
           <h2>Question {questionNumber}</h2>
       </div>
    )
}
Congratulations! You’ve now got your question number as a parameter. ☀️
Create a 404 Page
Amazing – everything is working as hoped! But what happens if you type anything into the URL? For example, if you try to access http://localhost:3000/helloHowAreYou?
You can see the header, but nothing else. Wouldn’t it be better to signal to the user that nothing exists at this address? Have you ever heard of error pages? That’s what we’re going to do here: display a 404 page.
Start by creating a simple Error component in components/Error/index.jsx :
function Error() {
   return (
      <div>
         <h1>Oops 🙈 This page doesn’t exist</h1>
      </div>
   )
}

export default Error
Going back to the router, you’ll need to use Switch from React Router: Switch allows you to render only the first route that matches the path, and you add a route to which you don’t pass a path prop.
So in the router, that gives you:
ReactDOM.render(
   <React.StrictMode>
      <Router>
         <Header />
         <Switch>
            <Route exact path="/">
               <Home />
            </Route>
            <Route path="/survey/:questionNumber">
                <Survey />
            </Route>
                <Route>
                    <Error />
                </Route>
            </Switch>
        </Router>
    </React.StrictMode>,
document.getElementById('root')
)
Let’s test it in the browser:
Yes! 💪
Give It a Go!

Now that you have your application base, it’s time to see how you do on your own.
You’ll find the base for the exercise on branch P1C3-begin. Your goals are to:
Create a new
Resultspage and add it to the router.Create a new
Freelancerspage, add it to the router, and create a link in theHeader.In
Survey.jsx, code a link forbackand one fornextto allow users to move onto the next question or back to the previous one.On question 1, the back link should not be active.
On question 10, the next link should not be displayed. Instead, a Results link should redirect to the Results page.
You can find the solution on branch P1C3-solution.
Let’s Recap!
With single-page applications (SPAs), the user has the impression of navigating between different pages. However, only a single HTML page exists, onto which you graft the content with JavaScript.
React Router is one of the libraries you can use to turn a React app into a SPA.
The router, routes, and switch manage the rendering of different pages.
It is possible to pass parameters in a route and then get them with
useParams().By specifying a route with no path at the end of the switch, you capture all routes with a path that doesn't match any declared route, creating a 404 page.
The app now contains all of the pages for the next step! 🎉 In the following chapter, you'll see how to secure props with PropTypes. See you there!
