Test your Components With React Testing Library
So far, you’ve learned how to do simple unit testing to test simple functions. But what about component behavior? How can you check that the user is seeing what you want them to with no regression?
In other words, how do you test components? 🙈
As you saw in the last chapter, testing works by running tests and comparing what you get with what you expected. However, React components supply instructions for updating the DOM. This means that to test components, you need to carry out a render, check the generated DOM, and compare that with what you expected.
To do this, you can use React Testing Library. 🚀
Discover React Testing Library
React Testing Library gives you access to tools located on react-dom and react-dom/test-utils that help you follow best testing practice and receive readable error messages.
This solution does not replace Jest but works alongside it. React Testing Library lets you focus on the DOM by recreating it, mocking interactions, and checking the render. It helps you to step into your end users’ shoes and anticipate what they will see.
For example, when you want to test a component that makes an API call, you don’t necessarily need to check the useEffect and state that enable you to do all of that. Instead, React Testing Library’s logic checks that you have your component, it’s replaced with a loader while the data loads, and it’s furnished with the data you’re fetching.
Do I have to worry about integration or unit testing here?
Well, React Testing Library lets you do both. You can test your hooks in isolation for unit testing and test interactions between different components, thereby carrying out integration testing.
Let’s test components with React Testing Library!
Create a Simple Component Test
Don't we have to install the library?
No need! React Testing Library is now one of the basic tools installed with Create React App. You just have to import what you need into your test file.
We’ll start by testing the Footer component for switching theme. In /components/Footer , create an index.test.js file.
First of all, let’s check that Footer renders without crashing. To do this, import Footer , the render from React Testing Library, and use render :
import Footer from './'
import { render } from '@testing-library/react'

describe('Footer', () => {
   test('Should render without crash', async () => {
      render(<Footer />
   })
})
If you haven’t quit watch mode, your tests will run automatically. Otherwise, redo yarn run test . And there is an error.
TypeError: Cannot destructure property toggleTheme of '(0 , _react.useContext)(...)' as it is undefined.Of course! This component is one of a group that uses the context. But here, component is not wrapped by provider for the light / dark theme . 🤦♀️
As you can imagine, React Testing Library has a way of managing all this. We'll look at a cleaner way of doing this later, but for now, wrap the Footer component with ThemeProvider directly in the test:
import Footer from './'
import { render } from '@testing-library/react'
import { ThemeProvider } from '../../utils/context'

describe('Footer', () => {
   test('Should render without crashing', async () => {
      render(
         <ThemeProvider>
            <Footer />
         </ThemeProvider>
      )
   })
})
Bravo! Now the test return is all green. ✅
Let’s see what else you can test in a component.
Test Component Events
React Testing Library helps you anticipate your end-user experience.
How can we test if the NightModeButton works properly?
We’re not going to check the context’s internal state. Instead, let’s look at what the user sees.
The button displays “☀️️” in day mode and “🌙” for night mode. We need to check that this is what is being displayed.
So let’s get the button content and compare the text displayed.
Interact With an Element
The library contains a series of selectors that give you access to a specific element (like in JavaScript). Look over the React Testing Library documentation to learn about all of the selectors you can access.
You can select an element by its role, label, placeholder, etc. Our Footer only contains a single button, so you can use getByRole .
You also need screen , which you import with render :
import { render, screen } from '@testing-library/react'What’s screen ?
screen is like the body that contains the component, from which you can use your selectors.
The following accesses the button:
test('Change theme', async () => {
   render(
      <ThemeProvider>
      <Footer />
      </ThemeProvider>
   )
   const nightModeButton = screen.getByRole('button')
})
And from here on, things start to get serious! 👩💻👨💻
Like with the test from the last chapter, we’re going to compare what we expect with what actually happens.
To begin with, the theme's initial value light : "☀️️" is displayed. When you click on the button, the value of the theme changes (with toggleTheme ), and the theme becomes dark . The button now displays "🌙". A good test is to do the following:
1- Check that you have "☀️️".
2- Click on the button.
3- Check that you get "🌙".
Let’s start with the first stage, checking for "☀️️" :
test('Change theme', async () => {
   render(
      <ThemeProvider>
         <Footer />
      </ThemeProvider>
   )
   const nightModeButton = screen.getByRole('button')
   expect(nightModeButton.textContent).toBe('Switch mode : ☀️️')
})
Looking at the terminal, you see that the test works. Yay!
Now it's time to move onto stage 2 and then run straight into stage 3, which looks a lot like stage 1.
To interact with the component, you need fireEvent , which you use to trigger the DOM events (in this case, click ) . Therefore, you do the following:
import { render, screen, fireEvent } from '@testing-library/react'
import { ThemeProvider } from '../../utils/context'
import Footer from './'

test('Change theme', async () => {
   render(
      <ThemeProvider>
         <Footer />
      </ThemeProvider>
   )
   const nightModeButton = screen.getByRole('button')
expect(nightModeButton.textContent).toBe('Switch mode : ☀️')
fireEvent.click(nightModeButton)
expect(nightModeButton.textContent).toBe('Switch mode : 🌙')
})
Bravo! You’ve just successfully tested your Footer component!
Check out a few additional testing methods in the screencast below 👇:
Test Your Hooks
In part 2, you learned how to create your own custom hooks. But how would you go about testing them? ⚓️
It might be tempting to test them independently, but most of the time, this is not in line with the React Testing Library philosophy. Indeed, this approach could be considered “testing implementation details.” It takes up time but is not relevant, which is what you want to avoid.
In any case, you’ve already tested one of your hooks without even realizing it.
Go ahead – launch the command yarn test -- --coverage to see.
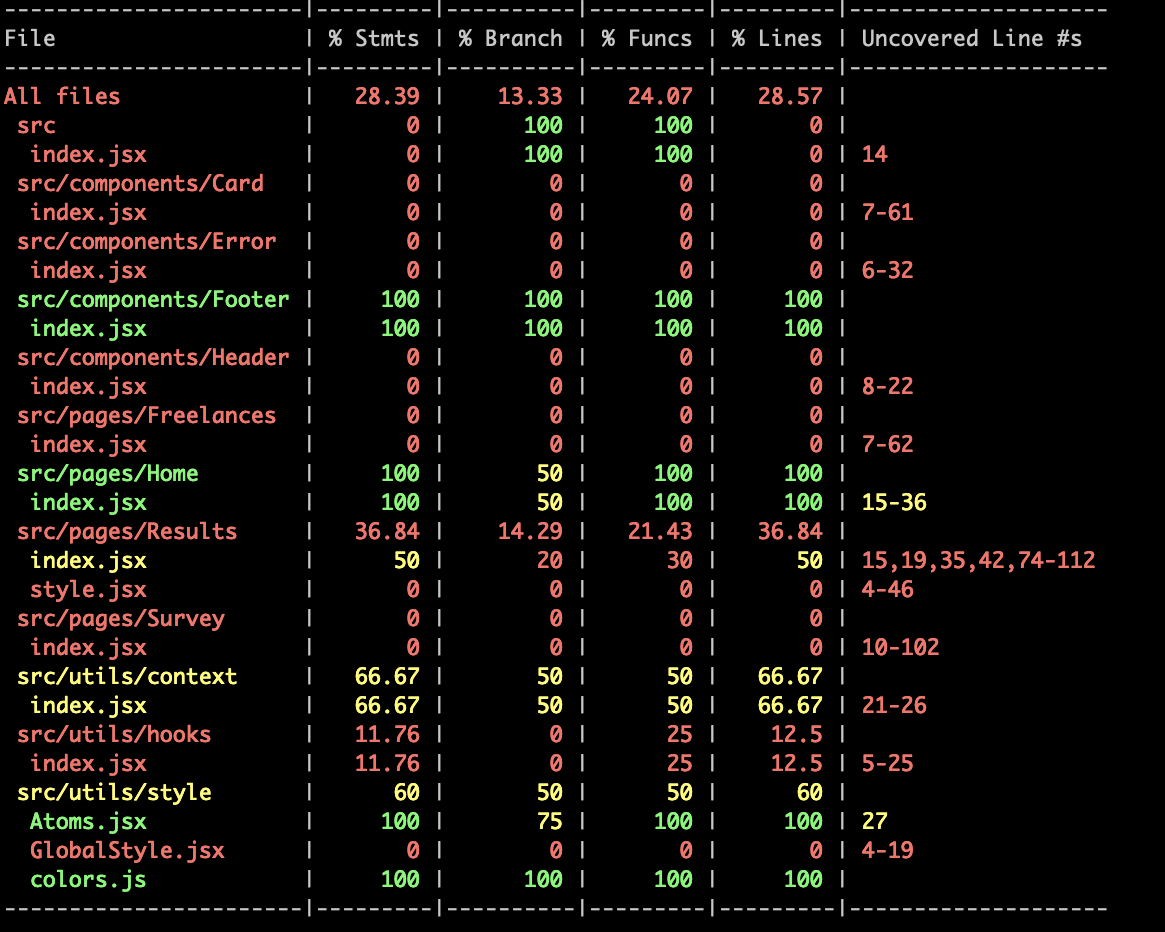
As you can see, your utils/hooks/index.jsx file has been tested (the percentage is low because the useFetch hook in the same file hasn’t been tested). This is because your Footer component uses the hook useTheme to access theme and toggleTheme . Most of the time, this is the best method when testing hooks.
The main lesson to take away is that the best method to test a hook is to test a component that uses this hook.
Give It a Go!
 It’s time to put everything you’ve learned in this chapter into practice. As usual, you can start the exercise on branch P3C2-begin.
This is what the new function for adding a favorite looks like
You should do the following:
Create a test file for
Card.Check that Card is using the
picturethat you passed as a prop.When you pass a
titleprop, test whether it displays correctly.Check that the title changes when a profile is selected as a favorite (to do this, you can use the
closestmethod – refer to the documentation – which will give you access to the closest parentdiv ).
You can find the solution on branch P3C2-solution.
Let’s Recap!
React Testing Library is a solution which lets you test React components and can be used alongside Jest.
You don’t need to test every component detail (no need to test your hooks individually or the internal state), but instead try to put yourself in the user's place.
renderlets you generate your element by simulating the behavior of the navigator.screengives you access to selectors to test your components.
What did you think of React Testing Library? Not bad, is it? In the next chapter, we’ll keep using it to test our components that make API calls. See you there! 🚀
