Display Data From an API in a Class Component
 Components go through various stages between the time they’re generated in the DOM and the time they’re removed from it. With class components, you have a list of stages that match a specific moment in the lifecycle in which you can perform actions.
I’m talking about lifecycle methods.
Discover Lifecycle Methods
In the screencast below, you’ll see a quick demonstration of the different stages that a component goes through that you can access. 👇
Clearer now?
Here is a quick summary of the different stages that you have access to in class components:
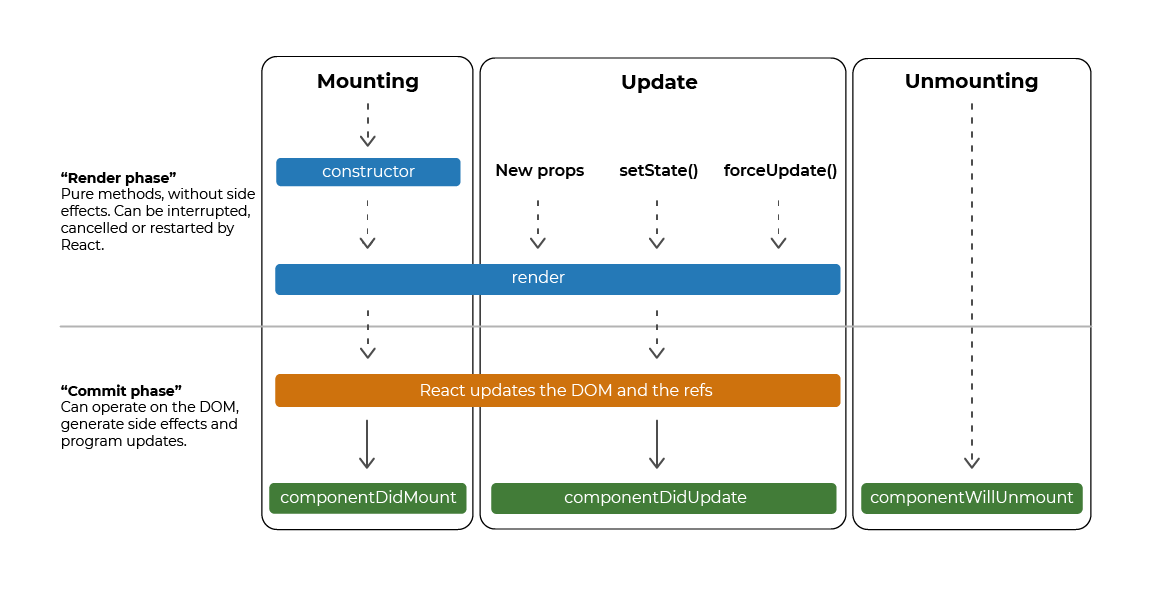
As you saw in the screencast:
The
constructoris called when the component appears for the first time in a virtual DOM. It receives the initial props as an argument.Then comes the
render, then callcomponentDidMount()(once the component is mounted on the DOM).If there’s an update and the component re-renders,
componentDidUpdateis called.And just before, the component is removed from the DOM, and you call
componentWillUnmount.
You can learn more about other lifecycle methods in the React documentation.
Call an API in a Class Component With componentDidMount
It’s now time to call the Shiny API in a new class component. Let’s create a new component that displays more information about a freelancer when you click on the Card .
Start by allowing navigation onhttp://localhost/profile/:id . There's a new rout to redirect users to the freelancer profile in the index.jsx file at your /src root:
...
<Route path="/freelancers">
   <Freelancers />
</Route>
<Route path="/profile/:id">
   <Profile />
</Route>
<Route path="*">
   <Error />
</Route>
...
Next allow navigation on the profile page by adding a link around the Card in /pages/Freelancers/index.jsx :
<CardsContainer>
   {freelancersList?.map((profile) => (
      <Link key={`freelance-${profile.id}`} to={`/profile/${profile.id}`}>
         <Card
            label={profile.job}
            title={profile.name}
            picture={profile.picture}
            theme={theme}
        />
      </Link>
   ))}
</CardsContainer>
Don’t forget to delete the favorite feature in the class component (so you don't pointlessly add stars). Now all you have to do is develop pages/Profile/index.jsx itself!
Start by getting the id of the freelancer whose profile you want to display in the parameters. But… how?
Can’t we just use useParams like we did for the survey page?!
No! Remember, you can only access hooks from function components. 😢
You’re going to have to use a different method to declare the route for accessing history. In /src/index.jsx :
<Route
   path="/profile/:id"
   render={(props) => <Profile {...props} />}
/>
Which lets you access the match object in your props.
So in pages /Profile/index.jsx , declare your component and then get the parameter passed in the URL with this.props.match.params.id , which gives you:
import { Component } from 'react'

class Profile extends Component {
   render() {
      const { id } = this.props.match.params
      return <div><h1>Freelancer : {id}</h1></div>
   }
}

export default Profile
Yay! The parameter is displaying correctly. 🎉
Now it’s time to get down to business and launch the API call in the lifecycle method componentDidMount() . Once again, you won’t be able to use the useFetch hook because you’re in a class component.
So let’s start with the constructor . If you look at the API, you’ll see that you’re going to get a profileData object. Therefore, you need profileData in your state.
constructor(props) {
   super(props)
   this.state = {
      profileData: {},
   }
}
For the fetch, you can reuse the code that you had in useFetch Promise version. Put it in componentDidMount() , giving you:
componentDidMount() {
   const { id } = this.props.match.params

   fetch(`http://localhost:8000/freelance?id=${id}`)
   .then((response) => response.json())
   .then((jsonResponse) => {
      this.setState({ profileData: jsonResponse?.freelanceData })
   })
}
It works! 🎉
The async / await syntax would have looked like this:
componentDidMount() {
   const { id } = this.props.match.params
   const fetchData = async () => {
      const response = await fetch(`http://localhost:8000/freelance?id=${id}`)
      const jsonResponse = await response.json()
      if (jsonResponse && jsonResponse.freelanceData) {
         this.setState({ profileData: jsonResponse?.freelanceData })
      }
   }
   fetchData()
}
All you need to do now is display what your API returns, and your component is ready:
import { Component } from 'react'

class Profile extends Component {
   constructor(props) {
      super(props)
      this.state = {
         profileData: {},
      }
   }

   componentDidMount() {
      const { id } = this.props.match.params

      fetch(`http://localhost:8000/freelance?id=${id}`)
      .then((response) => response.json())
      .then((jsonResponse) => {
         this.setState({ profileData: jsonResponse?.freelanceData })
      })
   }

   render() {
      const { profileData } = this.state
      const {
         picture,
         name,
         location,
         tjm,
         job,
         skills,
         available,
         id,
      } = profileData

      return (
         <div>
            <img src={picture} alt={name} height={150} width={150} />
            <h1>{name}</h1>
            <span>{location}</span>
            <h2>{job}</h2>
            <div>
               {skills &&
                  skills.map((skill) => (
                     <div key={`skill-${skill}-${id}`}>{skill}</div>
                  ))}
            </div>
            <div>{available ? 'Available immediately' : 'Unavailable'}</div>
            <span>{tjm} € / day</span>
         </div>
      )
   }
}

export default Profile
Ta-da! You have a whole new Profile component for displaying freelancer profiles, and all written with a class component. 😎 We haven’t added any style so far, but you can find all ones you’ll need on the GitHub repository for this course.
Give It a Go!

It’s time to put everything you’ve learned into practice. You can start this exercise on branch P4C2-begin where you’ll find:
The code that we’ve set up in this chapter.
The style.
Using context to get
themewith the way of making class components.
This time, you’re going to convert the class component we created in pages/Profile/index.jsx into a function component.
As always, you’ll find the solution to the exercise on branch P4C2-solution.
Let’s Recap!
Components pass through different stages in between being mounted on and removed from the DOM.
The lifecycle methods that you access from class components let you run your code at specific moments that line up with these stages.
componentDidMount()is the preferred method for making an API call.
And there you have it! A tour of class components. You should now have the basic knowledge you need for working with a codebase that includes class components. Next chapter, you’ll find some pieces of advice to help you spread your wings within the React ecosystem. See you there!
