Automate Assigning IP Addresses Using DHCP
Discover the Advantages of DHCP Servers
In the previous part, we learned that an IP address identifies a device, so it can communicate across networks. Each device must have an IP address, which you have to configure before using it.
But I can access the internet without having configured my IP address! So does that mean I don’t need one to access the internet?
Not exactly. You still need an IP address! But there is a protocol for assigning IP addresses, DHCP, which automatically configures devices’ IP addresses. This means that you don’t have to do it!
DHCP (Dynamic Host Configuration Protocol) is a very useful mechanism in LANs, as it simplifies internet access for end-users. It configures the following:
The device IP address and mask.
The default gateway IP address.
The DNS Server IP address.
DHCP also allows the centralization of IP address distribution, which provides two advantages:
It avoids duplicate IP addresses.
It provides a visible list of IP addresses that have been assigned.
Understand DHCP in a Simple Architecture
Client-Server Configuration
Like most protocols, DHCP operates based on the client-server model. It therefore needs:
A device that acts as a server.
One or several devices that act as client(s).
The server and client(s) are configured differently:
The server should be configured to:
Respond to client requests for an IP address.
Assign them an address for a set period of time.
Choose an address from a specified address range.
Clients should be configured to:
Automatically request an IP address when they are physically connected to a network.
Messages Between the Client and the Server
Once the devices are configured, this is how the client and server interact with each other:
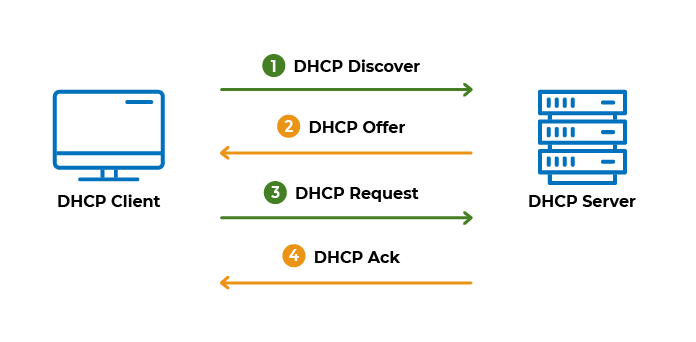
The process generally follows four steps, which correspond to four messages:
1. DHCPDISCOVER: “Is anybody there to assign me an IP address?”
A client has just connected to the network. It sends a request to the whole network to see if a DHCP server can assign it an address.
At this stage, the only form of identification that the client has is its MAC address. The request is therefore sent to the whole network, with the client’s MAC address as the source address.
2. DHCPOFFER: “Here’s an IP address!”
The DHCP server receives the message and responds to the client, providing it with an IP address.
This message contains the IP address, and is sent to the client’s MAC address.
3. DHCPREQUEST: “OK, I’ll take this IP address. Can you save it, please?”
The client accepts the offer and asks the server to send a confirmation message with all the configuration parameters and save the assigned IP.
4. DHCPACK: “It’s saved!”
The server sends the confirmation message and updates its network table.
Understand the Network Table
In the network table, each IP address is associated with:
The MAC address of the device to which the IP was assigned.
The lease end date.
A lease end date? What’s that for?
The network table might look like this, for example:
IP address | MAC address | End of lease |
192.168.0.1/24 | E3:34:12:35:FE:2A | 09/09/21 at 9:09 |
192.168.0.2/24 | D3:54:20:00:FF:23 | 15/09/21 at 8:00 |
Check Your DHCP Server Using the Command Prompt
If your computer or smartphone is connected to the internet, a server will have assigned you an IP address. You can check this in Windows by opening the command prompt and typing:
ipconfig /all
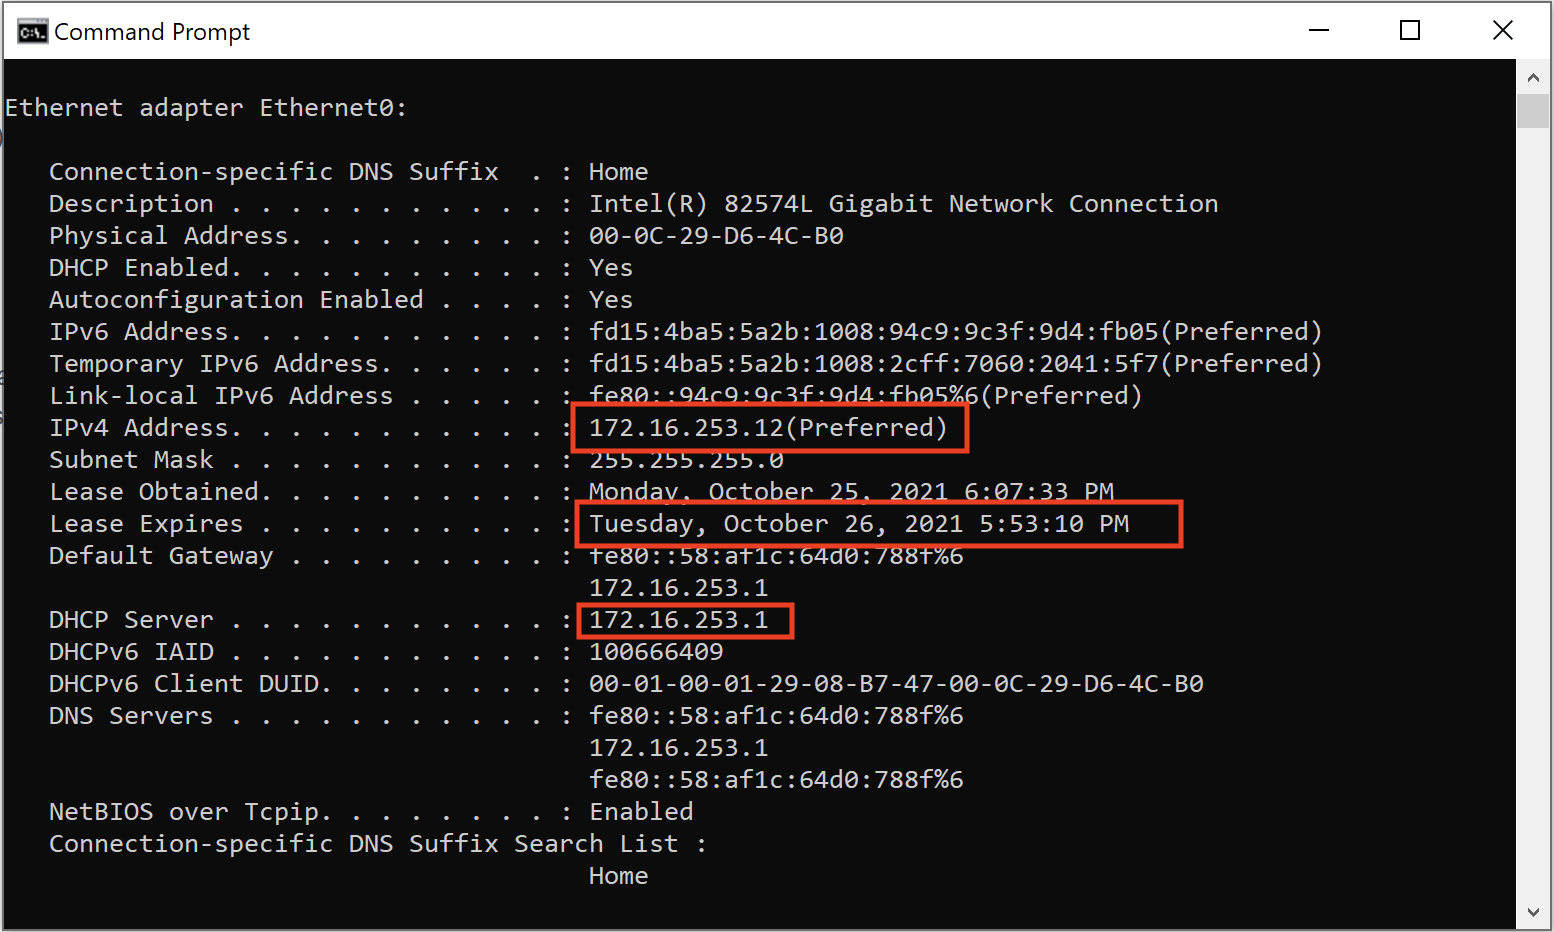
We can see in the image above:
The IP address assigned by the DHCP server.
The lease expiration date.
The IP address of the DHCP server.
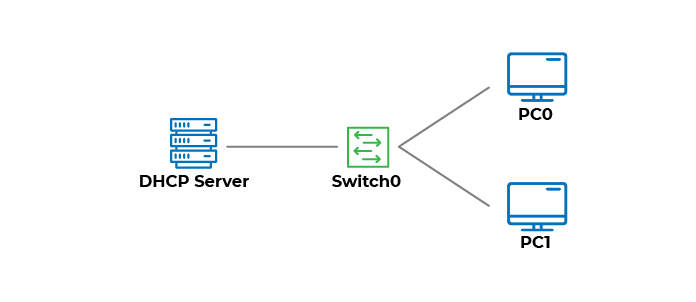
Configure the DHCP Service in Packet Tracer
To add the DHCP service in a network, you need two things:
A DHCP server configured to assign IPs.
One or several clients configured to request IP addresses.
Here is a simple network architecture with a server and two clients. Let’s configure it together.
Configure the Server
To configure the server, first, choose the IP address of the network you’re going to use. In our case, we’re going to take the network 1.0.0.0/8.
Then, follow the different configuration steps:
Configure an IP address on the server. We can use 1.0.0.1, for example.
Activate the DHCP service.
Configure the IP address range to assign to the devices. This is often known as an address pool.
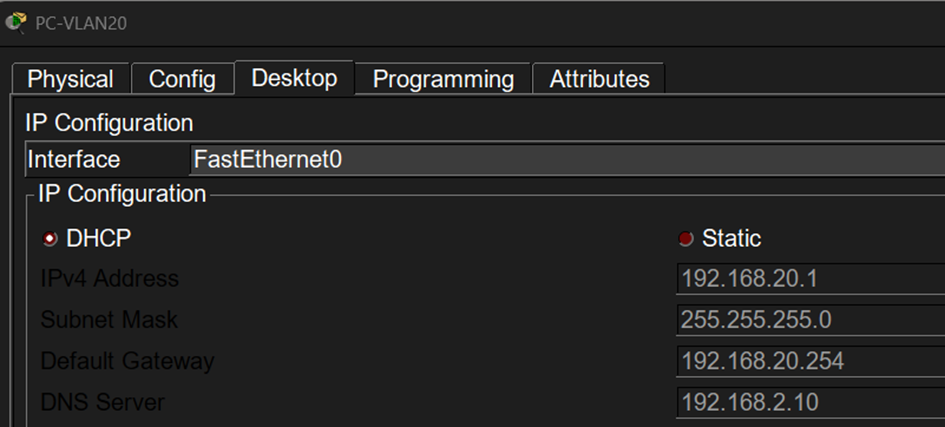
Configure the Client
To configure the client, all you need to do is select the option to obtain an IP address automatically.
We’ll go over these steps in the video below!
Add a DHCP Server to an Existing Network
Mr. Falman from Tinos driving school approaches you to work on a new project. The company he’s working with, Cyclades, is expanding, and its director wants the new users’ laptops to connect automatically to the network.
His employees are regularly out in the field canvassing local authorities, so they need to be assigned an IP address automatically whenever they plug back into the network. Two new employees equipped with laptops have already arrived, and further recruitment is expected.
It’s also possible to configure a DHCP relay, for example if the DHCP server is centralized and distributes addresses across multiple networks.
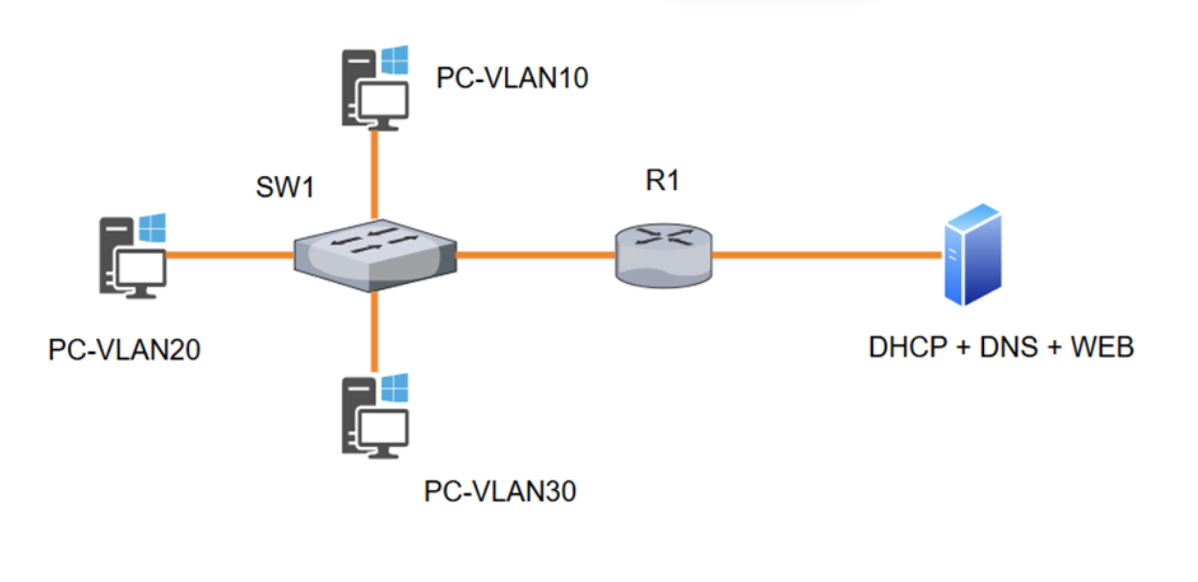
In the topology above, the DHCP server is on the 192.168.2.0/24 network and uses the IP address 192.168.2.10.
Behind the router, there are three VLANs. The router is configured with three subinterfaces on its physical interface connected to the switch (“Router on a Stick”). Each subinterface is configured according to the addressing plan of the corresponding VLAN and ends in .254.
Here is the VLAN addressing plan:
VLAN 10 : 192.168.10.0./24

VLAN 20 : 192.168.20.0/24

VLAN 30 : 192.168.30.0/24
Here is the basic configuration for router R1:
R1(config)#interface gig 0/0

R1(config-if)#no shutdown

R1(config-if)#exit

R1(config)#interface gig 0/0.1

R1(config-subif)#encapsulation dot1q 10

R1(config-subif)#ip address 192.168.10.254

R1(config-subif)#exit

R1(config)#interface gig 0/0.2

R1(config-subif)#encapsulation dot1q 20

R1(config-subif)#ip address 192.168.20.254

R1(config-subif)#exit


R1(config)#interface gig 0/0.3

R1(config-subif)#encapsulation dot1q 30

R1(config-subif)#ip address 192.168.30.254

R1(config-subif)#exit


R1(config)#interface gig 0/1

R1(config-if)#ip address 192.168.2.254

R1(config-if)#exit
Here is the basic configuration for switch SW1:
SW1(config)# vlan 10
SW1(config-vlan)# name VLAN10
SW1(config-vlan)# exit
SW1(config)# vlan 20
SW1(config-vlan)# name VLAN20
SW1(config-vlan)# exit
SW1(config)# vlan 30
SW1(config-vlan)# name VLAN30
SW1(config-vlan)# exit
SW1(config)# int fa 0/1
SW1(config-if)# switchport mode access
SW1(config-if)# switchport access vlan 10
SW1(config)# int fa 0/2
SW1(config-if)# switchport mode access
SW1(config-if)# switchport access vlan 20
SW1(config)# int fa 0/3
SW1(config-if)# switchport mode access
SW1(config-if)# switchport access vlan 30
SW1(config)# int gig 0/1
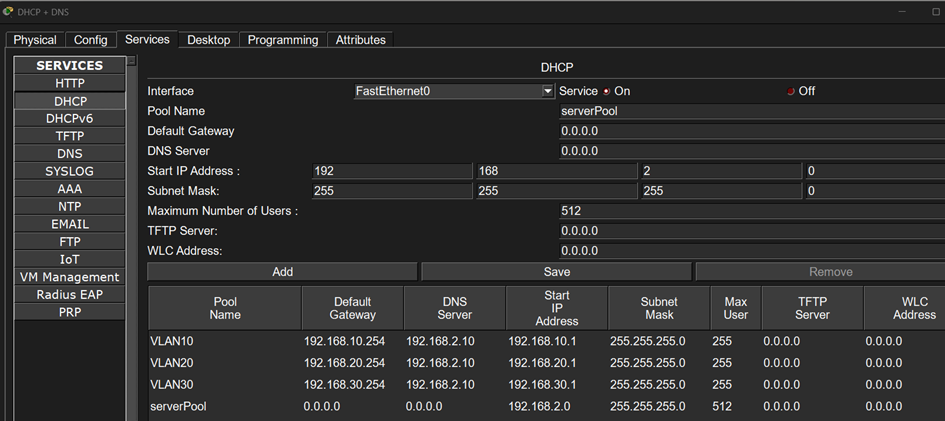
SW1(config-if)# switchport mode trunkHere is the DHCP server configuration in Packet Tracer:
La configuration du relai DHCP est relativement simple. Il suffit d’indiquer sur chaque sous interface du routeur R1 l’adresse du serveur DHCP, R1 se chargera ensuite d’intercepter la requête DHCP envoyée en BROADCAST pour en faire un flux unicast à destination du serveur DHCP, qui pourra ensuite répondre aux requêtes.
R1(config)#interface gig 0/0.1

R1(config-subif)#ip helper-address 192.168.2.10

R1(config-subif)#exit

R1(config)#interface gig 0/0.2

R1(config-subif)#ip helper-address 192.168.2.10

R1(config-subif)#exit

R1(config)#interface gig 0/0.3

R1(config-subif)#ip helper-address 192.168.2.10

R1(config-subif)#exit
That’s it!
You can then verify that the client workstations correctly received their IP settings:
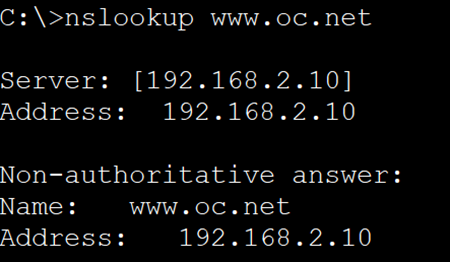
The DHCP server also acts as the DNS server and web server. The domain name oc.net is configured on the DNS server:
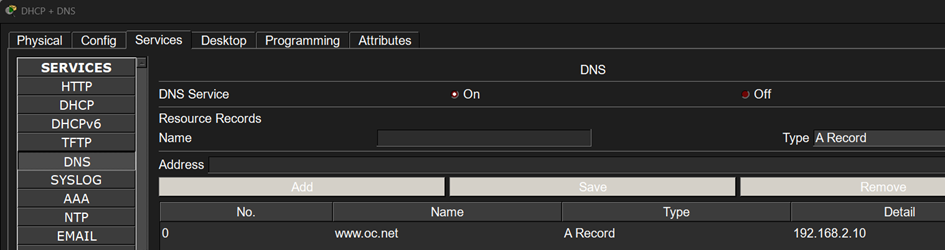
You can test name resolution from the clients using the NSLOOKUP command:
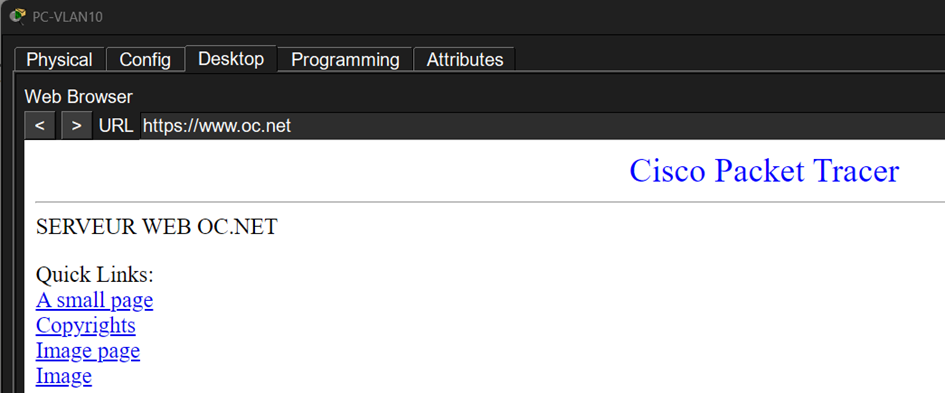
L’accès au site fonctionne via son nom de domaine :
Now it’s time to put what you’ve learned into practice with the following exercise.
Over to You!
Add a DHCP server to Cyclade’s architecture with an IP address of 192.168.100.250/24.
Add two laptops to the network.
Configure the DHCP server correctly.
The network you’re going to use is 192.168.100.0/24, but don’t forget that the two desktop computers already have an IP address on this network (192.168.100.1 and 192.168.100.2). We don’t want to change the configuration of these two devices.
Configure the mobile clients.
Check that the two mobile clients have been assigned an IP address.
Answers
You can find the answer sheet here and watch the video below to check your work.
You might have noticed that in the DHCP server configuration window, you can enter:
The IP address range to assign to clients.
The default gateway.
The DNS server.
We’ve left the “DNS server” field empty, as we don’t have one in our network. But we’re going to tackle this subject in the next chapter!
Let’s Recap!
All devices need an IP address to communicate.
The DHCP protocol allows IP addresses to be automatically distributed: a client requests an IP address on the network. The server then responds by sending the client a valid IP address.
To configure DHCP correctly, you need to:
Specify the IP address range which the DHCP server can distribute.
Let the client know that the IP configuration will be done automatically.
Now you know how to automate IP address distribution using a DHCP server! In the last chapter of this course, we’ll see how to make it easier to identify your devices.
