Set Up a Database and an EC2 Machine in Your VPC
The director of the company Cat’s Eyes is delighted with the network, but he doesn’t know much about the technical side of things. He was expecting to see you installing cables, and this morning he asked your colleague to show him the servers. You explained that the servers are virtual and that the network is managed through Amazon’s interface. However, the director seemed bemused by this. To reassure him, you invited him to spend the day watching what you do.
Luckily you’ve got something pretty cool to do: you’re setting up the company’s blog on the new cloud network so that Julian from the marketing team can publish articles. The blog uses an open-source application called DotClear, which is based on PHP and a MySQL or PostgreSQL database. You need to:
Create an EC2 machine.
Create a PostgreSQL database.
Install DotClear on the EC2 machine.
Configure redundancies to protect against outages.
You learned how to launch an RDS database and an EC2 machine in the introductory course to AWS. We're going to do this again, but this time, in the VPC network we created in the first part of the course.
Launch an EC2 Machine in a Public Subnet
How about a quick recap on EC2s?
Amazon Elastic Compute Cloud (EC2) is an Amazon virtualization product that makes it simple to run virtual machines in the cloud. One of its advantages is that you only pay for what you use, which means that you’ll only pay for the time your virtual machine is actually running, or how much data you transfer.
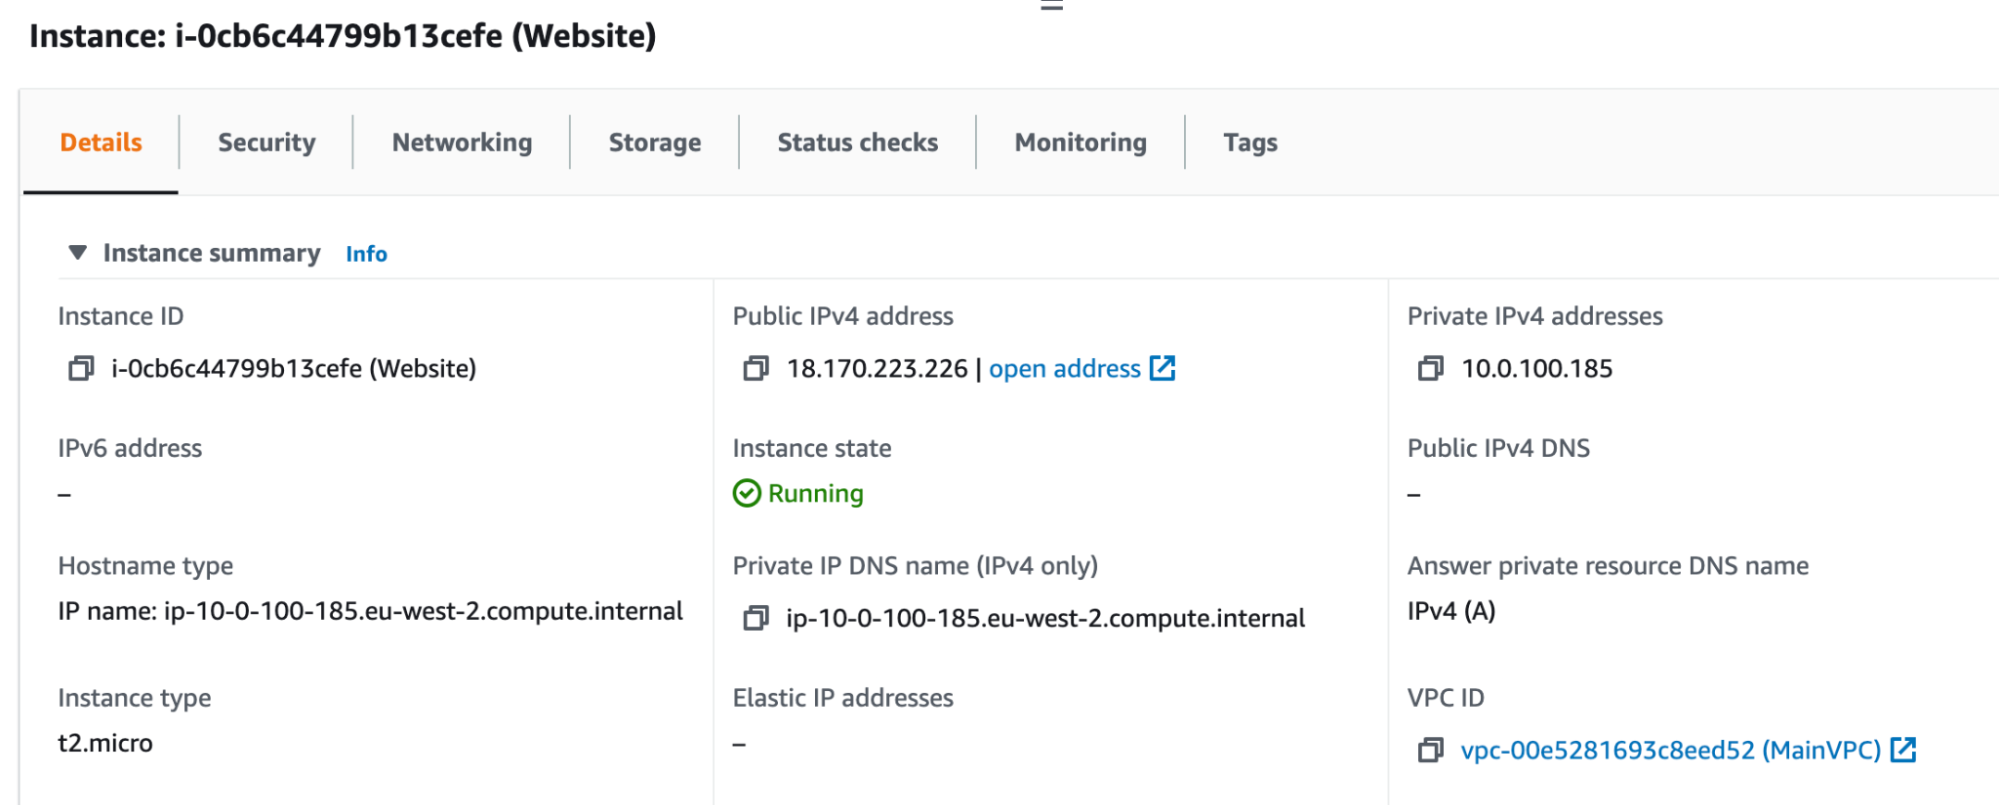
You’re now going to launch a virtual machine. To do this, go to the EC2 service and click on Instances. Then click on Launch Instance.
Next, choose a 64-bit Amazon Linux AMI with a x86 processor.
What’s an AMI?
You can find more details in the chapter entitled Launch Your First EC2 Instance in the Discover Cloud With Amazon Web Services course.
Choose a type t2.micro instance and click Next: Configure Instance Details.
Choose the VPC you created previously and a public subnet.
Select Enable for Auto-assign Public IP.
Then click on Review and Launch.
Click Launch and choose an existing set or create a pair of public and private keys - refer to Discover Cloud With Amazon Web Services for more details.
Check that you can connect to your machine and that it’s up and running:

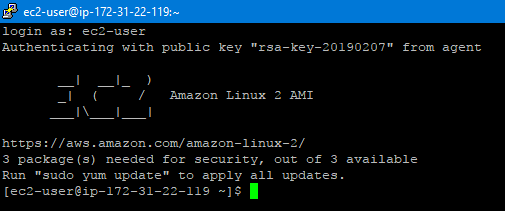
Nice work!
Launch a Database in a Private Subnet
Why choose a private subnet?
For security reasons, you don’t want your database to be accessible via the internet. In this case, a private subnet should be used, as it will isolate the database at a network level, meaning that it can’t be accessed from outside.
Create a Database in Amazon
To create your database, go to the RDS service and follow these steps:
Click on Create database.
Choose PostgreSQL.
Choose version PostgreSQL 12.9-R1.
Choose Free Tier.
Confirm your password.
Select the VPC you created under connectivity.
Accept the rest of the settings and click Create database.
Don’t we need to put the database in a private network? We haven’t specified whether it’s public or private.
You’re right! When you leave the default parameters as they are, the AWS web console does the job for you. Click on Subnet groups, and you’ll see that a default subnet group has been created:
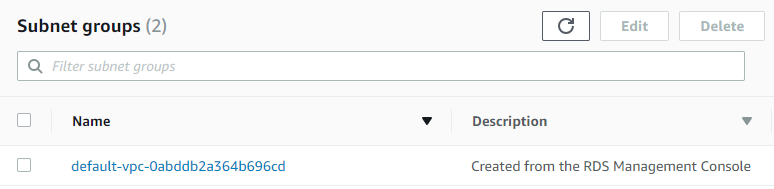
Click on it to see the detail:
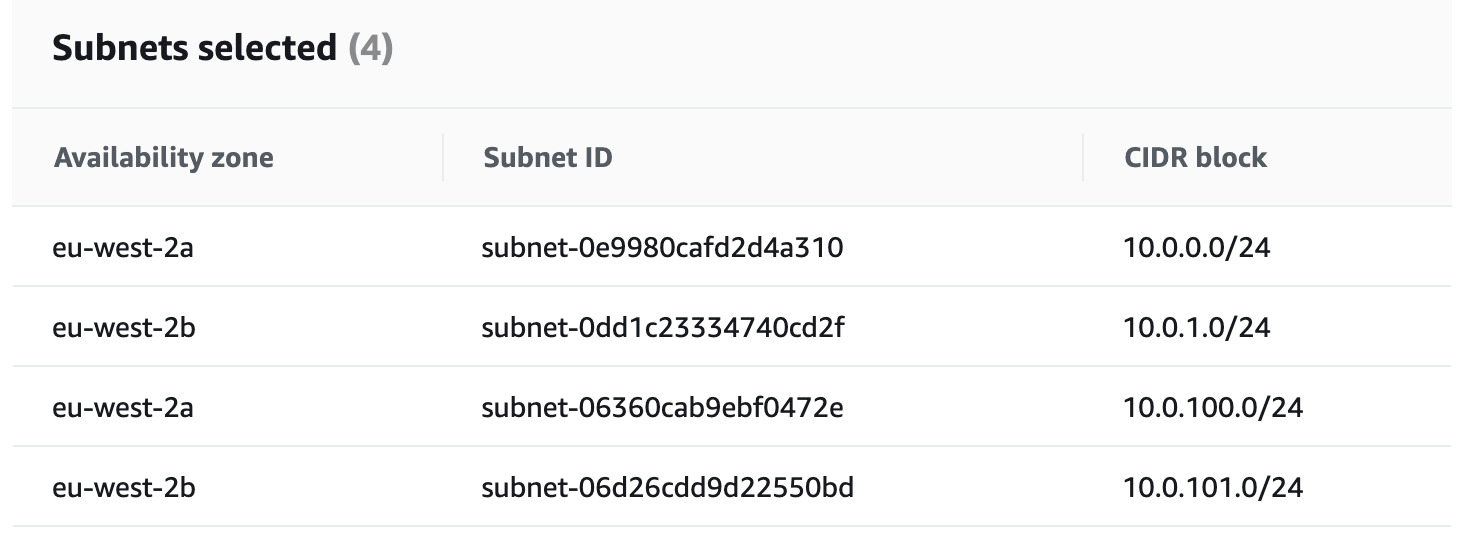
Oh no, there are public subnets in there! That’s not good, is it?
You’re right. When you click on Amazon’s web console options, certain things happen automatically. But don’t worry, we’re going to change it! Go back to the list of subnet groups, select the line your group is on, and click Edit. In the section Add Subnets, select your two Availability Zones, then deselect the public subnets from the Subnets menu, remove the public subnets, only keeping the private ones, then click Save.
To see if your machine can query a database, go to your database and copy the URL shown under Endpoint. It should look something like this: bdd.xyz.eu-west-2.rds.amazonaws.com.
Connect to a Database from an EC2 Machine
Using your SSH console connected to the EC2 machine, you can try to connect to the database and perform queries. To do this, first install the PostgreSQL client and then launch the connection command:
sudo yum install postgresql
psql -h bdd.xyz.eu-west-2.rds.amazonaws.com -d postgres -U my_user
Now replace:
bdd.xyz.eu-west-2.rds.amazonaws.com with the URL of your database.
my_db with the name you’ve given your database.
my_user with the db user name.
It’s not working!
That’s because the automatic configuration has caught us out again! You should see the message:
psql :  could not connect to server :  Connection timed out
        Is the server running on host "bdd.xyz.eu-west-2.rds.amazonaws.com" (10.0.101.52) and accepting
      TCP/IP connections on port 5432?
This means you need to enable network access between the database and the EC2 machine. Otherwise, AWS will prevent access, as security groups are blocked by default.
What’s a security group?
AWS has two features that control network traffic within your VPC: security groups and network access control lists (ACLs).
A security group is a virtual firewall for your instance that controls inbound and outbound traffic. It’s a stateful entity, which means that it retains the status of the request to authorize the response to it, among other things.
A network access control list, or network ACL, is an optional security layer, which serves as a firewall controlling inbound and outbound traffic from one or more subnets. It’s a stateless entity, meaning that it doesn’t retain the status of the network request—if you authorize outbound traffic via a port, you also have to authorize inbound traffic if you want to read the response.
For now, we are focusing on security groups.
How do you make changes to them?
Go to the list of your RDS instances and click on your database. In the middle of the page, there will be a Security group rules section:
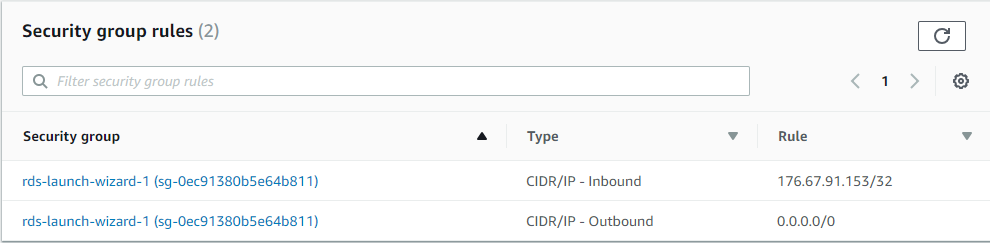
As you can see, the wrong IP is configured in Inbound.
Click on the security group rds-launch-wizard. The management page will appear, and you can then click on the Inbound tab and replace the CIDR block YOURIP/32 with your VPC’s block: 10.0.0.0/16.
Once the security group has been changed, the connection becomes possible immediately. Try running the same command again and the PostgreSQL command line should appear. Try entering \l to list available databases—it should show the following:

You can now exit the PostgreSQL console using the command \q
Install Your Blog
Let’s install Dotclear. On your EC2 machine, install the dependencies required by the application:
sudo yum install https mod_ssl
sudo yum install php php-pgsql php-mbstring php-iconv php-xml
sudo amazon-linux-extras install php7.3
Then, download and install Dotclear:
wget http://download.dotclear.net/latest.tar.gz
tar -xf latest.tar.gz
sudo mv dotclear/* /var/www/html/
sudo chmod 777 /var/www/html/inc
sudo chmod 777 /var/www/html/cache
sudo chmod 777 /var/www/html/public
Launch Apache:
sudo systemctl start httpd
For the moment, the server is running, but you can’t yet access your website. So if you try to access http://-ip-of-your-machine/ from a web browser, for example, you’ll see that the website doesn’t respond.
You need to authorize inbound HTTP access to the EC2 machine by opening the security group as you did for the connection between the database and the machine. To do this, open the EC2 service and click on your instance. Then, underneath, click on launch-wizard next to the heading Security groups.
Add HTTP access like this:

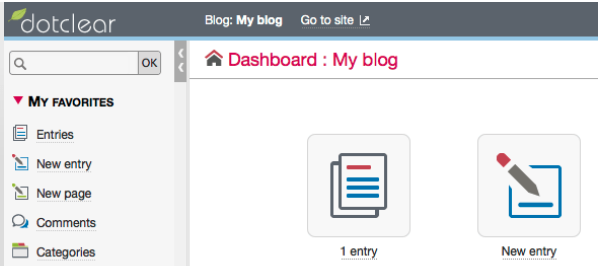
Now try to access http://-ip-of-your-machine/, and the blog installation page will appear. Follow the installation steps in the browser, and you should get to this website administration page:
You’ve completed the installation, but for the time being you aren’t protected against faults in an Availability Zone. You need a machine in each Availability Zone for this level or redundancy, but to do this, you first need an entity to direct traffic toward available machines. This is what we’re going to look at in the next chapter.
Let’s Recap!
You can create virtual machines in the cloud with the EC2 service.
You can create databases in the cloud with the RDS service.
AWS provides security features within your network such as security groups and network access control lists.
By default, security groups are closed. You must open access to access your machines or databases.
