Use a Launch Group and a Load Balancer
You’re going to deploy a configuration that will provide redundancy in case of a fault in one of the AWS Availability Zones. To do this, you need:
At least two machines, one in each Availability Zone.
A load balancer that can distribute load across “healthy” machines.
An automatic restart mechanism in case a machine crashes.
Create a Disk Image
So, you’ve installed a blog on a machine, and you’d like to have several instances with the same configuration. You need to create a disk image to duplicate the instances to do this. You’re going to use the machine you installed in the previous chapter as the source.
It’s best for the disk not to be in use when you make an image of the machine. This isn’t mandatory, but it will ensure that the startup is performed correctly. Click on your instance in the EC2 interface, and in the Actions drop down-menu, select Instance State and then Stop. This is the equivalent of powering down a computer and will stop your machine without destroying it.
Now you’re going to create a snapshot of the machine’s primary disk.
In the configuration of the instance, in Root device, click on /dev/xvda and then on vol-xxxxxx next to EBS volume. In the disk control panel that appears, click on Actions, then Create Snapshot.
On the left, click on Snapshots, and you’ll see your disk backup being created, like below:

Once it’s finished, the status will change to completed:

Then click on the Actions menu and choose Create Image.
There are two types of virtualization you can use to create an image:
Paravirtual: The instances boot with a special boot loader to load your system.
Hardware-assisted virtualization: The instances boot as normal and can use hardware optimizations that allow quick access to the host system’s hardware.
Here, you’re going to use hardware-assisted virtualization.
Leave the other default parameters as they are, and click Create. Then, click on the name of the image to see it in the interface:

You can now launch machines with this image, but first, you’re going to destroy the previous machine, as you’ve made a backup copy and no longer need it. By deleting it, you remove the risk of confusing it with the one you’re about to create.
To delete the machine, go to the Instances section, select your machine, click on Action, Instance State, and then Terminate.
Create a Launch Configuration
To create several machines using the same build, you need to provide AWS with a template for what the machines should look like. This template is called a Launch Configuration.
In the EC2 service, click on Launch Configurations and Create Launch Configuration. You’ll get to the same interface as when you launch an EC2 instance, but this time, you’re not going to use an Amazon Linux machine. Instead, you’ll use the image you just created. Click on My AMIs on the left and choose your image, as below:

Choose t2.micro as the instance type, click on Next, and follow these steps:
Once you’ve selected the instance type, give your configuration a name, and click Next.
Leave the disk as it is, and click Next again.
In the Configure Security Group section, choose Select an existing security group, and choose the security group created previously: launch-wizard-1.
Check that the security group authorizes HTTP and SSH.
Click on Next and then on Create Launch Configuration.
Choose the same pair of keys as before, and click on Create Launch Configuration.
Your launch configuration has been created!

You’ve learned how to do a lot of things, but don’t lose sight of the initial objective: launching several different machines to host the blog in several availability areas. AWS provides an auto scaling service to help you achieve this.
Create an Auto Scaling Group
You’re now going to tell Amazon to create several machines based on your launch configuration. This is called auto-scaling. Ready?
In the EC2 service, click on Auto Scaling Groups, then Create Auto Scaling Group. Click on Use an existing launch configuration and choose your configuration. Click on Next. Give your auto scaling group a name and leave the number of instances at 1 for the moment. Select your VPC and your public subnets.
An error message has appeared saying No public IP addresses will be assigned. Is this normal?
Yes, it’s normal, as you haven’t asked for public IP addresses to be assigned to machines when creating the group. In our case, you’re going to connect an internet-facing load balancer so that you can keep the “private” configuration.
Then select Keep this group at its initial size, so no automatic scaling is performed. You want to maintain a constant number of machines in case a fault occurs, not adapt to load.
Click on Review and then Create Auto Scaling Group. Wait a few seconds, and the group will detect that it needs to create a machine:

In the Instances section, you’ll see your machine automatically appear:

Now you need to test it to see if service will be automatically restored in case of a server failure. To simulate a failure, you’re going to destroy the machine manually. To do this, go to the Instances section, select your machine, and click on Actions. Choose Instance State, then Terminate. Then click on Yes, Terminate, and the instance will be destroyed.
Wait a few seconds, and suddenly, a new instance will be launched:

What is this sorcery?!
It may look like magic, but in fact, your Auto Scaling group has detected that one machine has gone off the radar and has launched another, as you specified that there always needs to be one machine running. You can see the Auto Scaling group’s activity in the Activity tab.
Does that mean I can’t ever stop my machines again?
No, it doesn’t—to stop the machines, you need to change the Auto Scaling group rather than the instances themselves. You can either delete it completely or change its size to 0.
Great! The machine is up and running! Now it’s time to add a load balancer to access your machines.
Create a Load Balancer
AWS provides a load balancing service, which distributes network requests to different machines to share the load across several infrastructure entities and help different actions run in parallel.
There are three types of load balancer in AWS.
Application Load Balancer (ALB)
This type of load balancer distributes HTTP or HTTPS traffic and allows you to configure request routing. For example, you can decide that people accessing http://example.com/premium will be directed to a certain group of machines, while people accessing http://example.com/standard will be sent to another.
Network Load Balancer (NLB)
This type of load balancer distributes low-level traffic such as TCP or TLS frames. It’s particularly effective when high performance is required.
Classic Load Balancer (LB)
This type of load balancer was one of the first to be used in AWS. It balances the load between several machines at the request level (HTTP, HTTPS) and connection level (TCP, TLS). It’s recommended for the EC2-Classic network and should be avoided for new projects.
How do they work?
In AWS, load balancers act in conjunction with a target group.
Now try it out yourself! Here are the steps to follow:
In the EC2 service, click on Load Balancers.
In the section Load Balancing, click on Create Load Balancer.
Choose Application Load Balancer and click on Create.
To make the load balancer externally accessible, choose internet-facing.
To direct HTTP website traffic, add an HTTP listener.
Choose your VPC from the list in Availability Zones, check both zones, and select the public subnets to be associated.
Click Next.
In the Configure Security Groups section, choose Create a new security group and leave the settings as they are. This will create a new security group that allows port 80, called load-balancer-wizard-1.
Click on Next. In the Configure Routing section, next to Target group, choose New target group.
Check that the type is set to Instance, the protocol to HTTP, the port to 80, and click Next.
Don’t save your instance for the moment, and click Create.
AWS has now created:
An application load balancer.
An empty target group.
You can see these in the Target Groups and Load Balancers sections of the EC2 service:


As you can see, your target group is empty.
How does the load balancer know which machines it should direct users to?
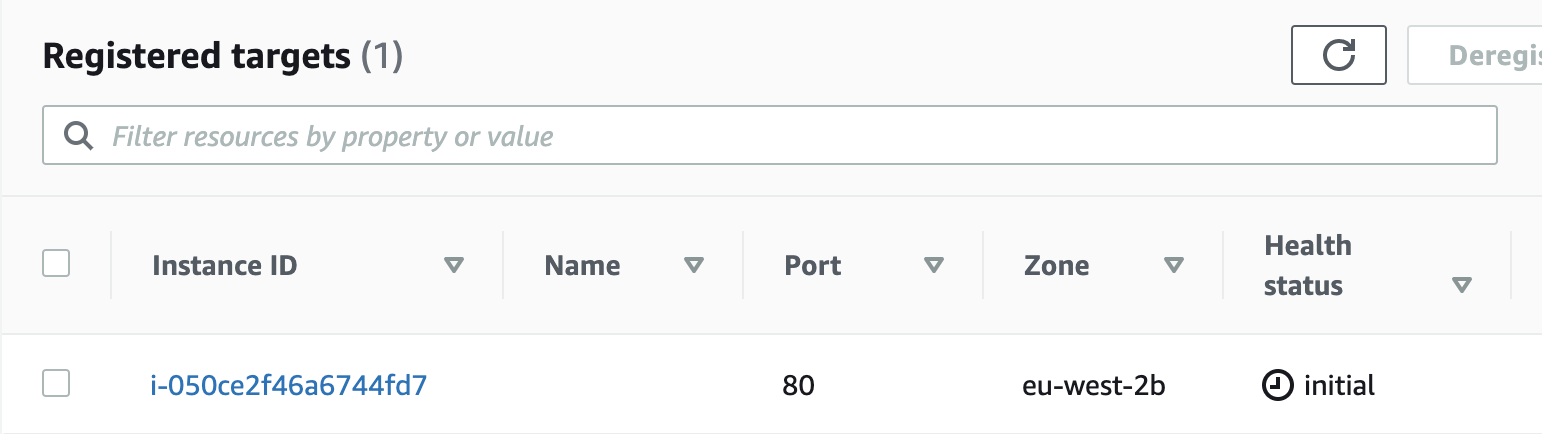
You must link the load balancer’s Auto Scaling group and target group. To do this, go back to the Auto Scaling Groups screen and click on your load balancer. Click on Actions, then Edit. In Target Groups configuration, choose the target group you just created and click Save.
When you go back to the Target Groups screen, you’ll see that your group now has your auto scaling group instance in it:
Now it’s time to see if everything’s working!
Test Access to the Load Balancer
Go to the Load Balancers screen and click on your load balancer. In the Description part, next to DNS, copy the domain name, which looks like website-1234567.eu-west-2.elb.amazonaws.com, and paste it into your browser.
It doesn’t work! I’ve got a 502 Bad Gateway error! What should I do?
Oops! There must be a problem with your instance. Earlier, we started the Apache server manually with:
sudo systemctl start httpd
But this configuration doesn’t persist at startup!
Does this mean I need to create the image again?
Luckily, no! AWS allows you to specify commands to be launched when your instance starts within an auto scaling group. You’ll need to provide these instructions in the launch configuration.
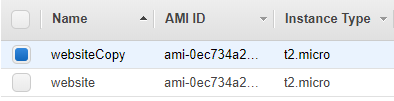
To do this, go to the Launch Configurations screen, click on your configuration, and in Actions, choose Copy launch configuration. The input screen will be displayed, and you can then click on Configure details. Then, under Advanced Details, click on the text box next to User Data and paste the Apache server start command you saw earlier:
#!/bin/bash
sudo systemctl start httpd
While you’re here, you can also select Do not assign a public IP address to any instances just underneath (We hadn’t previously configured this parameter). Next, click on Review and then Create.
You now have two configurations; the old one and the new one:
You now need to modify your auto scaling group to make it point to the new configuration. In Auto Scaling Groups, select your auto scaling group, then Actions and Edit. Next to Launch Configuration, choose the new configuration shown below and click Save.

To start the machines with the new configuration, destroy the current machine and wait for it to be restarted by the Auto Scaling group. Give it a few seconds, then go to the address of your load balancer in your browser (the address will look like this: http://website-1234567.eu-west-2.elb.amazonaws.com/) and you’ll see that it’s now working!
You can now increase the size of the Auto Scaling group to 2 so that there’s a machine in each Availability Zone.
Job done! You now have an infrastructure that can restart on its own, supports network traffic, and communicates with a database in your VPC network.
Let’s Recap!
To create an image you can use to create instances, you need to take a snapshot of an existing disk.
To set up an Auto Scaling group, you need to create a launch configuration.
A launch configuration is a generic configuration that details the type of machines and their parameters.
An Auto Scaling group maintains a pre-defined number of machines or can adapt to load by adding machines to the infrastructure during times of additional load.
A load balancer distributes traffic between several EC2 instances.
There are three load balancing services provided in AWS, each with different uses.
Application load balancers (ALBs)
Network load balancers (NLBs)
Classic load balancers (LBs)
Load balancers need to be in a target group, so they know which machines to target.
You can link a target group to an Auto Scaling group so that all machines managed by the Auto Scaling group are automatically associated with the target group.
Now it’s time to move into the modern age! What we’ve done so far hasn’t been automated, so you’re going to use your development superpowers again and work with CloudFormation to automate creation of all of this infrastructure.
