Work in Your Local Git Repository
Understand How Git Works
So far, you’ve discovered what version control is used for and initialized a Git repository.
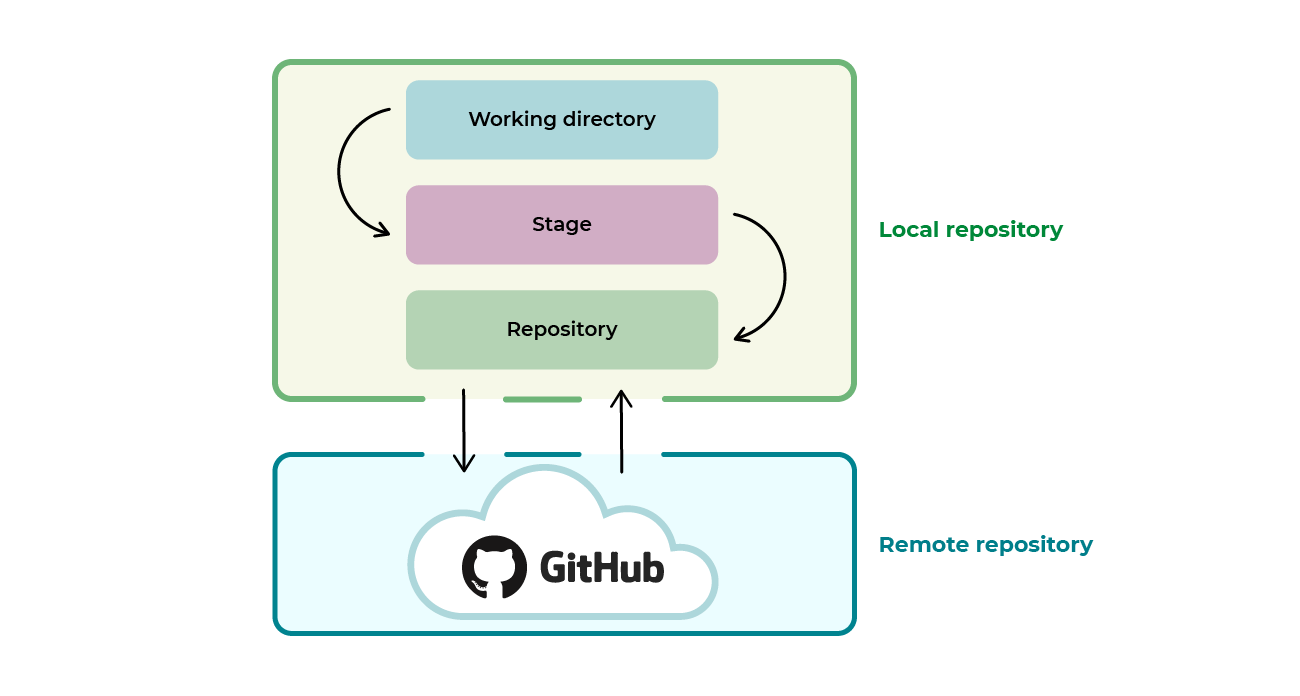
Before we move on to the basic commands, take a look at the diagram below to help you understand how Git works. Don’t worry, I’m going to explain it! 
This diagram shows how Git works. It’s composed of three different areas which make up the local repository, and the GitHub remote repository.
Let’s take a closer look at the different areas of the local repository.
Working Directory
This area corresponds to the project folder on your computer.
Remember when we initialized the repository named “FirstProject” in the previous part? Well, this repository is the blue box you can see in the diagram!
Stage or Index
This area is an intermediary between the working directory and the repository. It houses all the modified files you want to see included in the next version of your code.
Repository
When you create new versions of a project (remember the three different versions of the cake?), they are stored in this area.
These three areas are on your computer, at the local level.
At the bottom of the diagram, you can see the GitHub repository—your remote repository.
So how does it work?
Let’s take an example to make it clearer!
Imagine a project composed of three files: file1, file2, and file3.
You make a change to file1, and then to file2, from the working directory. Now you’ve got a new version of your project—great!
You want to save this version using Git, which means storing it in the repository.
How do I do that?
To start, send the modified files (file1 and file2) from the working directory to the stage. We call this staging file1 and file2. Once the files have been staged, you can create a new version of your project.
And Now, Over to You!
You’re going to implement a basic web project with an HTML file and a CSS file to put all of this into practice.
Initialize a Repository
Go to Your Git Repository
First of all, you need to go to the Git repository for the project.
To make sure you’re in the right place, enter the command “pwd” in Git Bash. If you’ve created the same files as me, and the result of the command “pwd” is similar to:
Users/JohnDoe/Documents/FirstProject/
— then you’re in the right place! If not, don’t worry; you just need to use the command “cd” to get back to the Git folder/repository for the project.
Then, initialize a repository following the example of “FirstProject” in the previous chapter. I’d advise you to follow the video below step by step!
Create the First Files
In your “FirstProject” folder, create an “index.html” file containing the following:
<!DOCTYPE html>
<html>
<head>
    <title></title>
    <link rel="stylesheet" type="text/css" href="styles.css">
</head>
<body>
    <h1>A great title</h1>
</body>
</html>
Then, create a “styles.css” file containing the following:
h1 {
  color: red;
}
You can open the “index.html” file in a browser to check that everything’s working as it should. If it is, you should have a white page with the title “A great title” in red.
Now that you have an initial basis for working on your web project, create a version of the project in its current state.
Stage Your Files Using the Command Git Add
You’ve created two files, index.html and styles.css, located in the Git repository. To create a new version of your project, you’re now going to stage the files. To do this, go back into the “Git Bash” tool.
You can now send the files index.html and styles.css to the staging area using the command “git add” followed by the name of the file:
$ git add index.html styles.css
You’ve now staged your two files!
Create a New Version With the Command Git Commit
Now that your modified files are staged, you can create a version, i.e., archive the project in its current state. To do this, use the command “git commit”:
git commit -m “Addition of basic html and css files”
“Addition of basic html and css files” is the message attached to the commit using the argument “-m.”
Your changes are now saved with the description “Addition of basic html and css files.”
The description is very important to keep track of your commits, and to be able to go back to a particular commit later. Don’t skip it! Choosing file names such as version1, version 2, or version 2.1 will make your life harder, as you’ll have to read the file to see what changes were made. With a clear message, you can identify the changes straight away.
Well done! You’ve just created a version of your project!
Send Your Commit to the Remote Repository With the Command Git Push
Creating a version of your project is a good start, but now you need to send your commit from your repository to a remote repository. We call this “pushing” a commit.
For your first push, you’ll need to configure a few things.
First, you need to link your local repository to the remote repository you created previously on GitHub. To do this:
Go to GitHub.
Click on the icon in the top right-hand corner.
Click on “your repositories.”
Click on the repository you created in the first part of the course, “OpenclassroomsProject.”
Your screen should look like this:
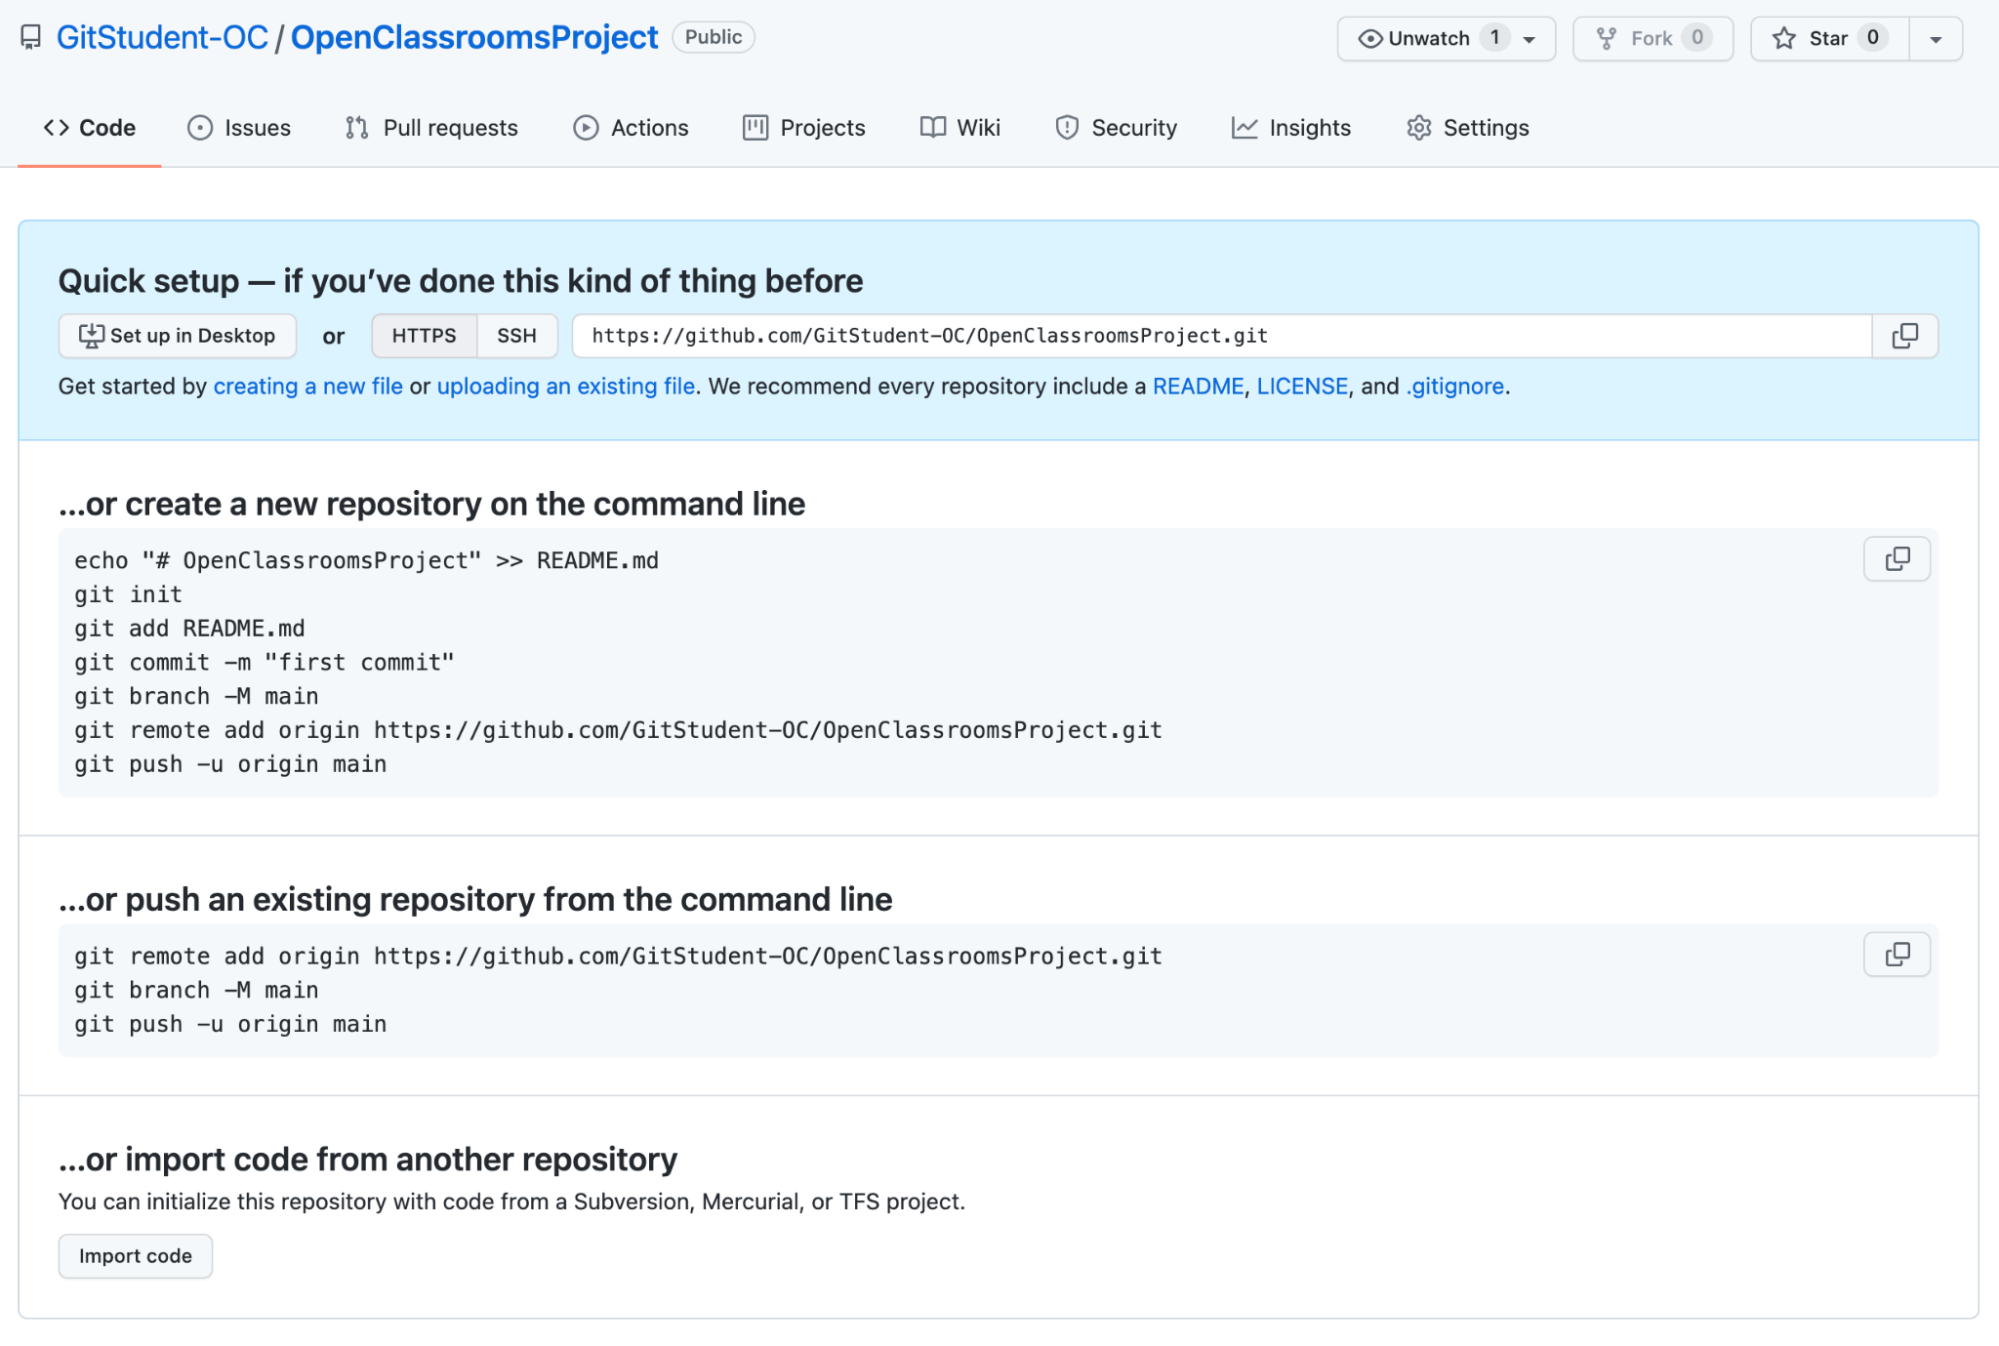
You’ll need to copy the link you can see in the screenshot.
Now, go back to Git Bash and type the following command:
git remote add origin https://github.com/GitStudent-OC/OpenclassroomsProject.git
As you might have guessed, the link you need to enter is the one you’ve just copied.
Then, type the command:
git branch -M main
And there you have it—you’ve linked the local repository to the remote repository! You can now send commits from your repository to the GitHub remote repository using the following command:
git push -u origin main
Congratulations, this version of the project is now stored in the cloud!
Let’s go back to the HTML file we created. What if you wanted to change the title from “A great title” to “A fantastic title?”
To create a version of the project with the updated HTML file and send it to the GitHub remote repository, you need to:
Stage the modified HTML file using the command:
git add index.html
Create a new version using the command:
git commit -m “H1 title change”
Send the new version to the remote repository using the command:
git push origin main
It’s as simple as that! Now you know how to use the commands git add , git commit , and git push . You’ll need to use these regularly. Therefore, it’s a good idea to practice them and to come back to the diagram below as often as you need to memorize the basic commands.
Let’s Recap!
Using git add, you can add files to the stage, which is an intermediary area where you can store your modified files.
Using git commit, you can create a new version with the files stored in the staging area.
Using git commit -m, you can create a new version and attach a message to the commit.
Using git push, you can send the changes you’ve made locally to a remote repository.
Now you know how to use the basic Git commands, it’s time to get acquainted with branches! Let’s take a closer look at how to use them.
