Understand the Branch System
Git’s main asset is its branch system—this is where the magic happens!
In Git, there is a main branch, or master branch, as it’s called for repositories created before October 2020.
The main (or master) branch contains all changes made. The idea is that you shouldn’t make changes directly to the main branch, but test them thoroughly on other branches first, before incorporating them in the main branch.
Does this sound like a lot of technical mumbo-jumbo? That’s totally normal! 
Think of the branches as a set of different files. Let’s look at a practical example. 
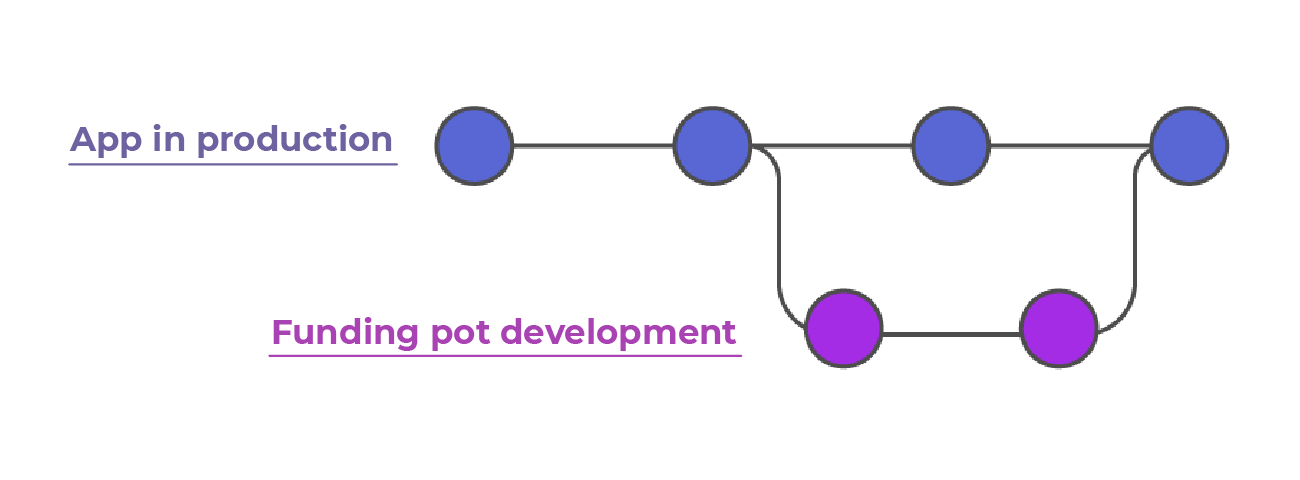
Imagine you’ve just created a shiny new banking app for Mr. Robert, and suddenly he has the brilliant idea of adding a funding pot to it.
Panic breaks out! Your app is working perfectly; it’s already in production, and making adjustments to it now would risk crashing the whole thing!
With Git and its branches, there’s no need to worry. You can create a branch for the funding pot development without affecting your app in production.
Once all the changes have been tested, you can send them to production without any cause for concern when you incorporate them in the main branch (if the worst comes to the worst, you can just go back to where you were)!
It’s been said that the best developers are the laziest!  In fact, good developers will always find a simple solution to do the work for them. Git is ideal for that! It allows you to create a virtual branch, memorize your changes, and once you’re ready, add them to the main app. It will check there are no conflicts with other merges, and then you’re good to go!
Watch the video below for a closer look at this:
To see the branches in our project, enter the following in the command line:
git branch
Initially, you’ll only see this:
git branch * main
That’s normal! The star means that this is the branch where you are, and that you’re currently making your changes on this branch.
It’s often better to create a branch for all modifications as a matter of course. It only takes 30 seconds to create one, and it can save you a lot of time and hassle if you make a mistake on your main branch.
But let’s get back to the project for Mr. Roberts!
So, you’ve got your main branch, and now you want to add the funding pot feature. To do this, enter:
git branch fundingpot
This command will create the funding pot branch locally. It won’t be duplicated on the remote repository.
Now enter this command again:
git branch
* main
fundingpot
You can now see your main branch and your funding pot branch. As you can see, the little star is still on the main branch. You’ve created the funding pot branch, but you aren’t on this branch yet.
To switch the branch, use:
git checkout fundingpot
Which will give you:
git branch
main
* fundingpot
The branch works like a virtual folder. Using git checkout, you can teleport into the virtual folder funding pot. You’re physically still in the OC folder, but virtually you’ve entered a parallel world!
You can now carry out your development without impacting the main branch that hosts your main working code. You can go back to the main branch at any time if you need to, without affecting the changes made in the funding pot branch.
Make a Commit
So, you’ve made some changes to the funding pot branch, and now you need to ask Git to save them and create a new version of the project, which includes the new developments on the funding pot branch.
You need to create a “commit” using the command:
git commit -m “Create the front end funding pot part”
Your changes are now saved with the description “Creation of the front end funding pot part.”
Congratulations! You’ve mastered the art of the commit!
Push Your Changes
Using the command git commit, you’ve saved your changes, but only locally. Now you need to send the changes to the remote repository using the command git push, which you saw in the previous chapter.
Merge Your Work Using the Command Git Merge
You’ve been working on the funding pot development for the app for a few days now. Finally, after many commits and pushes, the job seems to be done. You carry out a few tests to check if the funding pot development is working, and it is—well done you!
Now you need to add the changes you’ve made in the funding pot branch to the main branch. To do this, you should use the command “git merge.”
This command should be used in the branch where you want to send the changes. In our case, this means that the command should be used in the main branch. To go back to this branch, use the command:
git checkout main
Switched to branch 'main'
Now you’re in the main branch, you can merge your funding pot branch with it using the following command:
git merge fundingpot
Merge made by the 'recursive' strategy
Let’s Recap!
A branch is a copy of a project where you can make changes to the code.
All projects have a main branch, formerly known as a master branch.
Using git checkout, you can switch from one branch to another.
Using git merge, you can merge two branches.
It’s time to “merge” all the knowledge you’ve gained so far!  Follow me to the next chapter, where we’re going to work with an existing repository!
