Make and Fix Mistakes in a Local Repository
Git is a great tool, but it’s all too easy to create a branch you didn’t want, change the main branch by accident, or forget files in your commits. But that’s OK—you’re going to see now that it’s not difficult to fix these little mistakes using the right techniques.
Let’s create a sandbox to practice and implement what we covered in the previous parts of the course.
First, create a “Test” folder, which will serve as your Git repository, and go into this folder.
mkdir Test
cd Test
Initialize the repository with the command git init.
Your repository is now initialized. If you show the hidden folders, you can see the .git folder.
You can use the command ls -la to show hidden folders. In Windows you can reveal hidden files in the File Explorer by selecting the "Hidden items" option as shown in the following screenshot:
If you want to see the hidden files in MacOS Finder, then:
Open the folder where you want to display the hidden files in the Finder
Hold down the Command, Shift and Period keys: cmd + shift + [.]
The hidden files and folders on your Mac will then appear partially transparent (as in the following screenshot)
You can hide the files again using the same keyboard shortcut.
Now let’s fix any mistakes! 
You’ve Accidentally Created a Branch You Didn’t Want
Your sandbox is ready!
Before you create a branch, you need to create your main branch.
To do this, just add and commit a file.
Create a file named “FirstFile.txt” in your Test repository:
touch FirstFile.txt
Add it using the command:
git add FirstFile.txt
git commit
You’ll then be asked to enter and validate the commit message.
If using Vim, type your message, press Esc, then type :wq and press Enterto save and exit.
If using Bash,
git add FirstFile.txt && git commit -m "Your commit message"
To validate the message, once you’ve written it, click Escape (your cursor will move to the last line) and type :x .
This command will save the message and exit the commit message editor.

If your main branch is called “main” and not “master,” launch the following commands, as seen in the previous chapters:
git branch -M main
You’re now going to create another branch, separate from the main branch.
git branch testBranch
This command, as you saw previously, will create the branch “testBranch.”
You can check this using the command git branch:

Hurray! 
Hmm… but actually, we wanted to add our files before creating this branch, and now we’re stuck with a branch we didn’t want yet. 
Fortunately, it’s very easy to delete a branch you’ve just created in Git. All you need to do is run the command:
git branch -d testBranch
Ta-dah!  The branch has been deleted, and you can now add your files before creating the branch.

If you’ve already made changes within the branch, and you want to delete them, you can do so using the command:
git branch -D testBranch
You’ve Changed the Main Branch
Mistakes happen to the best of us, and at some point, you may find that you’ve accidentally made changes to the main branch. If so, don’t panic!
If you made changes to the main (or master) branch before creating your branch, and you haven’t committed them yet, it’s no big deal. You can just use the stash command.
Let’s take a look at how this works!
Go to your main branch to make changes to certain files.
You can check the status of your files at any time—i.e., see which changes have been staged or not—using the following command:
git status
You can see your files that have been changed but not yet committed.

Create a stash with the following command:
git stash
This gives you:

Make sure your main branch is clean again by using git status .
You should see:

Perfect! That’s exactly what we wanted. Now, create your branch “commitBranch.”
git branch commitBranch
Which will give you this:

Switch to this branch.
git checkout commitBranch
This is what you’ll see:

Finally, you can apply the stash, in order to:
Retrieve the changes you put to one side in the stash.
Apply these changes to your new branch.
git stash apply

This command will apply the last stash you created.
If you’ve created several stashes for one reason or another, and you don’t want to apply the last stash, don’t worry! You can apply a different one.
First, use the following command to see a list of your stashes:
git stash list
This command brings up a table of stashes with different IDs, such as:

All you have to do is use the command git stash , specifying the ID.
git stash apply stash@{0}It’s as simple as that! 
You’ve Changed the Branch and Made a Commit
Now, let’s imagine you’ve made your changes and committed them. This is a more complex case, as you’ve saved your changes on the main branch, but you shouldn’t have.
Go on, change some files and make a commit. 
To repair this error, you’ll have to analyze your most recent commits with the git log feature. This way, you’ll be able to find the commit ID, which is often referred to as the hash.
By default, git log will list all the commits you’ve made in reverse chronological order. We’ll look at this command in more detail in this chapter.
$ git log
commit ca83a6dff817ec66f443420071545390a954664949
Author: Marc <Marc@gee-mail.com>
Date: Mon Mar 19 21:52:11 2019 -0700
Now you’ve got the ID, keep it in a safe place! Check that you’re on the main branch, and run the following command:
git reset --hard HEAD^
This command will delete your last commit from the main branch. “HEAD^” indicates that the last commit is the one you want to delete. The history will be amended and the files deleted.
Then create your new branch.
git branch commitBranch
Switch to this branch.
git checkout commitBranch
Now you’re on the right branch.
Run the command git reset again to apply this commit to your new branch.
git reset --hard ca83a6df
Fixed! 
You’ve Made a Mistake in Your Commit Message
When you’re working on a project in Git, it’s very important to properly describe the changes made in the message. However, if you make a mistake in one of your commit messages, you can change it afterwards. I’ll show you how to do this in the video below.
Bear in mind that this command will work on the most recent commit! When you’re working on a project in Git, it’s very important to describe the changes made in the message properly. However, if you make a mistake in one of your commit messages, you can change it afterward.
Imagine you’ve just made a commit, and you’ve made a mistake in the message. Running this command when nothing has been changed yet will allow you to amend the previous commit’s message without changing its snapshot. The option -m sends the new message.
git commit --amend -m "Your new commit message"
You can check it with git log : 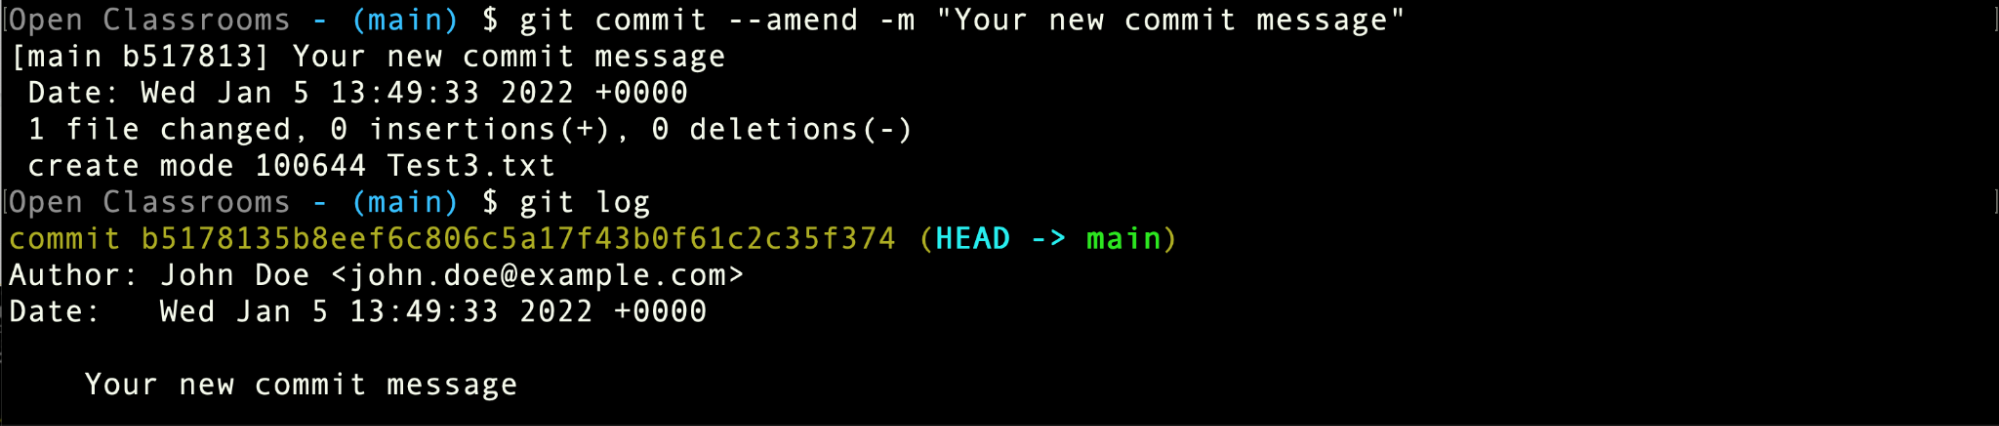
Looking good! 
You Forgot a File in Your Last Commit
Now imagine (I know, you need a lot of imagination in this course!  ) that you’ve made your commit, but you realize you forgot a file. Nevermind! All you need to do is use the command
 git --amend again, but slightly differently. As you saw, git --amend allows you to amend your most recent commit.
Use this command again, without the -m, which allows you to change the message.
First, add your file, then rungit --amend .
git add ForgottenFile.txt
git commit --amend --no-edit
Your file has been added to the commit without changing the commit message, thanks to the --no-edit part you added.

Using git commit --amend , you can select the last commit to add new pending changes. You can add or delete changes in order to apply them with commit --amend .
If there are no pending changes, you can use --amend to change the last log message of the commit with -m.
Let’s Recap!
You can use git branch -d to delete a branch.
With git status, you can check the status of files.
Git stash allows you to save unstaged changes to use them later.
You can use git log to display the commit history on the current branch.
With git reset
--hard HEAD^, you can reset the staging area and working directory to how they were at the last commit.Using git
commit --amend, you can select the last commit to make changes to it.
Now you know how to correct the most common errors in your local repository. But what happens if you make a mistake in your remote repository? You’re about to find out in the next chapter!
