Learn How to Use the GitHub API
Manipulate Data With the GitHub API
You’re making great progress! Now that you have an authentication token, you can use the API to update your GitHub profile!
In this chapter, we're going to use the rest of the CRUD operations - create, update, and delete - and their HTTP verb equivalents – POST, PUT, and DELETE.
Create a GitHub Repo With POST
You can use the POST HTTP verb whenever you create a new resource, whether it's a new tweet, photo, or post (see what I did there? 😉). For example, whenever you fill out an online form or use a form to sign up for a new account, the default verb associated with this is POST.
How does the API know that we’re trying to create something? 🤔
That's where the message body comes in! Remember? You saw it earlier. The message body accompanies POST and PUT requests and contains additional information. You can put the data you are trying to create in your request's message body using JSON.
Let’s give it a go – it will all make sense! 💪
We want to create a new repo on GitHub for our API. Cool, but how? First stage: documentation!
Check out what GitHub’s documentation has to say on the topic of repositories: https://developer.github.com/v3/repos
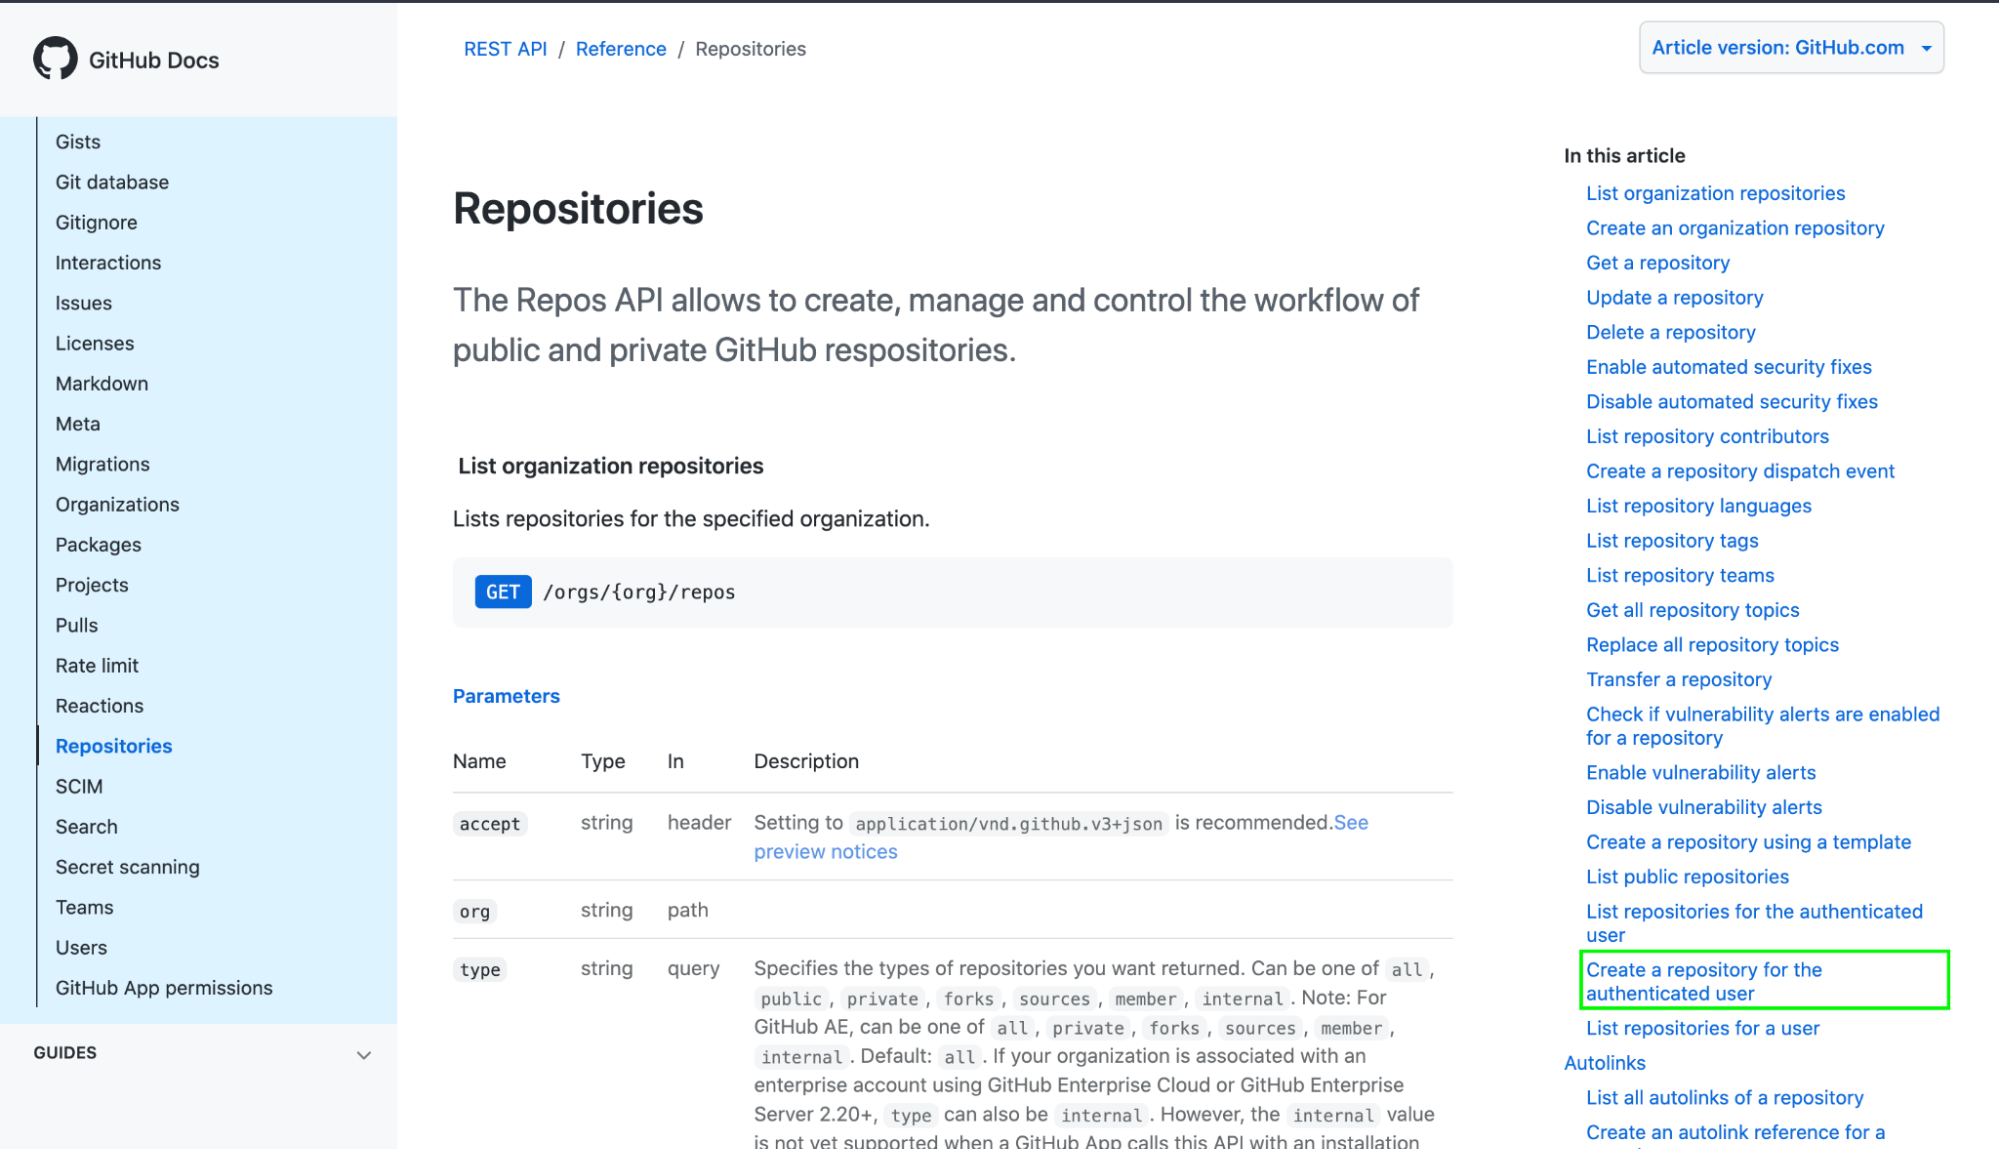
Wow, there’s a lot to choose from! We want to create a new repo, so click on Create a repository for the authenticated user (bottom right).
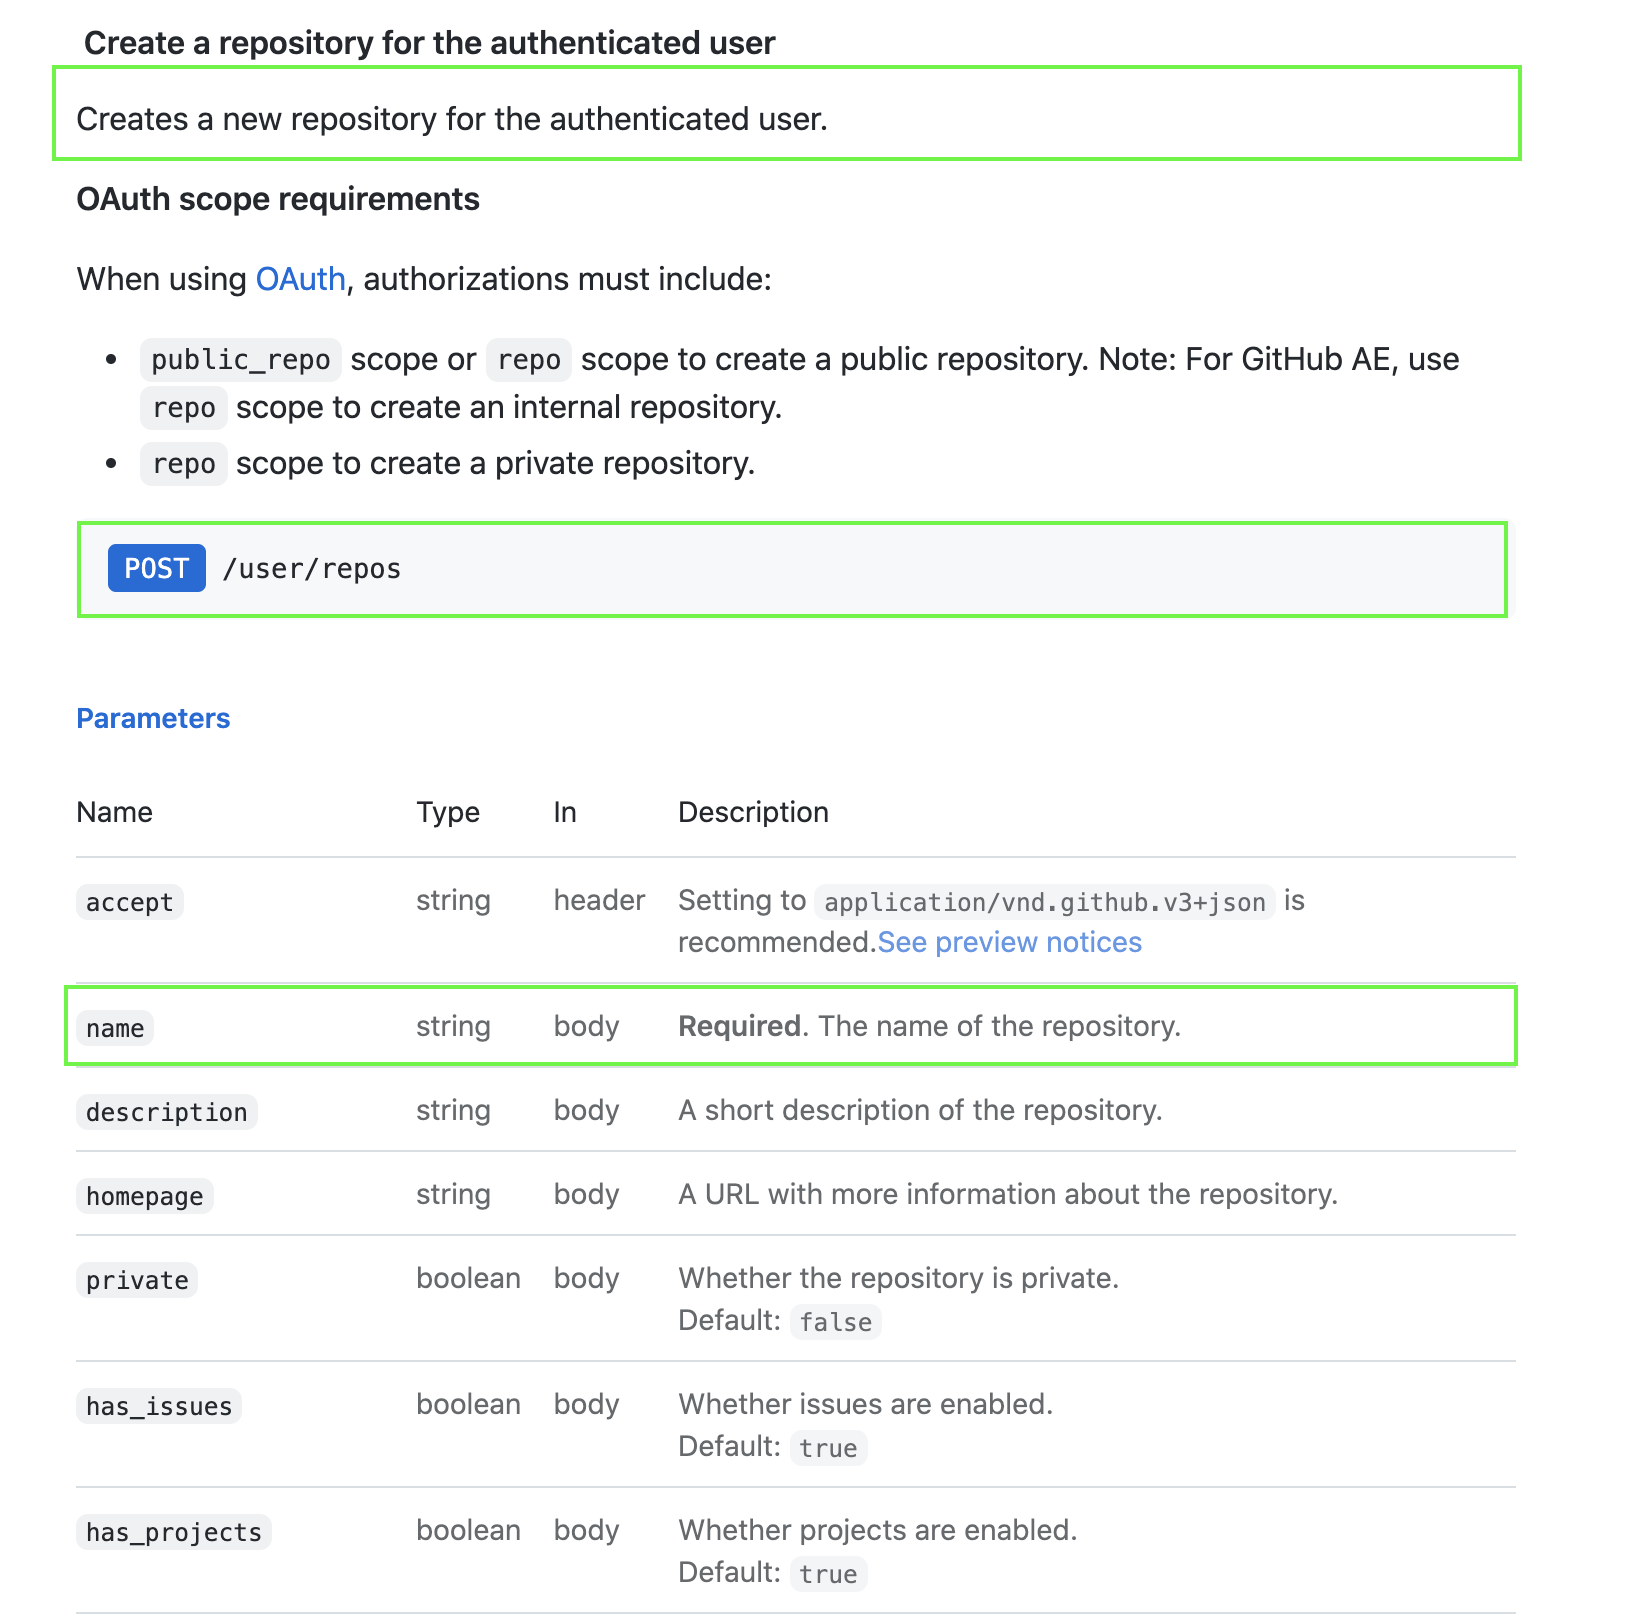
It says “Creates a new repository for the authenticated user” in the first green box.
To create a new repository, you need to make a POST request at /user/repos.
Great! Now, scroll down a bit, and you’ll get to the parameters.
The green box tells you that the name parameter is required.
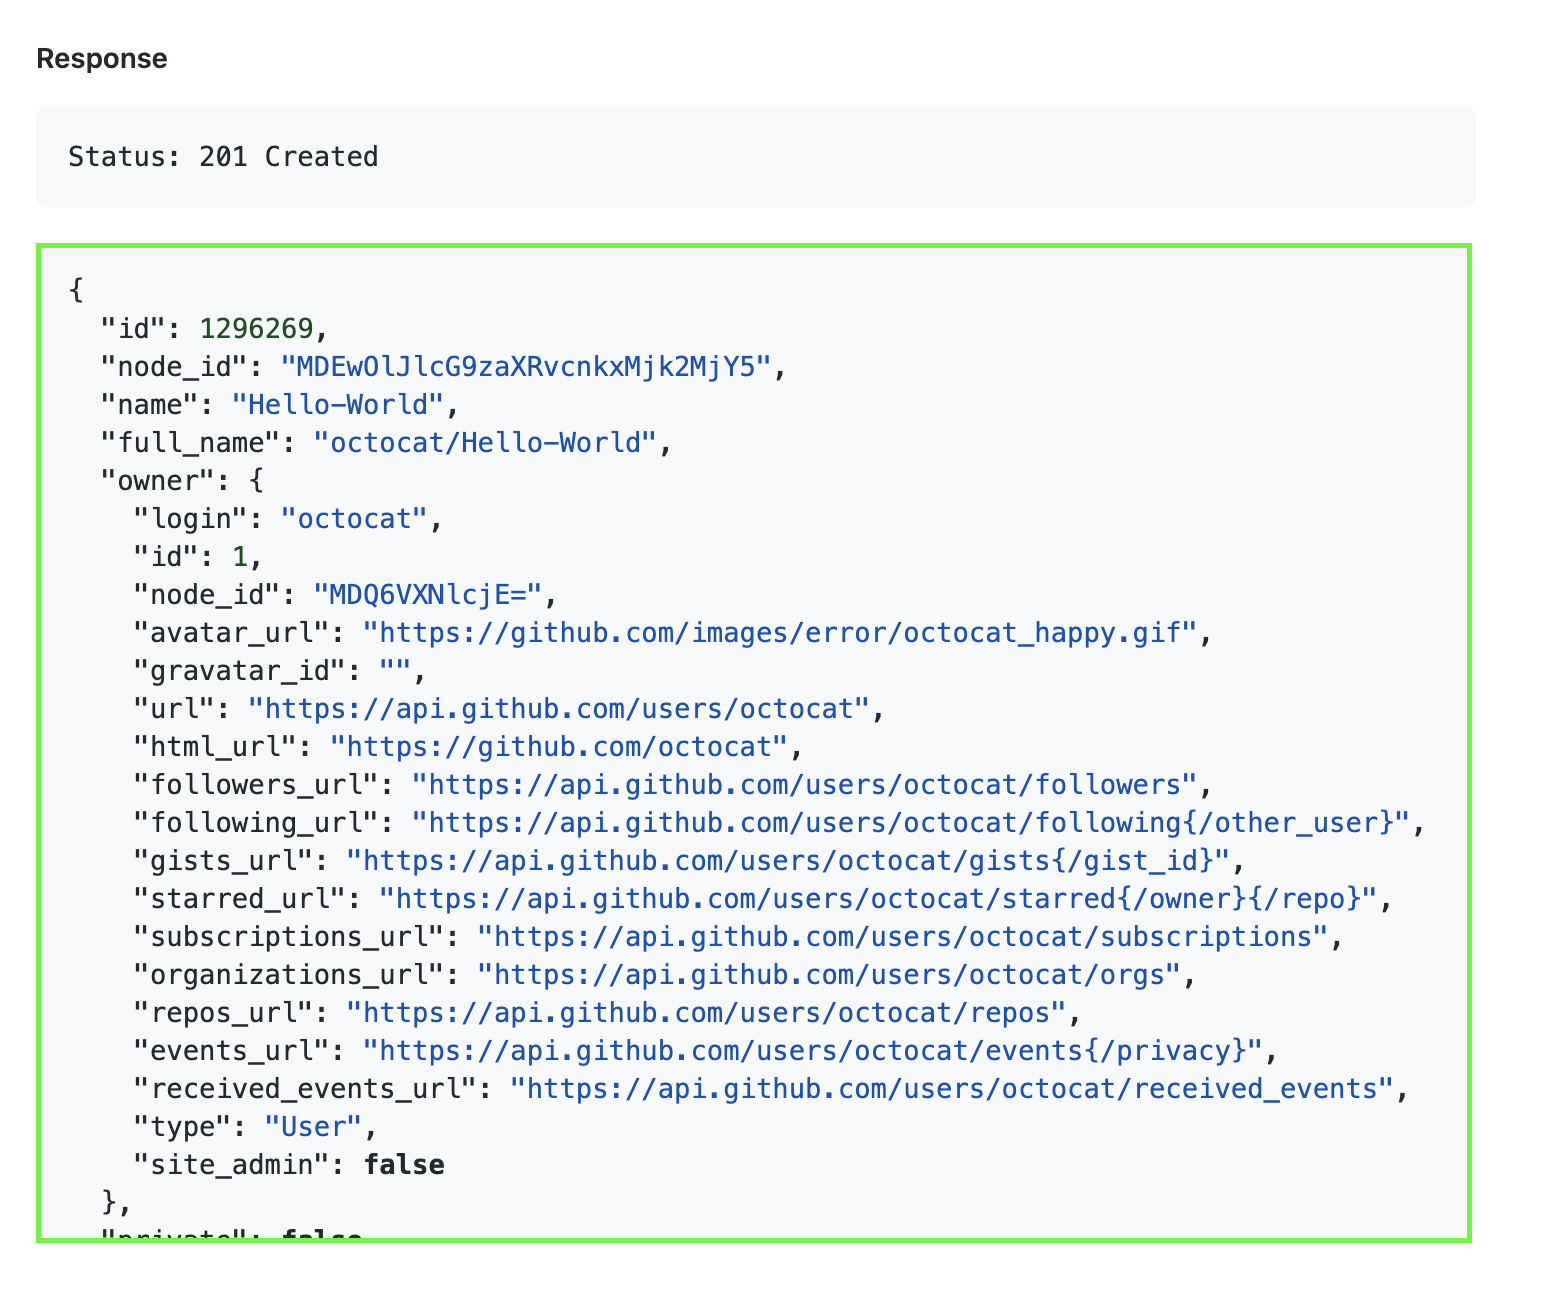
But that’s not all! The documentation also gives you an example of a successful request and response.
You have your endpoint, HTTP verb, parameters, and even an example! So let’s make this request. 🙌 Launch Postman!
Select POST from the drop-down menu, then type in the endpoint for creating a new repo using the GitHub API: https://api.github.com/user/repos, and then hit Send.
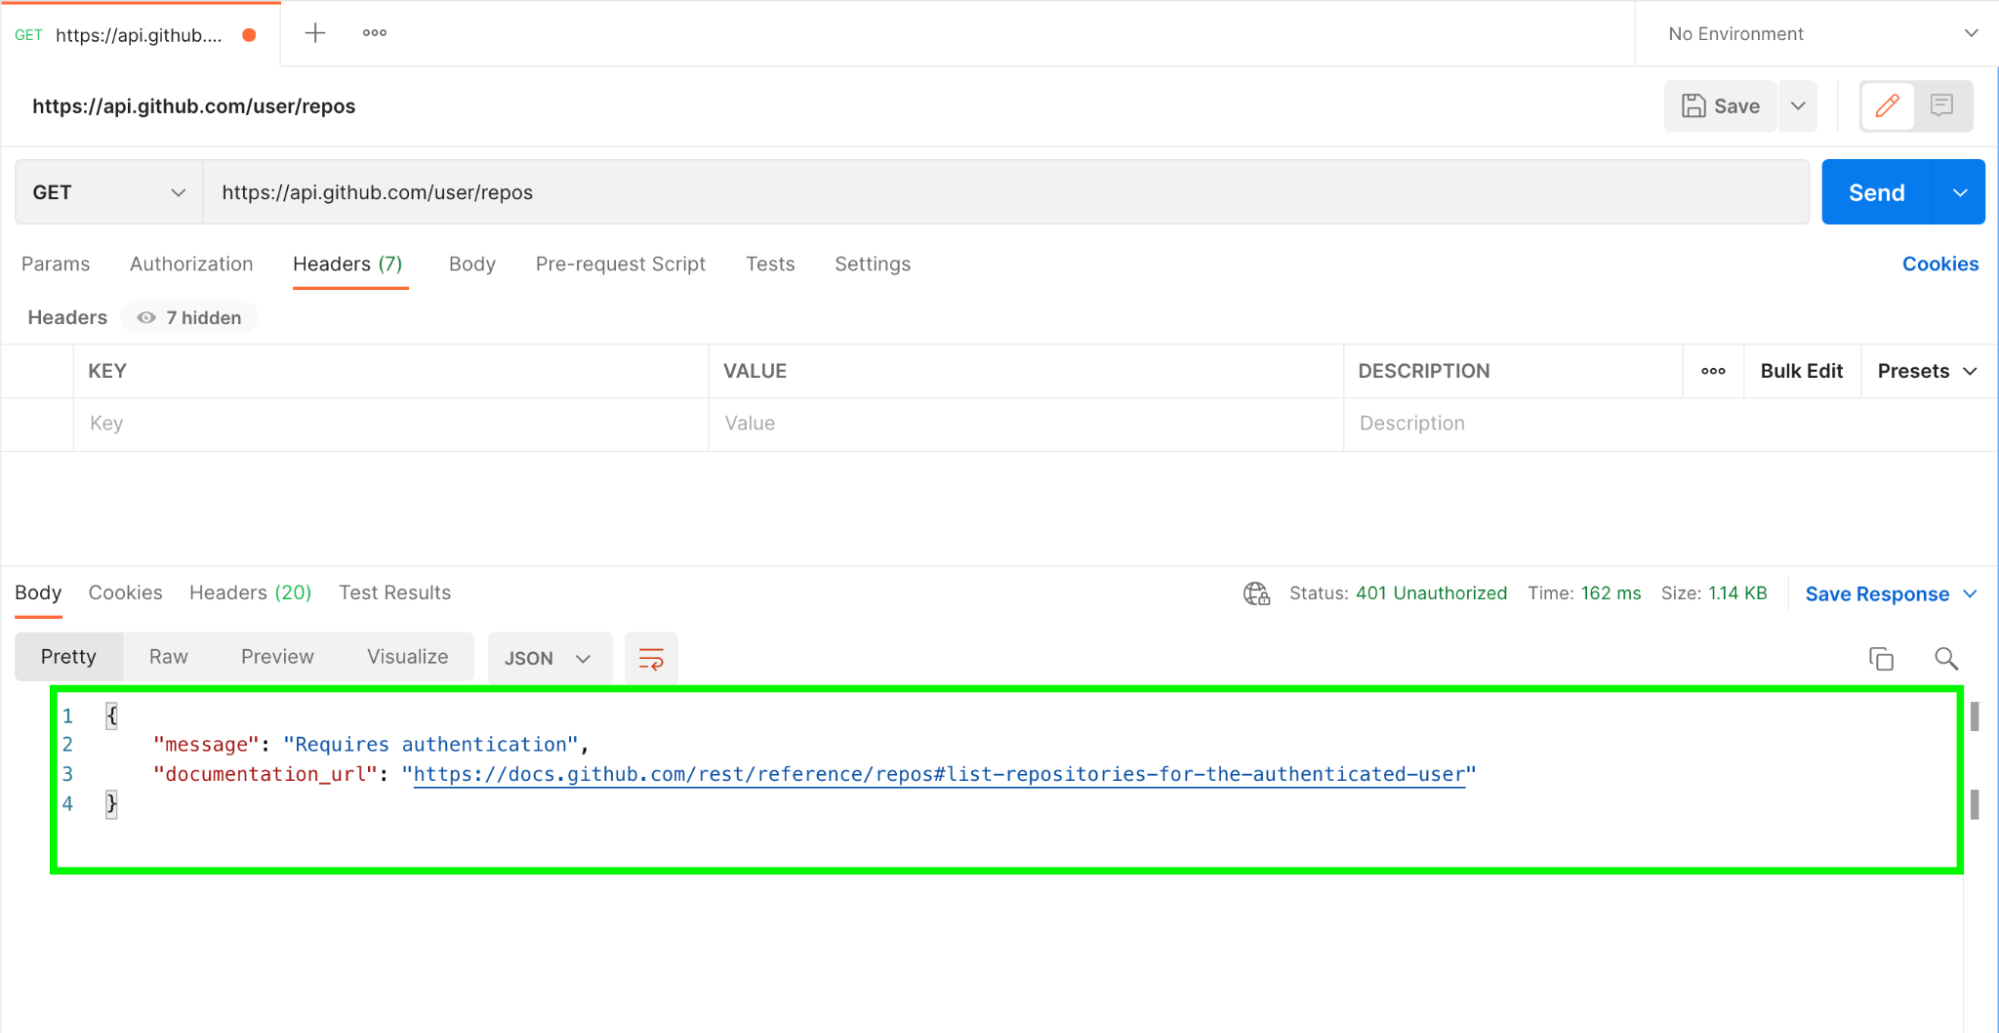
Oh no! We have an error. What’s going on? 🤔
This message tells you that you need authentication. The HTTP response code is 401: Unauthorized. Oh yes…your token! 😄
Go back to your GitHub API authentication token which you saved previously. Add it, just like in the image below, under the Headers tab in a key-value format where the key is Authorization and the value is Bearer :token: (your token, that is). So if your token is abcde, then the value would be: Bearer abcde.
Then click Send, and see what response you get. 👇🏼
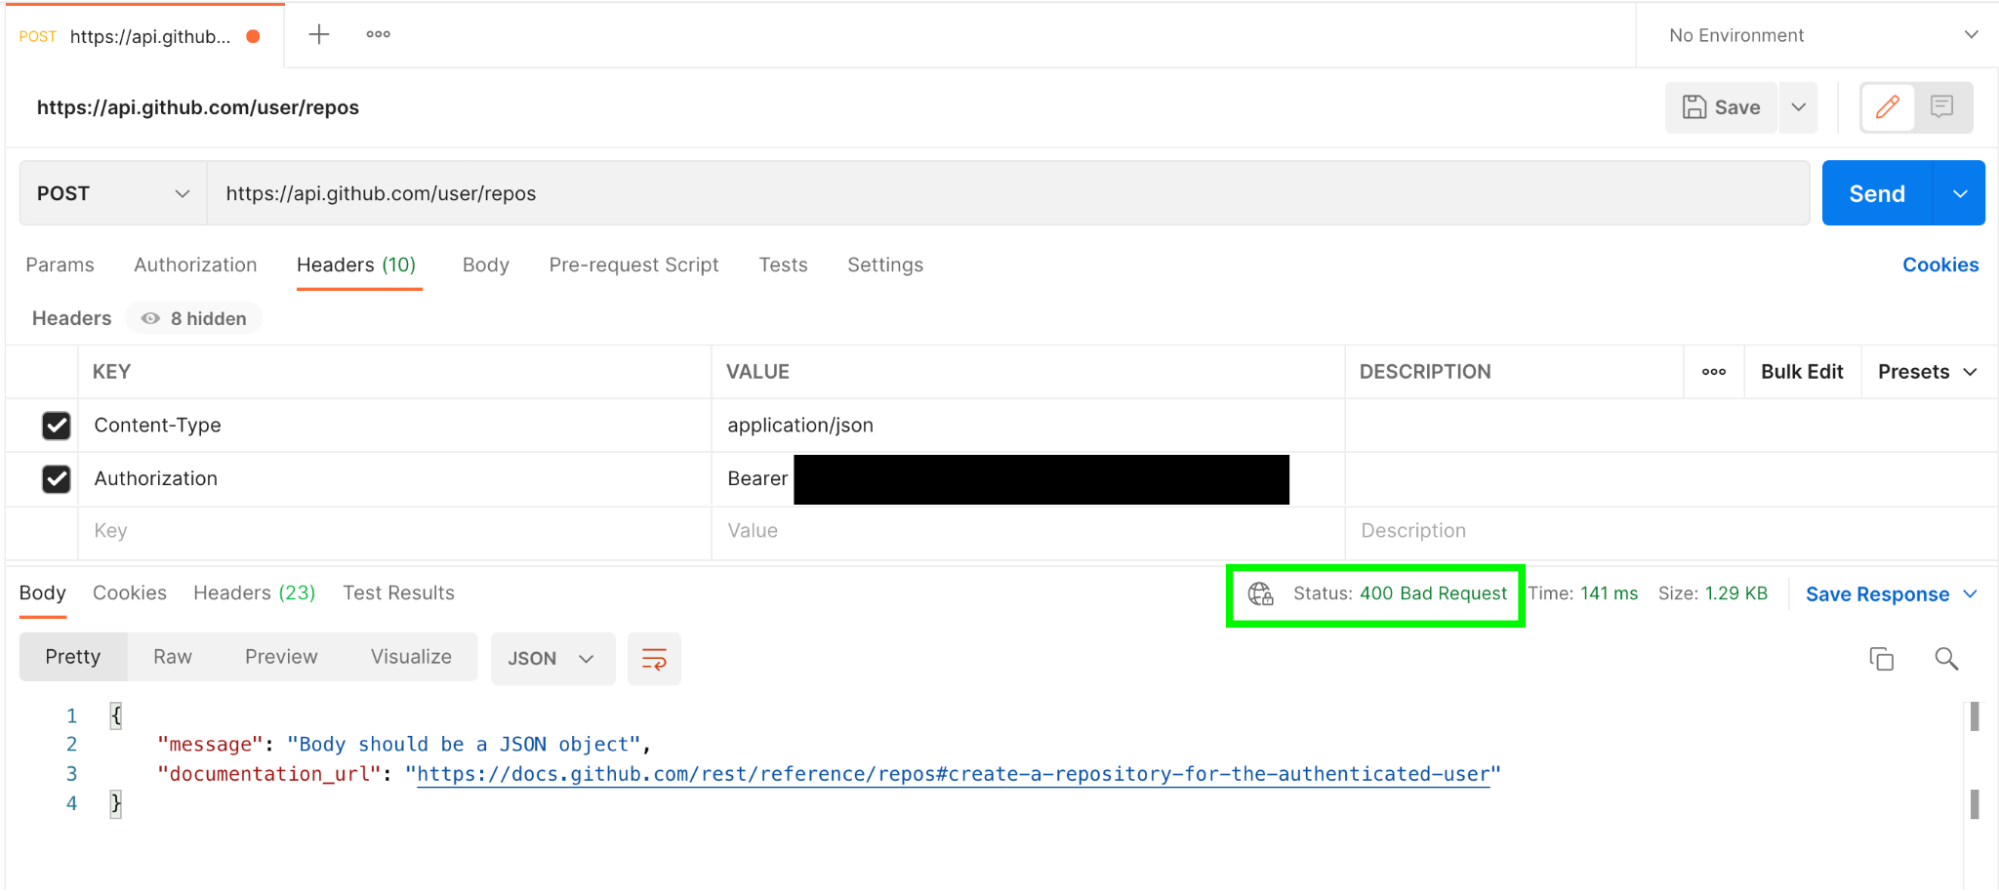
Another error?! Hmm… but the endpoint and token are right! This time, the HTTP response code is 400 Bad Request. Of course! The data is missing. 🙄 We’re asking GitHub to create a repo, but not giving it all the information.
Click on the Body section, then select raw, and make sure the content type is JSON.
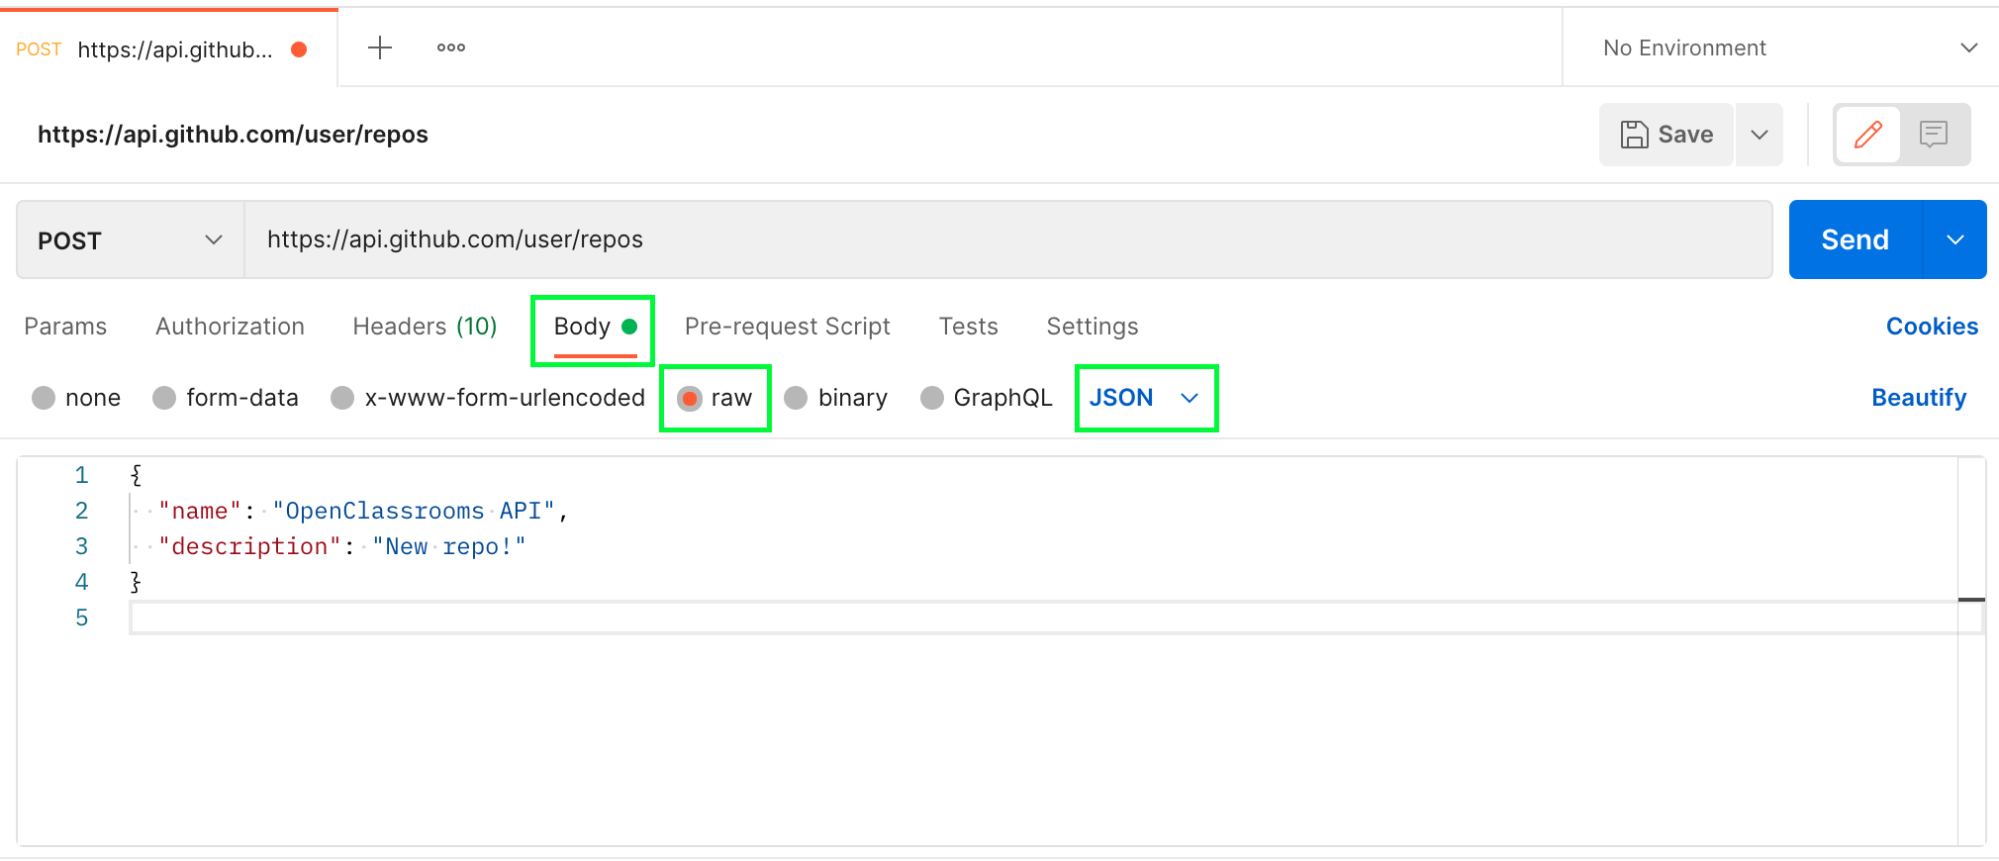
Now you can add your parameters in the key-value format. You need a repo name (that’s required) and a description.
{
  "name": "OpenClassrooms API",
  "description": "New repo!"
}
Click Send and see what response you get. 👇🏼
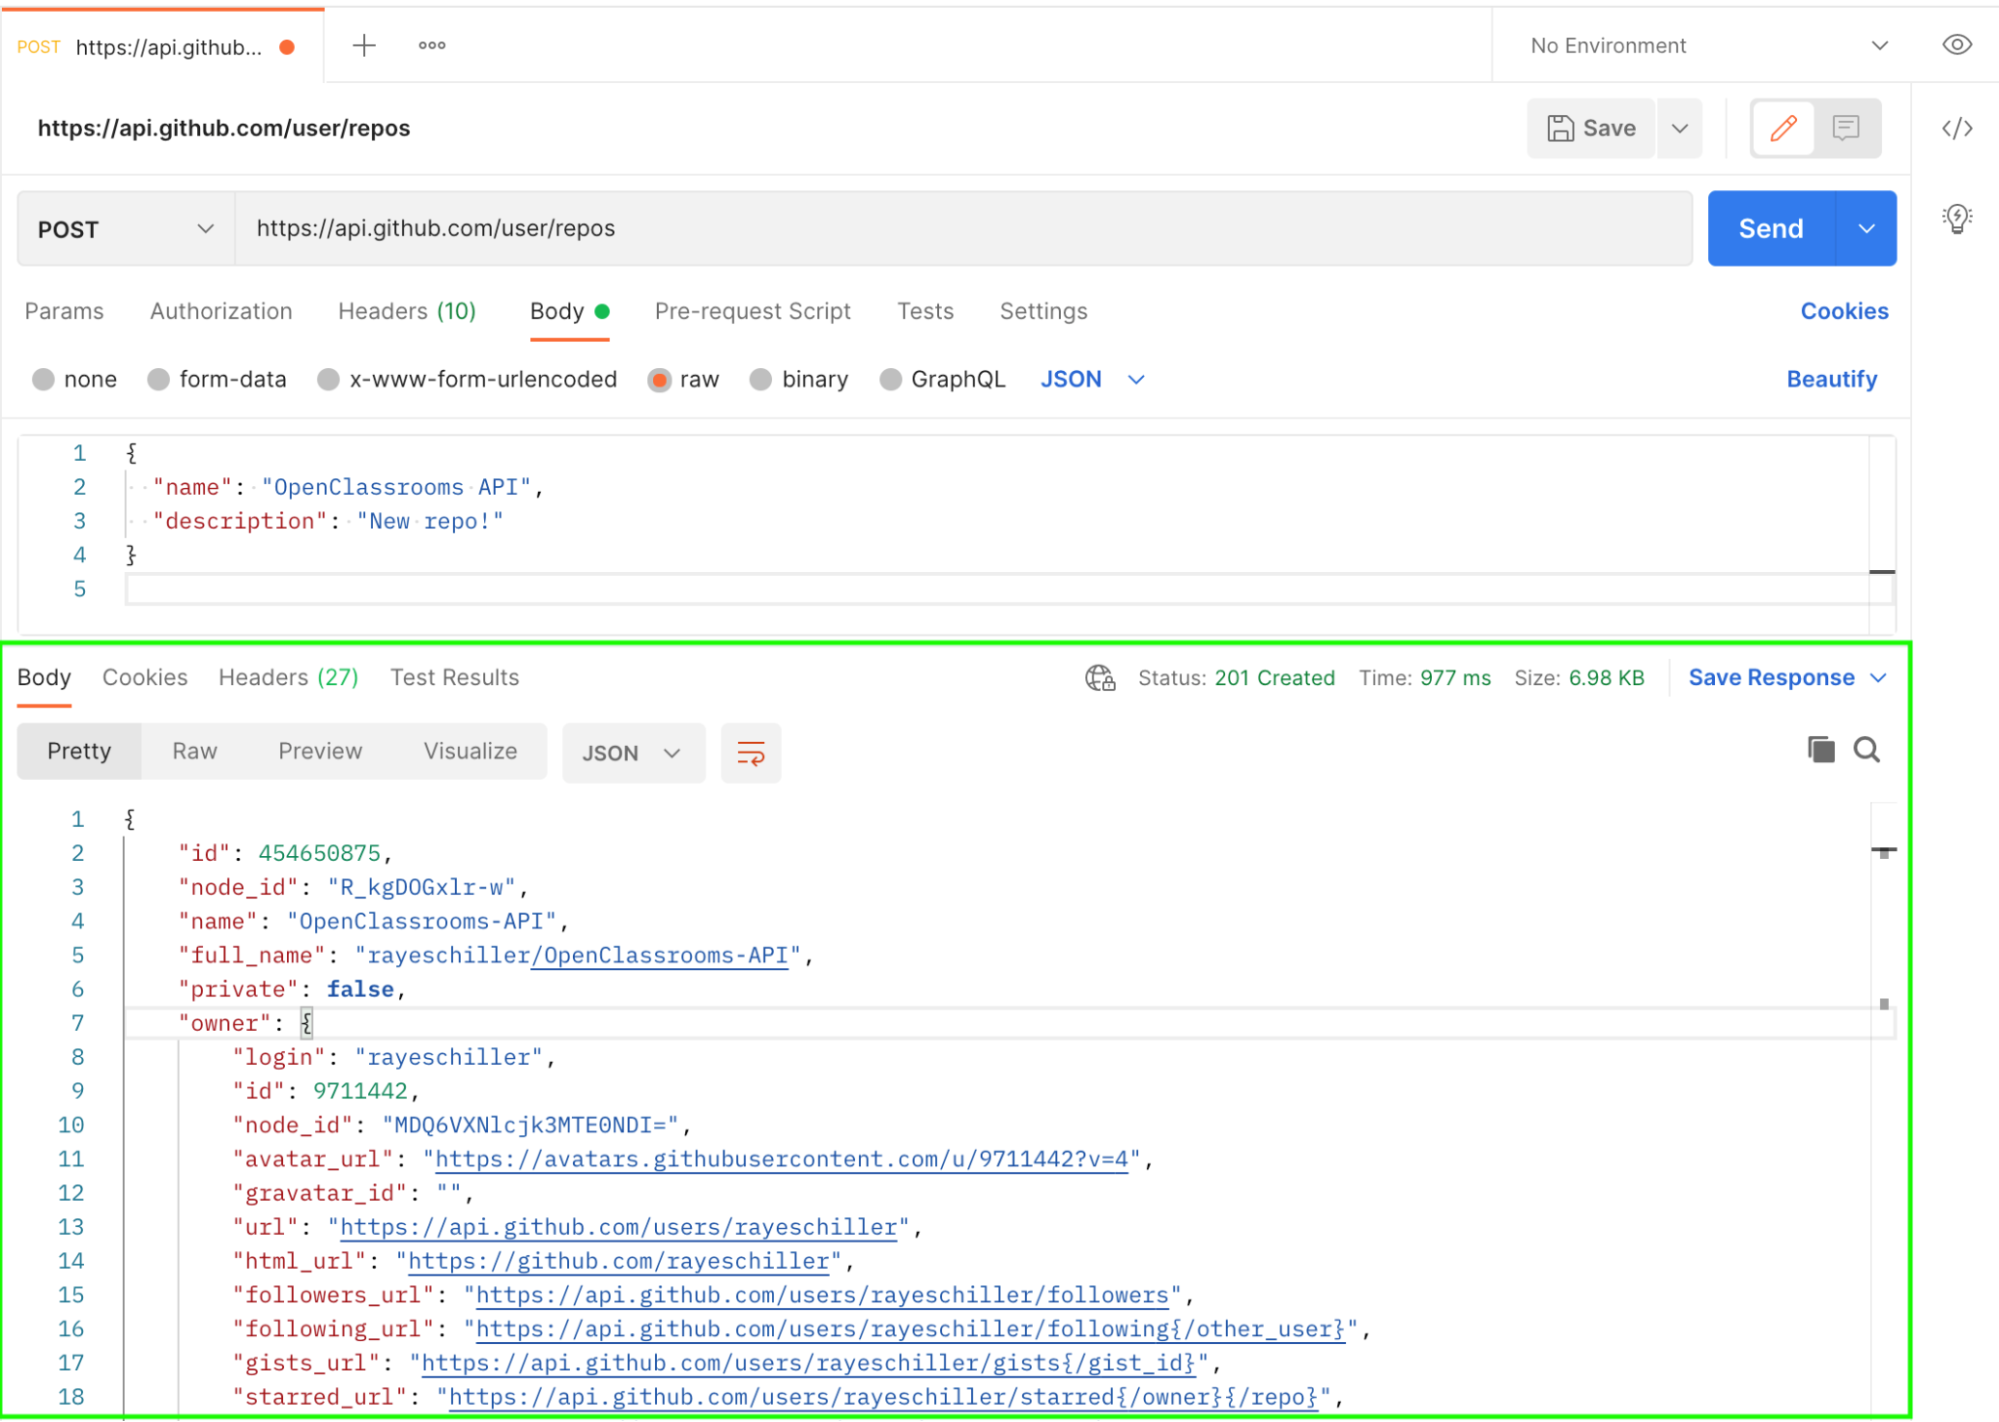
Amazing – you created a repo! 🎉 The HTTP response code is 201 Created – just what we want. The API is returning information about the new repo. You can also check on GitHub whether the repo has appeared in our list, and it has! 👇🏼🎉

To create a GitHub repository using the GitHub API, you:
Go to GitHub's documentation to see the correct endpoint: POST user/repos.
Add your authentication token to your header parameters using Postman.
Add your repository details into your message body in JSON using Postman.
See that once you make a successful request with your API, the repo shows up on your GitHub profile UI!
Watch the video to revise how to do all this:
And there you go! You have a new repo! What if you now tried to modify it with the GitHub API? 💪
Update a GitHub Repo With PUT/PATCH
You created your GitHub repo but then decided that you didn’t like the description and wanted to change it. You can use PUT to update an already existing resource in your API.
I often come across PUT along with PATCH online. Do they both mean the same thing, or are they different? 🤔
PUT: Updates the entire resource (i.e., replaces everything).
PATCH: Updates only the part of the resource that was sent.
We’re not going to spend time now looking at the difference between them, but if you’re not sure which one to use for which situation, check the API documentation!
And that’s what we’re going to do! Head back to the GitHub documentation about repos, but this time click on Update a repository.
To update a repo, you need to use the PATCH method at the endpoint /repos/owner/:repo.
The colon ( : ) in front of owner and repo means that you need the unique name of the repo you want to change and the unique name of the owner of the repo (in this case, that’s you!).
Change the verb to PATCH. Then change the relevant endpoint. My username is rayeschiller, and my repo is called OpenClassrooms-API. Switch rayeschiller for your username and OpenClassrooms-API for your repo name if they are different. In the message body section, type in the new description. I’ve written:
{
    "description": "This is a new description which is much cooler than the last one ☀️"
}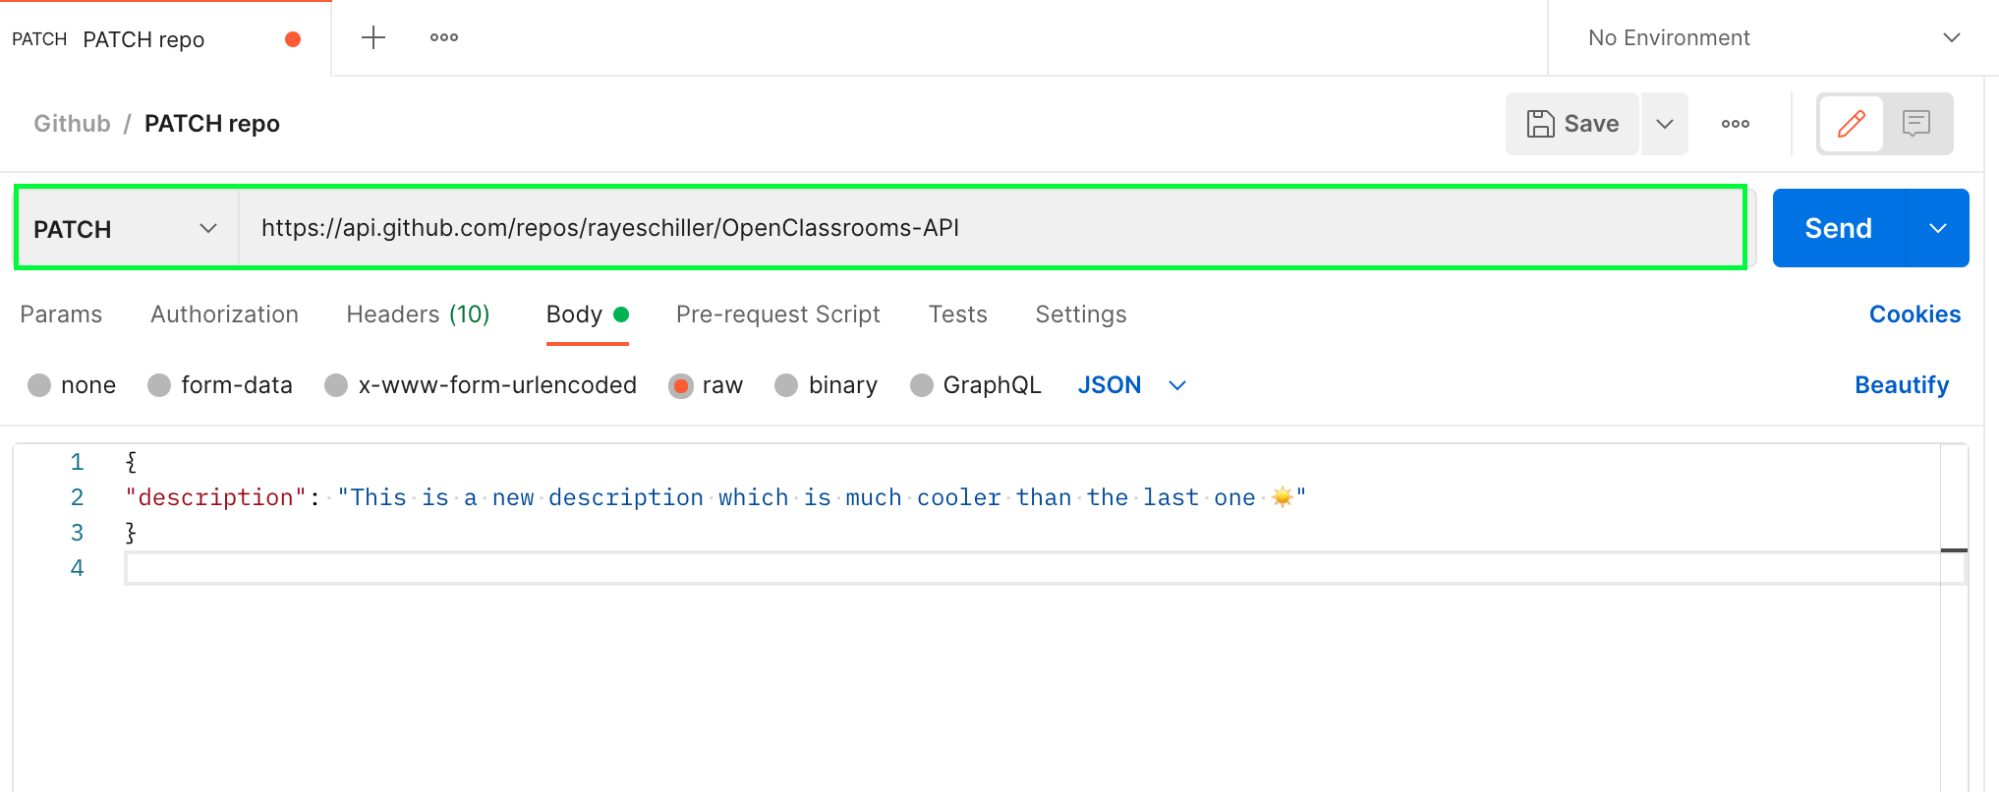
Click Send and take a look at the response. 👇🏼
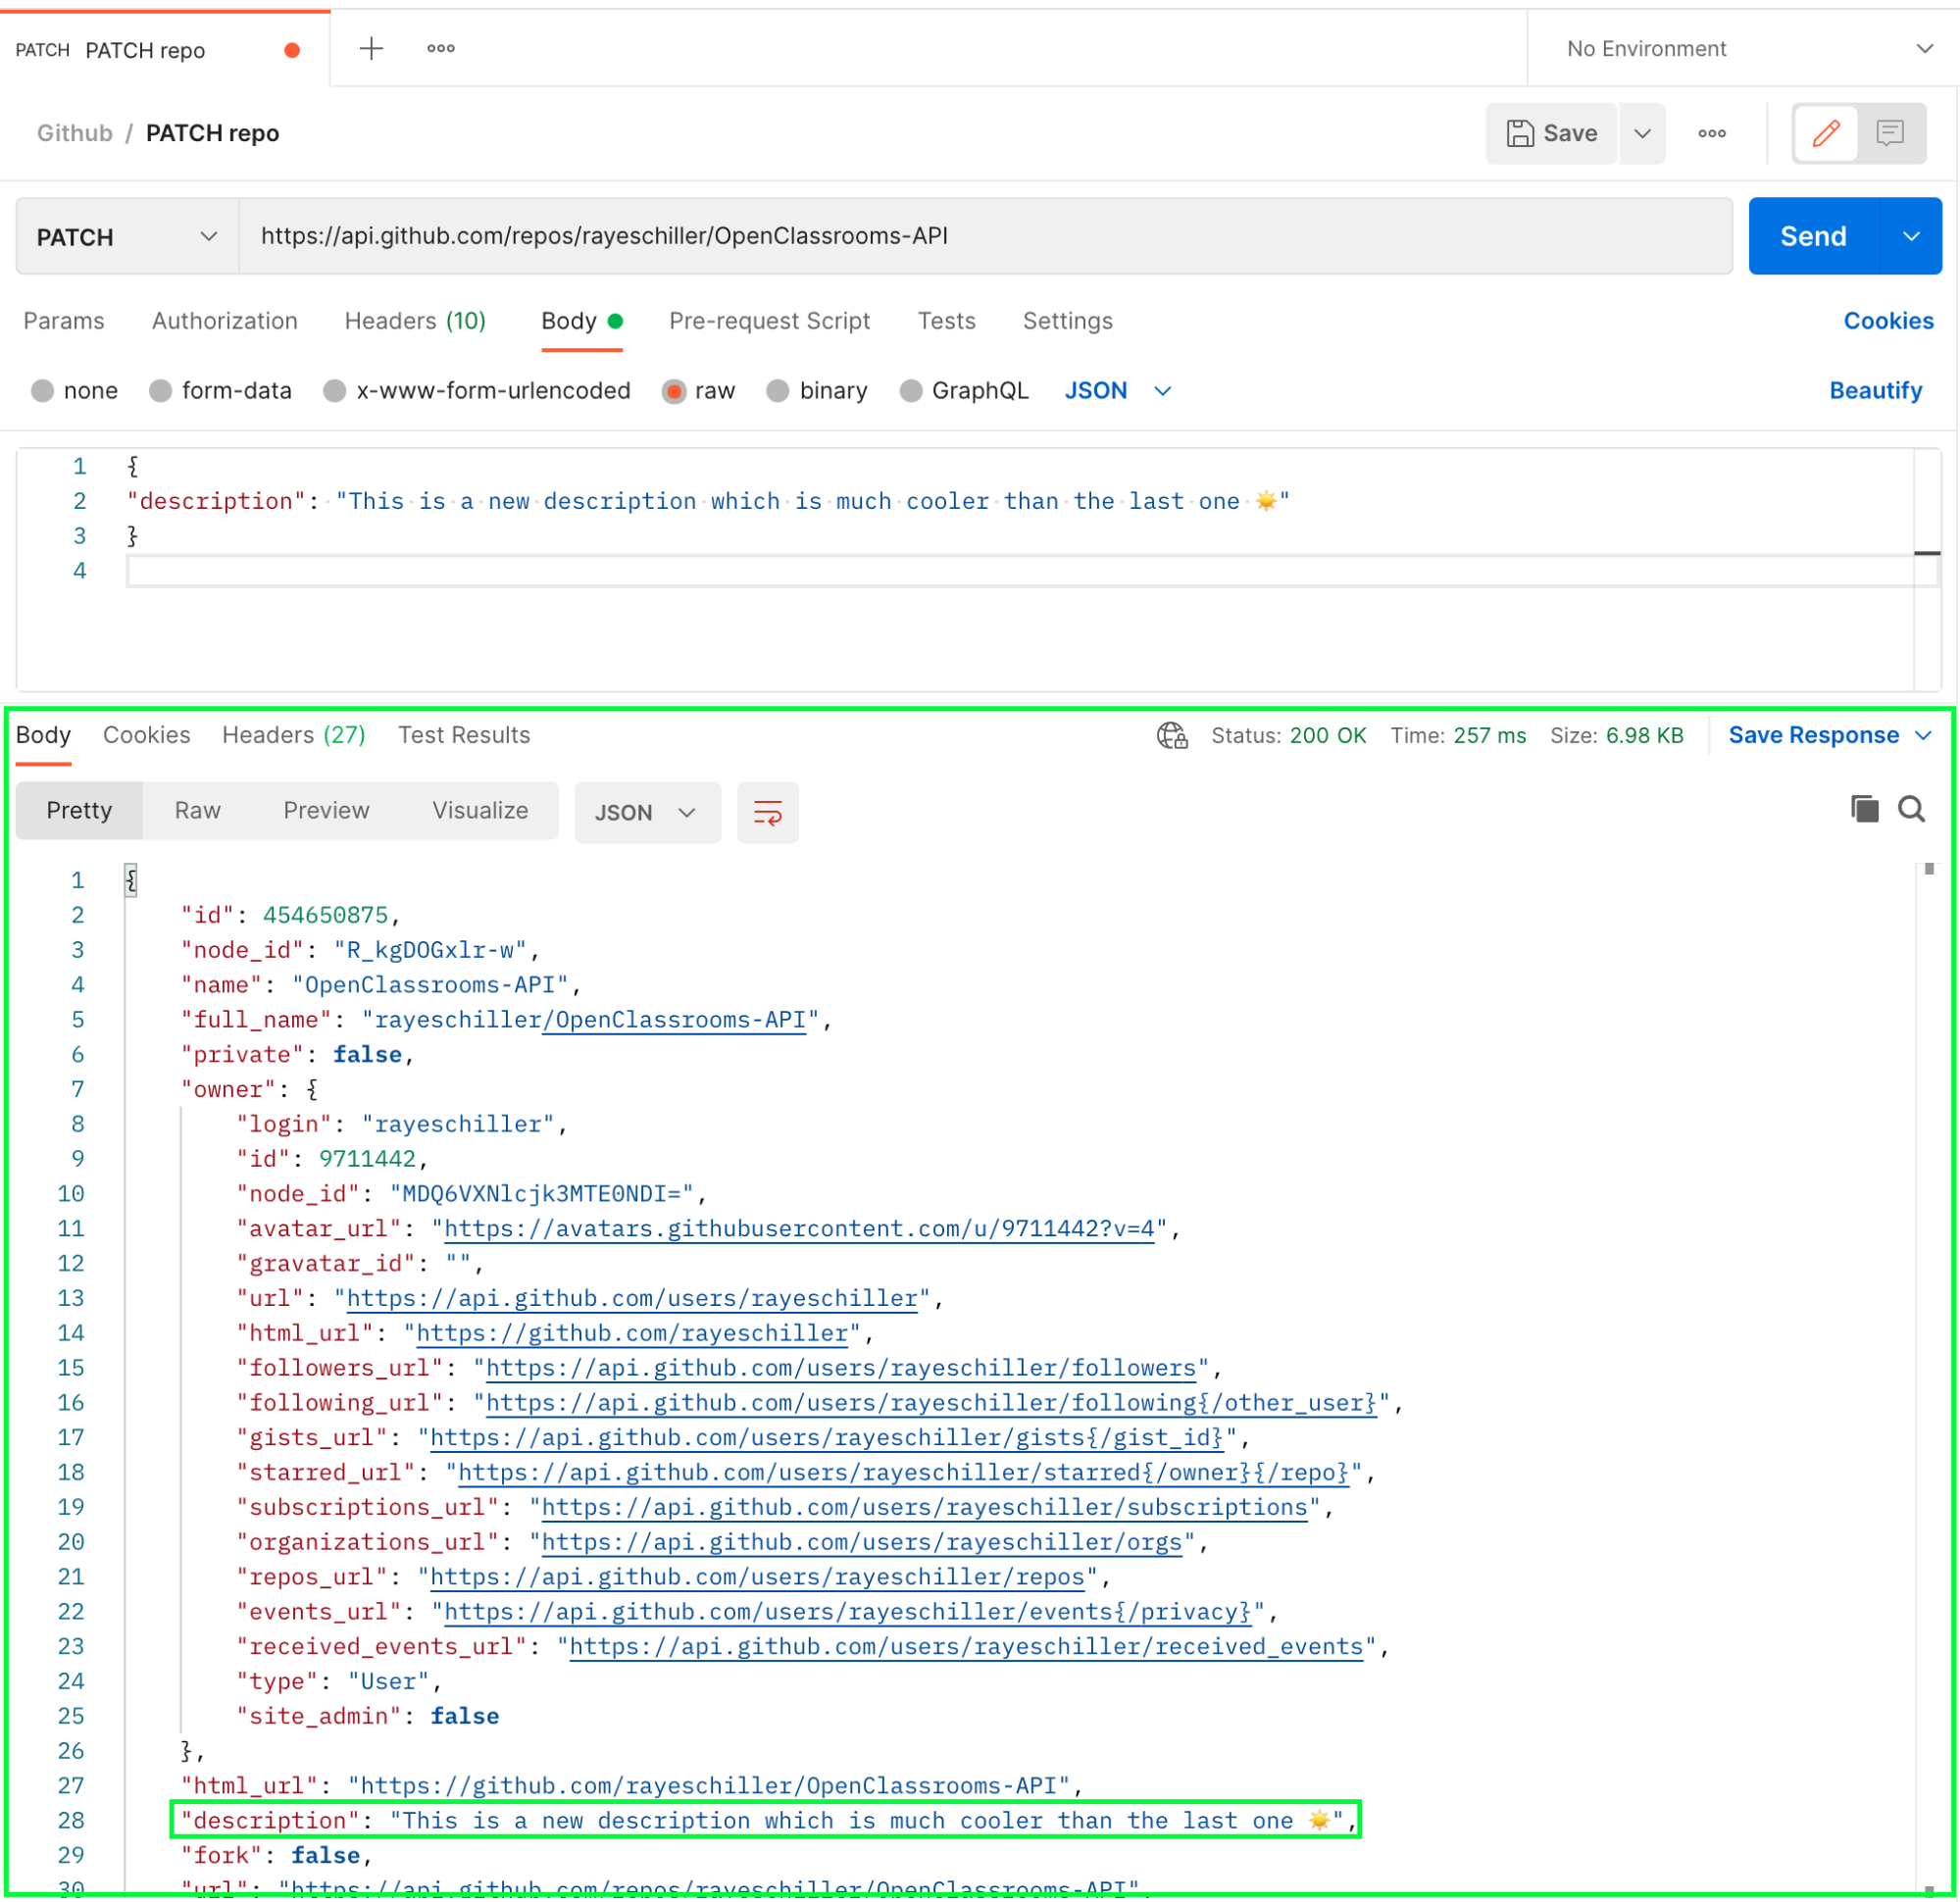
The repo has been updated! 🎉 You can see the response with the message body: the HTTP response code is 200 OK – just what we want.
If you go and check on GitHub, you should see your new description. 👇🏼

To update a GitHub repo:
Check the GitHub documentation for the correct URI: PATCH /repos/owner/:repo
Go to Postman, change your HTTP verb to PATCH, and enter the correct owner and repository name for the repository you want to update, and change the description in the message body.
See your new repository description is in your GitHub UI.
Great work! You created a repo, and then you’ve changed it. Now let’s try to delete it altogether! 💪
Delete Your GitHub Repo With DELETE
Now you’ve decided you don't really need your GitHub repo – so let's go ahead and DELETE it!
Off we go – the same routine as for previous requests. First of all: documentation! How to delete a GitHub repository?
In the list of available methods, you see: Delete a repository. Go ahead and click!
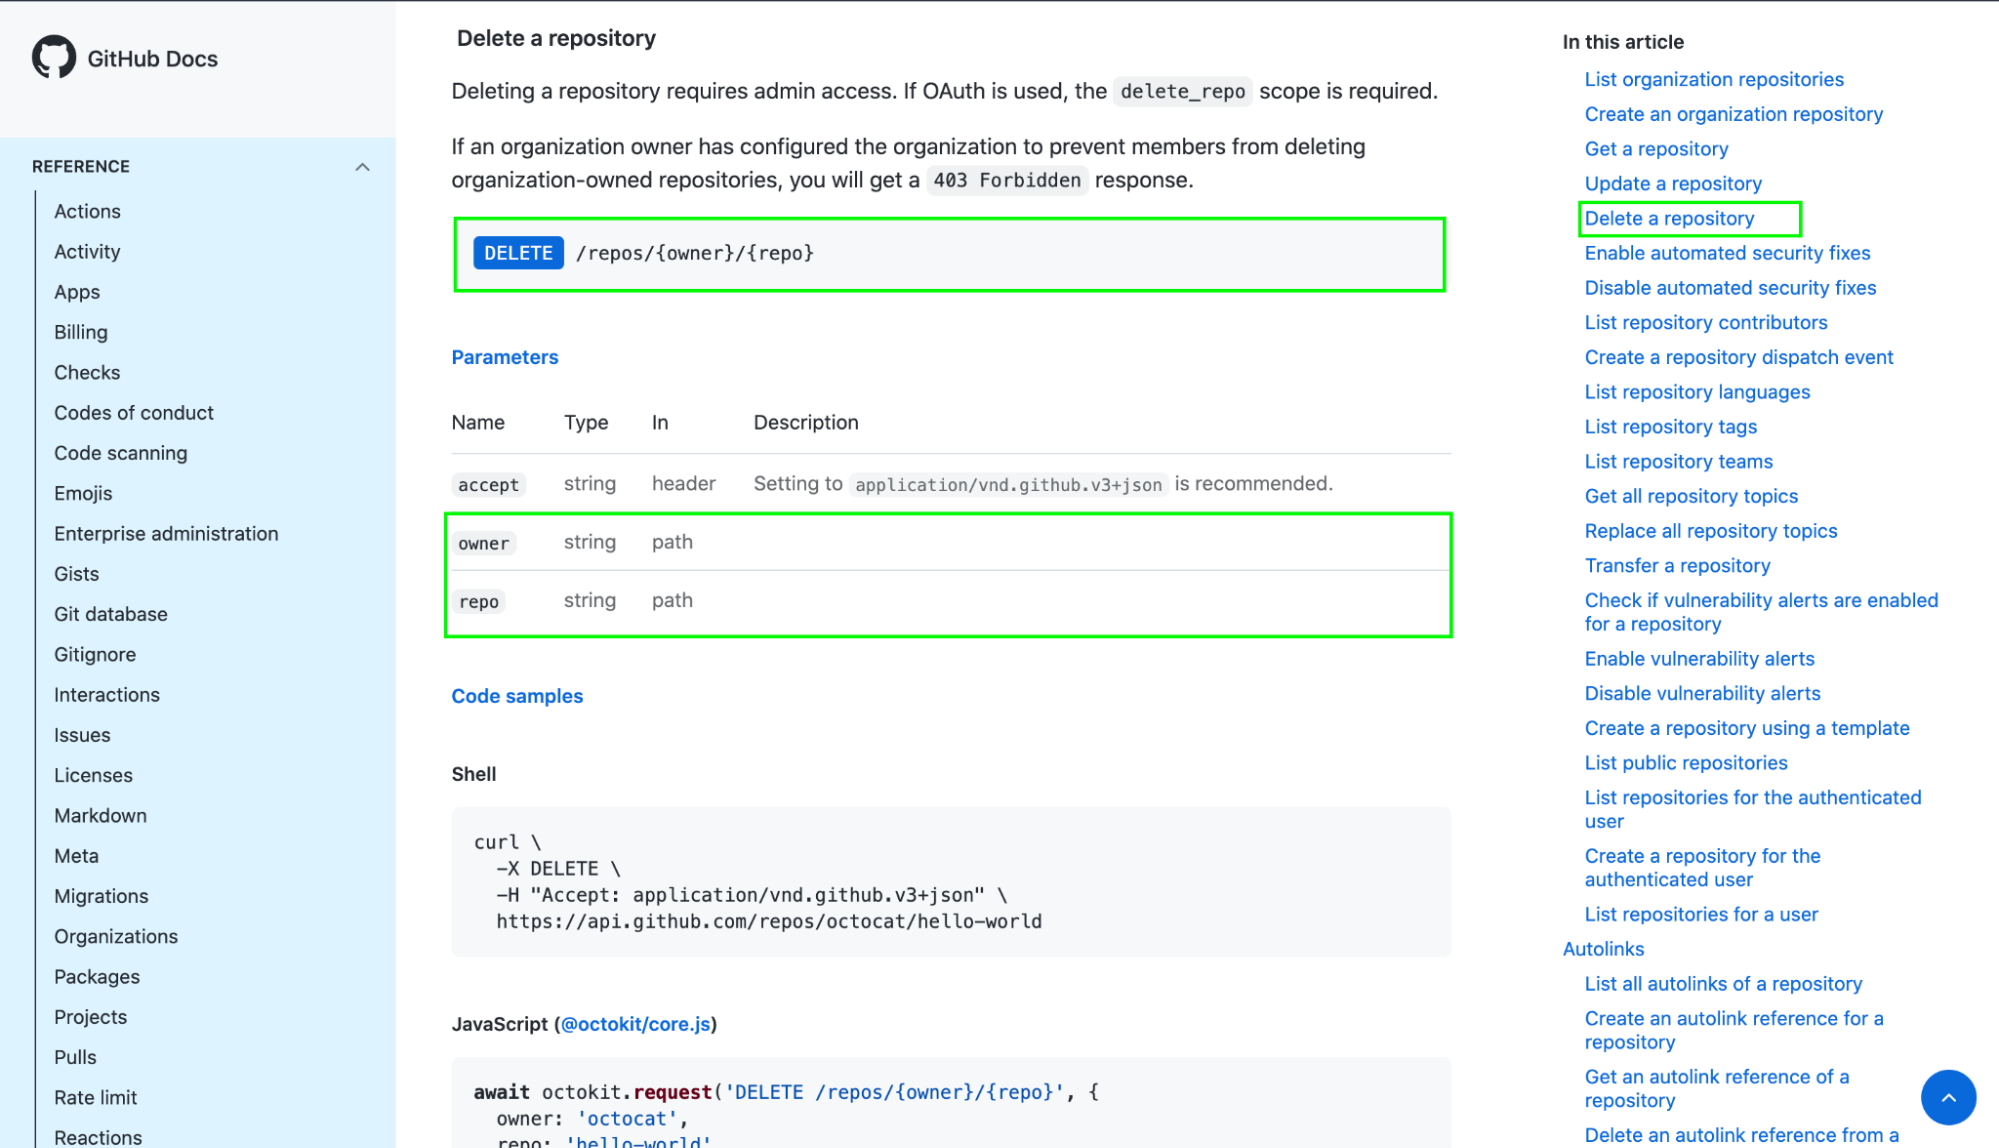
According to the documentation, you need to use the verb DELETE at the endpoint /repos/Owner/:repo to delete a GitHub repository. If the request is a success, you should get 204 No Content as your response. Let’s give it a go with Postman.
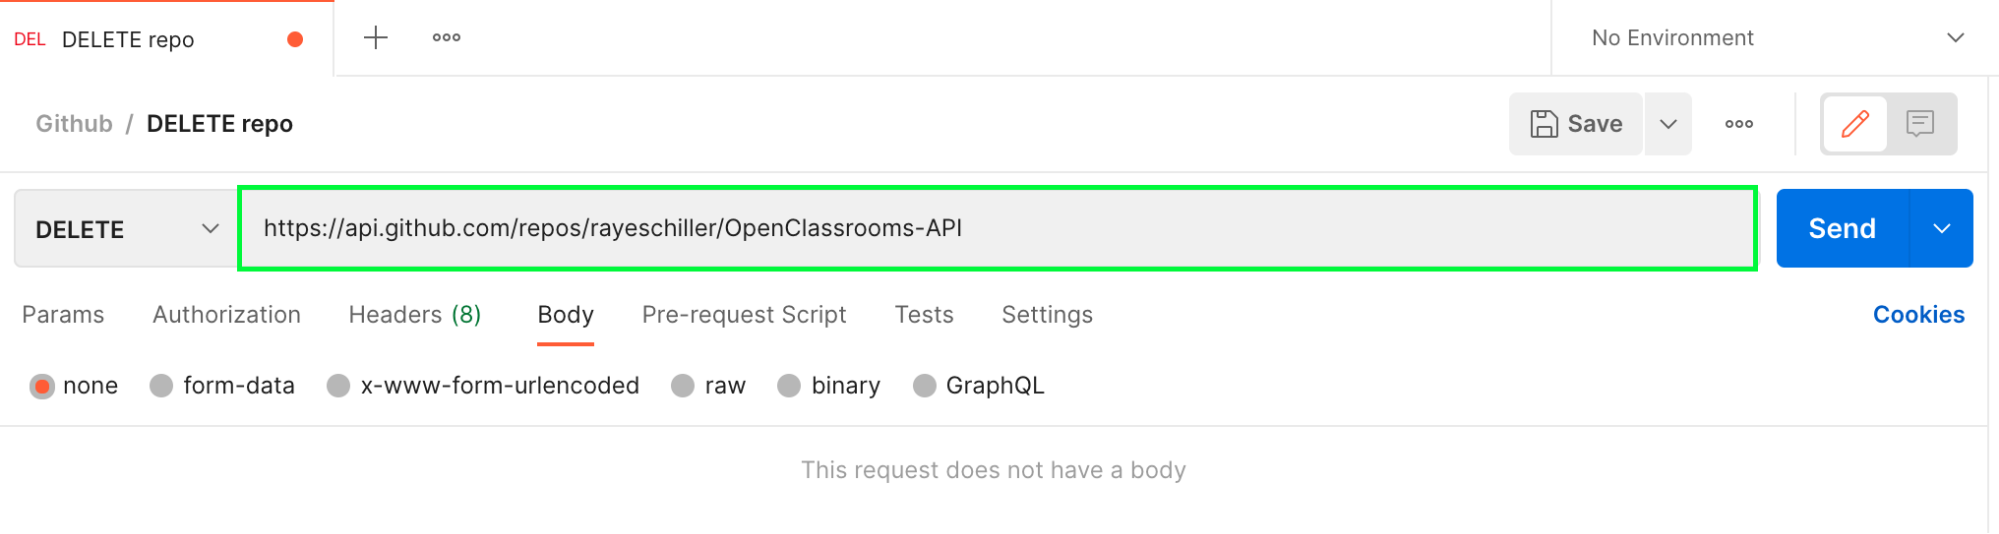
Type in the required information: your username and the name of the repo you want to delete. No need for any message body for DELETE – click on none. Then hit Send and see what response you get. 👇🏼
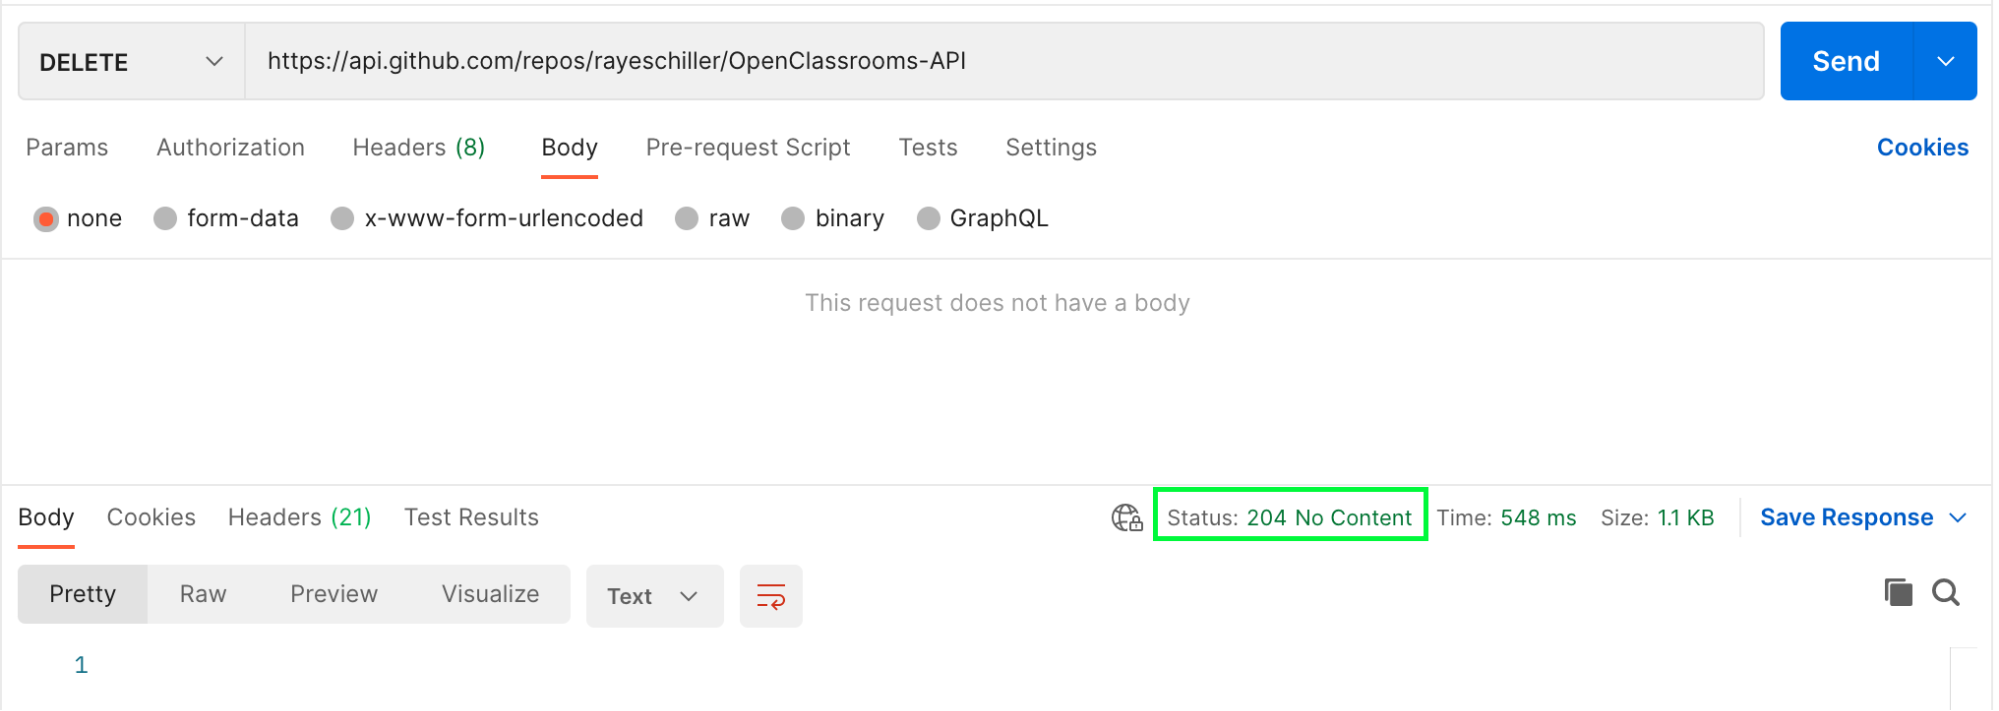
Ta-da! The repo has been obliterated! 🎉 There’s an empty message body and a 204 No Content status as described in the documentation.
Check whether your repo has been deleted on GitHub. 👇🏼
Now you've seen how POST, PUT, and DELETE work and used them yourself with the GitHub API and Postman. Congratulations! 👏
You used them in the context of a GitHub repository, but you can use these HTTP verbs for all different types of functionality depending on the API.
You saw that the correct URI is the same for Update in the GitHub documentation, but with a new HTTP verb: DELETE /repos/owner/:repo.
You saw that the repository is deleted and no longer there in the GitHub UI!
Here’s a video of how to do it:
Let’s Recap!
You can use POST to create new resources.
PUT or PATCH lets you update resources.
DELETE lets you delete resources!
In the next part, we’ll look at best practices when designing an API yourself! But first of all, it’s time to revise what you’ve learned with our end-of-part quiz!
