Work With Tabs

In this chapter, we’ll see how to handle tabs, which are also known as sheets.
What Is a Tab?
As soon as you open an Excel file, you’ll see one or more “sheets” appear along the bottom of the window. Depending on which version of Excel you're using, when you create a new file, this will create one or more tabs.
For example, here’s an Excel file with two tabs, which Excel names “Sheet1” and “Sheet2” by default. The name of Sheet2 is shown on a white background and Sheet1 is gray. This tells me that I am currently working on Sheet2.

Create and Delete Tabs
To create a tab, you just need to click on the  to the right of the last tab. You’ll then see a new tab that will be named automatically by Excel.
To delete a tab:
Place your cursor on the name of the tab.
Then, open the context menu.
Select Delete.
Rename Tabs
You can rename a tab anything you’d like—no need to stick to the default name!
All you need to do is double-click on the name of the tab and type in the name you want. You can also open the context menu with a right click and select Rename.
Also, Excel won’t let you use special characters in tab names.
Move Tabs
If you've created a number of tabs, it's important to show them in a logical order.
To move a tab, you just need to click on its name and drag it to where you want it to be (while holding down the mouse button).
Use Colored Tabs
If you have lots of tabs in your Excel file, it might be useful to highlight some of them. To do this, you can use colors.
So, in this example, changing the color of the “Total” tab to yellow makes it stand out:

To change the tab color:
Place your cursor on the name of the tab.
Open the context menu.
Click on Tab Color.
Select the color you'd like.
Hide Tabs
We saw in the chapter on columns that it can be useful to hide some data in a workbook. This is also true for tabs for the same reason: to maintain readability while retaining all of the information you’ve put into them.
To hide a tab:
Place your cursor on the name of the tab.
Open the context menu.
Select Hide.
To unhide a tab:
Place your cursor on the name of any tab.
Open the context menu.
Select Unhide.
Select the tab you want to unhide from the list of hidden tabs.
Copy Tabs
Copying tabs is really useful (and can save you a lot of time!). In our example workbook, you can test out this function by creating a “template” tab and copying it.
To copy a tab:
Place your cursor on the tab you’d like to copy.
Open the context menu.
Select Move or Copy. You’ll see the following dialog box:
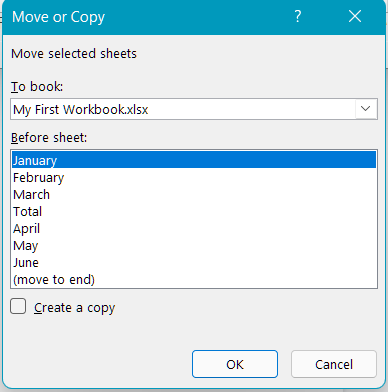
In this dialog box:
Select the destination workbook for the sheet. From here, Excel gives you the option to move or copy the sheet to a different Excel workbook if you’d like. To do this, use the drop-down menu to select the workbook where you’d like to move your tab.
Then, specify where inside the workbook you want to store the new sheet.
Finally, check the Create a copy box, unless you just want to move the sheet.
Watch the Video Tutorial!
Watch a step-by-step recap of everything described in this chapter in the tutorial below:
Let’s Recap!
An Excel file is called a workbook, and is made up of one or more worksheets.
Each worksheet appears as a tab on the bottom of the workbook.
You can easily move and copy the tabs using the context menu, where you can select the action you’d like to perform.
Now you know how to handle tabs. Well done! Let’s move on to the page layout for your file.
