Allow or Restrict Types of Data

Allowing or restricting certain types of data means that you can ensure that only certain types of data can be entered into a particular cell—or selection of cells—on your worksheet.
Why Allow or Restrict Types of Data?
Let’s look at an example! In our “Employee” file, we have a column for “Contract.” In this column, you might want the user to enter either “Contractor” or “Permanent.” However, some people might enter “Temp” or “Temporary” instead of “Contractor,” or even just misspell the words. There is a risk that different users will enter the data in different ways.
However, when using Excel’s really useful sorting and filtering features—by filtering your employees so that you only display Contractors, for example—you can see why users need to use the same method for entering data.
It’s the same for formulas. If you want to count the number of Permanent employees, it will be much easier if all the cells use the same value to indicate that the employee is permanent.
It’s much easier to restrict the data and only allow “Contractor” or “Permanent” to be entered.
How Do I Use This Feature?
To restrict data input into a cell:
Select the relevant cells.
Click on the Data tab.
In the Data Tools group, click on the Data Validation icon.
Specify your criteria in the dialog box that appears.
Let’s have a look at the different elements in this dialog box:
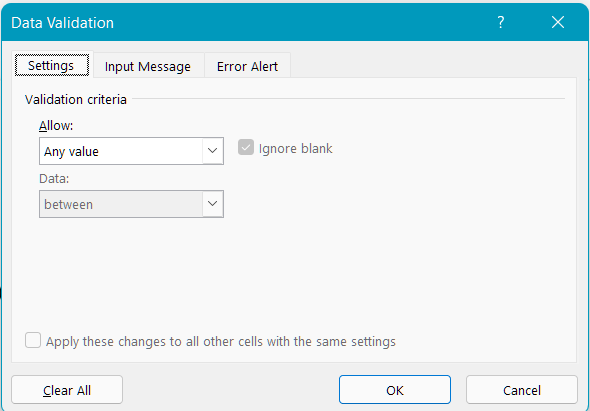
There are three tabs: Settings, Input Message and Error Alert.
In the Settings tab, we're going to specify the criteria we want to use to restrict the input. By default, “Any value” is selected, i.e., the user can enter whatever they like. By clicking on the little arrow to the right of “Any value,” you’ll see the different options for restricting input.
In our example, we want to limit the values entered to “Contractor” or “Permanent,” so we’ll choose “List” and then specify the list of allowed values.
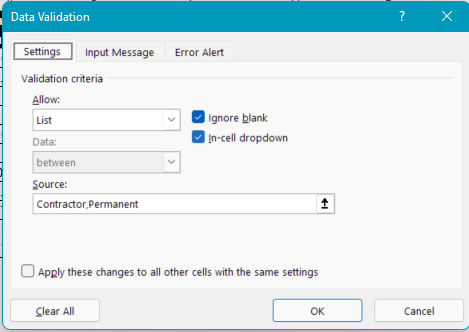
In the Source section, I’ve entered the two allowed values (“Contractor” and “Permanent”) separated by a comma.
For the other two tabs, Input Message and Error Alert:
Input Message gives you the option to pop up a message when the user is about to enter data in the cell. This is a really useful option for the user if the data entry is a bit complicated, but it’s not needed for simple scenarios.
Error Alert causes a message to appear if the user enters data that doesn't comply with your requirements. This feature allows you to block or allow input using an error message.
What happens from the user’s perspective?
Let’s put ourselves in the user’s shoes for the moment. They want to enter data in the Contract column, so let’s see what happens when they enter the data.
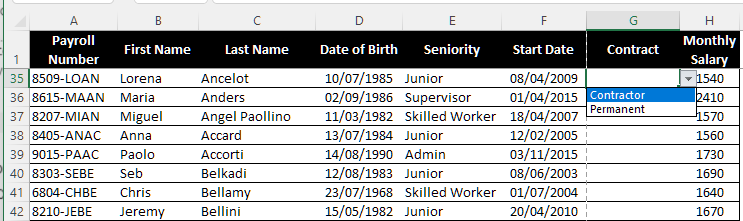
By clicking in cell G35, two things appear:
An arrow
A drop-down list containing the available values to choose from: “Contract” or “Permanent”
If I enter anything else, the pre-defined error message will appear.
And now you know how to allow or restrict certain data!
Watch the Video Tutorial
Watch a step-by-step recap of everything described in this chapter in the tutorial below:
Let’s Recap!
Data validation is useful for restricting the type of data or values that users can enter in a cell.
One of the most common ways of using data validation is to create a drop-down list.
You now know how to allow or prevent certain data values. Meet me in the next chapter where we’ll create some pivot tables!
