Discover the Importance of Prototyping in Web Development
Discover Prototyping
Prototyping is part of the design stage of your product and can take different forms—though it is usually a mock-up.
We’ve been talking about mock-ups since the start of the course, but what are they?
A mock-up is a full-size model of what you want to create, whether it’s a website, a computer program, or a mobile app—the possibilities are endless!
Think of mock-ups as a simulation of what your product will look like.
So what are we making a mock-up of here?
We’re going to create a mock-up of an interface, which is the part of a website users can interact with—i.e., the visible part of a website. However, the prototyping process includes several stages, each with its own characteristics.
The prototyping process involves creating:
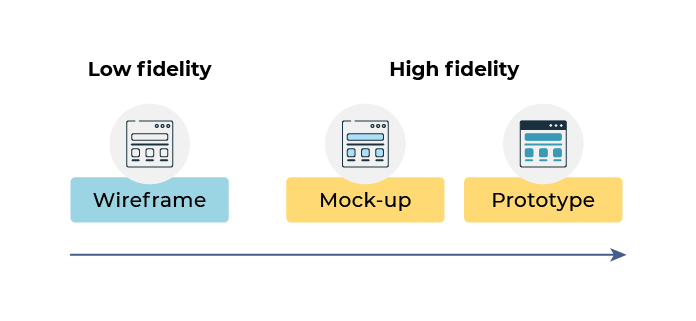
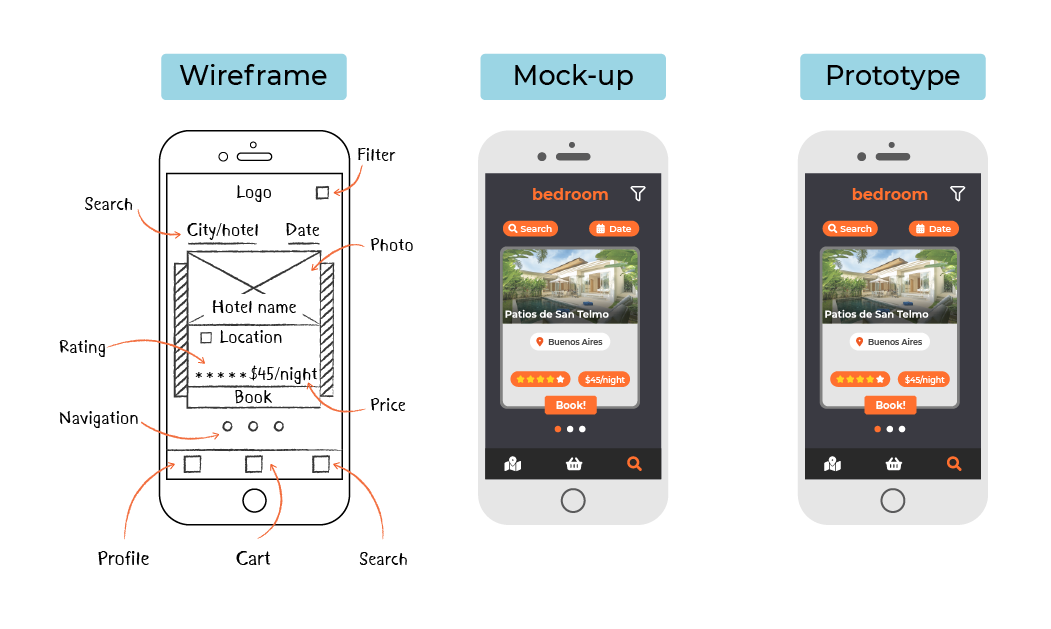
wireframes: these are a low-fidelity representation of your project. Whether drawn by hand or using software, wireframes represent the outline of a website, including the content to be displayed, the hierarchy of information, and a simple description of the intended interactions with the user.
mock-ups: these are a high-fidelity representation of the interface and its design. They are based on the outline drawn up in the wireframe, but go into more detail and add a visual dimension. Mock-ups are static—they represent the different screens of our website in full size, but don’t allow user interaction.
prototypes: these are high-fidelity representations that add a dynamic aspect. They enable user interaction, and therefore provide a simulation of the user experience (UX), by allowing the user to click on links leading to different screens, scroll through menus, etc.
OK, I can see the difference between a wireframe, a mock-up, and a prototype. But it must take ages to create all of that—wouldn’t it be quicker to just start coding?
Yes, it does take a while to create wireframes, mock-ups, and prototypes, but it’s well worth it—they’ll help you avoid all sorts of problems when you start coding!
Understand How Prototyping Helps Solve Problems
Prototyping provides some key advantages:
Prototypes are a tool for teamwork. Each stage (wireframe, mock-up, prototype) can be used by anyone, with any level of expertise, to discuss user needs. These discussions may be internal, between different professions, or external, for example with clients or future users.
They also allow reflection on both the practical and aesthetic aspects of a product, as they are equally important.
They are a good way of visualizing the work to be done and estimating the time (and therefore the budget) necessary to complete a project.
And finally, they save time, as prototypes don’t require you to code.
OK, but how does this work in a company? Who does what when you’re creating a mock-up?
Identify the Role of Each Profession in Prototyping
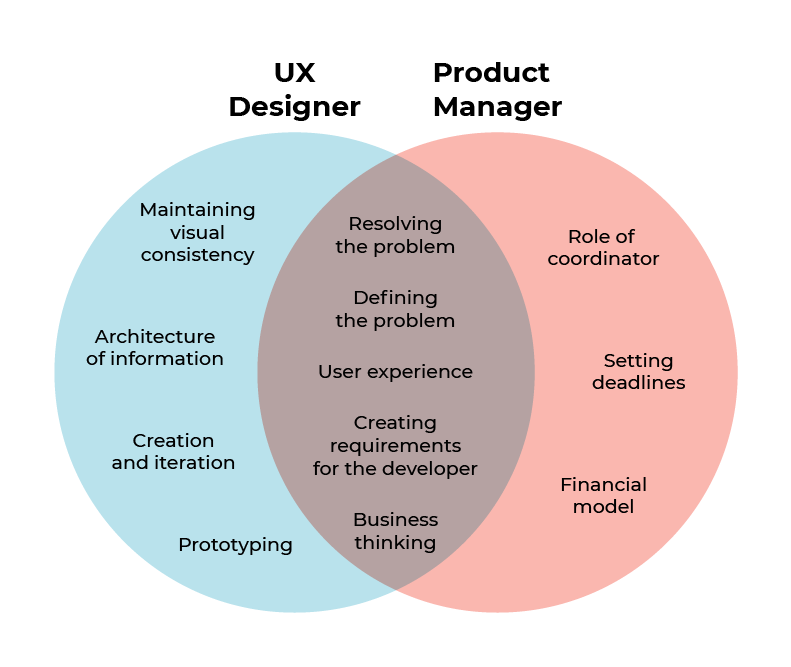
Imagine a company in which the different professions are very clearly defined. We’re only concerned here with the roles directly linked to the prototyping process, which include Product Managers (PM), UX Designers, and developers.
Here’s a diagram of the different professions involved at different stages:
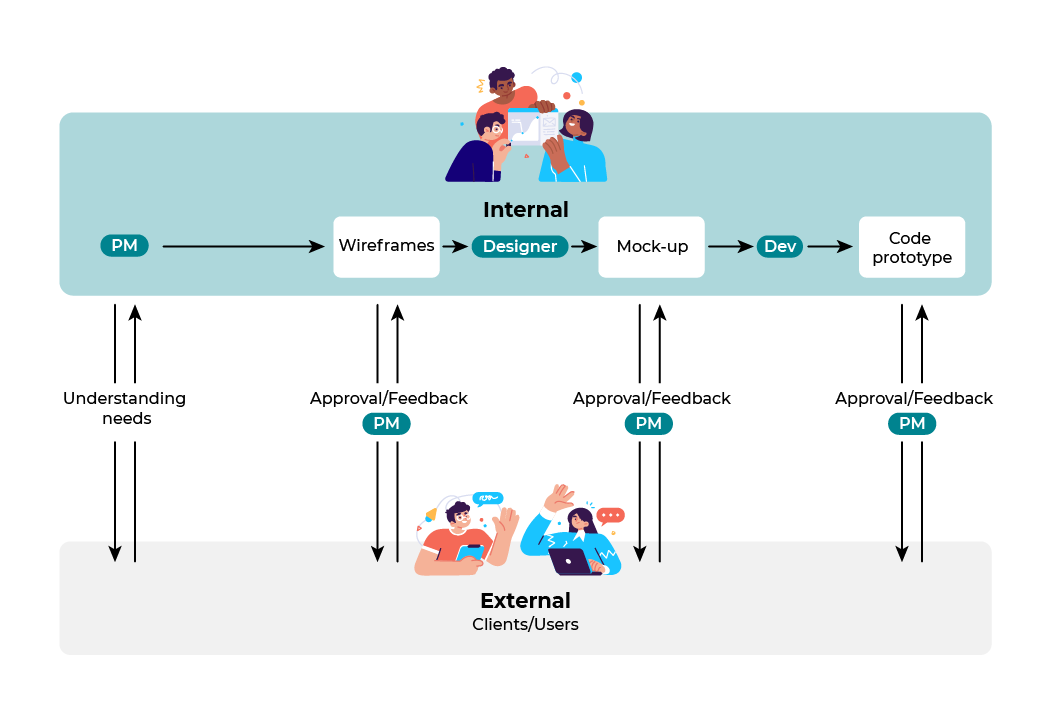
The Product Manager (PM) first discusses the product with users/clients to draw up a list of needs. This preliminary research phase can be carried out in conjunction with the UX Designer. Then, based on their understanding of the needs, they can create wireframes, which can be used to check with the users that their needs have been correctly understood.
The next stage is creating mock-ups. This is done by the designer, as these are visual tools. Based on the mock-up, the Product Manager then holds a new round of discussions with the users, taking a business-oriented approach, while the UX Designer focuses on the user experience.
Next, we get to the prototyping stage, which is also managed by the UX Designer, with input from the Product Manager. The prototype gives rise to a new phase of discussion and approval from users/clients and helps highlight areas to be developed further.
Only at this point can the developers start to plan the development process, agree on it with the Product team, and get coding. 💪👩💻
Discover How Developers Work Together With the Product Team
In the interview below, UX/UI designer Brian Lanier explains the prototyping process and how he works with developers:
Use the Prototyping Process Before Starting Development
OK, that’s all well and good, but why should I learn about prototyping when I’m a developer?
For several reasons!
Firstly, understanding what your colleagues do is a recipe for great teamwork! If you know the basics of the prototyping process, you’ll be able to communicate with designers, integrate mock-ups more easily, and also gain independence—if you need to make a small change, for example.
And secondly, because you won’t always be in a well-structured team. Sometimes, you might develop projects on your own—personal projects just for fun, experiments with new technology, or paid projects. Although you won’t be stealing experienced designers’ jobs any time soon, handling the design aspect of smaller projects is certainly within your capabilities! Then, it will be up to you to be disciplined about using the prototyping process, including when you want to add new features.
Over to You!

We’ve covered quite a lot of concepts here. Let’s see if you’ve understood the difference between wireframes, mock-ups, and prototypes. In this document, you’ll find images corresponding to each of the 3 options. Note directly on the document, on paper, or in a separate text editor, whether they’re:
A. a wireframe
or
B. a mock-up.
The answers are in the screencast just below: 👇
Let’s Recap!
A mock-up is a full-size model of the interface you want to create, whether it be a website, a program, a mobile app, or anything else!
The prototyping process can involve creating the following:
A wireframe that represents the outline of your website, without the design element (low-fidelity).
A mock-up is a high-fidelity representation of the product.
A prototype is a high-fidelity representation that allows user interaction (by clicking buttons, for example).
The advantages of using the prototyping process before creating a product are:
Better teamwork
Equal emphasis on the aesthetic and practical aspect
Saves time for developers
Hopefully, the prototyping process should be starting to make sense to you by now. We’re going to get hands-on in the next chapter, and create our first wireframes. See you in the next chapter! 🚀
