Manage Your Files Using PowerShell
In this chapter, we’re going to see how to manage files using PowerShell. Don’t worry, we’re using a Windows Server with a graphical user interface, so we won’t need to run any MS-DOS commands. However, we will need to understand some file management commands, as we need to bear in mind the objective of this course, which is to create PowerShell scripts to automate tasks.
Manage Your Files and Folders With Ease Using PowerShell
Learn to Navigate Around the File System Using PowerShell
Start up your server, launch PowerShell and you should end up in the default user directory: C:\Users\Administrator. Of course, if you’d logged in as a different user, you’d be in their user directory by default. If we want to know exactly where we are, we can use the command Get-Location :
PS C:\Users\Administrator> Get-Location
Path
----
C:\Users\Administrator
Great, we can see that we’re in the right directory. This is the same as the pwd command in Linux (or Unix).
To display the contents of a folder, use the command Get-ChildItem :
PS C:\Users\Administrator> Get-ChildItem


 Directory: C:\Users\Administrator


Mode           LastWriteTime    Length Name
----           -------------    ------ ----
d-r---      28/06/2019 11:59           3D Objects
d-r---      28/06/2019 11:59           Contacts
d-r---      07/07/2019 17:59           Desktop
d-r---      28/06/2019 11:59           Documents
d-r---      28/06/2019 11:59           Downloads
d-r---      28/06/2019 11:59           Favorites
d-r---      28/06/2019 11:59           Links
d-r---      28/06/2019 11:59           Music
d-r---      28/06/2019 11:59           Pictures
d-r---      28/06/2019 11:59           Saved Games
d-r---      28/06/2019 11:59           Searches
d-r---      28/06/2019 11:59           Videos
For those of you who have used DOS, this is the same as the dir command which can also be used here.
PS C:\Users\Administrator> dir


 Directory: C:\Users\Administrator


Mode           LastWriteTime    Length Name
----           -------------    ------ ----
d-r---      28/06/2019 11:59           3D Objects
d-r---      28/06/2019 11:59           Contacts
d-r---      07/07/2019 17:59           Desktop
d-r---      28/06/2019 11:59           Documents
d-r---      28/06/2019 11:59           Downloads
d-r---      28/06/2019 11:59           Favorites
d-r---      28/06/2019 11:59           Links
d-r---      28/06/2019 11:59           Music
d-r---      28/06/2019 11:59           Pictures
d-r---      28/06/2019 11:59           Saved Games
d-r---      28/06/2019 11:59           Searches
d-r---      28/06/2019 11:59           Videos
Okay, I promise I’m not going to talk about MS-DOS commands anymore! We need to move with the times, so let’s just use PowerShell from now on!
Right, we’re going to create a backup directory called SAVE in our user folder, so let’s use the New-Item command:
PS C:\Users\Administrator> New-Item -Name "SAVE" -ItemType Directory


 Directory: C:\Users\Administrator


Mode           LastWriteTime    Length Name
----           -------------    ------ ----
d-----      17/09/2019 10:38           SAVE
Now, if we display the contents of our current directory, we’ll see that the SAVE folder has been created.
We can also use the New-Item command to create a text file called users.txt by entering:
PS C:\Users\Administrator> New-Item -Name "users.txt" -ItemType File
In addition, we can use this command to create a text file called groups.txt and add some text to it, by entering:
PS C:\Users\Administrator> New-Item -Name "groups.txt" -ItemType File -Value "Here is the list of groups"
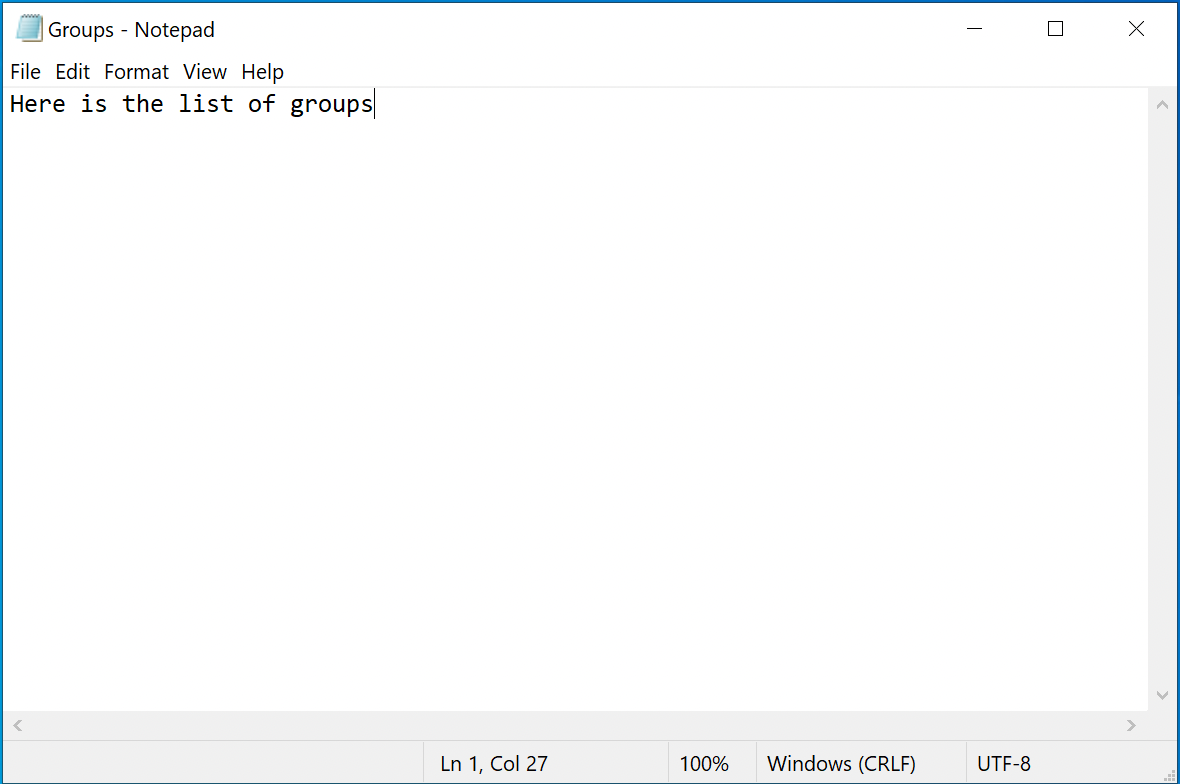
To display the contents of the text file, enter the following command:
PS C:\Users\Administrator> notepad.exe groups.txt
Process Your Files Using PowerShell
We’re going to copy our users.txt file into our SAVE directory by entering the following command:
PS C:\Users\Administrator> Copy-Item -Path users.txt -Destination SAVE
If we now look at the contents of SAVE, we’ll see that our users.txt file has indeed been copied over.
PS C:\Users\Administrator> Get-ChildItem SAVE


 Directory: C:\Users\Administrator\SAVE


Mode           LastWriteTime    Length Name
----           -------------    ------ ----
-a----      06/07/2019 15:35         0 users.txt
You can see that I used the Get-ChildItem command with a parameter (SAVE) to display the contents of the SAVE directory without actually having to move to the SAVE directory. By using parameters with your PowerShell commands, you can often save time.
Which is great! And now, if I want to move the groups.txt file, I can use the following command:
PS C:\Users\Administrator> Move-Item -Path C:\Users\Administrator\groups.txt -Destination C:\Users\Administrator\SAVE
Let’s check the contents of our two directories and we’ll see that groups.txt has been moved.
PS C:\Users\Administrator> Get-ChildItem


 Directory: C:\Users\Administrator


Mode           LastWriteTime    Length Name
----           -------------    ------ ----
d-r---      28/06/2019 11:59           3D Objects
d-r---      28/06/2019 11:59           Contacts
d-r---      07/07/2019 17:59           Desktop
d-r---      28/06/2019 11:59           Documents
d-r---      28/06/2019 11:59           Downloads
d-r---      28/06/2019 11:59           Favorites
d-r---      28/06/2019 11:59           Links
d-r---      28/06/2019 11:59           Music
d-r---      28/06/2019 11:59           Pictures
d-r---      28/06/2019 11:59           Saved Games
d-r---      28/06/2019 11:59           Searches
d-r---      28/06/2019 11:59           Videos
-a----      06/07/2019 15:35         0 users.txt

PS C:\Users\Administrator> Get-ChildItem SAVE


 Directory : C:\Users\Administrator\SAVE


Mode           LastWriteTime    Length Name
----           -------------    ------ ----
-a----      06/07/2019 15:37        26 groups.txt
-a----      06/07/2019 15:35         0 users.txt
If you look more closely, I moved the groups.txt file using a different method than when I copied the users.txt file. We used what’s known as a relative path to copy the users.txt file, meaning that we didn’t use the backslash. If I use the absolute path (backslash before the path), I need to enter the full path to the destination file/folder, and that’s what I just did when I moved the groups.txt file.
You need to understand these two types of move commands because although it’s quicker to use relative paths, this can lead to errors. So, it’s better to use absolute paths. And remember, you can use autocomplete to save time and prevent keying errors.
We can also rename our users.txt file in our SAVE directory to users_save.txt by entering the following command:
PS C:\Users\Administrator> Rename-Item -Path C:\Users\Administrator\SAVE\users.txt -NewName C:\Users\Administrator\SAVE\users_save.txt
We can see that our users.txt file has been renamed to users_save.txt:
PS C:\Users\Administrator> Get-ChildItem SAVE


 Directory: C:\Users\Administrator\SAVE


Mode           LastWriteTime Length Name
----           ------------- ------ ----
-a----      06/07/2019 15:37     26 groups.txt
-a----      06/07/2019 15:35      0 users_save.txt
Okay, so what if I wanted to create a sub-folder called OU (Organizational Unit) within SAVE? How would I do that? Well, I can use the New-Item command, as follows:
PS C:\Users\Administrator> New-Item -Path C:\Users\Administrator\SAVE\OU -ItemType Directory


 Directory: C:\Users\Administrator\SAVE


Mode           LastWriteTime Length Name
----           ------------- ------ ----
d-----      17/09/2019 10:45        OU

PS C:\Users\Administrator> Get-ChildItem C:\Users\Administrator\SAVE


 Directory: C:\Users\Administrator\SAVE


Mode           LastWriteTime Length Name
----           ------------- ------ ----
d-----      17/09/2019 10:45        OU
-a----      06/07/2019 15:37     26 groups.txt
-a----      06/07/2019 15:35      0 users_save.txt
Now we’re going to copy the contents from our personal SAVE folder into another folder called BACKUP, which will be in the root of the hard drive.
Okay, firstly, let’s create a BACKUP folder in the root directory by entering:
PS C:\Users\Administrator> New-Item -Path "C:\BACKUP" -ItemType Directory


 Directory: C:\


Mode           LastWriteTime Length Name
----           ------------- ------ ----
d-----      17/09/2019 10:46        BACKUP
And there it is:
PS C:\Users\Administrator> Get-ChildItem C:\


 Directory: C:\


Mode           LastWriteTime Length Name
----           ------------- ------ ----
d-----      15/09/2018 09:19        PerfLogs
d-r---      06/07/2019 19:27        Program Files
d-----      15/09/2018 18:38        Program Files (x86)
d-----      17/09/2019 10:46        BACKUP
d-r---      17/09/2019 10:35        Users
d-----      17/09/2019 10:30        Windows
Right, now we’re going to copy the contents from our SAVE directory in the Administrator user folder to the BACKUP folder, as follows:
PS C:\Users\Administrator> Copy-Item -Path C:\Users\Administrator\SAVE\ -Destination C:\BACKUP\ -Recurse
PS C:\Users\Administrator> Get-ChildItem C:\BACKUP


 Directory: C:\BACKUP


Mode           LastWriteTime Length Name
----           ------------- ------ ----
 d-----     17/09/2019 10:47        SAVE
We can see here that the SAVE folder has been copied to the BACKUP folder. And when we check the contents of the SAVE folder within the BACKUP folder, as follows...
PS C:\Users\Administrator> Get-ChildItem C:\BACKUP\SAVE


 Directory: C:\BACKUP\SAVE


Mode           LastWriteTime Length Name
----           ------------- ------ ----
d-----      17/09/2019 10:47        OU
-a----      06/07/2019 15:37     26 groups.txt
-a----      06/07/2019 15:35      0 users_save.txt
… we can see that the -Recurse parameter enabled us to copy the files and sub-folders, which is really handy when you’re backing up folders and sub-folders.
However, while this command has copied the contents of the SAVE folder from the Administrator personal directory into BACKUP, I didn’t really want it to recreate the SAVE folder within C:\BACKUP.
So, let’s delete the BACKUP folder by entering the following command followed by A to delete all:
PS C:\Users\Administrator> Remove-Item C:\BACKUP\

Confirm
The item at C:\BACKUP has children and the Recurse parameter
was not specified.
If you continue, all children will be removed with the item.
Are you sure you want to continue?
[Y] Yes [A] Yes to All [N] No [L] No to All [S] Suspend [?] Help
(default is "Y"): A
Let’s check that the BACKUP folder has actually been deleted.
PS C:\Users\Administrator> Get-ChildItem C:\


 Directory: C:\


Mode           LastWriteTime Length Name
----           ------------- ------ ----
d-----      15/09/2018 09:19        PerfLogs
d-r---      06/07/2019 19:27        Program Files
d-----      15/09/2018 18:38        Program Files (x86)
d-r---      17/09/2019 10:35        Users
d-----      17/09/2019 10:30        Windows
Right, so now we’re going to copy our SAVE directory from the Administrator user folder into the BACKUP folder by entering the following command, and this time it won’t recreate the SAVE directory:
PS C:\Users\Administrator> Copy-Item -Path C:\Users\Administrator\SAVE\ -Destination C:\BACKUP\ -Recurse
And now, let’s check the contents of the BACKUP folder:
PS C:\Users\Administrator> Get-ChildItem C:\BACKUP


 Directory: C:\BACKUP


Mode           LastWriteTime Length Name
----           ------------- ------ ----
d-----      17/09/2019 10:57        OU
-a----      06/07/2019 15:37     26 groups.txt
-a----      06/07/2019 15:35      0 users_save.txt
Excellent! We’ve successfully copied the contents of our Administrator user folder to the BACKUP folder.
Share Files Using PowerShell
Create Shared Folders Using PowerShell
Now we’re going to see how to create a shared folder using PowerShell. We’ll need to do it in the same way as we do using the graphical user interface, in three steps:
Create a standard folder
Create the share
Configure the sharing permissions
We’re going to share the BACKUP folder we created earlier, using the following command:
PS C:\Users\Administrator> New-SmbShare -Name Backup -Path C:\BACKUP -FullAccess Administrators

Name       ScopeName Path          Description
----       --------- ----          -----------
Backup     *         C:\BACKUP
This command shares the C:\BACKUP folder by creating a share called Backup and giving full control to the Administrators group.
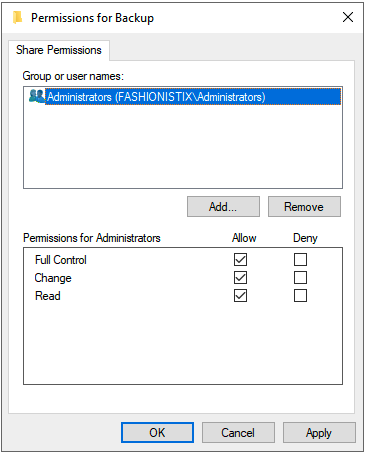
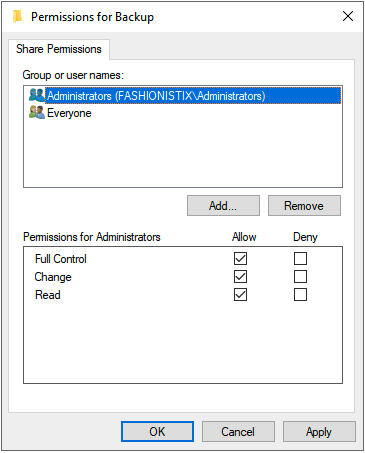
I can now go to Windows Explorer and check that my folder has been shared successfully:
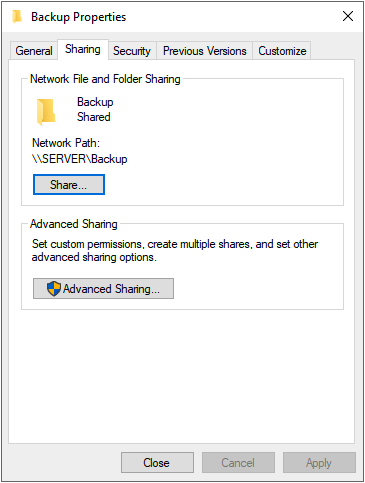
I’ll look at the Sharing tab:
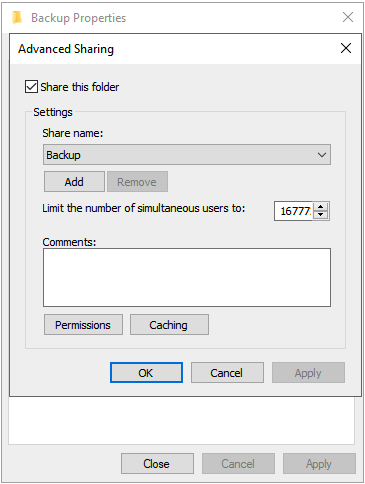
And the Permissions section:
Manage Sharing Permissions With PowerShell
We can change the sharing permissions by adding read permissions to Everyone, using the following command:
PS C:\Users\Administrator> Grant-SmbShareAccess -Name Backup -AccountName Everyone -AccessRight Read
The options for permissions (AccessRight) are:
Full: total control
Change: modify
Read: read only
Custom: personalized access
Click on A for Yes to all. The new folder permissions will be displayed.
PS C:\Users\Administrator> Grant-SmbShareAccess -Name Backup -AccountName "Everyone" -AccessRight Read

Confirm
Are you sure you want to perform this action?
Performing operation "Modify" on Target "Backup"
[Y] Yes [A] Yes to All [N] No [L] No to All [S] Suspend [?] Help
(default is "Y"): A

Name      ScopeName AccountName             AccessControlType AccessRight
----      --------- -----------             ----------------- -----------
Backup *            BUILTIN\Administrators  Allow             Full
Backup *            Everyone                Allow             Read
We can view these in a more visual way:
But we can also view the share name and permissions using the following PowerShell command:
PS C:\Users\Administrator> Get-SmbShareAccess -Name Backup

Confirm
Are you sure you want to perform this action?
Performing operation "Modify" on Target "Backup"
[Y] Yes [A] Yes to All [N] No [L] No to All [S] Suspend [?] Help
(default is "Y"): A

Name       ScopeName AccountName             AccessControlType AccessRight
----       --------- -----------             ----------------- -----------
Backup *             BUILTIN\Administrators  Allow             Full
Backup *             Everyone                Allow             Read
We can also view the security permissions for the C:\BACKUP folder by entering the following command:
PS C:\Users\Administrator> Get-Acl C:\BACKUP| fl


Path   : Microsoft.PowerShell.Core\FileSystem::C:\BACKUP
Owner  : BUILTIN\Administrators
Group  : Fashionistix\Domain users
Access : ACCESS NT\System Allow FullControl
         BUILTIN\Administrators Allow FullControl
         BUILTIN\Users Allow ReadAndExecute, Synchronize
         BUILTIN\Users Allow AppendData
         BUILTIN\Users Allow CreateFiles
         CREATOR OWNER Allow 268435456
Audit  :
Sddl   : O:BAG:DUD:AI(A;OICIID;FA;;;SY)(A;OICIID;FA;;;BA)(A;OICIID;0x1200a9;;;BU)(A;CIID;LC;;;BU)(A;CIID;DC;;;BU)(A;OICIIOID;GA;;;CO)
We’re not going to learn how to use PowerShell to change security permissions in this course.
Display the Contents of Your Shared Folders Using PowerShell
Okay, that’s all good, but now I’ve created my shared folder, what am I going to do with it?
We can already check the contents of our Backup shared folder using this method (the name of my server is Server, but if yours is different, change the command accordingly or rename your server):
PS C:\Users\Administrator> Get-ChildItem \\Server\Backup


 Directory: \\Server\Backup


Mode           LastWriteTime Length Name
----           ------------- ------ ----
d-----      17/09/2019 10:57        OU
-a----      06/07/2019 15:37     26 groups.txt
-a----      06/07/2019 15:35      0 users_save.txt
If you use the parameter -Force with Get-ChildItem , this will also display hidden files. Why don’t you give that a try?
Great, so there are lots of options. Now I can use the PowerShell commands we’ve already seen to move and copy files and folders to a shared directory. And this is great, because the whole purpose of this course is to create backup scripts using PowerShell!
In the next chapter, we’re going to see how to create scripts in PowerShell.
Let’s Recap!
In this chapter, we’ve seen:
the
Get-Locationcommand, which tells us which folder we’re currently in.the
Get-ChildItemcommand, which lists the contents of a directory.the
New-Itemcommand, which is used to create directories and text files with or without data.the command used to copy files or directories:
Copy-Item.the command used to move files or directories:
Move-Item.the command used to delete files or directories:
Remove-Item.the command used to rename files or directories:
Rename-Item.the
New-SmbSharecommand, used to create a folder share.the
Grant-SmbShareAccess, which adds access permissions to users or groups for a shared directory.
In the next chapter, we’re going to see how to create scripts in PowerShell.
