Automate Active Directory Configuration Using PowerShell
So, now we’ve reached the nitty-gritty: scripts! In this chapter, we’re going to create an Active Directory user using PowerShell and then we’ll use scripts to automate this task. Let’s get started.
Create and Enable a User Using PowerShell
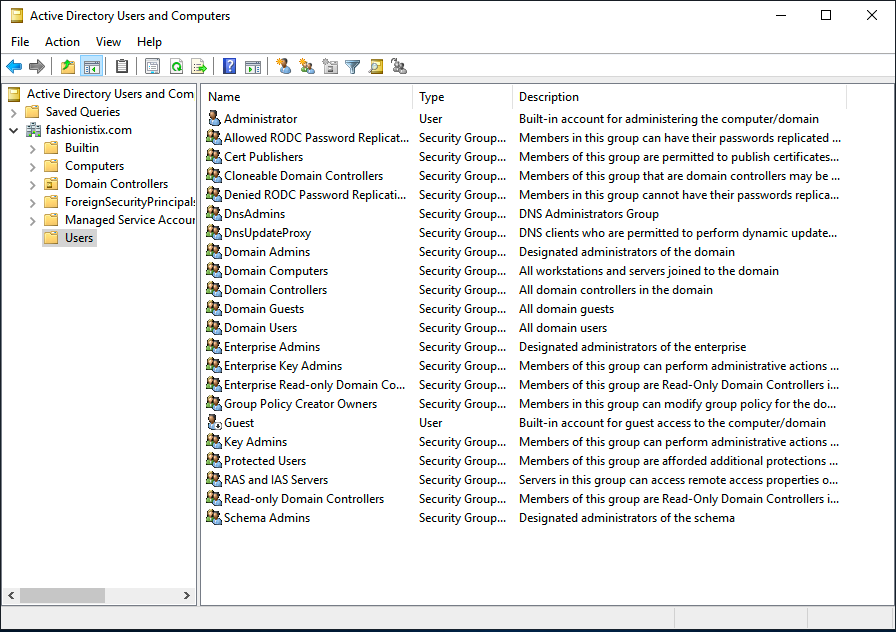
Take a look at the Users OU in Active Directory Users and Computers:
The New-ADUser command will create a user in PowerShell. Here’s an example of a user being created with the following attributes:
Login: lombard
Name: Joel Lombard
Mail: lombard@fashionistix.com
Password: Pwd4862
Password will never expire
Password cannot be changed
New-ADUser -Name "Joel Lombard" -SamAccountName lombard -UserPrincipalName "lombard@fashionistix.com" -AccountPassword (ConvertTo-SecureString -AsPlainText Pwd4862 -Force) -PasswordNeverExpires $true -CannotChangePassword $true
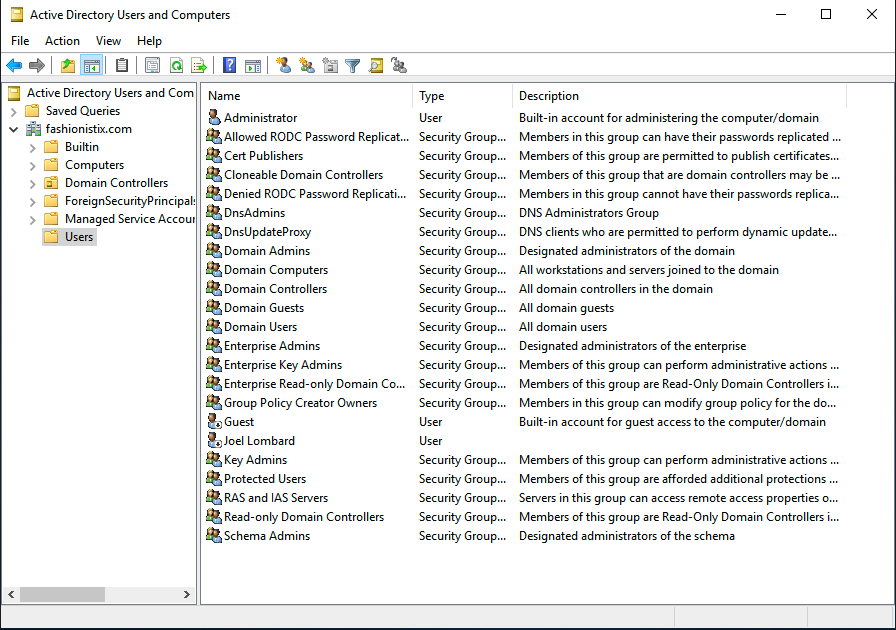
Great, I’ve created my first user with PowerShell and it’s been created in the Users organizational unit:
Oh no! He’s not enabled! You can tell from the downward arrow next to his profile icon.
It’s not a problem. We can enable the account by entering the following PowerShell command:
PS C:\Users\Administrator> Enable-ADAccount lombard
My user is now enabled! I can tell because there’s no longer a downward arrow next to his profile.

Okay, that’s all good, but actually I’d like to create a number of users in my domain as quickly as possible. So, I’ve created the list of users. Here they are:
User | Login | Password |
Joel Lombard | lombard | Pwd4862 |
Luke White | luke | Pwd2910 |
Vincent Tap | vincent | Pwd8744 |
Christine Deacon | christine | Pwd9911 |
Arnie Green | arnie | Pwd2565 |
Karen Tucker | karen | Pwd9718 |
Michael Fry | michael | Pwd0096 |
Even though the command for creating users is pretty simple, I’m concerned about keying errors, so I’m going to automate the process, which means I need to create my very first script. Let’s go!
Create a PowerShell Script For User Creation
Let’s get started. We’re just going to use what we’ve seen before, nothing new. So, let’s create a short script to perform the following actions:
1. Get the user’s name and surname:
$name = Read-Host "Please enter the first name and surname of the new user"
2. Get the user’s login ID:
$login = Read-Host "Please enter the login name for the new user"
3. Get the user’s password:
$pwd = Read-Host "Please enter the password for the new user"
4. Create the user:
New-ADUser -Name $name -SamAccountName $login -UserPrincipalName $login@fashionistix.com -AccountPassword (ConvertTo-SecureString -AsPlainText $pwd -Force) -PasswordNeverExpires $true -CannotChangePassword $true -Enabled $true
Okay, fine. But how do I actually create the script? 🤔
You can do this in Notepad by saving the file as script_user.ps1. Open Notepad by running the Notepad.exe command.
# Contents of script_user.ps1

$name = Read-Host "Please enter the first name and surname of the new user"

$login = Read-Host "Please enter the login name for the new user"

$pwd = Read-Host "Please enter the password for the new user"

New-ADUser -Name $name -SamAccountName $login -UserPrincipalName $login@fashionistix.com -AccountPassword (ConvertTo-SecureString -AsPlainText $pwd -Force) -PasswordNeverExpires $true -CannotChangePassword $true -Enabled $true
We can see that our script has been successfully created and we can see its size in bytes:
-a---- 06/07/2019 20:53 451 script_user.ps1
Next, we can run the script using the command powershell .\script_user.ps1 .
The script will ask us to enter each data item for each user that you want to create. Enter them using the list above. It should look something like this:
PS C:\Users\Administrator> powershell .\script_user.ps1
Please enter the first name and surname of the new user: Luke White
Please enter the login name for the new user: luke
Please enter the password for the new user: Pwd2910

PS C:\Users\Administrator> .\script_user.ps1
Please enter the first name and surname of the new user: Vincent Tap
Please enter the login name for the new user: vincent
Please enter the password for the new user: Pwd8744

PS C:\Users\Administrator> .\script_user.ps1
Please enter the first name and surname of the new user: Christine Deacon
Please enter the login name for the new user: christine
Please enter the password for the new user: Pwd9911

PS C:\Users\Administrator> .\script_user.ps1
Please enter the first name and surname of the new user: Arnie Green
Please enter the login name for the new user: arnie
Please enter the password for the new user: Pwd2565

PS C:\Users\Administrator> .\script_user.ps1
Please enter the first name and surname of the new user: Karen Tucker
Please enter the login name for the new user: karen
Please enter the password for the new user: Pwd9718

PS C:\Users\Administrator> .\script_user.ps1
Please enter the first name and surname of the new user: Michael Fry
Please enter the login name for the new user: michael
Please enter the password for the new user: Pwd0096
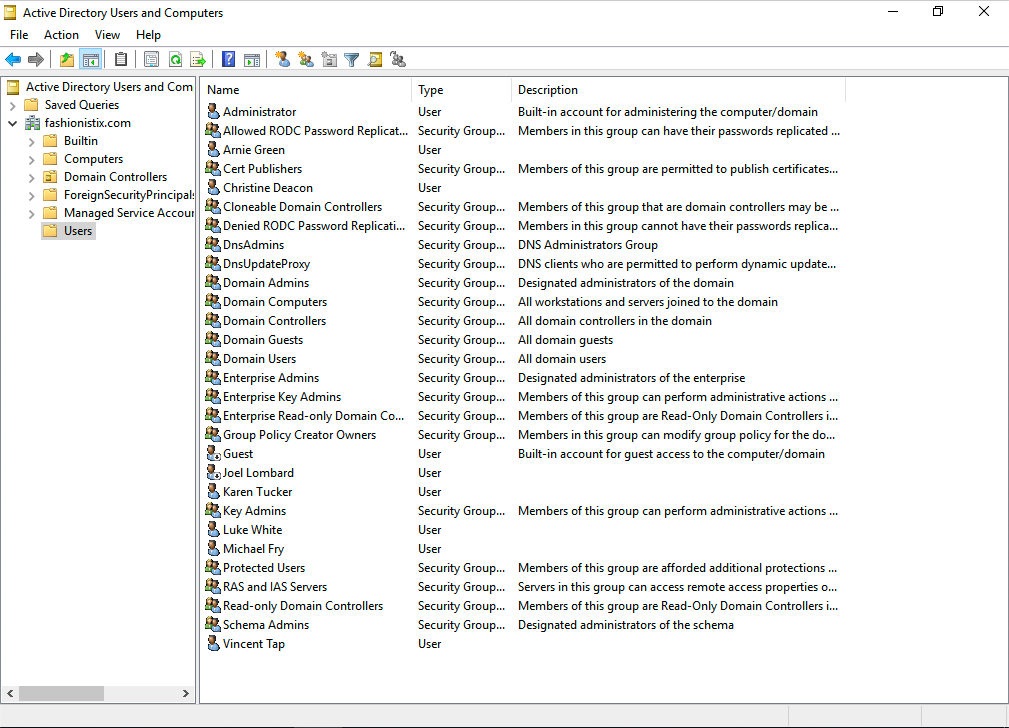
So now your Active Directory should look like this:
We can use a PowerShell command to display the users we created using either Get-ADUser -Filter * or Get-ADUser -Filter * | select samAccountName .
PS C:\Users\Administrator> Get-ADUser -Filter * | select samAccountName

samAccountName
--------------
Administrator
Guest
krbtgt
lombard
vincent
christine
arnie
karen
michael
luke
We can use other parameters, such as -Filter as follows:
PS C:\Users\Administrator> Get-ADUser -Filter * | select Name, samAccountName, UserPrincipalName

Name             samAccountName UserPrincipalName
----             -------------- -----------------
Administrator    Administrator
Guest            Guest
krbtgt           krbtgt
Joel Lombard     lombard        lombard@fashionistix.com
Luke White       luke           luke@fashionistix.com
Vincent Tap      vincent        vincent@fashionistix.com
Christine Deacon christine      christine@fashionistix.com
Arnie Green      arnie          arnie@fashionistix.com
Karen Tucker     karen          karen@fashionistix.com
Michael Fry      michael        michael@fashionistix.com
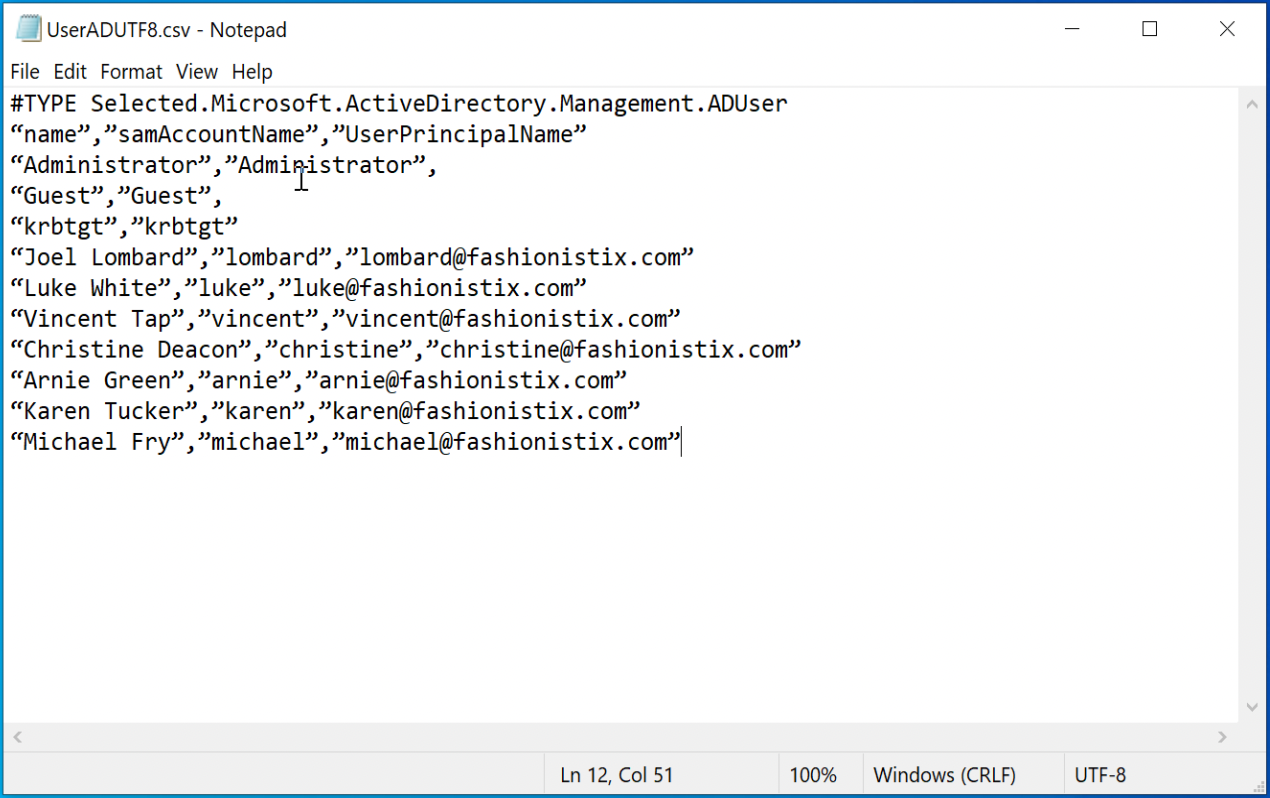
We can even generate a text file using our various filters, like this:
Get-ADUser -Filter * | Select-Object name, samAccountName, UserPrincipalName | Export-Csv UserAdUTF8.csv -Encoding UTF8 ↵
We can now open the file we created using the command Notepad.exe UserAdUTF8.csv .
Write a Script to Create and Manage Groups
Right, now we’re going to enhance our company setup by adding groups and putting our users into the groups. Here’s how we want to structure our groups
Group | User | Login |
CEO | Joel Lombard | lombard |
COMMS | Luke White Vincent Tap | luke vincent |
ACC | Christine Deacon Arnie Green | christine arnie |
SEC | Karen Tucker Michael Fry | karen michael |
So, our script will have to go through the following steps:
1. Ask for the name of the group you want to create and create the group:
We’re going to use the New-ADGroup command to create a group in Active Directory.
$group = Read-Host "Please enter the name of the new group"
New-ADGroup $group -GroupScope Global
2. Ask for the number of users to be added to the group:
[int] $number = Read-Host "Please enter the number of users to be added to the group"
3. Ask for the usernames to be added to the group:
$name = Read-Host "Please enter the username to be added to the group $group"
4. Add users to the group:
We’re going to use the Add-ADGroupMember command to add users to the group.
Add-ADGroupMember -identity $group -Members $name
So, that’s great, but we’re missing something. We need a control structure so that we can create a loop based on the number of users we want to add to the group.
Okay, I’ll help you out. Here’s our script_group.ps1 script and we’re going to use Windows PowerShell ISE to create the script from now on:
# Contents of script_group.ps1

$group = Read-Host "Please enter the name of the new group"

New-ADGroup $group -GroupScope Global

[int] $number = Read-Host "Please enter the number of users to be added to the group"

for ($i=1; $i -le $number; $i++)
{

$nom = Read-Host "Please enter the username to be added to the group $group"
Add-ADGroupMember -identity $group -Members $name
Write-Host "User $name has been successfully added to group $group."

}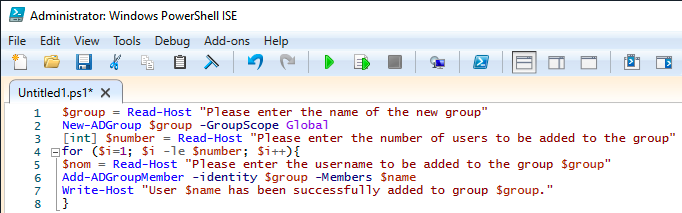
You can run the script from this console by clicking on the green arrow:

And here it is, adding two groups with two users:
PS C:\Users\Administrator> C:\Users\Administrator script_group.ps1
Please enter the name of the new group: COMMS
Please enter the number of users to be added to the group: 2
Please enter the username to be added to group COMMS : luke
User luke has been successfully added to group COMMS.
Please enter the username to be added to group COMMS: vincent
User vincent has been successfully added to group COMMS.

PS C:\Users\Administrator>
The WindowsPowerShell ISE is extremely intuitive as it’s like an IDE (Integrated Development Environment). It can spot errors in the code and the autocomplete function means we can enter commands more quickly and avoid making mistakes. We’re going to use Windows PowerShell ISE for the next part of the course. However, it is good practice to understand how to write PowerShell scripts using Notepad.exe, because some servers are installed without a graphical user interface, whereas Notepad.exe is always present.
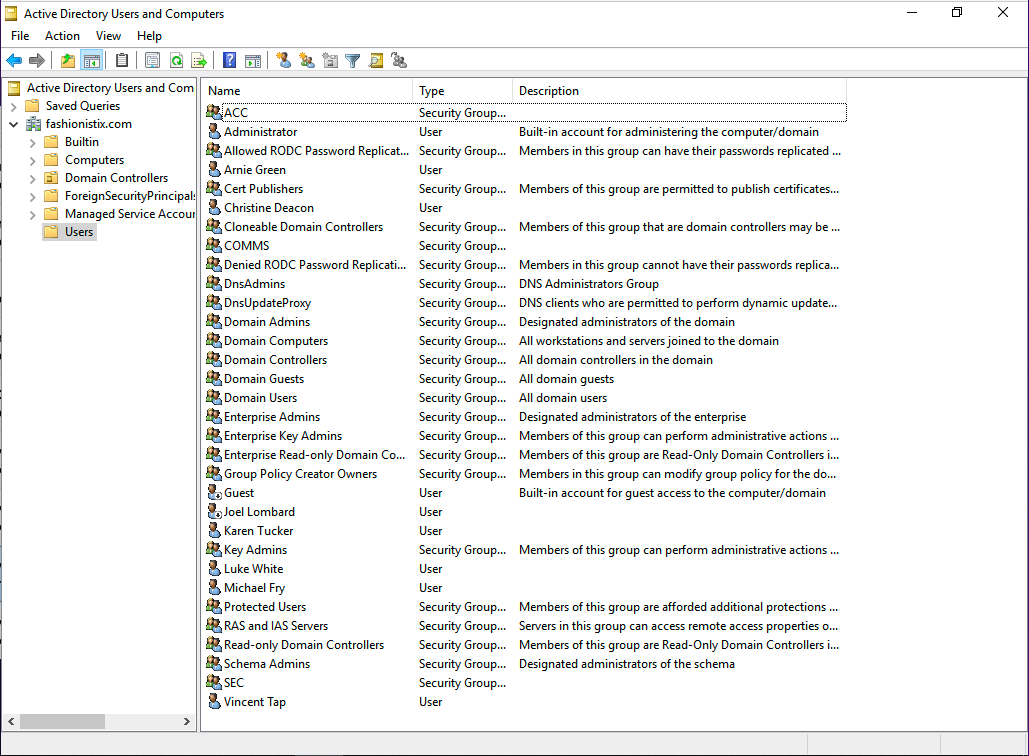
We can display the groups we created in Active Directory Users and Computers:
We can use this command to display a list of all groups:
PS C:\Users\Administrator> Get-ADGroup -Filter *
We can use this command to display a list of all users in the ACC group:
PS C:\Users\Administrator> Get-ADGroupMember ACC


distinguishedName: CN=Christine Deacon,CN=Users,DC=Fashionistix,DC=COMMS
name:              Christine Deacon
objectClass:       user
objectGUID:        b4ce7dce-8757-4021-aa5a-0de9d7efcb80
SamAccountName:    christine
SID:               S-1-5-21-1794228856-519301800-261500123-1121

distinguishedName: CN=Arnie Green,CN=Users,DC=Fashionistix,DC=COMMS
name:              Arnie Green
objectClass:       user
objectGUID:        8354055a-7dc4-47c7-9dfa-4bb29c90bae0
SamAccountName:    arnie
SID:               S-1-5-21-1794228856-519301800-261500123-1122
We can also generate a file listing information about the SEC group, as follows:
PS C:\Users\Administrator> Get-ADGroupMember SEC | Export-Csv SEC.csv -Encoding UTF8
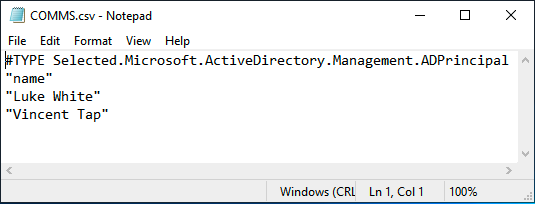
We can also generate a file listing the members of the COMMS group, like this:
PS C:\Users\Administrator> Get-ADGroupMember COMMS | Select-Object name | Export-Csv COMMS.csv -Encoding UTF8
We can also generate a file called TUCKER.txt to list the groups that user Karen Tucker belongs to:
$user = Get-AdUser -Filter * -SearchBase  "CN=Karen Tucker, CN=Users, DC=Fashionistix, DC=COMMS" -Properties MemberOf

foreach($u in $user) {

    $name = $u.name

    $member = $u.memberof

    Add-Content -Path "TUCKER.txt" -Value $name

    Add-Content -Path "TUCKER.txt" -Value $member

}
Here’s the result:
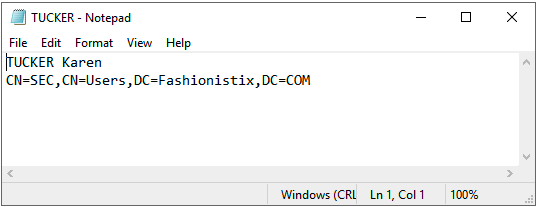
Well, it’s not particularly fascinating, but if Karen Tucker had belonged to a number of groups, all of them would be shown in the text file.
Right, let’s move on. We’re going to be tackling backup scripts in the next chapter.
Let’s Recap!
In this chapter, we’ve seen:
the
New-ADUsercommand that adds a user to Active Directory.the
New-ADGroupcommand that adds a group to Active Directory.the
Add-ADGroupMembercommand that adds a user to a group in Active Directory.the
Get-ADUser,Get-ADGroupandGet-ADGroupMembercommands, which provide information about users and groups in Active Directory.and most importantly, we’ve created our first PowerShell scripts!
In the next chapter, we’re going to learn how to automate backup tasks using PowerShell scripts.
