Launch Your Application on an Emulator or Device
 You've typed some code, great. But in a literal sense, what good is it? This chapter shows you how to launch your application. You have two options: either use an emulator if you don't have an Android device, or use your phone (or tablet) if you have one.
Using the emulator lets you quickly generate different configurations with different screen sizes, limited RAM, or when an older version of Android has been installed. Beyond that, nothing beats a test on an actual device to ensure the best possible user experience.
Launch on an Emulator
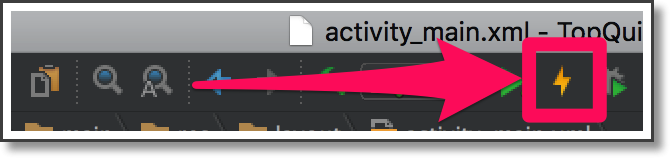
To launch the application, simply click on the green triangle located on the IDE bar:

The following window should appear:

Create a Virtual Device
To launch the application on an emulator, you have to create a virtual device. A virtual device corresponds to a real-world architecture (the hardware part) and a version of Android (the software part). To do this, click the Create New Virtual Device button.
In the left window pane, choose the hardware type. In our case we will use Phone, but in the future, you can choose Tablet if you would like to test the application on a larger virtual device.
The middle pane lists all available emulated devices. Each device has specific hardware characteristics (screen size, resolution, available memory, etc.). If you wanted to emulate a very specific device (with a large screen or little memory), you could create it by clicking on the New Hardware Profile button. For today, select the Nexus 5, which will do just fine. Then click the Next button.
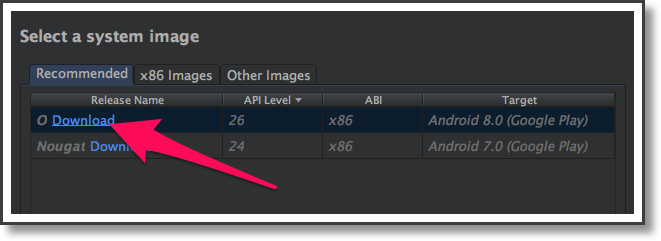
Finally, the system image corresponds to the version of Android installed on the virtual device. I recommend staying in the Recommended tab. 😉 You may need to install a system image to proceed. In that case, click the Download link next to the image that you want to install.
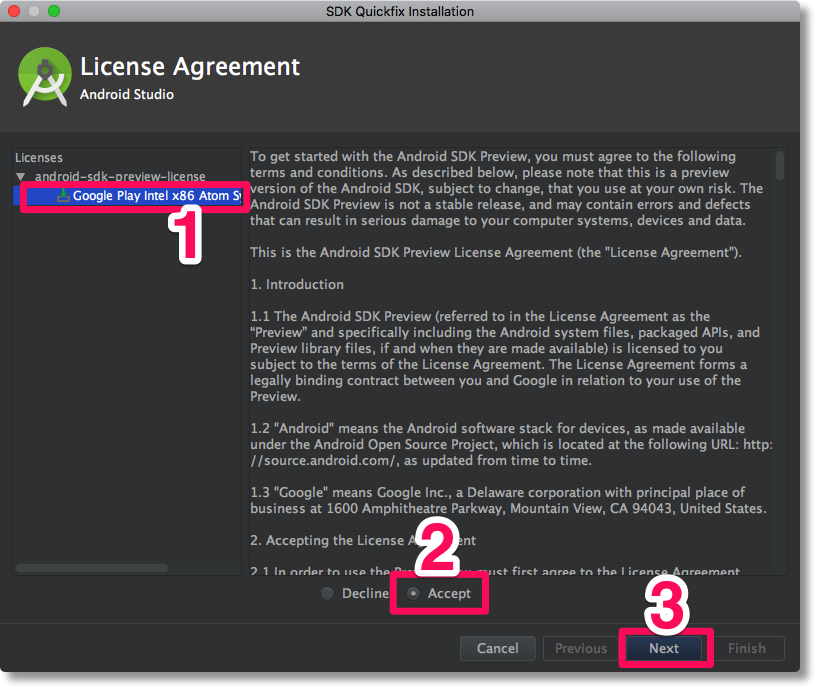
When you want to install a new image, a window will appear. You have to click on each license in the left pane, then accept it by toggling the appropriate radio button at the bottom of the window (not easy to spot). Then click Next. If you don't accept the license, the Next button will remain disabled (and yes, you should read the license agreement).
The Component Installer screen should appear. It will include the estimated time to download the necessary files. Since the files are large, you have plenty of time to go make a coffee, or a tea, or a expertly crafted sandwich. After installation completes, click the Finish button.
Back on the System Image screen, click the Next button to arrive on the Android Virtual Device (AVD) screen. This screen allows you to check the configuration of your virtual device or even change some parameters. For now, I suggest you keep the default settings. Click Finish.
Launching
You should now see your new virtual device appear in the window. If the window is not displayed, click the green play button we revealed at the beginning of this chapter.
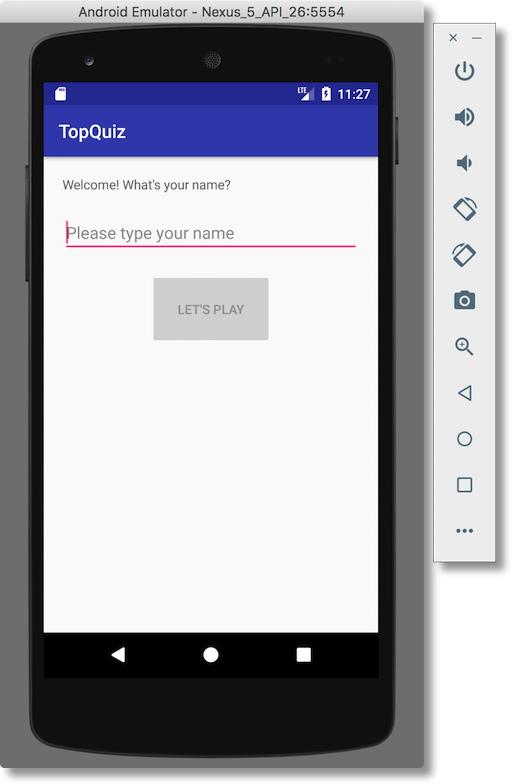
When launching the application on an emulator, by default the application will focus on the input field. You should see the cursor positioned and flashing at "Please type your name." You can use your computer keyboard to enter your name (if you want to display the virtual keyboard, click on the input field with your mouse).
You can move focus to the next interface element (in this case, the button) by pressing the tab key. Once highlighted, press the enter key to simulate a button click. The button animates to indicate the click, but nothing else happens (we haven't coded that behavior yet). Navigating by keyboard helps you test forms and other step-by-step interface experiences.
Launch on a Real Device
Nothing beats a test on a real device! Okay, maybe a hi-five from Weird Al Yankovic, but he's too busy to hi-five all of you. So, if you're lucky enough to have an Android device (phone or tablet), it's time to plug in your USB cable and connect it to your computer.
Enabling Developer Mode
To let Android Studio communicate with your device, enable developer mode. To do so, follow these instructions.
Then you must allow your operating system to detect your device. If you are on macOS, you're good to go. If you are on Windows or Linux, follow the Set up a Device for Development instructions.
Launching
If the application is already running on the emulator, stop it by clicking on the Stop button (red square on the Android Studio toolbar).

Then click the Launch button again. You should see the following window, which lets you select whether you want to launch the application on the emulator or your device. Select your device and click the OK button.

The Instant Run feature
Historically, testing any changes to your source code forced Android Studio to recompile your entire application and install it back on the emulator or device. This process was slow (even after repeated build cycles).

Fortunately, Android Studio v2.3 made it possible to pass your changes to your running application without recompiling the whole thing. This allows us to test code changes quickly. If you launch the application for the first time on your device, you might see the window below:

Click Install and Continue. A new window appears (Component Installer) to install the missing files. Press the Finish button, and the application should launch.
From now on, you can click Apply Changes in the toolbar to apply the changes without having to recompile everything.
If you want to know more about Instant Run, click here.
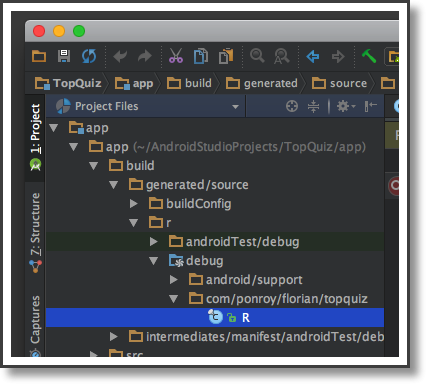
R Class
As we mentioned in the previous chapter, when compiling your application, Android Studio generates a Java class named R. This class identifies all project resources with a unique, static integer.
If you want to better understand its use and see what it looks like, select the Project Files view on the left and open the file in the tree shown below. You will see identifiers which you defined previously in your layout file, for example activity_main_name_input.
Let's Review With a Demo
You can see these steps in the video below:
Let's Recap!
To launch the emulator or install the app, click on the “Play” button.
After clicking Play, Android Studio presents a drop-down list that allows you to select a device to launch your application on.
You can use several emulators (a phone and a tablet, for example) to test your layouts on different screen sizes and configurations.
Congratulations, you’ve finished the first part of this course! 🥳 Now let’s add features to your app. But first, test your knowledge with a quiz!
